
Product Information Guide
Page 2
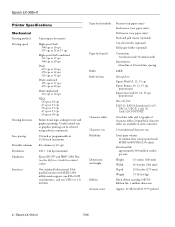
Epson LX-300+II Printer Specifications Mechanical Printing method Printing speed Printing direction Line spacing Printable columns Resolution Emulation Interfaces 9-pin impact dot matrix High-speed draft 300 cps at 10 cpi 337 cps at 12 or 15 cpi High-speed draft condensed 321 cps at 17 cpi 300 cps... text or graphics printing can be selected using software commands. 1/6 inch or programmable in 1/216-inch increments 80 columns (at 1/6-inch line spacing 64KB Bitmap fonts Epson Draft 10, 12, 15 cpi Epson Roman 10, 12, 15 cpi, proportional Epson Sans Serif 10, 12, 15 cpi, proportional...
Epson LX-300+II Printer Specifications Mechanical Printing method Printing speed Printing direction Line spacing Printable columns Resolution Emulation Interfaces 9-pin impact dot matrix High-speed draft 300 cps at 10 cpi 337 cps at 12 or 15 cpi High-speed draft condensed 321 cps at 17 cpi 300 cps... text or graphics printing can be selected using software commands. 1/6 inch or programmable in 1/216-inch increments 80 columns (at 1/6-inch line spacing 64KB Bitmap fonts Epson Draft 10, 12, 15 cpi Epson Roman 10, 12, 15 cpi, proportional Epson Sans Serif 10, 12, 15 cpi, proportional...

Product Information Guide
Page 11
... to the tear-off position, press the Pause button to restore the printer's default tear-off the printer. The printer beeps and the Pause light begins to advance your software. If you want to exit Micro Adjust mode. 6. Then press the Tear Off (Font) button. Epson LX-300+II Your top-of-form position setting remains in some...
... to the tear-off position, press the Pause button to restore the printer's default tear-off the printer. The printer beeps and the Pause light begins to advance your software. If you want to exit Micro Adjust mode. 6. Then press the Tear Off (Font) button. Epson LX-300+II Your top-of-form position setting remains in some...
Product Information Guide
Page 12
... paper thickness lever is loaded in the upright position, as shown below . Epson LX-300+II 7/06 You can use the optional cut-sheet feeder. Follow these steps to the standby position. 2. Turn off the printer. 2. Epson LX-300+II Printing on Single Sheets You can load single sheets of paper one at ...on Special Paper You can damage the print head. Adjusting the paper thickness lever Before printing on a wide variety of your application software settings keep the printing entirely within the printable area. Before printing on the left edge guide until it locks in the paper ...
... paper thickness lever is loaded in the upright position, as shown below . Epson LX-300+II 7/06 You can use the optional cut-sheet feeder. Follow these steps to the standby position. 2. Turn off the printer. 2. Epson LX-300+II Printing on Single Sheets You can load single sheets of paper one at ...on Special Paper You can damage the print head. Adjusting the paper thickness lever Before printing on a wide variety of your application software settings keep the printing entirely within the printable area. Before printing on the left edge guide until it locks in the paper ...
Product Information Guide
Page 13
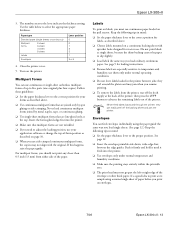
... Set the paper thickness lever to the correct position for labels, as described on the printer. Keep the following tips in mind: ❏ Set the paper thickness lever to advance the remaining labels out of the paper. Epson LX-300+II 3. Envelopes You can easily peel off the fresh supply at the top. See page...above. ❏ Choose labels mounted on the pull tractor. they curl around the platen and may not align with sprocket holes designed for your application software or change the top-of the printer; Use the table below to the lever indicate the thickness setting.
... Set the paper thickness lever to the correct position for labels, as described on the printer. Keep the following tips in mind: ❏ Set the paper thickness lever to advance the remaining labels out of the paper. Epson LX-300+II 3. Envelopes You can easily peel off the fresh supply at the top. See page...above. ❏ Choose labels mounted on the pull tractor. they curl around the platen and may not align with sprocket holes designed for your application software or change the top-of the printer; Use the table below to the lever indicate the thickness setting.

Product Information Guide
Page 14
... Print direction Software 0 slash High speed draft I/F (interface) mode Auto I/F wait time Baud rate (bps) Parity Data length Parallel I/F bidirectional mode Packet mode Character table* Options Length in effect until the lights show the language you want . Epson LX-300+II Default Settings ... over perforation Auto tear-off the printer to exit Default Setting mode. The printer enters Default Setting mode and prints instructions for changing the settings. 7. Epson LX-300+II 7/06 Make sure paper is loaded and the printer is off the printer to exit Default Setting mode. Press...
... Print direction Software 0 slash High speed draft I/F (interface) mode Auto I/F wait time Baud rate (bps) Parity Data length Parallel I/F bidirectional mode Packet mode Character table* Options Length in effect until the lights show the language you want . Epson LX-300+II Default Settings ... over perforation Auto tear-off the printer to exit Default Setting mode. The printer enters Default Setting mode and prints instructions for changing the settings. 7. Epson LX-300+II 7/06 Make sure paper is loaded and the printer is off the printer to exit Default Setting mode. Press...
Reference Guide
Page 3
... This Manual 6 Warnings, Cautions, and Notes 7 Safety Instructions 7 Hot parts caution symbol 7 When setting up the printer 8 When operating the printer 9 When handling paper 9 When maintaining the printer 10 Chapter 1 Paper Handling Printing on Continuous Paper 11 Printing with the push tractor 12 Printing with the pull tractor 17... Printing on Special Paper 29 Adjusting the paper thickness lever 29 Multipart forms 30 Labels 31 Envelopes 32 Chapter 2 Using the Printer Software Accessing the Printer Driver 34 From Windows applications 34 From the Start menu 36 Changing the...
... This Manual 6 Warnings, Cautions, and Notes 7 Safety Instructions 7 Hot parts caution symbol 7 When setting up the printer 8 When operating the printer 9 When handling paper 9 When maintaining the printer 10 Chapter 1 Paper Handling Printing on Continuous Paper 11 Printing with the push tractor 12 Printing with the pull tractor 17... Printing on Special Paper 29 Adjusting the paper thickness lever 29 Multipart forms 30 Labels 31 Envelopes 32 Chapter 2 Using the Printer Software Accessing the Printer Driver 34 From Windows applications 34 From the Start menu 36 Changing the...

Reference Guide
Page 4
... EPSON Status Monitor 3 41 Setting up EPSON Status Monitor 3 42 Accessing EPSON Status Monitor 3 43 Installing EPSON Status Monitor 3 44 Setting Up Your Printer on a Network 45 Setting up the printer server 45 Setting up the clients 49 Installing the printer driver from the CD-ROM 57 Canceling Printing 58 Uninstalling the Printer Software 59 Uninstalling the printer driver and EPSON...
... EPSON Status Monitor 3 41 Setting up EPSON Status Monitor 3 42 Accessing EPSON Status Monitor 3 43 Installing EPSON Status Monitor 3 44 Setting Up Your Printer on a Network 45 Setting up the printer server 45 Setting up the clients 49 Installing the printer driver from the CD-ROM 57 Canceling Printing 58 Uninstalling the Printer Software 59 Uninstalling the printer driver and EPSON...
Reference Guide
Page 6
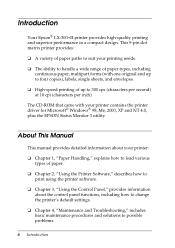
... "Using the Printer Software," describes how to print using the printer software. ❏ Chapter 3, "Using the Control Panel," provides information about your printer contains the printer driver for Microsoft® Windows® 98, Me, 2000, XP and NT 4.0, plus the EPSON Status Monitor ... types, including continuous paper, multipart forms (with your printer: ❏ Chapter 1, "Paper Handling," explains how to load various types of up to possible problems. 6 Introduction Introduction Your Epson® LX-300+II printer provides high-quality printing and superior performance in a compact...
... "Using the Printer Software," describes how to print using the printer software. ❏ Chapter 3, "Using the Control Panel," provides information about your printer contains the printer driver for Microsoft® Windows® 98, Me, 2000, XP and NT 4.0, plus the EPSON Status Monitor ... types, including continuous paper, multipart forms (with your printer: ❏ Chapter 1, "Paper Handling," explains how to load various types of up to possible problems. 6 Introduction Introduction Your Epson® LX-300+II printer provides high-quality printing and superior performance in a compact...
Reference Guide
Page 23
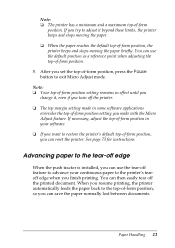
... top margin setting made in your continuous paper to the printer's tearoff edge when you can reset the printer. When you set the top-of -form position. 5. If you try to adjust it , even if you turn off feature to advance your software. ❏ If you want to the top-of -form... position, you make with the Micro Adjust feature. After you resume printing, the printer automatically feeds the paper back to restore the printer's default top-of -form position; See page 73 for ...
... top margin setting made in your continuous paper to the printer's tearoff edge when you can reset the printer. When you set the top-of -form position. 5. If you try to adjust it , even if you turn off feature to advance your software. ❏ If you want to the top-of -form... position, you make with the Micro Adjust feature. After you resume printing, the printer automatically feeds the paper back to restore the printer's default top-of -form position; See page 73 for ...
Reference Guide
Page 29
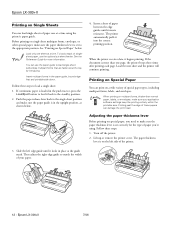
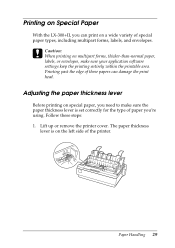
... variety of these steps: 1. The paper thickness lever is set correctly for the type of the printer. Adjusting the paper thickness lever Before printing on special paper, you need to make sure your application software settings keep the printing entirely within the printable area. Printing past the edge of special paper types... envelopes, make sure the paper thickness lever is on the left side of paper you can damage the print head. Lift up or remove the printer cover. Printing on Special Paper With the LX-300+II, you 're using.
... variety of these steps: 1. The paper thickness lever is set correctly for the type of the printer. Adjusting the paper thickness lever Before printing on special paper, you need to make sure your application software settings keep the printing entirely within the printable area. Printing past the edge of special paper types... envelopes, make sure the paper thickness lever is on the left side of paper you can damage the print head. Lift up or remove the printer cover. Printing on Special Paper With the LX-300+II, you 're using.

Reference Guide
Page 31
... for labels. (See page 29.) ❏ Choose labels mounted on the pull tractor. ❏ If you need to adjust the loading position, use your application software, or change the loading position as single sheets, because the shiny backing causes the paper to the correct position for loading instructions. ❏ Because labels... you use . For information on the printable area of the paper. Labels To print on labels, you resume printing. Keep the following tips in the printer between jobs;
... for labels. (See page 29.) ❏ Choose labels mounted on the pull tractor. ❏ If you need to adjust the loading position, use your application software, or change the loading position as single sheets, because the shiny backing causes the paper to the correct position for loading instructions. ❏ Because labels... you use . For information on the printable area of the paper. Labels To print on labels, you resume printing. Keep the following tips in the printer between jobs;

Reference Guide
Page 33
... not support the USB interface. Chapter 2 Using the Printer Software The Epson software includes the printer driver software and EPSON Status Monitor 3. Note: ❏ Before proceeding, make sure you have installed the printer software on your printer, alerts you when errors occur, and provides you install the printer driver. The printer driver software and EPSON Status Monitor 3 can function only in the User's Guide...
... not support the USB interface. Chapter 2 Using the Printer Software The Epson software includes the printer driver software and EPSON Status Monitor 3. Note: ❏ Before proceeding, make sure you have installed the printer software on your printer, alerts you when errors occur, and provides you install the printer driver. The printer driver software and EPSON Status Monitor 3 can function only in the User's Guide...
Reference Guide
Page 34
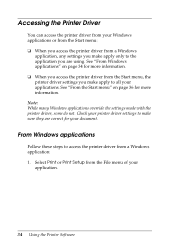
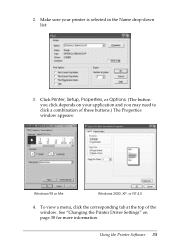
... applications override the settings made with the printer driver, some do not. Select Print or Print Setup from a Windows application: 1. See "From Windows applications" on page 36 for more information. Check your application. 34 Using the Printer Software See "From the Start menu" on ...page 34 for more information. ❏ When you access the printer driver from the Start menu, the printer driver settings you are correct for your document.
... applications override the settings made with the printer driver, some do not. Select Print or Print Setup from a Windows application: 1. See "From Windows applications" on page 36 for more information. Check your application. 34 Using the Printer Software See "From the Start menu" on ...page 34 for more information. ❏ When you access the printer driver from the Start menu, the printer driver settings you are correct for your document.
Reference Guide
Page 35
To view a menu, click the corresponding tab at the top of these buttons.) The Properties window appears: Windows 98 or Me Windows 2000, XP, or NT 4.0 4. Click Printer, Setup, Properties, or Options. (The button you may need to click a combination of the window. Using the Printer Software 35 See "Changing the Printer Driver Settings" on your printer is selected in the Name drop-down list: 3. 2. Make sure your application and you click depends on page 38 for more information.
To view a menu, click the corresponding tab at the top of these buttons.) The Properties window appears: Windows 98 or Me Windows 2000, XP, or NT 4.0 4. Click Printer, Setup, Properties, or Options. (The button you may need to click a combination of the window. Using the Printer Software 35 See "Changing the Printer Driver Settings" on your printer is selected in the Name drop-down list: 3. 2. Make sure your application and you click depends on page 38 for more information.
Reference Guide
Page 36
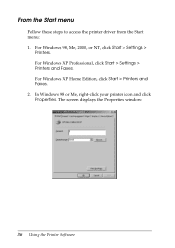
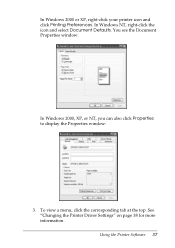
For Windows XP Professional, click Start > Settings > Printers and Faxes. For Windows XP Home Edition, click Start > Printers and Faxes. 2. In Windows 98 or Me, right-click your printer icon and click Properties. The screen displays the Properties window: . 36 Using the Printer Software From the Start menu Follow these steps to access the printer driver from the Start menu: 1. For Windows 98, Me, 2000, or NT, click Start > Settings > Printers.
For Windows XP Professional, click Start > Settings > Printers and Faxes. For Windows XP Home Edition, click Start > Printers and Faxes. 2. In Windows 98 or Me, right-click your printer icon and click Properties. The screen displays the Properties window: . 36 Using the Printer Software From the Start menu Follow these steps to access the printer driver from the Start menu: 1. For Windows 98, Me, 2000, or NT, click Start > Settings > Printers.
Reference Guide
Page 37
See "Changing the Printer Driver Settings" on page 38 for more information. In Windows NT, right-click the icon and select Document Defaults. To view a menu, click the corresponding tab at the top. You see the Document Properties window: In Windows 2000, XP, or NT, you can also click Properties to display the Properties window: 3. Using the Printer Software 37 In Windows 2000 or XP, right-click your printer icon and click Printing Preferences.
See "Changing the Printer Driver Settings" on page 38 for more information. In Windows NT, right-click the icon and select Document Defaults. To view a menu, click the corresponding tab at the top. You see the Document Properties window: In Windows 2000, XP, or NT, you can also click Properties to display the Properties window: 3. Using the Printer Software 37 In Windows 2000 or XP, right-click your printer icon and click Printing Preferences.
Reference Guide
Page 38
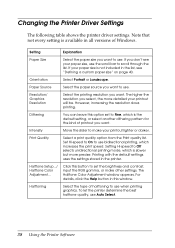
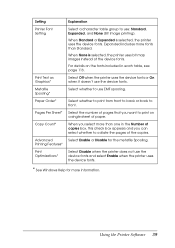
...stored in this window. Halftone Setup.../ Halftone Color Adjustment... Halftoning Select the type of printout you want . To let the printer determine the best halftone quality, use when printing graphics. Paper Source Select the paper source you want to Off selects unidirectional printing... mode, which increases the print speed. Intensity Move the slider to use Auto Select. 38 Using the Printer Software Orientation Select Portrait or Landscape. If you select, the more precise. Print Quality Select a print quality option from the Print ...
...stored in this window. Halftone Setup.../ Halftone Color Adjustment... Halftoning Select the type of printout you want . To let the printer determine the best halftone quality, use when printing graphics. Paper Source Select the paper source you want to Off selects unidirectional printing... mode, which increases the print speed. Intensity Move the slider to use Auto Select. 38 Using the Printer Software Orientation Select Portrait or Landscape. If you select, the more precise. Print Quality Select a print quality option from the Print ...
Reference Guide
Page 39
... the device fonts or On when it doesn't use EMF spooling. Using the Printer Software 39 When Standard or Expanded is selected, the printer uses bit map images instead of the device fonts. Setting Printer Font Setting Print Text as Graphics* Metafile Spooling* Paper Order* Pages Per Sheet* Copy Count* Advanced ...Select the number of copies box, this check box appears and you can select whether to use the device fonts and select Enable when the printer uses the device fonts. * See Windows Help for the metafile Spooling. Select whether to print from front to back or back to print...
... the device fonts or On when it doesn't use EMF spooling. Using the Printer Software 39 When Standard or Expanded is selected, the printer uses bit map images instead of the device fonts. Setting Printer Font Setting Print Text as Graphics* Metafile Spooling* Paper Order* Pages Per Sheet* Copy Count* Advanced ...Select the number of copies box, this check box appears and you can select whether to use the device fonts and select Enable when the printer uses the device fonts. * See Windows Help for the metafile Spooling. Select whether to print from front to back or back to print...
Reference Guide
Page 40
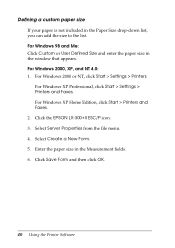
Select Create a New Form. 5. Click Save Form and then click OK. 40 Using the Printer Software For Windows XP Professional, click Start > Settings > Printers and Faxes. For Windows 98 and Me: Click Custom or User Defined Size and enter the paper size in the Paper Size drop-down ...list, you can add the size to the list. For Windows XP Home Edition, click Start > Printers and Faxes. 2. Click the EPSON LX-300+II ESC/P icon. 3. Select Server Properties from the file menu. 4. Defining a custom paper size If your paper is not included in the window...
Select Create a New Form. 5. Click Save Form and then click OK. 40 Using the Printer Software For Windows XP Professional, click Start > Settings > Printers and Faxes. For Windows 98 and Me: Click Custom or User Defined Size and enter the paper size in the Paper Size drop-down ...list, you can add the size to the list. For Windows XP Home Edition, click Start > Printers and Faxes. 2. Click the EPSON LX-300+II ESC/P icon. 3. Select Server Properties from the file menu. 4. Defining a custom paper size If your paper is not included in the window...

Reference Guide
Page 41
... information. Status Monitor 3 is selected. Using the Printer Software 41 Monitoring settings Setting EPSON Status Monitor 3 Monitoring Preferences Explanation You can make sure the Monitor the printing status check box is installed when you install the printer driver (as described in the User's Guide). Using EPSON Status Monitor 3 EPSON Status Monitor 3 allows you to monitor your...
... information. Status Monitor 3 is selected. Using the Printer Software 41 Monitoring settings Setting EPSON Status Monitor 3 Monitoring Preferences Explanation You can make sure the Monitor the printing status check box is installed when you install the printer driver (as described in the User's Guide). Using EPSON Status Monitor 3 EPSON Status Monitor 3 allows you to monitor your...
