

Product Information Guide
Page 7
...not lock it in place. Unlock the sprockets on the tractor by -sheet. (Follow the instructions in the next section.) The printer comes with the tractor installed in the push position. ❏ Use the tractor in the pull position if you will be printing on labels, multipart forms, ...Turn off continuous paper sheet-by pulling the blue lock levers forward. 8. Make sure there are above the 0 mark on the printer scale (beneath the tractor). Epson LX-300+II Printing on Continuous Paper You can print on continuous paper using the tractor in either the push or pull position: ❏ Use ...
...not lock it in place. Unlock the sprockets on the tractor by -sheet. (Follow the instructions in the next section.) The printer comes with the tractor installed in the push position. ❏ Use the tractor in the pull position if you will be printing on labels, multipart forms, ...Turn off continuous paper sheet-by pulling the blue lock levers forward. 8. Make sure there are above the 0 mark on the printer scale (beneath the tractor). Epson LX-300+II Printing on Continuous Paper You can print on continuous paper using the tractor in either the push or pull position: ❏ Use ...
Product Information Guide
Page 9
...in this position, make sure the printer is already installed in the printer. 2. then remove the printer cover and the paper guide. 2. Lower the tractor onto the mounting slots at the top of the position marked 0 (under the paper now). 7/06 Epson LX-300+II - 9 Remove the paper tension unit... the continuous paper position. 3. Feed the paper into place. 6. Epson LX-300+II To switch back to the continuous paper position. 4. Position the paper using the pull tractor, you feel it away from the printer. 7. Printing with the pull tractor To load continuous paper using the...
...in this position, make sure the printer is already installed in the printer. 2. then remove the printer cover and the paper guide. 2. Lower the tractor onto the mounting slots at the top of the position marked 0 (under the paper now). 7/06 Epson LX-300+II - 9 Remove the paper tension unit... the continuous paper position. 3. Feed the paper into place. 6. Epson LX-300+II To switch back to the continuous paper position. 4. Position the paper using the pull tractor, you feel it away from the printer. 7. Printing with the pull tractor To load continuous paper using the...

Product Information Guide
Page 11
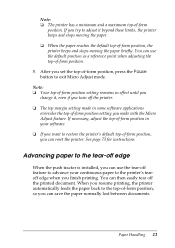
...When the push tractor is installed, you can use the tear-off feature to advance your paper's perforation is on the Auto tear off function in Default Setting mode. After you finish printing. Adjusting the tear-off position If your continuous paper to the printer's tearoff edge when you ...set the tear-off position, press the Pause button to exit Micro Adjust mode. 6. Hold down the Pause button for instructions.) 7/06 Epson LX-300+II - 11 The printer advances the paper to the tear-off position. When Auto tear off is not aligned with the Micro Adjust feature. If the Tear ...
...When the push tractor is installed, you can use the tear-off feature to advance your paper's perforation is on the Auto tear off function in Default Setting mode. After you finish printing. Adjusting the tear-off position If your continuous paper to the printer's tearoff edge when you ...set the tear-off position, press the Pause button to exit Micro Adjust mode. 6. Hold down the Pause button for instructions.) 7/06 Epson LX-300+II - 11 The printer advances the paper to the tear-off position. When Auto tear off is not aligned with the Micro Adjust feature. If the Tear ...
Product Information Guide
Page 15
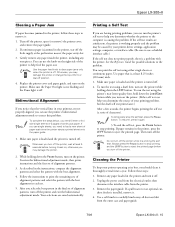
... a soft brush to the problem. You can print the self test using a draft font, turn off the printer and exit the bidirectional adjustment mode. Make sure paper is loaded and the printer is installed, remove it : 1. If continuous paper is a problem with the best alignment. 4. To run the test ... brush away all dust and dirt from the outer case and paper guide. 7/06 Epson LX-300+II - 15 Use the paper feed knob to stop the self test, press the Pause button. Turn off the printer. To complete the steps below, you notice that is working properly and the problem ...
... a soft brush to the problem. You can print the self test using a draft font, turn off the printer and exit the bidirectional adjustment mode. Make sure paper is loaded and the printer is installed, remove it : 1. If continuous paper is a problem with the best alignment. 4. To run the test ... brush away all dust and dirt from the outer case and paper guide. 7/06 Epson LX-300+II - 15 Use the paper feed knob to stop the self test, press the Pause button. Turn off the printer. To complete the steps below, you notice that is working properly and the problem ...

Product Information Guide
Page 16
...dirty, clean it with a soft, clean cloth dampened with your printer for a few minutes before touching it. 1. these chemicals can damage the printer mechanism. You need to transport your printer is installed, remove it using the original box and packing materials or equivalent ...the USB cable holder, paper supports, and knob. 4. Epson LX-300+II 7/06 Keep the printer cover in the printer's original box. 16 - Do not use alcohols or thinners to remove the ribbon cartridge. Related Documentation( Manual Epson LX-300+II User's Guide CD-ROM containing the on-screen Reference ...
...dirty, clean it with a soft, clean cloth dampened with your printer for a few minutes before touching it. 1. these chemicals can damage the printer mechanism. You need to transport your printer is installed, remove it using the original box and packing materials or equivalent ...the USB cable holder, paper supports, and knob. 4. Epson LX-300+II 7/06 Keep the printer cover in the printer's original box. 16 - Do not use alcohols or thinners to remove the ribbon cartridge. Related Documentation( Manual Epson LX-300+II User's Guide CD-ROM containing the on-screen Reference ...

Reference Guide
Page 4
... 3 41 Setting up EPSON Status Monitor 3 42 Accessing EPSON Status Monitor 3 43 Installing EPSON Status Monitor 3 44 Setting Up Your Printer on a Network 45 Setting up the printer server 45 Setting up the clients 49 Installing the printer driver from the CD-ROM 57 Canceling Printing 58 Uninstalling the Printer Software 59 Uninstalling the printer driver and EPSON Status Monitor 3 59...
... 3 41 Setting up EPSON Status Monitor 3 42 Accessing EPSON Status Monitor 3 43 Installing EPSON Status Monitor 3 44 Setting Up Your Printer on a Network 45 Setting up the printer server 45 Setting up the clients 49 Installing the printer driver from the CD-ROM 57 Canceling Printing 58 Uninstalling the Printer Software 59 Uninstalling the printer driver and EPSON Status Monitor 3 59...

Reference Guide
Page 11
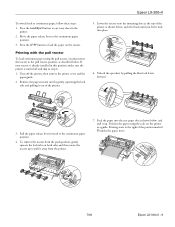
... paper in the pull position if you will be tearing off continuous paper sheet-by-sheet. (Follow the instructions in the next section.) The printer comes with the pull tractor" on using continuous paper, see the following section. To load single sheets, see page 29. For information about ..., or if you will be printing on labels, multipart forms, or other documents that require a precise print position. (See "Printing with the tractor installed in the push position. ❏ Use the tractor in either the push or the pull position, as well as single sheets and special papers such...
... paper in the pull position if you will be tearing off continuous paper sheet-by-sheet. (Follow the instructions in the next section.) The printer comes with the pull tractor" on using continuous paper, see the following section. To load single sheets, see page 29. For information about ..., or if you will be printing on labels, multipart forms, or other documents that require a precise print position. (See "Printing with the tractor installed in the push position. ❏ Use the tractor in either the push or the pull position, as well as single sheets and special papers such...

Reference Guide
Page 17
Pull the paper release lever forward to the pull tractor position, as described below. Remove the paper tension unit by gently squeezing the lock tabs and pulling it out of the printer. 4. Printing with the pull tractor To load continuous paper using the pull tractor, you must move the tractor to the continuous paper position. Turn off and skip to step 6. 1. Paper Handling 17 Remove the printer cover and the paper guide. 3. If your tractor is already installed in this position, make sure the printer is turned off the printer. 2.
Pull the paper release lever forward to the pull tractor position, as described below. Remove the paper tension unit by gently squeezing the lock tabs and pulling it out of the printer. 4. Printing with the pull tractor To load continuous paper using the pull tractor, you must move the tractor to the continuous paper position. Turn off and skip to step 6. 1. Paper Handling 17 Remove the printer cover and the paper guide. 3. If your tractor is already installed in this position, make sure the printer is turned off the printer. 2.
Reference Guide
Page 23
...-of -form position, the printer beeps and stops moving the paper briefly. You can use the default position as a reference point when adjusting the top-of -form position setting remains in your continuous paper to the tear-off edge When the push tractor is installed, you can use the tear...-off the printed document. If necessary, adjust the top-of-form position in effect until you change it beyond these limits, the printer beeps and stops moving the paper. ❏ When the paper...
...-of -form position, the printer beeps and stops moving the paper briefly. You can use the default position as a reference point when adjusting the top-of -form position setting remains in your continuous paper to the tear-off edge When the push tractor is installed, you can use the tear...-off the printed document. If necessary, adjust the top-of-form position in effect until you change it beyond these limits, the printer beeps and stops moving the paper. ❏ When the paper...

Reference Guide
Page 33
... you with troubleshooting tips. The printer driver software and EPSON Status Monitor 3 can function only in the User's Guide. ❏ Make sure the software setting is automatically installed when you monitor the status of the printer's capabilities. Using the Printer Software 33 Status Monitor 3 lets you install the printer driver. The printer driver allows your computer to control...
... you with troubleshooting tips. The printer driver software and EPSON Status Monitor 3 can function only in the User's Guide. ❏ Make sure the software setting is automatically installed when you monitor the status of the printer's capabilities. Using the Printer Software 33 Status Monitor 3 lets you install the printer driver. The printer driver allows your computer to control...

Reference Guide
Page 41
... you to open the Monitoring Preferences window, where you install the printer driver (as described in the User's Guide). When sharing the printer, be monitored on page 45. Monitoring settings Setting EPSON Status Monitor 3 Monitoring Preferences Explanation You can access EPSON Status Monitor 3 when you when printer errors occur, and provides troubleshooting instructions when needed. It...
... you to open the Monitoring Preferences window, where you install the printer driver (as described in the User's Guide). When sharing the printer, be monitored on page 45. Monitoring settings Setting EPSON Status Monitor 3 Monitoring Preferences Explanation You can access EPSON Status Monitor 3 when you when printer errors occur, and provides troubleshooting instructions when needed. It...
Reference Guide
Page 44
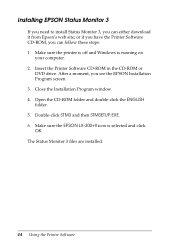
... ENGLISH folder. 5. Make sure the EPSON LX-300+II icon is running on your computer. 2. Make sure the printer is off and Windows is selected and click OK. After a moment, you can follow these steps: 1. Installing EPSON Status Monitor 3 If you need to install Status Monitor 3, you see the EPSON Installation Program screen. 3. Insert the Printer Software CD-ROM in the...
... ENGLISH folder. 5. Make sure the EPSON LX-300+II icon is running on your computer. 2. Make sure the printer is off and Windows is selected and click OK. After a moment, you can follow these steps: 1. Installing EPSON Status Monitor 3 If you need to install Status Monitor 3, you see the EPSON Installation Program screen. 3. Insert the Printer Software CD-ROM in the...
Reference Guide
Page 45
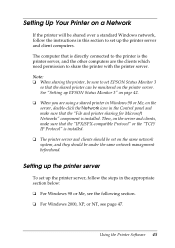
... need permission to set up the printer server and client computers. Then, on the server and clients, make sure that the "File and printer sharing for Microsoft Networks" component is installed. ❏ The printer server and clients should be set EPSON Status Monitor 3 so that the... "IPX/SPX-compatible Protocol" or the "TCP/ IP Protocol" is installed. Setting Up Your Printer on a Network If the printer will be shared...
... need permission to set up the printer server and client computers. Then, on the server and clients, make sure that the "File and printer sharing for Microsoft Networks" component is installed. ❏ The printer server and clients should be set EPSON Status Monitor 3 so that the... "IPX/SPX-compatible Protocol" or the "TCP/ IP Protocol" is installed. Setting Up Your Printer on a Network If the printer will be shared...

Reference Guide
Page 49
... share name. Follow the instructions on page 49 to set up the clients This section describes how to install the printer driver on the client computers by accessing the shared printer on a network. Using the Printer Software 49 Setting up the client computers so they can use spaces or hyphens for your operating system... or Me: see page 50. ❏ Windows 2000 or XP: see page 52. ❏ Windows NT 4.0: see page 55. In Windows XP, select Share this printer, then type the name in the Share name box and click OK. Note: Do not use the...
... share name. Follow the instructions on page 49 to set up the clients This section describes how to install the printer driver on the client computers by accessing the shared printer on a network. Using the Printer Software 49 Setting up the client computers so they can use spaces or hyphens for your operating system... or Me: see page 50. ❏ Windows 2000 or XP: see page 52. ❏ Windows NT 4.0: see page 55. In Windows XP, select Share this printer, then type the name in the Share name box and click OK. Note: Do not use the...

Reference Guide
Page 50
If you need to install both the printer driver and Status Monitor 3 on a standard network system using the server (Microsoft workgroup). Click Browse. Note: You can also access the shared printer from Network Neighborhood or My Network on the Windows desktop. ❏ If you want to be able to ...❏ This section describes how to set up Windows 98 or Me clients: 1. Windows 98 or Me Follow these steps to install the printer driver by accessing the shared printer from the Printers folder. You can also type "\\(the name of the computer that is locally connected to the shared...
If you need to install both the printer driver and Status Monitor 3 on a standard network system using the server (Microsoft workgroup). Click Browse. Note: You can also access the shared printer from Network Neighborhood or My Network on the Windows desktop. ❏ If you want to be able to ...❏ This section describes how to set up Windows 98 or Me clients: 1. Windows 98 or Me Follow these steps to install the printer driver by accessing the shared printer from the Printers folder. You can also type "\\(the name of the computer that is locally connected to the shared...

Reference Guide
Page 51
... 98 or Me, go to . Check the name of the shared printer. 5. Then click OK. If the printer driver was installed on the printer server is connected to select the new printer driver or the current printer driver when you 're not sure about the shared printer's name, ask the network administrator. 6. If the operating system on...
... 98 or Me, go to . Check the name of the shared printer. 5. Then click OK. If the printer driver was installed on the printer server is connected to select the new printer driver or the current printer driver when you 're not sure about the shared printer's name, ask the network administrator. 6. If the operating system on...
Reference Guide
Page 52
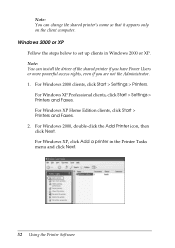
...Follow the steps below to set up clients in the Printer Tasks menu and click Next. 52 Using the Printer Software For Windows XP, click Add a printer in Windows 2000 or XP. Note: You can change the shared printer's name so that it appears only on the client ... click Start > Printers and Faxes. 2. For Windows 2000, double-click the Add Printer icon, then click Next. For Windows 2000 clients, click Start > Settings > Printers. For Windows XP Professional clients, click Start > Settings > Printers and Faxes. Note: You can install the driver of the shared printer if you have Power...
...Follow the steps below to set up clients in the Printer Tasks menu and click Next. 52 Using the Printer Software For Windows XP, click Add a printer in Windows 2000 or XP. Note: You can change the shared printer's name so that it appears only on the client ... click Start > Printers and Faxes. 2. For Windows 2000, double-click the Add Printer icon, then click Next. For Windows 2000 clients, click Start > Settings > Printers. For Windows XP Professional clients, click Start > Settings > Printers and Faxes. Note: You can install the driver of the shared printer if you have Power...

Reference Guide
Page 54
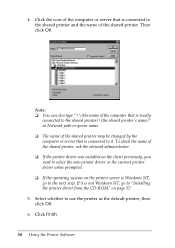
... the name of the shared printer, ask the network administrator. ❏ If the printer driver was installed on the client previously, you 'll need to select either the new printer driver or the current printer driver when prompted. ❏ If the operating system on the printer server is Windows 2000 or XP...to the next step. ❏ If the operating system on the printer server is connected to the shared printer, and the name of the shared printer may be changed by the computer or server that is connected to install the printer driver from the CD-ROM. 5. Click the icon of the computer...
... the name of the shared printer, ask the network administrator. ❏ If the printer driver was installed on the client previously, you 'll need to select either the new printer driver or the current printer driver when prompted. ❏ If the operating system on the printer server is Windows 2000 or XP...to the next step. ❏ If the operating system on the printer server is connected to the shared printer, and the name of the shared printer may be changed by the computer or server that is connected to install the printer driver from the CD-ROM. 5. Click the icon of the computer...

Reference Guide
Page 55
... the steps below to use the printer as the default printer, then click OK. 7. Select Network printer server, then click Next. Double-click the Add Printer icon. 3. 6. For Windows 2000, select whether to use the printer as the default printer, then click OK. For Windows XP, if another driver is already installed, select whether to set up...
... the steps below to use the printer as the default printer, then click OK. 7. Select Network printer server, then click Next. Double-click the Add Printer icon. 3. 6. For Windows 2000, select whether to use the printer as the default printer, then click OK. For Windows XP, if another driver is already installed, select whether to set up...
Reference Guide
Page 56
...the shared printer, ask the network administrator. ❏ If the printer driver was installed on the client previously, you need to select the new printer driver or the current printer driver when prompted. ❏ If the operating system on the printer server is not Windows NT, go to "Installing the printer driver ...from the CD-ROM" on page 57. 5. Select whether to it is Windows NT, go to the next step. Click Finish. 56 Using the Printer Software Note: ❏ You can also...
...the shared printer, ask the network administrator. ❏ If the printer driver was installed on the client previously, you need to select the new printer driver or the current printer driver when prompted. ❏ If the operating system on the printer server is not Windows NT, go to "Installing the printer driver ...from the CD-ROM" on page 57. 5. Select whether to it is Windows NT, go to the next step. Click Finish. 56 Using the Printer Software Note: ❏ You can also...


