

Product Information Guide
Page 1
Epson LX-300+II LX-300+II Parts Printer cover Paper supports Edge guides Paper guide User Replaceable Parts User replaceable part Knob Logo plate Paper supports Paper eject assembly Printer cover assembly Sheet guide assembly Reference number 106 120 180 570 105 109 Part ...number 1051718 1056595 1054395 1050616 1050626 1050625 Control panel Knob Paper release lever Paper tension unit Serial interface Ribbon cartridge Paper thickness lever (gap) Parallel interface USB interface Tractor USB...
Epson LX-300+II LX-300+II Parts Printer cover Paper supports Edge guides Paper guide User Replaceable Parts User replaceable part Knob Logo plate Paper supports Paper eject assembly Printer cover assembly Sheet guide assembly Reference number 106 120 180 570 105 109 Part ...number 1051718 1056595 1054395 1050616 1050626 1050625 Control panel Knob Paper release lever Paper tension unit Serial interface Ribbon cartridge Paper thickness lever (gap) Parallel interface USB interface Tractor USB...
Product Information Guide
Page 2
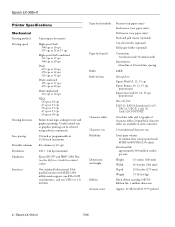
Epson LX-300+II Printer Specifications Mechanical Printing method Printing speed Printing direction Line spacing Printable columns Resolution Emulation Interfaces 9-pin impact dot matrix High-speed draft 300 cps at 10 cpi 337 cps at 12 or 15 cpi High-speed draft condensed 321 cps at 17 cpi 300 cps at 20...) 240 × 144 dpi maximum Epson ESC/P® and IBM® 2380 Plus (see the Reference Guide for control codes) One standard bidirectional, 8-bit parallel interface with IEEE-1284 nibble mode support, one EIA-232D serial interface, and one USB (ver 1.1) interface Paper feed methods Paper...
Epson LX-300+II Printer Specifications Mechanical Printing method Printing speed Printing direction Line spacing Printable columns Resolution Emulation Interfaces 9-pin impact dot matrix High-speed draft 300 cps at 10 cpi 337 cps at 12 or 15 cpi High-speed draft condensed 321 cps at 17 cpi 300 cps at 20...) 240 × 144 dpi maximum Epson ESC/P® and IBM® 2380 Plus (see the Reference Guide for control codes) One standard bidirectional, 8-bit parallel interface with IEEE-1284 nibble mode support, one EIA-232D serial interface, and one USB (ver 1.1) interface Paper feed methods Paper...

Reference Guide
Page 41
It is available when: ❏ The printer is connected directly to the host computer via the parallel port [LPT1] or the USB port, and ❏ Your system is selected. Monitoring settings Setting EPSON Status Monitor 3 Monitoring Preferences Explanation You can be monitored on the printer server. To monitor the printer, make settings for more information. Using the...
It is available when: ❏ The printer is connected directly to the host computer via the parallel port [LPT1] or the USB port, and ❏ Your system is selected. Monitoring settings Setting EPSON Status Monitor 3 Monitoring Preferences Explanation You can be monitored on the printer server. To monitor the printer, make settings for more information. Using the...
Reference Guide
Page 67
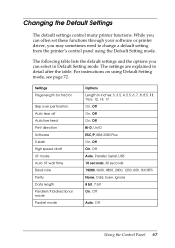
...using the Default Setting mode. The following table lists the default settings and the options you may sometimes need to change a default setting from the printer's control panel using Default Setting mode, see page 72. The settings are explained in Default Setting mode. Settings Page length for tractor Skip over... 14, 17 On, Off On, Off On, Off Bi-D, Uni-D ESC/P, IBM 2380 Plus On, Off On, Off Auto, Parallel, Serial, USB 10 seconds, 30 seconds 19200, 9600, 4800, 2400, 1200, 600, 300 BPS None, Odd, Even, Ignore 8 bit, 7 bit On, Off Auto, Off Using the Control Panel 67 While you can ...
...using the Default Setting mode. The following table lists the default settings and the options you may sometimes need to change a default setting from the printer's control panel using Default Setting mode, see page 72. The settings are explained in Default Setting mode. Settings Page length for tractor Skip over... 14, 17 On, Off On, Off On, Off Bi-D, Uni-D ESC/P, IBM 2380 Plus On, Off On, Off Auto, Parallel, Serial, USB 10 seconds, 30 seconds 19200, 9600, 4800, 2400, 1200, 600, 300 BPS None, Odd, Even, Ignore 8 bit, 7 bit On, Off Auto, Off Using the Control Panel 67 While you can ...

Reference Guide
Page 70
... the serial interface. Parity When this option to set to Auto. parallel, serial, and USB. I /F (interface) mode is disabled. If your printer is connected to two computers using different interfaces, select Auto (automatic) to allow the printer to only one is being sent through the other interface. High speed... longer receives data from an interface before it checks whether a print job is receiving data. When you choose Off, the printer prints up to 300 cps (characters per second) at 10 cpi. See your computer manual and software documentation for the proper setting. 70 Using ...
... the serial interface. Parity When this option to set to Auto. parallel, serial, and USB. I /F (interface) mode is disabled. If your printer is connected to two computers using different interfaces, select Auto (automatic) to allow the printer to only one is being sent through the other interface. High speed... longer receives data from an interface before it checks whether a print job is receiving data. When you choose Off, the printer prints up to 300 cps (characters per second) at 10 cpi. See your computer manual and software documentation for the proper setting. 70 Using ...

User's Guide
Page 11
Replace the printer cover and close it. Connecting the Printer Attach the power cord and connect the printer to your computer using a USB, parallel, or serial interface cable, as follows: 1. Connect the printer to a grounded electrical outlet. 2. Connect the power cord to the printer and to your computer as shown on the following page. Setting Up the Printer 11 10.
Replace the printer cover and close it. Connecting the Printer Attach the power cord and connect the printer to your computer using a USB, parallel, or serial interface cable, as follows: 1. Connect the printer to a grounded electrical outlet. 2. Connect the power cord to the printer and to your computer as shown on the following page. Setting Up the Printer 11 10.

User's Guide
Page 12
RS-232C (Serial) Connect firmly. USB Connect firmly and route the cable through the USB cable holder. Note: You can connect cables to the correct interface when it receives data. 12 Setting Up the Printer the printer switches automatically to multiple interfaces simultaneously; Connect firmly and fasten. IEEE1284 (Parallel) Connect firmly and fasten the screw.
RS-232C (Serial) Connect firmly. USB Connect firmly and route the cable through the USB cable holder. Note: You can connect cables to the correct interface when it receives data. 12 Setting Up the Printer the printer switches automatically to multiple interfaces simultaneously; Connect firmly and fasten. IEEE1284 (Parallel) Connect firmly and fasten the screw.

User's Guide
Page 36
The table below lists the settings and available options. Changing the Printer's Default Settings While you can often change one or more of the printer's default settings from the printer's control panel using the Default Setting mode. Setting Page length for tractor Skip over perforation Auto tear off Auto line feed Print ...70/6, 12, 14, 17 On, Off On, Off On, Off Bi-D, Uni-D ESC/P, IBM 2380 On, Off On, Off Auto, Parallel, Serial, USB 10 seconds, 30 seconds 19200, 9600, 4800, 2400, 1200, 600, 300 BPS None, Odd, Even, Ignore 8 bit, 7 bit On, Off Auto, Off Italic, PC 437, PC 850, PC 860, PC...
The table below lists the settings and available options. Changing the Printer's Default Settings While you can often change one or more of the printer's default settings from the printer's control panel using the Default Setting mode. Setting Page length for tractor Skip over perforation Auto tear off Auto line feed Print ...70/6, 12, 14, 17 On, Off On, Off On, Off Bi-D, Uni-D ESC/P, IBM 2380 On, Off On, Off Auto, Parallel, Serial, USB 10 seconds, 30 seconds 19200, 9600, 4800, 2400, 1200, 600, 300 BPS None, Odd, Even, Ignore 8 bit, 7 bit On, Off Auto, Off Italic, PC 437, PC 850, PC 860, PC...


