

Product Information Guide
Page 11
...Setting mode. After you set the tear-off position, press the Pause button to restore the printer's default top-of-form position, you can use the tear-off feature in two ways: ❏ Manually, by pressing the printer's Tear Off (Font) button ❏ Automatically, by no more data. When you resume ... moving the paper. 5. Your tear-off position setting remains in effect until you change it , even if you turn off the printer. (If you want to exit Micro Adjust mode. 6. Epson LX-300+II Your top-of-form position setting remains in effect until you change it , even if you turn off the...
...Setting mode. After you set the tear-off position, press the Pause button to restore the printer's default top-of-form position, you can use the tear-off feature in two ways: ❏ Manually, by pressing the printer's Tear Off (Font) button ❏ Automatically, by no more data. When you resume ... moving the paper. 5. Your tear-off position setting remains in effect until you change it , even if you turn off the printer. (If you want to exit Micro Adjust mode. 6. Epson LX-300+II Your top-of-form position setting remains in effect until you change it , even if you turn off the...

Product Information Guide
Page 14
...mode. Changing Default Settings Follow the steps below lists the default settings (in bold) and options you can often set for Italic table Manual feed wait time Buzzer Auto CR (IBM 2380 Plus)* IBM character table* All other models: Italic, PC 437, PC 850, PC...Page length for the selected setting until you change a default setting from the printer's control panel using Default setting mode. If the settings are on the printer. Restoring the printer's default settings If you want . 4. Epson LX-300+II Default Settings While you can select in this mode. (For more information, see...
...mode. Changing Default Settings Follow the steps below lists the default settings (in bold) and options you can often set for Italic table Manual feed wait time Buzzer Auto CR (IBM 2380 Plus)* IBM character table* All other models: Italic, PC 437, PC 850, PC...Page length for the selected setting until you change a default setting from the printer's control panel using Default setting mode. If the settings are on the printer. Restoring the printer's default settings If you want . 4. Epson LX-300+II Default Settings While you can select in this mode. (For more information, see...

Product Information Guide
Page 16
...( Manual Epson LX-300+II User's Guide CD-ROM containing the on-screen Reference Guide Part number 4105348-00/CPD-21412 3101470-00/CPD-21416 Transporting the Printer If you have just used the printer, the print head may detach and cause the printer to fall. Make sure the printer is... Make sure the print head is turned off. 2. Epson LX-300+II 5. Remove any options are installed, remove them and pack them in place and flat on the printer mechanism or electronic components. Unplug the power cord from the printer. 3. Make sure the tractor that comes with mild ...
...( Manual Epson LX-300+II User's Guide CD-ROM containing the on-screen Reference Guide Part number 4105348-00/CPD-21412 3101470-00/CPD-21416 Transporting the Printer If you have just used the printer, the print head may detach and cause the printer to fall. Make sure the printer is... Make sure the print head is turned off. 2. Epson LX-300+II 5. Remove any options are installed, remove them and pack them in place and flat on the printer mechanism or electronic components. Unplug the power cord from the printer. 3. Make sure the tractor that comes with mild ...
Reference Guide
Page 3
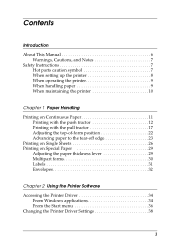
Contents Introduction About This Manual 6 Warnings, Cautions, and Notes 7 Safety Instructions 7 Hot parts caution symbol 7 When setting up the printer 8 When operating the printer 9 When handling paper 9 When maintaining the printer 10 Chapter 1 Paper Handling Printing on Continuous Paper 11 Printing with the push tractor 12 Printing with the ...on Special Paper 29 Adjusting the paper thickness lever 29 Multipart forms 30 Labels 31 Envelopes 32 Chapter 2 Using the Printer Software Accessing the Printer Driver 34 From Windows applications 34 From the Start menu 36 Changing the...
Contents Introduction About This Manual 6 Warnings, Cautions, and Notes 7 Safety Instructions 7 Hot parts caution symbol 7 When setting up the printer 8 When operating the printer 9 When handling paper 9 When maintaining the printer 10 Chapter 1 Paper Handling Printing on Continuous Paper 11 Printing with the push tractor 12 Printing with the ...on Special Paper 29 Adjusting the paper thickness lever 29 Multipart forms 30 Labels 31 Envelopes 32 Chapter 2 Using the Printer Software Accessing the Printer Driver 34 From Windows applications 34 From the Start menu 36 Changing the...
Reference Guide
Page 6
...® 98, Me, 2000, XP and NT 4.0, plus the EPSON Status Monitor 3 utility. Introduction Your Epson® LX-300+II printer provides high-quality printing and superior performance in a compact design. About This Manual This manual provides detailed information about the control panel functions, including how to change the printer's default settings. ❏ Chapter 4, "Maintenance and Troubleshooting," includes basic...
...® 98, Me, 2000, XP and NT 4.0, plus the EPSON Status Monitor 3 utility. Introduction Your Epson® LX-300+II printer provides high-quality printing and superior performance in a compact design. About This Manual This manual provides detailed information about the control panel functions, including how to change the printer's default settings. ❏ Chapter 4, "Maintenance and Troubleshooting," includes basic...
Reference Guide
Page 10
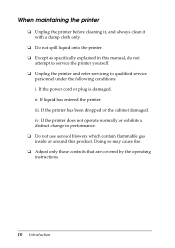
...ii. When maintaining the printer ❏ Unplug the printer before cleaning it, and always clean it with a damp cloth only. ❏ Do not spill liquid onto the printer. ❏ Except as specifically explained in performance. ❏ Do not use aerosol blowers which contain flammable gas inside or around this manual..., do not attempt to service the printer yourself. ❏ Unplug the printer and refer servicing to qualified service personnel under the following conditions: i. Doing so ...
...ii. When maintaining the printer ❏ Unplug the printer before cleaning it, and always clean it with a damp cloth only. ❏ Do not spill liquid onto the printer. ❏ Except as specifically explained in performance. ❏ Do not use aerosol blowers which contain flammable gas inside or around this manual..., do not attempt to service the printer yourself. ❏ Unplug the printer and refer servicing to qualified service personnel under the following conditions: i. Doing so ...
Reference Guide
Page 24
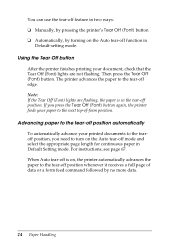
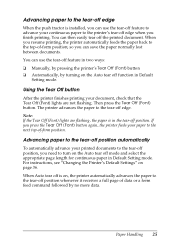
...the tear-off position automatically To automatically advance your document, check that the Tear Off (Font) lights are flashing, the paper is on, the printer automatically advances the paper to turn on the Auto tear-off function in Default-setting mode. For instructions, see page 67. Using the Tear ... mode. Note: If the Tear Off (Font) lights are not flashing. You can use the tear-off feature in two ways: ❏ Manually, by pressing the printer's Tear Off (Font) button ❏ Automatically, by no more data. 24 Paper Handling If you need to the tear-off position whenever it...
...the tear-off position automatically To automatically advance your document, check that the Tear Off (Font) lights are flashing, the paper is on, the printer automatically advances the paper to turn on the Auto tear-off function in Default-setting mode. For instructions, see page 67. Using the Tear ... mode. Note: If the Tear Off (Font) lights are not flashing. You can use the tear-off feature in two ways: ❏ Manually, by pressing the printer's Tear Off (Font) button ❏ Automatically, by no more data. 24 Paper Handling If you need to the tear-off position whenever it...
Reference Guide
Page 68
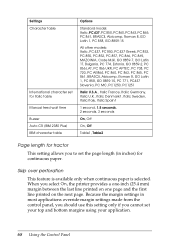
... the page length (in most applications override margin settings made from the control panel, you should use this setting only if you select On, the printer provides a one-inch (25.4 mm) margin between the last line printed on one page and the first line printed on the next page. Skip over... you cannot set your top and bottom margins using your application. 68 Using the Control Panel Settings Character table International character set for Italic table Manual feed wait time Buzzer Auto CR (IBM 2380 Plus) IBM character table Options Standard model: Italic, PC 437, PC 850, PC 860, PC 863, PC...
... the page length (in most applications override margin settings made from the control panel, you should use this setting only if you select On, the printer provides a one-inch (25.4 mm) margin between the last line printed on one page and the first line printed on the next page. Skip over... you cannot set your top and bottom margins using your application. 68 Using the Control Panel Settings Character table International character set for Italic table Manual feed wait time Buzzer Auto CR (IBM 2380 Plus) IBM character table Options Standard model: Italic, PC 437, PC 850, PC 860, PC 863, PC...

Reference Guide
Page 70
... is set to Auto. The parity bit, if used, provides a basic form of interfaces; High speed draft When you choose Off, the printer prints up to 300 cps (characters per second) at 10 cpi. parallel, serial, and USB. You can specify 10 seconds or 30 seconds for the serial interface.... See your computer manual and software documentation for the proper setting. See your computer manual and software documentation for the proper setting. 70 Using...
... is set to Auto. The parity bit, if used, provides a basic form of interfaces; High speed draft When you choose Off, the printer prints up to 300 cps (characters per second) at 10 cpi. parallel, serial, and USB. You can specify 10 seconds or 30 seconds for the serial interface.... See your computer manual and software documentation for the proper setting. See your computer manual and software documentation for the proper setting. 70 Using...
Reference Guide
Page 71
... off this off. Using the Control Panel 71 Packet mode Select Auto for Packet mode to 7 bit or 8 bit. Manual feed wait time This sets the amount of the serial interface to print from applications based on other operating systems such as ...the Italic table to your satisfaction, you can adjust its position to suit your computer manual and software documentation for the Italic character table. International character set contains eight characters that comes with the printer. Parallel I/F bidirectional mode The parallel interface bidirectional transfer mode is used when this ...
... off this off. Using the Control Panel 71 Packet mode Select Auto for Packet mode to 7 bit or 8 bit. Manual feed wait time This sets the amount of the serial interface to print from applications based on other operating systems such as ...the Italic table to your satisfaction, you can adjust its position to suit your computer manual and software documentation for the Italic character table. International character set contains eight characters that comes with the printer. Parallel I/F bidirectional mode The parallel interface bidirectional transfer mode is used when this ...
Reference Guide
Page 123
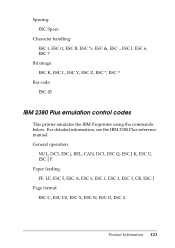
For detailed information, see the IBM 2380 Plus reference manual. General operation: NUL, DC3, ESC j, BEL, CAN, DC1, ESC Q, ESC [ K, ESC U, ESC [ F Paper feeding: FF, LF, ESC 5, ESC A, ESC 0, ESC 1, ESC 2, ESC 3, CR, ESC ] Page format: ESC C, ESC C0, ESC X, ESC N, ESC O, ESC 4 Product Information 123 Spacing: ESC Space Character handling: ESC t, ESC (t, ESC R, ESC %, ESC &, ESC :, ESC I, ESC 6, ESC 7 Bit image: ESC K, ESC L, ESC Y, ESC Z, ESC *, ESC ^ Bar code: ESC (B IBM 2380 Plus emulation control codes This printer emulates the IBM Proprinter using the commands below.
For detailed information, see the IBM 2380 Plus reference manual. General operation: NUL, DC3, ESC j, BEL, CAN, DC1, ESC Q, ESC [ K, ESC U, ESC [ F Paper feeding: FF, LF, ESC 5, ESC A, ESC 0, ESC 1, ESC 2, ESC 3, CR, ESC ] Page format: ESC C, ESC C0, ESC X, ESC N, ESC O, ESC 4 Product Information 123 Spacing: ESC Space Character handling: ESC t, ESC (t, ESC R, ESC %, ESC &, ESC :, ESC I, ESC 6, ESC 7 Bit image: ESC K, ESC L, ESC Y, ESC Z, ESC *, ESC ^ Bar code: ESC (B IBM 2380 Plus emulation control codes This printer emulates the IBM Proprinter using the commands below.

Reference Guide
Page 127
H Help, EPSON, 96 to 97 High speed draft, 67, 70 Hot parts caution symbol, 7 I I/F mode, 67, 70 IBM character table, 68, 72 ... forms, 29 to 31 on the pull tractor, 19 to 21 on the push tractor, 11 to 14 single sheets, 26 to 28 M Manual feed wait time, 68, 71 Micro Adjust mode, 22 to 23, 64 to 65 Multipart forms, 29 to 31, 116 N Network, 45... 67, 70, 110 Parity, 67, 70 Power cord, 110 Power supply problems, 79 to 80 Printable columns, 111 Print direction, 67, 69 Printer cleaning, 74 to 75 cover, 109 parts, 109 to 110 server, 45 to 49 sharing, 45 to 58 specifications, 111 to 124 transporting, 75...
H Help, EPSON, 96 to 97 High speed draft, 67, 70 Hot parts caution symbol, 7 I I/F mode, 67, 70 IBM character table, 68, 72 ... forms, 29 to 31 on the pull tractor, 19 to 21 on the push tractor, 11 to 14 single sheets, 26 to 28 M Manual feed wait time, 68, 71 Micro Adjust mode, 22 to 23, 64 to 65 Multipart forms, 29 to 31, 116 N Network, 45... 67, 70, 110 Parity, 67, 70 Power cord, 110 Power supply problems, 79 to 80 Printable columns, 111 Print direction, 67, 69 Printer cleaning, 74 to 75 cover, 109 parts, 109 to 110 server, 45 to 49 sharing, 45 to 58 specifications, 111 to 124 transporting, 75...

User's Guide
Page 5
.... Options By adding options, such as a cut-sheet feeder or roll paper holder, you can purchase ribbon cartridges, paper, manuals, and accessories from an Epson® authorized reseller. Or you started using your printer. As you read your documentation, please keep the following basic information to get you can purchase online at www...
.... Options By adding options, such as a cut-sheet feeder or roll paper holder, you can purchase ribbon cartridges, paper, manuals, and accessories from an Epson® authorized reseller. Or you started using your printer. As you read your documentation, please keep the following basic information to get you can purchase online at www...
User's Guide
Page 25
...tear-off position automatically To automatically advance your printed documents to the tear-off position, you press the Tear Off (Font) button again, the printer feeds your document, check that the Tear Off (Font) lights are flashing, the paper is in the tear-off position. Then press the Tear... paper to the tear-off edge When the push tractor is installed, you can use the tear-off feature in two ways: ❏ Manually, by pressing the printer's Tear Off (Font) button ❏ Automatically, by no more data. The printer advances the paper to the tear-off the printed document.
...tear-off position automatically To automatically advance your printed documents to the tear-off position, you press the Tear Off (Font) button again, the printer feeds your document, check that the Tear Off (Font) lights are flashing, the paper is in the tear-off position. Then press the Tear... paper to the tear-off edge When the push tractor is installed, you can use the tear-off feature in two ways: ❏ Manually, by pressing the printer's Tear Off (Font) button ❏ Automatically, by no more data. The printer advances the paper to the tear-off the printed document.

User's Guide
Page 36
... Parity Data length Parallel I/F bidirectional mode Packet mode Character table International character set for italic table Manual feed wait time Buzzer Auto CR (in IBM PPDS emulation mode) IBM character table Options (default...Parallel, Serial, USB 10 seconds, 30 seconds 19200, 9600, 4800, 2400, 1200, 600, 300 BPS None, Odd, Even, Ignore 8 bit, 7 bit On, Off Auto, Off Italic, ...Control Panel Changing the Printer's Default Settings While you can often change the printer's settings through your Reference Guide. For detailed descriptions, see your software or printer driver, you may sometimes...
... Parity Data length Parallel I/F bidirectional mode Packet mode Character table International character set for italic table Manual feed wait time Buzzer Auto CR (in IBM PPDS emulation mode) IBM character table Options (default...Parallel, Serial, USB 10 seconds, 30 seconds 19200, 9600, 4800, 2400, 1200, 600, 300 BPS None, Odd, Even, Ignore 8 bit, 7 bit On, Off Auto, Off Italic, ...Control Panel Changing the Printer's Default Settings While you can often change the printer's settings through your Reference Guide. For detailed descriptions, see your software or printer driver, you may sometimes...
User's Guide
Page 39
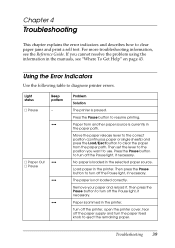
.... Light status n Pause Beep pattern - ••• n Paper Out ••• n Pause ••• ••• Problem Solution The printer is loaded in the selected paper source. Remove your paper and reload it. Then press the Pause button to turn off the paper supply and... turn the paper feed knob to turn off the Pause light, if necessary. The paper is jammed in the manuals, see the Reference Guide. Paper is not loaded correctly. Then set the lever to the position you cannot resolve the problem using the ...
.... Light status n Pause Beep pattern - ••• n Paper Out ••• n Pause ••• ••• Problem Solution The printer is loaded in the selected paper source. Remove your paper and reload it. Then press the Pause button to turn off the paper supply and... turn the paper feed knob to turn off the Pause light, if necessary. The paper is jammed in the manuals, see the Reference Guide. Paper is not loaded correctly. Then set the lever to the position you cannot resolve the problem using the ...


