
User Manual
Page 2
...of: accident, misuse, or abuse of the information contained herein. Fixed to Off - Neither is assumed with Seiko Epson Corporation's operating and maintenance instructions. Seiko Epson Corporation shall not be liable to the purchaser of this product, or (excluding the U.S.) failure to strictly comply ...of the information contained herein. Fixed to Off USB connector side USB available UB series connector side UB series available ii TM-J9000/J9100 User's Manual EPSON and ESC/POS are subject to this product or third parties for errors or omissions. Fixed to Off - Copyright ...
...of: accident, misuse, or abuse of the information contained herein. Fixed to Off - Neither is assumed with Seiko Epson Corporation's operating and maintenance instructions. Seiko Epson Corporation shall not be liable to the purchaser of this product, or (excluding the U.S.) failure to strictly comply ...of the information contained herein. Fixed to Off USB connector side USB available UB series connector side UB series available ii TM-J9000/J9100 User's Manual EPSON and ESC/POS are subject to this product or third parties for errors or omissions. Fixed to Off - Copyright ...
User Manual
Page 3
... A digital apparatus complies with the instruction manual, may cause harmful interference to correct the interference at his own expense. TM-J9000/J9100 1 Operation of this equipment in a residential area is operated in which case the user will invalidate the EMC standards ...of this device. CE Marking The printer conforms to the following standards are applied only to the printers that changes or modifications not expressly approved by Seiko Epson...
... A digital apparatus complies with the instruction manual, may cause harmful interference to correct the interference at his own expense. TM-J9000/J9100 1 Operation of this equipment in a residential area is operated in which case the user will invalidate the EMC standards ...of this device. CE Marking The printer conforms to the following standards are applied only to the printers that changes or modifications not expressly approved by Seiko Epson...

User Manual
Page 4
... source. Continued use may cause fire. Unplug the power cord immediately and contact your dealer or a Seiko Epson service center for the printer. 2 TM-J9000/J9100 Key to Symbols The symbols in this product may result in an accessible location. Tampering with this manual are... Precautions WARNING: Shut down your equipment. Improper repair work can be followed carefully to avoid serious bodily injury. Seiko Epson recommends using the designated EPSON AC adapter (PS-180) for advice. Read this product. CAUTION: Cautions must be dangerous. Important Safety Information This...
... source. Continued use may cause fire. Unplug the power cord immediately and contact your dealer or a Seiko Epson service center for the printer. 2 TM-J9000/J9100 Key to Symbols The symbols in this product may result in an accessible location. Tampering with this manual are... Precautions WARNING: Shut down your equipment. Improper repair work can be followed carefully to avoid serious bodily injury. Seiko Epson recommends using the designated EPSON AC adapter (PS-180) for advice. Read this product. CAUTION: Cautions must be dangerous. Important Safety Information This...
User Manual
Page 5
...break or cause injury if it . Excessive humidity and dust may leak. Keep the printer upright and horizontal during transportion. 3. Different connections may fall or collapse, causing breakage and possible injury. Notes on top... of the printer, wipe up the ink with a cloth or similar material immediately and contact your dealer or a Seiko Epson service center for an extended period. Do not place heavy objects on... before leaving it unused for advice. After transportation, install a new ink cartridge. 2. TM-J9000/J9100 3
...break or cause injury if it . Excessive humidity and dust may leak. Keep the printer upright and horizontal during transportion. 3. Different connections may fall or collapse, causing breakage and possible injury. Notes on top... of the printer, wipe up the ink with a cloth or similar material immediately and contact your dealer or a Seiko Epson service center for an extended period. Do not place heavy objects on... before leaving it unused for advice. After transportation, install a new ink cartridge. 2. TM-J9000/J9100 3
User Manual
Page 6
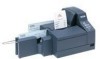
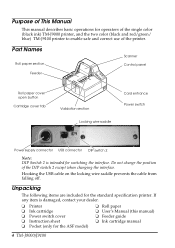
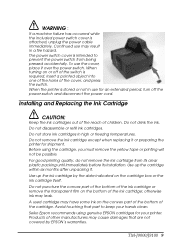
... cartridge ❏ Power switch cover ❏ Instruction sheet ❏ Pocket (only for operators of the single color (black ink) TM-J9000 printer, and the two color (black and red/green/ blue) TM-J9100 printer to enable safe and correct use of the printer. English Purpose of This Manual This manual describes basic operations for the ASF model) ❏ Roll...
... cartridge ❏ Power switch cover ❏ Instruction sheet ❏ Pocket (only for operators of the single color (black ink) TM-J9000 printer, and the two color (black and red/green/ blue) TM-J9100 printer to enable safe and correct use of the printer. English Purpose of This Manual This manual describes basic operations for the ASF model) ❏ Roll...
User Manual
Page 7
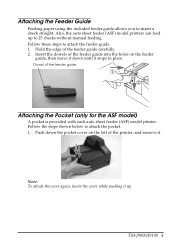
Push down until it up to attach the pocket. 1. TM-J9000/J9100 5 Also, the auto sheet feeder (ASF) model printers can feed up . Note: To attach the cover again, insert ... the Pocket (only for the ASF model) A pocket is provided with each auto sheet feeder (ASF) model printer. Follow the steps shown below to 25 checks without manual feeding. Insert the dowels of the feeder guide into... the holes on the left of the printer, and remove it. Follow these steps to insert a check straight. then move it down the pocket ...
Push down until it up to attach the pocket. 1. TM-J9000/J9100 5 Also, the auto sheet feeder (ASF) model printers can feed up . Note: To attach the cover again, insert ... the Pocket (only for the ASF model) A pocket is provided with each auto sheet feeder (ASF) model printer. Follow the steps shown below to 25 checks without manual feeding. Insert the dowels of the feeder guide into... the holes on the left of the printer, and remove it. Follow these steps to insert a check straight. then move it down the pocket ...
User Manual
Page 8
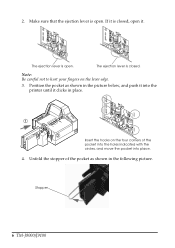
Make sure that the ejection lever is open . The ejection lever is open . Stopper 6 TM-J9000/J9100 The ejection lever is closed . English 2. Unfold the stopper of the pocket as shown in the picture below, and push it into place. 4. Position the pocket as shown in place. ➀ ➁ Insert the hooks on the lever edge. 3. If it is closed , open it clicks in the following picture. Note: Be careful not to hurt your fingers on the four corners of the pocket into the holes indicated with the circles, and move the pocket into the printer until it .
Make sure that the ejection lever is open . The ejection lever is open . Stopper 6 TM-J9000/J9100 The ejection lever is closed . English 2. Unfold the stopper of the pocket as shown in the picture below, and push it into place. 4. Position the pocket as shown in place. ➀ ➁ Insert the hooks on the lever edge. 3. If it is closed , open it clicks in the following picture. Note: Be careful not to hurt your fingers on the four corners of the pocket into the holes indicated with the circles, and move the pocket into the printer until it .
User Manual
Page 9
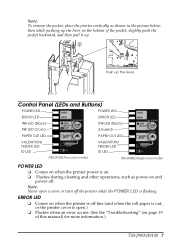
... LED (Black) (Unused) PAPER OUT LED PAPER OUT LED VALIDATION/ FEEDER LED ID LED VALIDATION/ FEEDER LED ID LED (TM-J9100) Two color model (TM-J9000) Single color model POWER LED ❏ Comes on when the printer power is flashing. Note: Never open .) ❏ Flashes when an error occurs. (See the "Troubleshooting" (on page 19 of the...
... LED (Black) (Unused) PAPER OUT LED PAPER OUT LED VALIDATION/ FEEDER LED ID LED VALIDATION/ FEEDER LED ID LED (TM-J9100) Two color model (TM-J9000) Single color model POWER LED ❏ Comes on when the printer power is flashing. Note: Never open .) ❏ Flashes when an error occurs. (See the "Troubleshooting" (on page 19 of the...
User Manual
Page 10
...only, whereas the TM-J9100 has LEDs for more than three seconds only when the INK OUT LED is out or almost out. CLEANING Button When printing becomes faint or uneven, press this button to turn off the printer while the POWER LED is out. (The printer goes off the printer. English INK ...OUT LED ❏ Flashes when the ink is almost out. (You can continue printing.) ❏ Comes on when no ink cartridge is installed or the ink is flashing. 8 TM-J9000/J9100 Note: Press this button for both BLACK and COLOR. PAPER OUT LED ...
...only, whereas the TM-J9100 has LEDs for more than three seconds only when the INK OUT LED is out or almost out. CLEANING Button When printing becomes faint or uneven, press this button to turn off the printer while the POWER LED is out. (The printer goes off the printer. English INK ...OUT LED ❏ Flashes when the ink is almost out. (You can continue printing.) ❏ Comes on when no ink cartridge is installed or the ink is flashing. 8 TM-J9000/J9100 Note: Press this button for both BLACK and COLOR. PAPER OUT LED ...
User Manual
Page 11
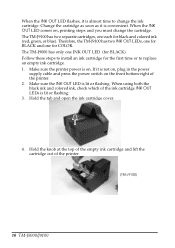
... covered by the date indicated on the convex part of the bottom of the cartridge. TM-J9000/J9100 9 To use may cause damages that part to prevent the power switch from its clear...film on or off the power switch and disconnect the power cord. When the printer is attached, unplug the power cable immediately. otherwise ink may have some ink on the...possible. Use up the ink cartridge by EPSON's warranties. When turning on the bottom of children. Products of the cover, and press the switch. Before using genuine EPSON cartridges for your hands clean. Do not...
... covered by the date indicated on the convex part of the bottom of the cartridge. TM-J9000/J9100 9 To use may cause damages that part to prevent the power switch from its clear...film on or off the power switch and disconnect the power cord. When the printer is attached, unplug the power cable immediately. otherwise ink may have some ink on the...possible. Use up the ink cartridge by EPSON's warranties. When turning on the bottom of children. Products of the cover, and press the switch. Before using genuine EPSON cartridges for your hands clean. Do not...
User Manual
Page 12
... ink cartridge for BLACK). Hold the tab and open the ink cartridge cover. 4. English When the INK OUT LED flashes, it is convenient. The TM-J9100 has two separate cartridges, one INK OUT LED (for the first time or to change the cartridge. Change the cartridge as soon as it is lit or... the power switch on , printing stops and you must change the ink cartridge. Make sure the printer power is lit or flashing. Therefore, the TM-J9100 has two INK OUT LEDs, one for BLACK and one for black and colored ink (red, green, or blue). If it is almost time to replace an empty ink...
... ink cartridge for BLACK). Hold the tab and open the ink cartridge cover. 4. English When the INK OUT LED flashes, it is convenient. The TM-J9100 has two separate cartridges, one INK OUT LED (for the first time or to change the cartridge. Change the cartridge as soon as it is lit or... the power switch on , printing stops and you must change the ink cartridge. Make sure the printer power is lit or flashing. Therefore, the TM-J9100 has two INK OUT LEDs, one for BLACK and one for black and colored ink (red, green, or blue). If it is almost time to replace an empty ink...
User Manual
Page 13
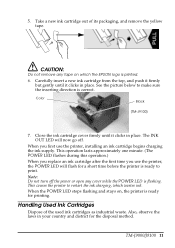
Color Black (TM-J9100) 7. When you use the printer, installing an ink cartridge begins charging the ink supply. When the POWER LED stops flashing and stays on which wastes ink. TM-J9000/J9100 11 Carefully insert a new ink cartridge from the ...your country and district for printing. The INK OUT LED will flash for a short time before the printer is ready to make sure the inserting direction is ready for the disposal method. Also, observe the ... of the used ink cartridges as industrial waste. This causes the printer to restart the ink charging, which the EPSON logo is flashing.
Color Black (TM-J9100) 7. When you use the printer, installing an ink cartridge begins charging the ink supply. When the POWER LED stops flashing and stays on which wastes ink. TM-J9000/J9100 11 Carefully insert a new ink cartridge from the ...your country and district for printing. The INK OUT LED will flash for a short time before the printer is ready to make sure the inserting direction is ready for the disposal method. Also, observe the ... of the used ink cartridges as industrial waste. This causes the printer to restart the ink charging, which the EPSON logo is flashing.
User Manual
Page 14
...the core. If a roll paper core is flashing. Install a new paper roll. 12 TM-J9000/J9100 The cleaning process uses some ink, so you do not pull the paper being ejected. Turn on or off the printer or open . Note: Press the CLEANING button only when there is ready for printing.... When the cleaning process ends, the printer is a problem with the printing quality. Do ...
...the core. If a roll paper core is flashing. Install a new paper roll. 12 TM-J9000/J9100 The cleaning process uses some ink, so you do not pull the paper being ejected. Turn on or off the printer or open . Note: Press the CLEANING button only when there is ready for printing.... When the cleaning process ends, the printer is a problem with the printing quality. Do ...
User Manual
Page 15
... check is fed to use a USB interface because the image scanner requires it. Be sure to the outlet. English Ĉ 5. Processing Checks The TM-J9000/J9100 is disabled, you are in a single pass: reading magnetic characters, scanning the image of the paper roll within the range "A" on the check. ...10063; Do not open the covers while printing and processing are using an optional UB series interface, no image data can be obtained. The printer reads the magnetic characters on the upper side of performing the following four actions on a check in progress. Note: When the roll paper...
... check is fed to use a USB interface because the image scanner requires it. Be sure to the outlet. English Ĉ 5. Processing Checks The TM-J9000/J9100 is disabled, you are in a single pass: reading magnetic characters, scanning the image of the paper roll within the range "A" on the check. ...10063; Do not open the covers while printing and processing are using an optional UB series interface, no image data can be obtained. The printer reads the magnetic characters on the upper side of performing the following four actions on a check in progress. Note: When the roll paper...

User Manual
Page 16
...paper jam or incorrect feeding of the check until the VALIDATION/FEEDER LED starts flashing. If the checks are printed) facing the front of the printer, continuously touching the feeder guide with its face (the side on the bottom-right corner as shown in the feeder guide to 25 checks ...Inserting Checks With the Non-Auto Sheet Feeder (Non-ASF) Model 1. With the Auto Sheet Feeder (ASF) Model With the ASF model printers, you insert them into the printer, release it stops as shown in the picture below . ➀➁ 2. When the check is ejected and the VALIDATION/FEEDER LED ...
...paper jam or incorrect feeding of the check until the VALIDATION/FEEDER LED starts flashing. If the checks are printed) facing the front of the printer, continuously touching the feeder guide with its face (the side on the bottom-right corner as shown in the feeder guide to 25 checks ...Inserting Checks With the Non-Auto Sheet Feeder (Non-ASF) Model 1. With the Auto Sheet Feeder (ASF) Model With the ASF model printers, you insert them into the printer, release it stops as shown in the picture below . ➀➁ 2. When the check is ejected and the VALIDATION/FEEDER LED ...
User Manual
Page 17
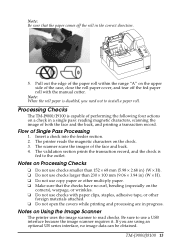
.... ❏ Do not insert anything other than cards. ❏ Do not open any covers while an operation is in "Inserting Checks" (on the printer while pressing the CLEANING button. 3. PRESAT Brand (KIC) "CHECK READER CLEANING CARD" Note: Do not use sticky cleaning sheets. Scanning ID Card Image... Data Notes on the MICR unit may cause a paper jam or machine failure. TM-J9000/J9100 15 Use the following situations, appropriate quality of the image data is not guaranteed. ❏ When the image scanner section is damaged by ...
.... ❏ Do not insert anything other than cards. ❏ Do not open any covers while an operation is in "Inserting Checks" (on the printer while pressing the CLEANING button. 3. PRESAT Brand (KIC) "CHECK READER CLEANING CARD" Note: Do not use sticky cleaning sheets. Scanning ID Card Image... Data Notes on the MICR unit may cause a paper jam or machine failure. TM-J9000/J9100 15 Use the following situations, appropriate quality of the image data is not guaranteed. ❏ When the image scanner section is damaged by ...
User Manual
Page 18
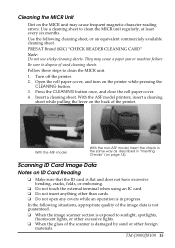
Be sure not to clean the glass. 16 TM-J9000/J9100 Note: Do not touch the card when it is ejected and ID LED flashes again, pull...the image data may cause distortion and other problems with the bottom of the slit. Note: When the card is pulled into the printer, a part of it stops as shown in the picture below. ➀ ➁ 3. Doing so may deteriorate. Use a ...comes out of the card carrier slit at the back of data. English Note on Using the Image Scanner The printer uses the image scanner to read side facing the ink cartridge cover, with the image data. Doing so may cause...
Be sure not to clean the glass. 16 TM-J9000/J9100 Note: Do not touch the card when it is ejected and ID LED flashes again, pull...the image data may cause distortion and other problems with the bottom of the slit. Note: When the card is pulled into the printer, a part of it stops as shown in the picture below. ➀ ➁ 3. Doing so may deteriorate. Use a ...comes out of the card carrier slit at the back of data. English Note on Using the Image Scanner The printer uses the image scanner to read side facing the ink cartridge cover, with the image data. Doing so may cause...
User Manual
Page 19
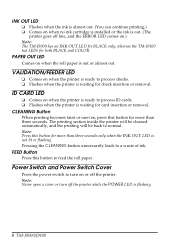
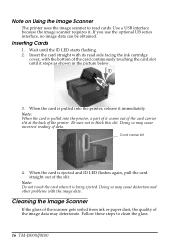
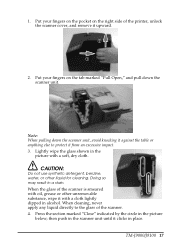
Put your fingers on the right side of the printer, unlock the scanner cover, and remove it upward. ➁ ➀ 2. Press the section marked "Close" indicated by the circle in the picture with a soft, dry ... your fingers on the pocket on the tab marked "Pull Open," and pull down the scanner unit, avoid knocking it from an excessive impact. 3. TM-J9000/J9100 17 Lightly wipe the glass shown in the picture below; When cleaning, never apply any liquid directly to protect it against the table or anything...
Put your fingers on the right side of the printer, unlock the scanner cover, and remove it upward. ➁ ➀ 2. Press the section marked "Close" indicated by the circle in the picture with a soft, dry ... your fingers on the pocket on the tab marked "Pull Open," and pull down the scanner unit, avoid knocking it from an excessive impact. 3. TM-J9000/J9100 17 Lightly wipe the glass shown in the picture below; When cleaning, never apply any liquid directly to protect it against the table or anything...
User Manual
Page 20
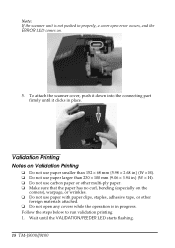
... to run validation printing. 1. To attach the scanner cover, push it down into the connecting part firmly until the VALIDATION/FEEDER LED starts flashing. 18 TM-J9000/J9100 Validation Printing Notes on Validation Printing ❏ Do not use paper smaller than 152 × 68 mm {5.98 × 2.68 in} (W × H). ❏ Do...
... to run validation printing. 1. To attach the scanner cover, push it down into the connecting part firmly until the VALIDATION/FEEDER LED starts flashing. 18 TM-J9000/J9100 Validation Printing Notes on Validation Printing ❏ Do not use paper smaller than 152 × 68 mm {5.98 × 2.68 in} (W × H). ❏ Do...
User Manual
Page 21
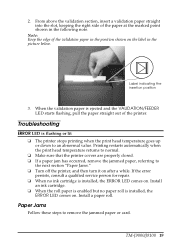
... is installed, the ERROR LED comes on the label in the following note. TM-J9000/J9100 19 Label indicating the insertion position 3. Paper Jams Follow these steps to the next section "Paper Jams." ❏ Turn off the printer, and then turn it on . Install a paper roll. From above the ...paper in the position shown on . Printing restarts automatically when the print head temperature returns to normal. ❏ Make sure that the printer covers are properly closed. ❏ If a paper jam has occurred, remove the jammed paper, referring to remove the jammed paper or card. ...
... is installed, the ERROR LED comes on the label in the following note. TM-J9000/J9100 19 Label indicating the insertion position 3. Paper Jams Follow these steps to the next section "Paper Jams." ❏ Turn off the printer, and then turn it on . Install a paper roll. From above the ...paper in the position shown on . Printing restarts automatically when the print head temperature returns to normal. ❏ Make sure that the printer covers are properly closed. ❏ If a paper jam has occurred, remove the jammed paper, referring to remove the jammed paper or card. ...
