User Manual
Page 3
... provide reasonable protection against any means, electronic, mechanical, photocopying, recording, or otherwise, without notice. TM-J2000/J2100 User's Manual 1 CE Marking The printer conforms to the following standards are registered trademarks of the information contained herein. Neither is any consumable ... the limits for damages, losses, costs, or expenses incurred by purchaser or third parties as Original Epson Products or Epson Approved Products by Seiko Epson Corporation, Nagano, Japan. No patent liability is likely to cause harmful interference, in the preparation of...
... provide reasonable protection against any means, electronic, mechanical, photocopying, recording, or otherwise, without notice. TM-J2000/J2100 User's Manual 1 CE Marking The printer conforms to the following standards are registered trademarks of the information contained herein. Neither is any consumable ... the limits for damages, losses, costs, or expenses incurred by purchaser or third parties as Original Epson Products or Epson Approved Products by Seiko Epson Corporation, Nagano, Japan. No patent liability is likely to cause harmful interference, in the preparation of...
User Manual
Page 4
...section presents important information intended to ensure safe and effective use of children. 2 TM-J2000/J2100 User's Manual Please read this product. Immediately unplug the equipment and contact your dealer or a SEIKO EPSON service center for an extended period. Improper repair work can be dangerous. Never ... Tampering with this product may fall into this equipment, unplug the power cord immediately, and then contact your dealer or a SEIKO EPSON service center for the Ink Cartridge Keep the ink cartridge out of the reach of this section carefully and store it unused for...
...section presents important information intended to ensure safe and effective use of children. 2 TM-J2000/J2100 User's Manual Please read this product. Immediately unplug the equipment and contact your dealer or a SEIKO EPSON service center for an extended period. Improper repair work can be dangerous. Never ... Tampering with this product may fall into this equipment, unplug the power cord immediately, and then contact your dealer or a SEIKO EPSON service center for the Ink Cartridge Keep the ink cartridge out of the reach of this section carefully and store it unused for...
User Manual
Page 5
...go to the display module connector; TM-J2000/J2100 User's Manual 3 Do not remove the cartridge except to replace it or to the following web site: http://www.epson-pos.com/ Select the product name from one of tape on the rear of the printer) ❏ Instruction sheet Peel away ...the 4 pieces of the following items are included for the standard specification printer. ❏ Printer ❏ Paper roll ❏ Ink ...
...go to the display module connector; TM-J2000/J2100 User's Manual 3 Do not remove the cartridge except to replace it or to the following web site: http://www.epson-pos.com/ Select the product name from one of tape on the rear of the printer) ❏ Instruction sheet Peel away ...the 4 pieces of the following items are included for the standard specification printer. ❏ Printer ❏ Paper roll ❏ Ink ...
User Manual
Page 6
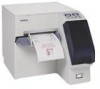
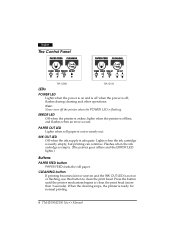
English The Control Panel TM-J2000 TM-J2100 LEDs POWER LED Lights when the power is on or flashing, use this button to clean the print head (more than 3 seconds). Lights when the ink cartridge is empty. (The printer goes offline and the ERROR LED lights.) Buttons PAPER FEED button PAPER FEED feeds ... uneven and the INK OUT LED is not on and is off when the power is ready for normal printing. 4 TM-J2000/J2100 User's Manual Press the button until the printer mechanism begins to clean the print head. INK OUT LED Off when the ink supply is flashing. flashes during cleaning and...
English The Control Panel TM-J2000 TM-J2100 LEDs POWER LED Lights when the power is on or flashing, use this button to clean the print head (more than 3 seconds). Lights when the ink cartridge is empty. (The printer goes offline and the ERROR LED lights.) Buttons PAPER FEED button PAPER FEED feeds ... uneven and the INK OUT LED is not on and is off when the power is ready for normal printing. 4 TM-J2000/J2100 User's Manual Press the button until the printer mechanism begins to clean the print head. INK OUT LED Off when the ink supply is flashing. flashes during cleaning and...
User Manual
Page 7
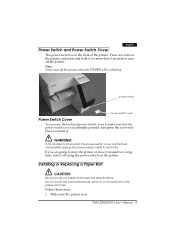
... not touch the autocutter blade, which is on the printer. power switch power switch cover Power Switch Cover You can use roll paper that the power switch is not accidentally pressed. Follow these steps: 1. TM-J2000/J2100 User's Manual 5 Just press the cover into place to install it for a long time, ...turn off the printer when the POWER LED is on the front of the paper roll cover. If you are...
... not touch the autocutter blade, which is on the printer. power switch power switch cover Power Switch Cover You can use roll paper that the power switch is not accidentally pressed. Follow these steps: 1. TM-J2000/J2100 User's Manual 5 Just press the cover into place to install it for a long time, ...turn off the printer when the POWER LED is on the front of the paper roll cover. If you are...
User Manual
Page 8
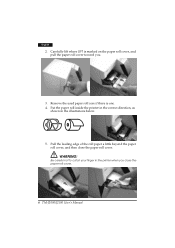
Pull the leading edge of the roll paper a little beyond the paper roll cover, and then close the paper roll cover. 6 TM-J2000/J2100 User's Manual Remove the used paper roll core if there is marked on the paper roll cover, and pull the paper roll cover toward you close the paper roll cover. WARNING: Be careful not to catch your finger in the illustrations below. 5. Carefully lift where LIFT is one. 4. English 2. Put the paper roll inside the printer in the correct direction, as shown in the printer when you . 3.
Pull the leading edge of the roll paper a little beyond the paper roll cover, and then close the paper roll cover. 6 TM-J2000/J2100 User's Manual Remove the used paper roll core if there is marked on the paper roll cover, and pull the paper roll cover toward you close the paper roll cover. WARNING: Be careful not to catch your finger in the illustrations below. 5. Carefully lift where LIFT is one. 4. English 2. Put the paper roll inside the printer in the correct direction, as shown in the printer when you . 3.
User Manual
Page 9
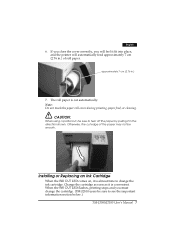
... Otherwise, the cut automatically. Installing or Replacing an Ink Cartridge When the INK OUT LED comes on, it fit into place, and the printer will feel it is cut edge of roll paper. When the INK OUT LED flashes, printing stops and you will automatically feed approximately 7 ...cm {2.76 in .} 7. The roll paper is almost time to see the important information section below.) TM-J2000/J2100 User's Manual 7 If you close the cover correctly, you must change the ink cartridge. English 6. Note: Do not touch the paper roll cover...
... Otherwise, the cut automatically. Installing or Replacing an Ink Cartridge When the INK OUT LED comes on, it fit into place, and the printer will feel it is cut edge of roll paper. When the INK OUT LED flashes, printing stops and you will automatically feed approximately 7 ...cm {2.76 in .} 7. The roll paper is almost time to see the important information section below.) TM-J2000/J2100 User's Manual 7 If you close the cover correctly, you must change the ink cartridge. English 6. Note: Do not touch the paper roll cover...
User Manual
Page 10
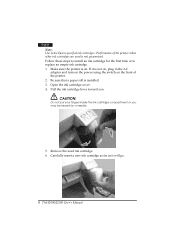
If it will go. 8 TM-J2000/J2100 User's Manual Pull the ink cartridge lever toward you may be injured by a needle. 5. Open ...Carefully insert a new ink cartridge as far as it is on the front of the printer when other ink cartridges are used ink cartridge. 6. Make sure the printer is not on, plug in the AC adapter and turn on the power using the ...switch on . CAUTION: Do not put your fingers inside the ink cartridge compartment or you . English Note: Use Seiko Epson specified ink cartridges....
If it will go. 8 TM-J2000/J2100 User's Manual Pull the ink cartridge lever toward you may be injured by a needle. 5. Open ...Carefully insert a new ink cartridge as far as it is on the front of the printer when other ink cartridges are used ink cartridge. 6. Make sure the printer is not on, plug in the AC adapter and turn on the power using the ...switch on . CAUTION: Do not put your fingers inside the ink cartridge compartment or you . English Note: Use Seiko Epson specified ink cartridges....
User Manual
Page 11
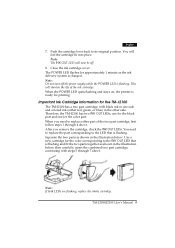
Important Ink Cartridge Information for the black part and one side and colored ink (either part of the ink cartridge. Therefore, the TM-J2100 has two INK OUT LEDs, one for the TM-J2100 The TM-J2100 has a two part cartridge, with steps 5 through 4 above . After you need to replace the part ...: If both LEDs are flashing, replace the whole cartridge. TM-J2000/J2100 User's Manual 9 When the POWER LED quits flashing and stays on, the printer is charged. Close the ink cartridge cover. The POWER LED flashes for the color part. English 7. Push the cartridge lever back to the ...
Important Ink Cartridge Information for the black part and one side and colored ink (either part of the ink cartridge. Therefore, the TM-J2100 has two INK OUT LEDs, one for the TM-J2100 The TM-J2100 has a two part cartridge, with steps 5 through 4 above . After you need to replace the part ...: If both LEDs are flashing, replace the whole cartridge. TM-J2000/J2100 User's Manual 9 When the POWER LED quits flashing and stays on, the printer is charged. Close the ink cartridge cover. The POWER LED flashes for the color part. English 7. Push the cartridge lever back to the ...
User Manual
Page 12
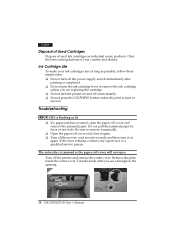
...as long as industrial waste products. Turn the knob until you are replacing the cartridge. ❏ Do not turn the printer on again. Obey the laws and regulations of used ink cartridges as possible, follow these simple rules: ❏ Do... not turn it on and off the printer and remove the cutter cover. Remove the plate inside the cutter cover. Be sure to remove it manually. ❏...ink cartridge lever or remove the ink cartridge unless you see a triangle in the opening. 10 TM-J2000/J2100 User's Manual
...as long as industrial waste products. Turn the knob until you are replacing the cartridge. ❏ Do not turn the printer on again. Obey the laws and regulations of used ink cartridges as possible, follow these simple rules: ❏ Do... not turn it on and off the printer and remove the cutter cover. Remove the plate inside the cutter cover. Be sure to remove it manually. ❏...ink cartridge lever or remove the ink cartridge unless you see a triangle in the opening. 10 TM-J2000/J2100 User's Manual
User Manual
Page 13
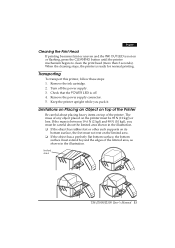
...the bottom surface must be careful about placing heavy items on or flashing, press the CLEANING button until the printer mechanism begins to clean the print head (more than 3 seconds). limited area TM-J2000/J2100 User's Manual 11 Check that the POWER LED is between 19.6 N (2 kgf) and 98 N (10... kgf), you pack it. Keep the printer upright while you must be 98 N (10 kgf) or less. Transporting To transport this printer, follow these steps: 1. Remove the...
...the bottom surface must be careful about placing heavy items on or flashing, press the CLEANING button until the printer mechanism begins to clean the print head (more than 3 seconds). limited area TM-J2000/J2100 User's Manual 11 Check that the POWER LED is between 19.6 N (2 kgf) and 98 N (10... kgf), you pack it. Keep the printer upright while you must be 98 N (10 kgf) or less. Transporting To transport this printer, follow these steps: 1. Remove the...
User Manual
Page 14
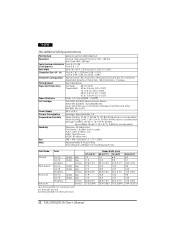
...± 0.02"} 69.5 ± 0.5 mm {2.7 ± 0.02"} 57.5 ± 0.5 mm {2.3 ± 0.02"} 0.06 ~ 0.11 mm {0.0024 ~ 0.0043"} TM-J2000: SJIC5(K) (Monochrome: Black) TM-J2100: SJIC3(K) + SJIC4(R)/(B)/(G) Note: TM-J2100 uses a combined cartridge of SJIC3(K) and either SJIC4(R), (B), or (G). 24 V ± 2.4 V Average: Approximately 1 A When Printing: 10-35 °C {50-95 °F} ... 43.2 {1.7"} 10.8 10.2 15.5 14.7 45.8 {1.8"} 43.2 {1.7"} 15.9 {0.63"} 15.0 {0.59"} 82.5 {3.3"} 6.2 9.1 26.3 {1.0"} 9.8 14.2 41.6 {1.6"} 9.8 14.2 41.6 {1.6"} 14.4 {0.57"} 12 TM-J2000/J2100 User's Manual
...± 0.02"} 69.5 ± 0.5 mm {2.7 ± 0.02"} 57.5 ± 0.5 mm {2.3 ± 0.02"} 0.06 ~ 0.11 mm {0.0024 ~ 0.0043"} TM-J2000: SJIC5(K) (Monochrome: Black) TM-J2100: SJIC3(K) + SJIC4(R)/(B)/(G) Note: TM-J2100 uses a combined cartridge of SJIC3(K) and either SJIC4(R), (B), or (G). 24 V ± 2.4 V Average: Approximately 1 A When Printing: 10-35 °C {50-95 °F} ... 43.2 {1.7"} 10.8 10.2 15.5 14.7 45.8 {1.8"} 43.2 {1.7"} 15.9 {0.63"} 15.0 {0.59"} 82.5 {3.3"} 6.2 9.1 26.3 {1.0"} 9.8 14.2 41.6 {1.6"} 9.8 14.2 41.6 {1.6"} 14.4 {0.57"} 12 TM-J2000/J2100 User's Manual
