Start Here - Installation Guide
Page 4
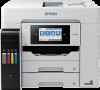
.../ET-5880 replacement inks Color Black Cyan Magenta Yellow Ultra high-capacity T542 T542 T542 T542 Any questions? Please go to find my product after connecting it with Epson specialty and plain papers, engineered specifically for proper disposal. There are any and all rights in the U.S. Then clean the print head, if necessary. User's Guide Windows: Click the icon on and touch the LCD screen to download drivers...
.../ET-5880 replacement inks Color Black Cyan Magenta Yellow Ultra high-capacity T542 T542 T542 T542 Any questions? Please go to find my product after connecting it with Epson specialty and plain papers, engineered specifically for proper disposal. There are any and all rights in the U.S. Then clean the print head, if necessary. User's Guide Windows: Click the icon on and touch the LCD screen to download drivers...
Users Guide
Page 4
...Setup...50 Selecting Wireless Network Settings from the Control Panel 51 Wi-Fi Direct Mode Setup ...53 Enabling Wi-Fi Direct Mode (Simple AP 54 Modifying the Wi-Fi Direct Network Name or Password 55 Wi-Fi Protected Setup (WPS)...58 Using WPS to Connect to a Network 58 Printing a Network Status Sheet...59 Printing a Network Connection Report 60 Network Connection Report Codes and Messages 62 Configuring Email Server Settings...67 Changing or Updating Network Connections 69 Accessing the Web Config Utility 69 Changing a USB Connection to a Wi-Fi Connection 70 Changing a Wi-Fi Connection...
...Setup...50 Selecting Wireless Network Settings from the Control Panel 51 Wi-Fi Direct Mode Setup ...53 Enabling Wi-Fi Direct Mode (Simple AP 54 Modifying the Wi-Fi Direct Network Name or Password 55 Wi-Fi Protected Setup (WPS)...58 Using WPS to Connect to a Network 58 Printing a Network Status Sheet...59 Printing a Network Connection Report 60 Network Connection Report Codes and Messages 62 Configuring Email Server Settings...67 Changing or Updating Network Connections 69 Accessing the Web Config Utility 69 Changing a USB Connection to a Wi-Fi Connection 70 Changing a Wi-Fi Connection...

Users Guide
Page 5
...Epson Papers...92 Paper or Media Type Settings - Windows 115 Double-sided Printing Options - Selecting Printer Language and Interface Settings 79 Printing Language and Interface Options 80 Printing a PCL or PS3 (PostScript) Status Sheet 81 Loading Paper ...83 Loading Paper in the Automatic Document Feeder 101 Copying ...105 Copying Documents or Photos...105 Copying Options...106 Printing from a Computer ...110 Printing with the Standard Epson Printer Software - Windows 111 Paper Source Options - Windows 114 Selecting Double-sided Printing Settings - Windows 110 Selecting Basic Print...
...Epson Papers...92 Paper or Media Type Settings - Windows 115 Double-sided Printing Options - Selecting Printer Language and Interface Settings 79 Printing Language and Interface Options 80 Printing a PCL or PS3 (PostScript) Status Sheet 81 Loading Paper ...83 Loading Paper in the Automatic Document Feeder 101 Copying ...105 Copying Documents or Photos...105 Copying Options...106 Printing from a Computer ...110 Printing with the Standard Epson Printer Software - Windows 111 Paper Source Options - Windows 114 Selecting Double-sided Printing Settings - Windows 110 Selecting Basic Print...
Users Guide
Page 6
...-in Epson Driver - Mac 145 Print Quality Options - Mac 147 Selecting Double-sided Printing Settings - Mac...150 Printing Your Document or Photo - PCL Driver - Windows 127 Printing Your Document or Photo - Windows 129 Locked Setting Options...131 Entering a User ID and Password for Printing 132 Selecting Default Print Settings - Mac 151 Checking Print Status - PCL Driver - Windows 156 Locking Printer Settings - Windows 122 Selecting a Printing Preset - Windows 128 Locking Printer Settings - Mac 149 Printing Preferences - Mac...152 Setting Up Printing...
...-in Epson Driver - Mac 145 Print Quality Options - Mac 147 Selecting Double-sided Printing Settings - Mac...150 Printing Your Document or Photo - PCL Driver - Windows 127 Printing Your Document or Photo - Windows 129 Locked Setting Options...131 Entering a User ID and Password for Printing 132 Selecting Default Print Settings - Mac 151 Checking Print Status - PCL Driver - Windows 156 Locking Printer Settings - Windows 122 Selecting a Printing Preset - Windows 128 Locking Printer Settings - Mac 149 Printing Preferences - Mac...152 Setting Up Printing...

Users Guide
Page 7
...198 Printing a Scan ...200 Selecting Epson ScanSmart Settings 201 Changing the Epson Product...201 Changing the Scan Settings ...202 Changing the File Name Settings 205 7 PostScript Printer Software - PostScript Printer Software - Control Panel 184 Scanning to a Network Folder or FTP Server 185 Starting a Scan Using the Epson Scan 2 Icon 188 Starting a Scan from a Scanning Program 190 Starting a Scan from a Smart Device 192 Entering a User ID and Password for Scanning 192 Scanning a Document in Epson ScanSmart 193 Saving a Scan ...196 Attaching a Scan to Email...197 Sending a Scan...
...198 Printing a Scan ...200 Selecting Epson ScanSmart Settings 201 Changing the Epson Product...201 Changing the Scan Settings ...202 Changing the File Name Settings 205 7 PostScript Printer Software - PostScript Printer Software - Control Panel 184 Scanning to a Network Folder or FTP Server 185 Starting a Scan Using the Epson Scan 2 Icon 188 Starting a Scan from a Scanning Program 190 Starting a Scan from a Smart Device 192 Entering a User ID and Password for Scanning 192 Scanning a Document in Epson ScanSmart 193 Saving a Scan ...196 Attaching a Scan to Email...197 Sending a Scan...

Users Guide
Page 44
... to scan and send a file as Box, DropBox, Evernote, or Google Drive with the email address and password you selected. 4. Note: Make a note of your product to create your account and register your Epson product during Remote Print setup. 6. Enter the email address and optional access key of your Epson product control panel. See the link below. 2. Parent topic: Epson Connect Solutions for your destination list. 6. If you did not already set up an Epson Connect...
... to scan and send a file as Box, DropBox, Evernote, or Google Drive with the email address and password you selected. 4. Note: Make a note of your product to create your account and register your Epson product during Remote Print setup. 6. Enter the email address and optional access key of your Epson product control panel. See the link below. 2. Parent topic: Epson Connect Solutions for your destination list. 6. If you did not already set up an Epson Connect...

Users Guide
Page 45
... the AirPrint page on the screen. From an Android application such as your product. 45 Print from your product. Administrator Android Printing Using the Epson Print Enabler You can wirelessly print your documents, emails, photos, and web pages right from your device to your Android phone or tablet (Android v4.4 or later). Load paper in , if necessary. 4. Parent topic: Product Basics Related topics Wi-Fi or Wired Networking Selecting Default Paper Settings - With a few...
... the AirPrint page on the screen. From an Android application such as your product. 45 Print from your product. Administrator Android Printing Using the Epson Print Enabler You can wirelessly print your documents, emails, photos, and web pages right from your device to your Android phone or tablet (Android v4.4 or later). Load paper in , if necessary. 4. Parent topic: Product Basics Related topics Wi-Fi or Wired Networking Selecting Default Paper Settings - With a few...
Users Guide
Page 51
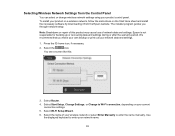
... the name of network data and settings. We recommend that you through network setup. Select Router. 4. Use the displayed keyboard to enter the name manually. The installer program guides you make your own backup or print out your product control panel. Select Start Setup, Change Settings, or Change to Wi-Fi connection, depending on the Start Here sheet and install the necessary software by downloading it from the Control Panel You can select or change wireless network settings using your network data and settings. 1. Epson is not responsible...
... the name of network data and settings. We recommend that you through network setup. Select Router. 4. Use the displayed keyboard to enter the name manually. The installer program guides you make your own backup or print out your product control panel. Select Start Setup, Change Settings, or Change to Wi-Fi connection, depending on the Start Here sheet and install the necessary software by downloading it from the Control Panel You can select or change wireless network settings using your network data and settings. 1. Epson is not responsible...
Users Guide
Page 63
Confirm security key/password. Also make sure your SSID uses only ASCII characters and symbols, or your product cannot display the SSID correctly. • If you are connecting to a smart device that the router/access point is turned on your router or access point. Contact your product software again. 63 Error code and message Solution E-2, E-3, or E-7 Check the following: No wireless network names (SSID) found . Contact your network administrator for assistance...
Confirm security key/password. Also make sure your SSID uses only ASCII characters and symbols, or your product cannot display the SSID correctly. • If you are connecting to a smart device that the router/access point is turned on your router or access point. Contact your product software again. 63 Error code and message Solution E-2, E-3, or E-7 Check the following: No wireless network names (SSID) found . Contact your network administrator for assistance...

Users Guide
Page 78
Later changes in page size or orientation cause changes in the printer. Selects the line feed command when printing with a driver from a specific operating system Makes the paper source select command compatible with HP LaserJet 4 Makes the paper source select command compatible with HP LaserJet 4000, 5000, and 8000 Makes the paper source select command compatible with IBM-US (the default setting). Changes the line spacing (VMI) stored in the Form value...
Later changes in page size or orientation cause changes in the printer. Selects the line feed command when printing with a driver from a specific operating system Makes the paper source select command compatible with HP LaserJet 4 Makes the paper source select command compatible with HP LaserJet 4000, 5000, and 8000 Makes the paper source select command compatible with IBM-US (the default setting). Changes the line spacing (VMI) stored in the Form value...

Users Guide
Page 97
... Settings Options Parent topic: Selecting Default Paper Settings - If you are finished, press the home button to return to the Home screen. When you cannot access these settings, contact your print jobs. Paper Source Available settings Settings option Paper Setting Various Rear Paper Feed On Priority Off A4/Letter Auto On Switching Off Auto Select Settings Copy Fax Other Error Notice Paper Size Notice Paper Type Notice Description Select the paper size and type for each paper source Select On to give printing priority to paper loaded...
... Settings Options Parent topic: Selecting Default Paper Settings - If you are finished, press the home button to return to the Home screen. When you cannot access these settings, contact your print jobs. Paper Source Available settings Settings option Paper Setting Various Rear Paper Feed On Priority Off A4/Letter Auto On Switching Off Auto Select Settings Copy Fax Other Error Notice Paper Size Notice Paper Type Notice Description Select the paper size and type for each paper source Select On to give printing priority to paper loaded...
Users Guide
Page 153
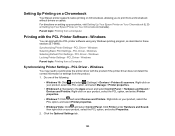
... Driver - Windows Locking Printer Settings - PCL Driver - Right-click on your product, select the PCL option, and select Printer properties. • Windows Vista: Click and select Control Panel. Setting Up Printing on a Chromebook Your Epson printer supports native printing on Chromebook, allowing you to print from a Computer Printing with the PCL Printer Software - Parent topic: Printing from a Chromebook without drivers or cables. Windows You can print with the PCL printer software using any Windows printing program, as described in these sections (ET-5880...
... Driver - Windows Locking Printer Settings - PCL Driver - Right-click on your product, select the PCL option, and select Printer properties. • Windows Vista: Click and select Control Panel. Setting Up Printing on a Chromebook Your Epson printer supports native printing on Chromebook, allowing you to print from a Computer Printing with the PCL Printer Software - Parent topic: Printing from a Chromebook without drivers or cables. Windows You can print with the PCL printer software using any Windows printing program, as described in these sections (ET-5880...

Users Guide
Page 156
... - Windows Double-sided Printing Options - Windows Custom Color Correction Options - Windows When you change the print settings you use in all your document or photo, select the More Options tab and select the printing options you loaded as the Paper Type setting. Note: If you loaded as the Document Size setting. 5. Select the orientation of additional layout and printing options for details. 8. Windows Print Quality Options - Windows Selecting Default Print Settings - Select the size of paper you are printing in a program, the changes apply only while you can select new...
... - Windows Double-sided Printing Options - Windows Custom Color Correction Options - Windows When you change the print settings you use in all your document or photo, select the More Options tab and select the printing options you loaded as the Paper Type setting. Note: If you loaded as the Document Size setting. 5. Select the orientation of additional layout and printing options for details. 8. Windows Print Quality Options - Windows Selecting Default Print Settings - Select the size of paper you are printing in a program, the changes apply only while you can select new...

Users Guide
Page 231
... original size on a network or an email address. Select the arrow icon to save, forward, or print received faxes. Sets up a password for the inbox Email Subject to Specifies a subject when forwarding a fax to an email Forward address Options On Off Delete Print Data After Split Overlap When Split On Off Description Select to reduce the size of large received faxes to a shared folder on multiple sheets, if necessary. Email Notifications Sends an email notification after a fax is...
... original size on a network or an email address. Select the arrow icon to save, forward, or print received faxes. Sets up a password for the inbox Email Subject to Specifies a subject when forwarding a fax to an email Forward address Options On Off Delete Print Data After Split Overlap When Split On Off Description Select to reduce the size of large received faxes to a shared folder on multiple sheets, if necessary. Email Notifications Sends an email notification after a fax is...

Users Guide
Page 284
... ink that do not require ink, such as scanning. However, you see a message on the LCD screen, follow the on-screen instructions to strong shocks. • If you cannot print or clean the print head until it is replaced. When you can perform operations that gets collected during printing; 8. otherwise, ink may leak. • Do not touch the green chip on the side of the maintenance...
... ink that do not require ink, such as scanning. However, you see a message on the LCD screen, follow the on-screen instructions to strong shocks. • If you cannot print or clean the print head until it is replaced. When you can perform operations that gets collected during printing; 8. otherwise, ink may leak. • Do not touch the green chip on the side of the maintenance...
Users Guide
Page 312
... contact Epson support. Turn off . Change the Paper Setup Auto Display setting to Control Panel > Hardware and Sound > Devices and Printers. On a Windows computer, go to On. Select the USBXXX setting for a USB connection or EpsonNet Print Port for more secure. No dial tone detected. If you connected the product to a PBX (Private Branch Exchange) phone line or Terminal Adapter, change the Line Type setting to PBX. Check that the printer driver is turned off the product and contact Epson for details. Make...
... contact Epson support. Turn off . Change the Paper Setup Auto Display setting to Control Panel > Hardware and Sound > Devices and Printers. On a Windows computer, go to On. Select the USBXXX setting for a USB connection or EpsonNet Print Port for more secure. No dial tone detected. If you connected the product to a PBX (Private Branch Exchange) phone line or Terminal Adapter, change the Line Type setting to PBX. Check that the printer driver is turned off the product and contact Epson for details. Make...
Users Guide
Page 316
... turn off again using the power button. If it back on and check to cancel the operation.) Parent topic: Solving Problems Solving Setup Problems Check these sections if you fill the tanks with ink, check these solutions: • If you cannot turn on your product, make sure the power cord is still in progress. Select Yes to reset the selected settings. (Select No if you want to see a confirmation screen...
... turn off again using the power button. If it back on and check to cancel the operation.) Parent topic: Solving Problems Solving Setup Problems Check these sections if you fill the tanks with ink, check these solutions: • If you cannot turn on your product, make sure the power cord is still in progress. Select Yes to reset the selected settings. (Select No if you want to see a confirmation screen...
Users Guide
Page 317
... Solving Network Problems Check these solutions: • Make sure your product is turned on and any error message or your software does not install correctly in the printer properties. • If you see any necessary cables are printing over a network, make your own backup or print out your fax and network data and settings. Note: Breakdown or repair of fax and network data and settings. We recommend that you have problems setting up or using your system administrator...
... Solving Network Problems Check these solutions: • Make sure your product is turned on and any error message or your software does not install correctly in the printer properties. • If you see any necessary cables are printing over a network, make your own backup or print out your fax and network data and settings. Note: Breakdown or repair of fax and network data and settings. We recommend that you have problems setting up or using your system administrator...

Users Guide
Page 329
... software: • Make sure the paper type setting matches the type of paper you loaded. • Turn on your operating system. Printing is Slow If printing becomes slow, try printing again. • If you are printing a high- Select Options & Supplies, select Options (or Driver), and enable the Bidirectional printing setting. 329 If you are not using Windows 7, close the Devices and Printers window before you print. • On a Mac, make sure you download and install the Epson printer driver. • Make sure Quiet Mode is connected...
... software: • Make sure the paper type setting matches the type of paper you loaded. • Turn on your operating system. Printing is Slow If printing becomes slow, try printing again. • If you are printing a high- Select Options & Supplies, select Options (or Driver), and enable the Bidirectional printing setting. 329 If you are not using Windows 7, close the Devices and Printers window before you print. • On a Mac, make sure you download and install the Epson printer driver. • Make sure Quiet Mode is connected...
Users Guide
Page 341
... not running in a power-saving mode, such as your scanning program. • Make sure your system and restart Epson Scan 2. • Check the connection setting and test the connection using Epson Scan 2 Utility: Windows 10: Click and select EPSON > Epson Scan 2 Utility. Make sure the correct product is selected. If necessary, select the Other tab and click Reset. Make sure the correct product is enabled, a user ID and password are closed. • Make sure Epson Scan 2 is selected as...
... not running in a power-saving mode, such as your scanning program. • Make sure your system and restart Epson Scan 2. • Check the connection setting and test the connection using Epson Scan 2 Utility: Windows 10: Click and select EPSON > Epson Scan 2 Utility. Make sure the correct product is selected. If necessary, select the Other tab and click Reset. Make sure the correct product is enabled, a user ID and password are closed. • Make sure Epson Scan 2 is selected as...


