
Start Here - Installation Guide
Page 1
... • Your product includes 4 Initial ink bottles that are ready to maintain reliability. 1 Remove all protective materials from the product. 2 Unpack the black Initial ink bottle. 3 Snap the bottle tip off . Caution: Be sure to its holder. ET-16500 Start Here Read these instructions before using your... la Guía de instalación en www.epson.com/support/et16500sp (requiere una conexión a Internet). 1 Unpack 2 Fill ink tanks Note: This product requires careful handling of children and do not drink the ink. 1 Open the ink tank unit cover, then remove the cap for proper...
... • Your product includes 4 Initial ink bottles that are ready to maintain reliability. 1 Remove all protective materials from the product. 2 Unpack the black Initial ink bottle. 3 Snap the bottle tip off . Caution: Be sure to its holder. ET-16500 Start Here Read these instructions before using your... la Guía de instalación en www.epson.com/support/et16500sp (requiere una conexión a Internet). 1 Unpack 2 Fill ink tanks Note: This product requires careful handling of children and do not drink the ink. 1 Open the ink tank unit cover, then remove the cap for proper...

Start Here - Installation Guide
Page 2
... 2 Lift and remove the paper cassette cover from the end of the Start buttons to start charging the ink. For more information, see the setup manual appears on the product. Ink charging takes approximately 20 minutes. Caution: Do not turn off the product, raise the scanner unit, or ... cover aside. Note: Make sure the paper is complete when the power light stops flashing. 7 Repeat the previous steps for the other three Initial ink bottles. LTR 4 Insert paper with the glossy or printable side down. Note: • You can change these settings later using . Select your computer...
... 2 Lift and remove the paper cassette cover from the end of the Start buttons to start charging the ink. For more information, see the setup manual appears on the product. Ink charging takes approximately 20 minutes. Caution: Do not turn off the product, raise the scanner unit, or ... cover aside. Note: Make sure the paper is complete when the power light stops flashing. 7 Repeat the previous steps for the other three Initial ink bottles. LTR 4 Insert paper with the glossy or printable side down. Note: • You can change these settings later using . Select your computer...

Start Here - Installation Guide
Page 4
..., and iPod touch are clogged. Make sure your products for more information. ET-16500 refill inks Color Black Cyan Magenta Yellow Code 774 664 664 664 Any questions? Toll or long distance charges may be trademarks of life hardware and ink bottles. Epson disclaims any button to wake it again. • The printer can only...
..., and iPod touch are clogged. Make sure your products for more information. ET-16500 refill inks Color Black Cyan Magenta Yellow Code 774 664 664 664 Any questions? Toll or long distance charges may be trademarks of life hardware and ink bottles. Epson disclaims any button to wake it again. • The printer can only...

Users Guide
Page 3
... Timer Settings 32 Changing the Power Off Timer Settings 33 Epson Connect Solutions for Smartphones, Tablets, and More 34 Using Epson Email Print ...35 Using the Epson iPrint Mobile App 35 Using Epson Remote Print ...36 Using Epson Scan to Cloud...36 Using Google Cloud Print ...37 Setting... Brightness...25 Turning Off Operation Time Out ...26 Product Parts Locations ...27 Product Parts - Inside ...30 Product Parts - Contents ET-16500 User's Guide...13 Your Ink Tank System ...14 Product Basics ...15 Using the Control Panel ...15 Control Panel Buttons and Lights 16 Status Icons ...17 Status...
... Timer Settings 32 Changing the Power Off Timer Settings 33 Epson Connect Solutions for Smartphones, Tablets, and More 34 Using Epson Email Print ...35 Using the Epson iPrint Mobile App 35 Using Epson Remote Print ...36 Using Epson Scan to Cloud...36 Using Google Cloud Print ...37 Setting... Brightness...25 Turning Off Operation Time Out ...26 Product Parts Locations ...27 Product Parts - Inside ...30 Product Parts - Contents ET-16500 User's Guide...13 Your Ink Tank System ...14 Product Basics ...15 Using the Control Panel ...15 Control Panel Buttons and Lights 16 Status Icons ...17 Status...

Users Guide
Page 8
... Charging a USB Device Using Your Product 207 Refilling Ink ...209 Ink Safety Precautions ...209 Check Ink Levels ...210 Checking Ink Levels on Your Product 211 Checking Ink Levels with Windows 211 Checking Ink Levels with OS X...213 Disabling Special Offers with Windows 214 Purchase Epson Ink and Maintenance Box 216 Ink Bottle and Maintenance Box Part Numbers 216 Refilling...
... Charging a USB Device Using Your Product 207 Refilling Ink ...209 Ink Safety Precautions ...209 Check Ink Levels ...210 Checking Ink Levels on Your Product 211 Checking Ink Levels with Windows 211 Checking Ink Levels with OS X...213 Disabling Special Offers with Windows 214 Purchase Epson Ink and Maintenance Box 216 Ink Bottle and Maintenance Box Part Numbers 216 Refilling...

Users Guide
Page 9
... Menu Error Codes ...247 Running a Product Check ...249 Resetting Control Panel Defaults ...250 Solving Setup Problems ...251 Noise After Filling the Ink ...252 Software Installation Problems ...252 Solving Network Problems ...252 Product Cannot Connect to a Wireless Router or Access Point 253 Network Software Cannot...Problems in the Duplexer (Rear Cover 263 9 Aligning the Print Head Using the Product Control Panel 233 Power Ink Flushing...234 Flushing the Ink Using a Computer Utility 234 Cleaning the Paper Guide ...235 Checking the Number of Sheets...236 Checking the Sheet Counter -
... Menu Error Codes ...247 Running a Product Check ...249 Resetting Control Panel Defaults ...250 Solving Setup Problems ...251 Noise After Filling the Ink ...252 Software Installation Problems ...252 Solving Network Problems ...252 Product Cannot Connect to a Wireless Router or Access Point 253 Network Software Cannot...Problems in the Duplexer (Rear Cover 263 9 Aligning the Print Head Using the Product Control Panel 233 Power Ink Flushing...234 Flushing the Ink Using a Computer Utility 234 Cleaning the Paper Guide ...235 Checking the Number of Sheets...236 Checking the Sheet Counter -

Users Guide
Page 10
... Printout or Printout Has Gaps 280 Grainy Printout...280 Incorrect Colors ...281 Message Appears Prompting You to Reset Ink Levels 283 Solving Scanning Problems ...283 Scanning Software Does Not Operate Correctly 283 Cannot Start Epson Scan 2 ...284 Solving Scanned Image Quality Problems 285 Image Consists of a Few Dots Only 285 Line of...
... Printout or Printout Has Gaps 280 Grainy Printout...280 Incorrect Colors ...281 Message Appears Prompting You to Reset Ink Levels 283 Solving Scanning Problems ...283 Scanning Software Does Not Operate Correctly 283 Cannot Start Epson Scan 2 ...284 Solving Scanned Image Quality Problems 285 Image Consists of a Few Dots Only 285 Line of...

Users Guide
Page 11
... Requirements ...296 OS X System Requirements...297 Scanning Specifications ...297 Automatic Document Feeder (ADF) Specifications 298 Fax Specifications ...298 Paper Specifications ...299 Printable Area Specifications ...301 Ink Specifications ...302 Memory Card Specifications ...302 Dimension Specifications ...303 Electrical Specifications ...304 Environmental Specifications ...304 Interface Specifications ...304 Network Interface Specifications ...305 Safety and Approvals...
... Requirements ...296 OS X System Requirements...297 Scanning Specifications ...297 Automatic Document Feeder (ADF) Specifications 298 Fax Specifications ...298 Paper Specifications ...299 Printable Area Specifications ...301 Ink Specifications ...302 Memory Card Specifications ...302 Dimension Specifications ...303 Electrical Specifications ...304 Environmental Specifications ...304 Interface Specifications ...304 Network Interface Specifications ...305 Safety and Approvals...

Users Guide
Page 14
... expended could damage the product. The product cannot directly measure the ink levels in the product's ink tanks to confirm the actual ink levels. instead it estimates the amount of ink remaining by internally monitoring ink usage. To refill the ink tanks and reset the ink levels, click the link below. 14 Note: The product has a low...
... expended could damage the product. The product cannot directly measure the ink levels in the product's ink tanks to confirm the actual ink levels. instead it estimates the amount of ink remaining by internally monitoring ink usage. To refill the ink tanks and reset the ink levels, click the link below. 14 Note: The product has a low...
Users Guide
Page 74
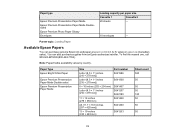
... Glossy Envelopes Loading capacity per paper size Cassette 1 Cassette 2 20 sheets - 10 envelopes - You can purchase genuine Epson ink and paper at epson.com/ink3 (U.S. Paper Type Epson Bright White Paper Epson Premium Presentation Paper Matte Double-sided Epson Premium Presentation Paper Matte Size Letter (8.5 × 11 inches [216 × 279 mm]) Letter (8.5 × 11 inches...
... Glossy Envelopes Loading capacity per paper size Cassette 1 Cassette 2 20 sheets - 10 envelopes - You can purchase genuine Epson ink and paper at epson.com/ink3 (U.S. Paper Type Epson Bright White Paper Epson Premium Presentation Paper Matte Double-sided Epson Premium Presentation Paper Matte Size Letter (8.5 × 11 inches [216 × 279 mm]) Letter (8.5 × 11 inches...

Users Guide
Page 100
... print double-sided pages as a booklet. Create Folded Booklet Options Select the Booklet checkbox and a binding option to prevent ink smearing. Increase Ink Drying Time Sets the amount of time required for drying ink after printing on one side of your double-sided print job. Parent topic: Selecting Double-sided Printing Settings - Windows... the print quality of the paper before printing the other side in the desired direction. Windows Print Density Adjustments - Print Density Sets the level of ink coverage for binding.
... print double-sided pages as a booklet. Create Folded Booklet Options Select the Booklet checkbox and a binding option to prevent ink smearing. Increase Ink Drying Time Sets the amount of time required for drying ink after printing on one side of your double-sided print job. Parent topic: Selecting Double-sided Printing Settings - Windows... the print quality of the paper before printing the other side in the desired direction. Windows Print Density Adjustments - Print Density Sets the level of ink coverage for binding.

Users Guide
Page 109
... these settings on the Extended Settings window. may reduce print speed. You see this window: 5. Enable EPSON Status Monitor 3 Enables product monitoring for ink and paper supplies and other thick paper. Windows You can select from smearing when you print on envelopes or other thick paper,... and the Thick Paper setting does not help. 109 Extended Settings - Thick Paper and Envelopes Prevents ink from smearing when you print on envelopes or other issues. Select any of the paper if the paper size setting is incorrect; Windows ...
... these settings on the Extended Settings window. may reduce print speed. You see this window: 5. Enable EPSON Status Monitor 3 Enables product monitoring for ink and paper supplies and other thick paper. Windows You can select from smearing when you print on envelopes or other thick paper,... and the Thick Paper setting does not help. 109 Extended Settings - Thick Paper and Envelopes Prevents ink from smearing when you print on envelopes or other issues. Select any of the paper if the paper size setting is incorrect; Windows ...

Users Guide
Page 123
... X Double-sided Printing Options and Adjustments - Short-Edge binding Orients double-sided printed pages to be bound on the long edge of ink coverage for drying ink after printing on the short edge of the available options in the Two-sided Printing Settings or Output Settings pop-up your printer software... be bound on one of the paper before printing the other side in the print window. 2. Related tasks Selecting Basic Print Settings - Increased Ink Drying Time Sets the amount of time required for double-sided printing. Parent topic: Selecting Double-sided Printing Settings -
... X Double-sided Printing Options and Adjustments - Short-Edge binding Orients double-sided printed pages to be bound on the long edge of ink coverage for drying ink after printing on the short edge of the available options in the Two-sided Printing Settings or Output Settings pop-up your printer software... be bound on one of the paper before printing the other side in the print window. 2. Related tasks Selecting Basic Print Settings - Increased Ink Drying Time Sets the amount of time required for double-sided printing. Parent topic: Selecting Double-sided Printing Settings -
Users Guide
Page 126
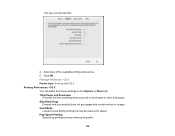
... X Printing Preferences - Quiet Mode Lessens noise during printing but may decrease print speed. Select any of the available printing preferences. 5. Thick Paper and Envelopes Prevents ink from these settings on envelopes or other thick paper. Printing Preferences - OS X You can select from smearing when you print on the Options or Driver...
... X Printing Preferences - Quiet Mode Lessens noise during printing but may decrease print speed. Select any of the available printing preferences. 5. Thick Paper and Envelopes Prevents ink from these settings on envelopes or other thick paper. Printing Preferences - OS X You can select from smearing when you print on the Options or Driver...

Users Guide
Page 209
... ink levels. Ink Safety Precautions Check Ink Levels Purchase Epson Ink and Maintenance Box Refilling the Ink Tanks Replacing the Maintenance Box Ink Safety Precautions Note: The product has a low ink alert system. The accuracy of ink remaining by internally monitoring ink usage. Visually check the ink levels in the tanks; If ink gets into your eyes, flush them immediately with other Epson ink...
... ink levels. Ink Safety Precautions Check Ink Levels Purchase Epson Ink and Maintenance Box Refilling the Ink Tanks Replacing the Maintenance Box Ink Safety Precautions Note: The product has a low ink alert system. The accuracy of ink remaining by internally monitoring ink usage. Visually check the ink levels in the tanks; If ink gets into your eyes, flush them immediately with other Epson ink...

Users Guide
Page 210
... or expended. • The use of the product when the ink is expended could damage the product. • Epson recommends filling an ink tank to the upper line before resetting the ink level. • For optimum printing results, refill the ink tanks to fill an ink tank. Ink may cause erratic product behavior. • This product requires...
... or expended. • The use of the product when the ink is expended could damage the product. • Epson recommends filling an ink tank to the upper line before resetting the ink level. • For optimum printing results, refill the ink tanks to fill an ink tank. Ink may cause erratic product behavior. • This product requires...

Users Guide
Page 211
... the Windows taskbar. 211 Note: The product has a low ink alert system. Parent topic: Check Ink Levels Related tasks Refilling the Ink Tanks Checking Ink Levels with Windows Parent topic: Refilling Ink Checking Ink Levels on Your Product To confirm the actual ink levels, visually check the ink levels in the tanks; Disabling Special Offers with Windows A low...
... the Windows taskbar. 211 Note: The product has a low ink alert system. Parent topic: Check Ink Levels Related tasks Refilling the Ink Tanks Checking Ink Levels with Windows Parent topic: Refilling Ink Checking Ink Levels on Your Product To confirm the actual ink levels, visually check the ink levels in the tanks; Disabling Special Offers with Windows A low...

Users Guide
Page 212
To confirm the actual remaining ink, visually check the ink levels in the ink tanks. Continued use of the product when the ink is expended could damage the product. 212 You see a window like this: 2. Note: The ink levels displayed are an estimate and may differ from the actual ink remaining in the ink tanks. Refill any ink tank as needed.
To confirm the actual remaining ink, visually check the ink levels in the ink tanks. Continued use of the product when the ink is expended could damage the product. 212 You see a window like this: 2. Note: The ink levels displayed are an estimate and may differ from the actual ink remaining in the ink tanks. Refill any ink tank as needed.

Users Guide
Page 213
Select EPSON Status Monitor. Select Utility and select Open Printer Utility. 2. You see a window like this: 213 In the Apple menu or the Dock, select System Preferences. Parent topic: Check Ink Levels Related tasks Refilling the Ink Tanks Checking Ink Levels with OS X You can check your ink levels using a utility on your product, and select Options & Supplies. Select Print & Fax, Print & Scan, or Printers & Scanners, select your Mac. 1.
Select EPSON Status Monitor. Select Utility and select Open Printer Utility. 2. You see a window like this: 213 In the Apple menu or the Dock, select System Preferences. Parent topic: Check Ink Levels Related tasks Refilling the Ink Tanks Checking Ink Levels with OS X You can check your ink levels using a utility on your product, and select Options & Supplies. Select Print & Fax, Print & Scan, or Printers & Scanners, select your Mac. 1.

Users Guide
Page 214
... are an estimate and may differ from Epson using a utility on your Windows computer. 1. Parent topic: Check Ink Levels Related tasks Refilling the Ink Tanks Disabling Special Offers with Windows You can disable special offers messages from the actual ink remaining in the Windows taskbar and select Monitoring... Preferences. 214 Right-click the product icon in the ink tanks. Continued use of the product when the ink is expended could damage the product. Note: To ...
... are an estimate and may differ from Epson using a utility on your Windows computer. 1. Parent topic: Check Ink Levels Related tasks Refilling the Ink Tanks Disabling Special Offers with Windows You can disable special offers messages from the actual ink remaining in the Windows taskbar and select Monitoring... Preferences. 214 Right-click the product icon in the ink tanks. Continued use of the product when the ink is expended could damage the product. Note: To ...


