
Product Information Guide
Page 3
... on the setting of your images, it is aligned as closely as possible with the top of the zoom ring. 8/99 EPSON PowerLite 5350/7250/7350 Projector - 3 To determine the exact distance required for three installations: Image size (diagonal) 300 inches* (762 cm) 200 inches... (4.1 m) 217.1 inches (5.5 m) * For an image size of 300 inches, the projector may be up to the screen. EPSON PowerLite 5350/7250/7350 Projector Computer 1 and 2 and Computer Out Connector Pin Assignments The Computer 1 and 2 and Computer Out connectors are : Input pin 1 2 3 4 5 6 7 8 9 10 11 12 13 14 15 Computer...
... on the setting of your images, it is aligned as closely as possible with the top of the zoom ring. 8/99 EPSON PowerLite 5350/7250/7350 Projector - 3 To determine the exact distance required for three installations: Image size (diagonal) 300 inches* (762 cm) 200 inches... (4.1 m) 217.1 inches (5.5 m) * For an image size of 300 inches, the projector may be up to the screen. EPSON PowerLite 5350/7250/7350 Projector Computer 1 and 2 and Computer Out Connector Pin Assignments The Computer 1 and 2 and Computer Out connectors are : Input pin 1 2 3 4 5 6 7 8 9 10 11 12 13 14 15 Computer...

Product Information Guide
Page 6
... Switches between Computer 1 and Computer 2. (When the Computer 2/BNC switch on the remote control for VGA, XGA, SVGA, and SXGA input. Video Switches to the Video image. Menu Displays or hides the menu. Pressing Esc while viewing a menu or the online help menu.... Effects can be assigned the next available number, 1 through 5. Help Displays the online help displays the previous screen or menu. EPSON PowerLite 5350/7250/7350 Projector This table summarizes the functions on or off. Pressing Esc while viewing a menu or the online help menu. Enlarges or reduces...
... Switches between Computer 1 and Computer 2. (When the Computer 2/BNC switch on the remote control for VGA, XGA, SVGA, and SXGA input. Video Switches to the Video image. Menu Displays or hides the menu. Pressing Esc while viewing a menu or the online help menu.... Effects can be assigned the next available number, 1 through 5. Help Displays the online help displays the previous screen or menu. EPSON PowerLite 5350/7250/7350 Projector This table summarizes the functions on or off. Pressing Esc while viewing a menu or the online help menu. Enlarges or reduces...

User Manual
Page 9
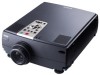
... Your EPSON® PowerLite® projector is a brilliant, lightweight, portable projector that can be easily seen in full color (16,770,000 colors) at an SVGA resolution of 800 × 600 pixels on the PowerLite 7250 and 7350. The projectors support a wide variety of 1024 × 768 pixels on the PowerLite 5350, and an XGA resolution of video inputs...
... Your EPSON® PowerLite® projector is a brilliant, lightweight, portable projector that can be easily seen in full color (16,770,000 colors) at an SVGA resolution of 800 × 600 pixels on the PowerLite 7250 and 7350. The projectors support a wide variety of 1024 × 768 pixels on the PowerLite 5350, and an XGA resolution of video inputs...

User Manual
Page 60
...RCA video jack. Contact your workstation. Your equipment has S-Video if your projector. Connecting to a High-End Workstation The PowerLite 5350, 7250, and 7350 are capable of workstation video output. Those workstations that follow ...the SXGA standard and use the HD15 connector don't need an adapter cable. Note: The projector is the default resolution for most leading workstations, this capability makes these projectors the best portable solution for the display of remapping input...
...RCA video jack. Contact your workstation. Your equipment has S-Video if your projector. Connecting to a High-End Workstation The PowerLite 5350, 7250, and 7350 are capable of workstation video output. Those workstations that follow ...the SXGA standard and use the HD15 connector don't need an adapter cable. Note: The projector is the default resolution for most leading workstations, this capability makes these projectors the best portable solution for the display of remapping input...

User Manual
Page 78
... pressing the Resize button, the projector will pan around areas of image signals input from a computer. PowerLite 7250 and PowerLite 7350: With images less than XGA size (up to 1024 × 768 pixels), you can either display the image in a compressed format. The projector automatically reduces the image size to the projector's maximum resolution. Press the Resize...
... pressing the Resize button, the projector will pan around areas of image signals input from a computer. PowerLite 7250 and PowerLite 7350: With images less than XGA size (up to 1024 × 768 pixels), you can either display the image in a compressed format. The projector automatically reduces the image size to the projector's maximum resolution. Press the Resize...

User Manual
Page 79
...; Automatically set up the computer image ❐ Switch between input images (Computer 1, Computer 2, or Video) ❐ Access the projector menus to perform the following actions: ❐ Turn the power on . Controlling the Projector You can unplug the projector's power cord. In sleep mode, the projector's power status indicator is in sleep mode, you can press...
...; Automatically set up the computer image ❐ Switch between input images (Computer 1, Computer 2, or Video) ❐ Access the projector menus to perform the following actions: ❐ Turn the power on . Controlling the Projector You can unplug the projector's power cord. In sleep mode, the projector's power status indicator is in sleep mode, you can press...

User Manual
Page 84
When the confirmation message displays, choose Yes and press Enter. Adjusts the volume. 76 2 • Using the Projector Optimizes the computer image. Use the Enter button to reposition the Picture in Picture (P in P session. Switches to the Computer2/BNC image...Video Resize Preset - You cannot resize the image if the input resolution matches the output resolution of the projector (SVGA for the PowerLite 5350, or XGA for VGA, XGA, SVGA, and SXGA input. Switches the display dot mode and resize mode for the PowerLite 7250 and 7350). Button Comp1 S-Video Auto P in a subscreen...
When the confirmation message displays, choose Yes and press Enter. Adjusts the volume. 76 2 • Using the Projector Optimizes the computer image. Use the Enter button to reposition the Picture in Picture (P in P session. Switches to the Computer2/BNC image...Video Resize Preset - You cannot resize the image if the input resolution matches the output resolution of the projector (SVGA for the PowerLite 5350, or XGA for VGA, XGA, SVGA, and SXGA input. Switches the display dot mode and resize mode for the PowerLite 7250 and 7350). Button Comp1 S-Video Auto P in a subscreen...

User Manual
Page 86
...back of a menu, if a menu is displayed. 78 2 • Using the Projector Resize Switches the display dot mode and resize mode for the PowerLite 7250 and 7350). Left, right arrows Matches the projector's internal clock to the video image. Esc Stops the current function. Video Switches to ...and video, displaying the black, blue, or user logo background. Allows movement or selection of the projector (SVGA for the PowerLite 5350, or XGA for VGA, XGA, SVGA, and SXGA input. Use these buttons to adjust an image with vertical fuzzy lines, or to S-Video. Up,...
...back of a menu, if a menu is displayed. 78 2 • Using the Projector Resize Switches the display dot mode and resize mode for the PowerLite 7250 and 7350). Left, right arrows Matches the projector's internal clock to the video image. Esc Stops the current function. Video Switches to ...and video, displaying the black, blue, or user logo background. Allows movement or selection of the projector (SVGA for the PowerLite 5350, or XGA for VGA, XGA, SVGA, and SXGA input. Use these buttons to adjust an image with vertical fuzzy lines, or to S-Video. Up,...

User Manual
Page 87
... menu/help screen is displayed optimizes the computer image. Adjusts the volume when used , Computer 2 or BNC. Keystone + - Adjusts a trapezoid distorted image to the desired input source. Selecting a Computer 2 or BNC Video Source 79 Pressing the shift and Keystone buttons at the same time increases or decreases the sound volume. The...
... menu/help screen is displayed optimizes the computer image. Adjusts the volume when used , Computer 2 or BNC. Keystone + - Adjusts a trapezoid distorted image to the desired input source. Selecting a Computer 2 or BNC Video Source 79 Pressing the shift and Keystone buttons at the same time increases or decreases the sound volume. The...
User Manual
Page 92
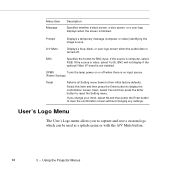
❐ The Setting menu allows you to set or adjust such projector options as the Picture in Picture (P in P) video source, blank screen color, image source message prompt, A/V Mute display option, and BNC input source. ❐ The User's Logo menu lets you capture and store a custom logo which may ...be used as a startup screen or with the A/V Mute option. ❐ The Reset All menu lets you restore the factory defaults for all the projector settings. ❐ The Advanced...
❐ The Setting menu allows you to set or adjust such projector options as the Picture in Picture (P in P) video source, blank screen color, image source message prompt, A/V Mute display option, and BNC input source. ❐ The User's Logo menu lets you capture and store a custom logo which may ...be used as a startup screen or with the A/V Mute option. ❐ The Reset All menu lets you restore the factory defaults for all the projector settings. ❐ The Advanced...

User Manual
Page 97
.... Video Menu (Image Source = Computer) 89 Next, use the Enter button or up to enter the color adjustment mode. Sharpness Adjusts the sharpness of the input source. Preset Allows you finish making adjustments, press the Esc button to return to darken the image. Decrease it to the Video menu. When you...
.... Video Menu (Image Source = Computer) 89 Next, use the Enter button or up to enter the color adjustment mode. Sharpness Adjusts the sharpness of the input source. Preset Allows you finish making adjustments, press the Esc button to return to darken the image. Decrease it to the Video menu. When you...

User Manual
Page 100
... it to display the confirmation screen. Audio Menu Use the Audio menu to clear the confirmation screen without changing any settings. 92 3 • Using the Projector Menus If you change your audio. Treble Adjusts the treble tone of your mind, select No and then press the Enter button to adjust the... all Audio menu items to increase the treble tone; Menu item Description Volume Adjusts the volume level for details. 3D Sound Adjusts the speakers' stereo input.
... it to display the confirmation screen. Audio Menu Use the Audio menu to clear the confirmation screen without changing any settings. 92 3 • Using the Projector Menus If you change your audio. Treble Adjusts the treble tone of your mind, select No and then press the Enter button to adjust the... all Audio menu items to increase the treble tone; Menu item Description Volume Adjusts the volume level for details. 3D Sound Adjusts the speakers' stereo input.
User Manual
Page 102
...you to capture and save a custom logo which can be used as a splash screen or with the A/V Mute button. 94 3 • Using the Projector Menus If the source is video, select YcrCb. Select this item and then press the Enter button to reset the Setting menu. A/V Mute Displays a blue... BNC will not display if the optional Video I/F board is blanked. DPMS Turns the lamp power on or off . BNC Specifies the format for BNC input. Menu item Message Description Specifies whether a black screen, a blue screen, or a user logo displays when the screen is not installed. Prompt Displays a ...
...you to capture and save a custom logo which can be used as a splash screen or with the A/V Mute button. 94 3 • Using the Projector Menus If the source is video, select YcrCb. Select this item and then press the Enter button to reset the Setting menu. A/V Mute Displays a blue... BNC will not display if the optional Video I/F board is blanked. DPMS Turns the lamp power on or off . BNC Specifies the format for BNC input. Menu item Message Description Specifies whether a black screen, a blue screen, or a user logo displays when the screen is not installed. Prompt Displays a ...

User Manual
Page 105
... on the control button or remote control to decrease the color temperature value. Reset All Menu 97 Select Yes to reset all the projector settings to their default values. Color Matching Adjusts the whiteness of the screen. Positive color temperature values provide a cold white; Selecting ...mirroring on this option when projecting from behind onto a transparent screen. Reset All Menu The Reset All menu lets you set additional projector options. Video Signal Specifies the input image signal mode. You can select AUTO, NTSC, NTSC 4.43, NTSC50, PAL, PAL N, PAL M, PAL 60 or SECAM....
... on the control button or remote control to decrease the color temperature value. Reset All Menu 97 Select Yes to reset all the projector settings to their default values. Color Matching Adjusts the whiteness of the screen. Positive color temperature values provide a cold white; Selecting ...mirroring on this option when projecting from behind onto a transparent screen. Reset All Menu The Reset All menu lets you set additional projector options. Video Signal Specifies the input image signal mode. You can select AUTO, NTSC, NTSC 4.43, NTSC50, PAL, PAL N, PAL M, PAL 60 or SECAM....

User Manual
Page 106
... computer connected to clear the confirmation screen without changing any settings. 98 3 • Using the Projector Menus Selecting 1 ↔ 2 tells the projector to automatically switch wireless mouse control whenever the input source computer is mounted upside-down from the ceiling. Select this option on when the... projector is changed. Turn this item and then press the Enter button to their initial factory defaults. Select 2 to ...
... computer connected to clear the confirmation screen without changing any settings. 98 3 • Using the Projector Menus Selecting 1 ↔ 2 tells the projector to automatically switch wireless mouse control whenever the input source computer is mounted upside-down from the ceiling. Select this option on when the... projector is changed. Turn this item and then press the Enter button to their initial factory defaults. Select 2 to ...
User Manual
Page 107
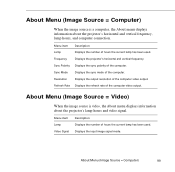
...Displays the sync mode of the computer video output. Refresh Rate Displays the refresh rate of the computer. Video Signal Displays the input image signal mode. Menu item Lamp Description Displays the number of hours the current lamp has been used . Menu item Lamp ..., and computer connection. About Menu (Image Source = Video) When the image source is a computer, the About menu displays information about the projector's lamp hours and video signal. Sync Polarity Displays the sync polarity of the computer video output. Resolution Displays the output resolution of the computer...
...Displays the sync mode of the computer video output. Refresh Rate Displays the refresh rate of the computer. Video Signal Displays the input image signal mode. Menu item Lamp Description Displays the number of hours the current lamp has been used . Menu item Lamp ..., and computer connection. About Menu (Image Source = Video) When the image source is a computer, the About menu displays information about the projector's lamp hours and video signal. Sync Polarity Displays the sync polarity of the computer video output. Resolution Displays the output resolution of the computer...

User Manual
Page 125
Controlling Projector Features You can use the ELP Link IV software to control the following features: ❐ Changing projector settings ❐ Changing the test pattern ❐ Specifying an image gamma ❐ Creating a user logo Using the Quick Change Toolbar To quickly change some basic projector settings, click one of the toolbar buttons described below: Power On, Off A/V Mute Freeze Resize Input Source - Computer Controlling Projector Features 117 Video Input Source -
Controlling Projector Features You can use the ELP Link IV software to control the following features: ❐ Changing projector settings ❐ Changing the test pattern ❐ Specifying an image gamma ❐ Creating a user logo Using the Quick Change Toolbar To quickly change some basic projector settings, click one of the toolbar buttons described below: Power On, Off A/V Mute Freeze Resize Input Source - Computer Controlling Projector Features 117 Video Input Source -

User Manual
Page 127
Brightness Adjusts screen brightness. Position Adjusts the horizontal and vertical screen position. Video Tab (Computer Input) Option Tracking Description Adjusts tracking to the signal received. Contrast Adjusts screen contrast. Color Adjusts the ...to their default values. To save the current session settings, choose the present number from the dropdown list and click OK. Controlling Projector Features 119 Input Resolution Selects the signal format. You can select AUTO, PAL, NTSC, a specific resolution, or a preset setting. Sharpness Adjusts...
Brightness Adjusts screen brightness. Position Adjusts the horizontal and vertical screen position. Video Tab (Computer Input) Option Tracking Description Adjusts tracking to the signal received. Contrast Adjusts screen contrast. Color Adjusts the ...to their default values. To save the current session settings, choose the present number from the dropdown list and click OK. Controlling Projector Features 119 Input Resolution Selects the signal format. You can select AUTO, PAL, NTSC, a specific resolution, or a preset setting. Sharpness Adjusts...
User Manual
Page 128
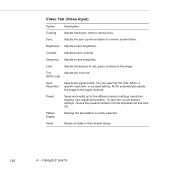
... screen brightness. Sync. You can select AUTO, PAL, NTSC, a specific resolution, or a preset setting. Pattern Display Displays the test pattern currently selected. Video Tab (Video Input) Option Tracking Description Adjusts tracking to their default values. 120 4 • Using ELP Link IV Color Adjusts the balance of red, green, and blue in... sharpness. To save the current session settings, choose the present number from the dropdown list and click OK. Tint Adjusts the color tint. (NTSC only) Input Resolution Selects the signal format.
... screen brightness. Sync. You can select AUTO, PAL, NTSC, a specific resolution, or a preset setting. Pattern Display Displays the test pattern currently selected. Video Tab (Video Input) Option Tracking Description Adjusts tracking to their default values. 120 4 • Using ELP Link IV Color Adjusts the balance of red, green, and blue in... sharpness. To save the current session settings, choose the present number from the dropdown list and click OK. Tint Adjusts the color tint. (NTSC only) Input Resolution Selects the signal format.
User Manual
Page 130
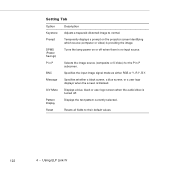
DPMS (Power Savings) Turns the lamp power on the projector screen identifying which source (computer or video) is providing the image. Pattern Display Displays the test pattern currently selected. Setting Tab Option Keystone Description...subscreen. Message Specifies whether a black screen, a blue screen, or a user logo displays when the screen is no input source. Reset Resets all fields to normal. Prompt Temporarily displays a prompt on or off . BNC Specifies the input image signal mode as either RGB or Y, R-Y, B-Y. A/V Mute Displays a blue, black or user logo screen ...
DPMS (Power Savings) Turns the lamp power on the projector screen identifying which source (computer or video) is providing the image. Pattern Display Displays the test pattern currently selected. Setting Tab Option Keystone Description...subscreen. Message Specifies whether a black screen, a blue screen, or a user logo displays when the screen is no input source. Reset Resets all fields to normal. Prompt Temporarily displays a prompt on or off . BNC Specifies the input image signal mode as either RGB or Y, R-Y, B-Y. A/V Mute Displays a blue, black or user logo screen ...


