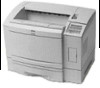
User Manual
Page 5
... Removing the Duplex Unit 4-19 Installing the EPSONScript Module or Memory Modules 4-21 Removing an EPSONScript Module/Memory Modules . . . . 4-25 Chapter 5 Maintenance Replacing the Imaging Cartridge 5-2 Adjusting the RITech Setting 5-5 Cleaning the Printer 5-8 Transporting the Printer 5-11 vi
... Removing the Duplex Unit 4-19 Installing the EPSONScript Module or Memory Modules 4-21 Removing an EPSONScript Module/Memory Modules . . . . 4-25 Chapter 5 Maintenance Replacing the Imaging Cartridge 5-2 Adjusting the RITech Setting 5-5 Cleaning the Printer 5-8 Transporting the Printer 5-11 vi

User Manual
Page 6
... Tray-Letter (C812661 A-12 500 Sheet Lower Paper Cassette-A4 (C812641 A-13 500 Sheet Lower Paper Tray-A4 (C812671 A-13 Duplex Unit (C812681 A-14 Imaging Cartridge (S051035 A-14 Ethernet Interface Connector Card A-15 Index vii
... Tray-Letter (C812661 A-12 500 Sheet Lower Paper Cassette-A4 (C812641 A-13 500 Sheet Lower Paper Tray-A4 (C812671 A-13 Duplex Unit (C812681 A-14 Imaging Cartridge (S051035 A-14 Ethernet Interface Connector Card A-15 Index vii
User Manual
Page 10
If you need information on the EPL-N2000 printer. Chapter 5, "Maintenance," gives instructions for replacing the imaging cartridge and for selecting printer driver settings. Chapter 3, "Using the Control Panel," explains how to use your printer software, see ...it with the Windows printer driver or the printer's control panel. Appendix A, "Specifications," provides technical details on how to configure the EPL-N2000 for your printer, and handle special print jobs. Chapter 6, "Troubleshooting," contains guidelines for solving any print quality or printer operation problems ...
If you need information on the EPL-N2000 printer. Chapter 5, "Maintenance," gives instructions for replacing the imaging cartridge and for selecting printer driver settings. Chapter 3, "Using the Control Panel," explains how to use your printer software, see ...it with the Windows printer driver or the printer's control panel. Appendix A, "Specifications," provides technical details on how to configure the EPL-N2000 for your printer, and handle special print jobs. Chapter 6, "Troubleshooting," contains guidelines for solving any print quality or printer operation problems ...
User Manual
Page 18
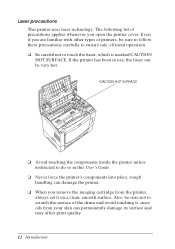
... CAUTION HOT SURFACE. t Be careful not to scratch the surface of precautions applies whenever you open the printer cover. Even if you remove the imaging cartridge from the printer, always set it , since oils from your skin can damage the printer.
... CAUTION HOT SURFACE. t Be careful not to scratch the surface of precautions applies whenever you open the printer cover. Even if you remove the imaging cartridge from the printer, always set it , since oils from your skin can damage the printer.
User Manual
Page 19
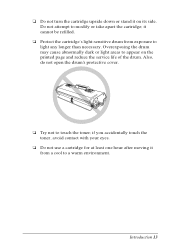
...may cause abnormally dark or light areas to appear on its side. t Protect the cartridge's light-sensitive drum from a cool to light any longer than necessary. if you accidentally...it cannot be refilled. Do not attempt to touch the toner; t Do not use a cartridge for at least one hour after moving it from exposure to a warm environment. t Try not to modify or ...take apart the cartridge; Also, do not open the drum's protective cover. t Do not turn the cartridge upside down or stand it on the printed page and reduce the service...
...may cause abnormally dark or light areas to appear on its side. t Protect the cartridge's light-sensitive drum from a cool to light any longer than necessary. if you accidentally...it cannot be refilled. Do not attempt to touch the toner; t Do not use a cartridge for at least one hour after moving it from exposure to a warm environment. t Try not to modify or ...take apart the cartridge; Also, do not open the drum's protective cover. t Do not turn the cartridge upside down or stand it on the printed page and reduce the service...

User Manual
Page 20
Also, be sure to direct sunlight, dust, salty air, or corrosive gasses (such as ammonia). otherwise, print quality may decline. glass t To get the best print quality, do not store the imaging cartridge in an area subject to keep the cartridge out of the reach of the laser beam; Avoid locations subject to high temperatures or humidity, or abrupt changes in temperature or humidity. t Avoid touching the glass in front of children. 14 Introduction
Also, be sure to direct sunlight, dust, salty air, or corrosive gasses (such as ammonia). otherwise, print quality may decline. glass t To get the best print quality, do not store the imaging cartridge in an area subject to keep the cartridge out of the reach of the laser beam; Avoid locations subject to high temperatures or humidity, or abrupt changes in temperature or humidity. t Avoid touching the glass in front of children. 14 Introduction

User Manual
Page 43
... is best to use the default setting (Auto). Image Optimum reduces graphic quality and data when that data reaches the memory limit. EPL-N2000 driver settings (continued) Page Protect ** Auto ON Sets the printer to use Image Optimum mode so you can print complex, memoryintensive graphics... Printer 2-12 Printing With the Windows Printer Drivers Page Protect reallocates printer memory from receiving data to send your changes and continue. Cartridge Not available Advanced Status Sheet Font Sample Click this button and select a submenu option to print a status sheet or a list of...
... is best to use the default setting (Auto). Image Optimum reduces graphic quality and data when that data reaches the memory limit. EPL-N2000 driver settings (continued) Page Protect ** Auto ON Sets the printer to use Image Optimum mode so you can print complex, memoryintensive graphics... Printer 2-12 Printing With the Windows Printer Drivers Page Protect reallocates printer memory from receiving data to send your changes and continue. Cartridge Not available Advanced Status Sheet Font Sample Click this button and select a submenu option to print a status sheet or a list of...
User Manual
Page 59
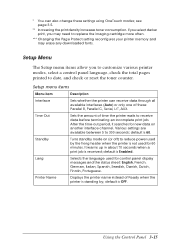
..., Swedish, Danish, Dutch, Finnish, Portuguese. default is OFF. default is Enabled. Using the Control Panel 3-15 Various settings are available between 5 to replace the imaging cartridge more often. *** Changing the Page Protect setting reconfigures your printer memory and may erase any downloaded fonts. Setup menu items Menu item Description Interface Sets...
..., Swedish, Danish, Dutch, Finnish, Portuguese. default is OFF. default is Enabled. Using the Control Panel 3-15 Various settings are available between 5 to replace the imaging cartridge more often. *** Changing the Page Protect setting reconfigures your printer memory and may erase any downloaded fonts. Setup menu items Menu item Description Interface Sets...

User Manual
Page 60
... * Enables or disables bidirectional communication across the interface channel. select this menu item and press the Enter button after installing a new imaging cartridge (see Chapter 5. Parallel B and Parallel C Menus These menus control interface options when you use the Parallel B and/or Parallel C... Description Toner Displays the amount of pages printed by the printer to date. Page Count Displays the total number of toner left in the imaging cartridge as follows: E****F (75 to 100%) E*** F (50 to 75%) E** F (25 to 50%) E* F (0 to their factory defaults. SelecType Init Resets...
... * Enables or disables bidirectional communication across the interface channel. select this menu item and press the Enter button after installing a new imaging cartridge (see Chapter 5. Parallel B and Parallel C Menus These menus control interface options when you use the Parallel B and/or Parallel C... Description Toner Displays the amount of pages printed by the printer to date. Page Count Displays the total number of toner left in the imaging cartridge as follows: E****F (75 to 100%) E*** F (50 to 75%) E** F (25 to 50%) E* F (0 to their factory defaults. SelecType Init Resets...

User Manual
Page 71
... Then install the options by following table lists the available interfaces, their part numbers, and their uses. Interface name LocalTalk/Serial module EPSON part number C823551 32KB Serial interface C823071 card Uses Serial port: for connection to a computer with an RS-232C serial port Installing ...the manuals that you purchased your printer. sales only). If you can purchase optional equipment, imaging cartridges, paper, parts, printed manuals, and accessories for EPSON products from EPSON Accessories at the same time, first set up the printer and run the print test. The following...
... Then install the options by following table lists the available interfaces, their part numbers, and their uses. Interface name LocalTalk/Serial module EPSON part number C823551 32KB Serial interface C823071 card Uses Serial port: for connection to a computer with an RS-232C serial port Installing ...the manuals that you purchased your printer. sales only). If you can purchase optional equipment, imaging cartridges, paper, parts, printed manuals, and accessories for EPSON products from EPSON Accessories at the same time, first set up the printer and run the print test. The following...

User Manual
Page 94
Chapter 5 Maintenance Replacing the Imaging Cartridge 5-2 5 Adjusting the RITech Setting 5-5 Cleaning the Printer 5-8 Transporting the Printer 5-11 Maintenance 5-1
Chapter 5 Maintenance Replacing the Imaging Cartridge 5-2 5 Adjusting the RITech Setting 5-5 Cleaning the Printer 5-8 Transporting the Printer 5-11 Maintenance 5-1
User Manual
Page 95
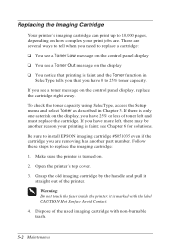
...the Toner function in Chapter 3. Grasp the old imaging cartridge by the handle and pull it is faint; Dispose of toner left , there may be another part number. Be sure to install EPSON imaging cartridge #S051035 even if the cartridge you are several ways to tell when you have 0... to replace the imaging cartridge: 1. Open the printer's top cover. 3. Follow these steps to 25% toner capacity. w...
...the Toner function in Chapter 3. Grasp the old imaging cartridge by the handle and pull it is faint; Dispose of toner left , there may be another part number. Be sure to install EPSON imaging cartridge #S051035 even if the cartridge you are several ways to tell when you have 0... to replace the imaging cartridge: 1. Open the printer's top cover. 3. Follow these steps to 25% toner capacity. w...
User Manual
Page 96
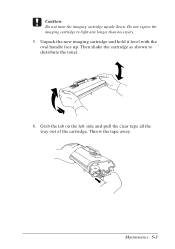
Do not expose the imaging cartridge to distribute the toner. 6. Throw the tape away. Maintenance 5-3 Grab the tab on the left side and pull the clear tape all the way out of the cartridge. c Caution: Do not turn the imaging cartridge upside down. Then shake the cartridge as shown to light any longer than necessary. 5. Unpack the new imaging cartridge and hold it level with the oval handle face up.
Do not expose the imaging cartridge to distribute the toner. 6. Throw the tape away. Maintenance 5-3 Grab the tab on the left side and pull the clear tape all the way out of the cartridge. c Caution: Do not turn the imaging cartridge upside down. Then shake the cartridge as shown to light any longer than necessary. 5. Unpack the new imaging cartridge and hold it level with the oval handle face up.
User Manual
Page 97
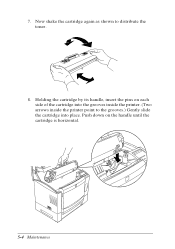
Now shake the cartridge again as shown to the grooves.) Gently slide the cartridge into place. Holding the cartridge by its handle, insert the pins on the handle until the cartridge is horizontal. 5-4 Maintenance 7. Push down on each side of the cartridge into the grooves inside the printer. (Two arrows inside the printer point to distribute the toner. 8.
Now shake the cartridge again as shown to the grooves.) Gently slide the cartridge into place. Holding the cartridge by its handle, insert the pins on the handle until the cartridge is horizontal. 5-4 Maintenance 7. Push down on each side of the cartridge into the grooves inside the printer. (Two arrows inside the printer point to distribute the toner. 8.

User Manual
Page 98
... RITech setting if you notice a change in quality, such as after you see Chapter 3 or the Technical Information manual for instructions. Adjusting the RITech Setting EPSON's new Resolution Improvement Technology (RITech) automatically improves the print quality of the time it doesn't come on, press the On Line button.) Note: Before proceeding... Toner Save Mode is turned off using the printer's control panel. Turn on the printer and let it warm up until you replace the imaging cartridge. Most of your lines, text, and graphics.
... RITech setting if you notice a change in quality, such as after you see Chapter 3 or the Technical Information manual for instructions. Adjusting the RITech Setting EPSON's new Resolution Improvement Technology (RITech) automatically improves the print quality of the time it doesn't come on, press the On Line button.) Note: Before proceeding... Toner Save Mode is turned off using the printer's control panel. Turn on the printer and let it warm up until you replace the imaging cartridge. Most of your lines, text, and graphics.
User Manual
Page 101
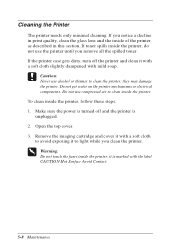
.... If the printer case gets dirty, turn off and the printer is marked with the label CAUTION Hot Surface Avoid Contact. 5-8 Maintenance Remove the imaging cartridge and cover it with mild soap. they may damage the printer. w Warning: Do not touch the fuser inside the printer, follow these steps: 1. If toner...
.... If the printer case gets dirty, turn off and the printer is marked with the label CAUTION Hot Surface Avoid Contact. 5-8 Maintenance Remove the imaging cartridge and cover it with mild soap. they may damage the printer. w Warning: Do not touch the fuser inside the printer, follow these steps: 1. If toner...

User Manual
Page 103
Reload the paper and close the front cover. 5-10 Maintenance Close the top cover and open the front cover. 8. 5. Clean the printer's lens by wiping it from the multi-purpose paper tray. 9. Clean inside the paper feeder with a dry, lint-free cloth. 6. Replace the imaging cartridge. 7. Remove any paper from end to end with a soft dry cloth. 10.
Reload the paper and close the front cover. 5-10 Maintenance Close the top cover and open the front cover. 8. 5. Clean the printer's lens by wiping it from the multi-purpose paper tray. 9. Clean inside the paper feeder with a dry, lint-free cloth. 6. Replace the imaging cartridge. 7. Remove any paper from end to end with a soft dry cloth. 10.
User Manual
Page 104
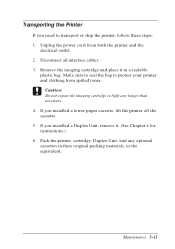
... you need to protect your printer and clothing from both the printer and the electrical outlet. 2. Disconnect all interface cables. 3. Pack the printer, cartridge, Duplex Unit, and any longer than necessary. 4. c Caution: Do not expose the imaging cartridge to light any optional cassettes in a sealable plastic bag. Maintenance 5-11 Remove the imaging...
... you need to protect your printer and clothing from both the printer and the electrical outlet. 2. Disconnect all interface cables. 3. Pack the printer, cartridge, Duplex Unit, and any longer than necessary. 4. c Caution: Do not expose the imaging cartridge to light any optional cassettes in a sealable plastic bag. Maintenance 5-11 Remove the imaging...
User Manual
Page 112
...is in Chapter 5. Wait at least five seconds and then turn off the printer. see "Replacing the Imaging Cartridge" in Chapter 5 for paper in the control panel, if you may send a print job. Toner Out You must replace the ...imaging cartridge, as described in its low power state. Standby The printer is not correct. Then press Continue. Service Req.Cnnn ... Write down the error number and turn off the printer, unplug the power cord, and contact an authorized EPSON Customer Care Center.
...is in Chapter 5. Wait at least five seconds and then turn off the printer. see "Replacing the Imaging Cartridge" in Chapter 5 for paper in the control panel, if you may send a print job. Toner Out You must replace the ...imaging cartridge, as described in its low power state. Standby The printer is not correct. Then press Continue. Service Req.Cnnn ... Write down the error number and turn off the printer, unplug the power cord, and contact an authorized EPSON Customer Care Center.
User Manual
Page 115
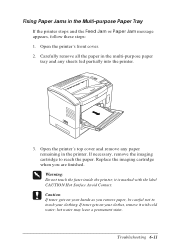
If necessary, remove the imaging cartridge to touch your clothing. w Warning: Do not touch the fuser inside the printer; c Caution: If toner gets on your hands as you are finished. If ...-purpose paper tray and any sheets fed partially into the printer. 3. hot water may leave a permanent stain. Open the printer's front cover. 2. Replace the imaging cartridge when you remove paper, be careful not to reach the paper. Fixing Paper Jams in the Multi-purpose Paper Tray If the printer stops and...
If necessary, remove the imaging cartridge to touch your clothing. w Warning: Do not touch the fuser inside the printer; c Caution: If toner gets on your hands as you are finished. If ...-purpose paper tray and any sheets fed partially into the printer. 3. hot water may leave a permanent stain. Open the printer's front cover. 2. Replace the imaging cartridge when you remove paper, be careful not to reach the paper. Fixing Paper Jams in the Multi-purpose Paper Tray If the printer stops and...

