
Product Information Guide
Page 10
...display and turn off the printer unless you save them with CANCBL MANUAL FEED. [Sj ,;-TR* :jcB',' MOcaE If all of toner. You may send printer commands that you have been turned off line. Data still remains in the specified paper cassette. SERJJ I I... Ieastfivesecundsandthentumitbackon.Iftheerror message stlB appears, turn off the printer, unplug the power cord, and contact a quaBfies service person. Press any remaining data. EPL-8000 [El =.r,,.lcrpT :,lJE.,; .--*1_..- To correct the error, make sure that the printer is on tine. CXXZ'X A controlk error has been...
...display and turn off the printer unless you save them with CANCBL MANUAL FEED. [Sj ,;-TR* :jcB',' MOcaE If all of toner. You may send printer commands that you have been turned off line. Data still remains in the specified paper cassette. SERJJ I I... Ieastfivesecundsandthentumitbackon.Iftheerror message stlB appears, turn off the printer, unplug the power cord, and contact a quaBfies service person. Press any remaining data. EPL-8000 [El =.r,,.lcrpT :,lJE.,; .--*1_..- To correct the error, make sure that the printer is on tine. CXXZ'X A controlk error has been...
Product Support Bulletin(s)
Page 4
...accept 7 or 8 bit word length? What are the product codes of the consumable items? Using letter or A4-size paper with 5% toner coverage of the sheet, the rated life for the Long Life Imaging Cartridge is the rated life of the options and supplies: Part ... Board (Type B) C826051 Adobe PostScript Identity Card 15. Centronics Parallel 2. Listed below are the product codes for the options and supplies for the EPSON "B" Type interfaces. 13. The EPL-8000 has two (2) of 6 12. What is 8,000 pages. A. Q. Through the control panel, in SelecType Level 2, either 7 or 8 ...
...accept 7 or 8 bit word length? What are the product codes of the consumable items? Using letter or A4-size paper with 5% toner coverage of the sheet, the rated life for the Long Life Imaging Cartridge is the rated life of the options and supplies: Part ... Board (Type B) C826051 Adobe PostScript Identity Card 15. Centronics Parallel 2. Listed below are the product codes for the options and supplies for the EPSON "B" Type interfaces. 13. The EPL-8000 has two (2) of 6 12. What is 8,000 pages. A. Q. Through the control panel, in SelecType Level 2, either 7 or 8 ...
Product Support Bulletin(s)
Page 5
... tray and optional equipment? Also, no control panel functions need to activate the switching of 6 16. The EPL-8000 Long Life Cartridge has additional toner which equates into 2000 additional pages. Identity cartridges for HP printers will require more memory. Face-down Exit Tray... (Standard) - 150 sheets 5. It is for Epson identity cards. The printer can receive print jobs from the other interface. Q. The card slots are listed below: 1. Q. paper, are for HP-compatible font cartridges. A. Why does the EPL-8000 have both card slots (A) and (B), and a cartridge...
... tray and optional equipment? Also, no control panel functions need to activate the switching of 6 16. The EPL-8000 Long Life Cartridge has additional toner which equates into 2000 additional pages. Identity cartridges for HP printers will require more memory. Face-down Exit Tray... (Standard) - 150 sheets 5. It is for Epson identity cards. The printer can receive print jobs from the other interface. Q. The card slots are listed below: 1. Q. paper, are for HP-compatible font cartridges. A. Why does the EPL-8000 have both card slots (A) and (B), and a cartridge...
User Manual
Page 13
... of printed output. Two IC card slots for easy maintenance. 2 Introduction introduction Two Epson ESC/P® emulation modes for the compatibility with the range of applications written for Epson 9-pin and 24-pin printers. 1 megabyte (MB) of standard random access memory ...a single disposable imaging cartridge for adding optional identity and font cards, including a PostScript emulation card. A combined photoconductive, developing, and toner unit in interfaces: Centronics® parallel and RS-232C or RS-422 serial. Manual feeding directly selectable from the control panel. Also...
... of printed output. Two IC card slots for easy maintenance. 2 Introduction introduction Two Epson ESC/P® emulation modes for the compatibility with the range of applications written for Epson 9-pin and 24-pin printers. 1 megabyte (MB) of standard random access memory ...a single disposable imaging cartridge for adding optional identity and font cards, including a PostScript emulation card. A combined photoconductive, developing, and toner unit in interfaces: Centronics® parallel and RS-232C or RS-422 serial. Manual feeding directly selectable from the control panel. Also...
User Manual
Page 18
... touching the drum, since oils from your skin can damage it. If there is designed to spill into place. Overexposing the drum may cause toner to be very hot. Laser Printer Precautions 7 Avoid touching the components inside the printer unless instructed to touch the fuser, which is marked by... imaging cartridge out of the printer or by a CAUTION HOT SURFACE label. When you are familiar with a soft cloth or sheet of the toner cartridge. Be careful not to do so in this guide. Avoid exposing the imaging cartridge to light. The following list of printers, be sure...
... touching the drum, since oils from your skin can damage it. If there is designed to spill into place. Overexposing the drum may cause toner to be very hot. Laser Printer Precautions 7 Avoid touching the components inside the printer unless instructed to touch the fuser, which is marked by... imaging cartridge out of the printer or by a CAUTION HOT SURFACE label. When you are familiar with a soft cloth or sheet of the toner cartridge. Be careful not to do so in this guide. Avoid exposing the imaging cartridge to light. The following list of printers, be sure...
User Manual
Page 28
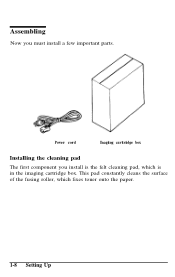
Power cord Imaging cartridge box Installing the cleaning pad The first component you must install a few important parts. Assembling Now you install is in the imaging cartridge box. This pad constantly cleans the surface of the fusing roller, which is the felt cleaning pad, which fixes toner onto the paper. 1-8 Setting Up
Power cord Imaging cartridge box Installing the cleaning pad The first component you must install a few important parts. Assembling Now you install is in the imaging cartridge box. This pad constantly cleans the surface of the fusing roller, which is the felt cleaning pad, which fixes toner onto the paper. 1-8 Setting Up

User Manual
Page 35
Setting Up 1-15 Remove the clear seal completely. Hold the imaging cartridge steady and pull firmly on the yellow tab. Assembling 2. Hold the imaging cartridge upright, as shown below, and shake the cartridge from side to side a few times to distribute the toner. 3.
Setting Up 1-15 Remove the clear seal completely. Hold the imaging cartridge steady and pull firmly on the yellow tab. Assembling 2. Hold the imaging cartridge upright, as shown below, and shake the cartridge from side to side a few times to distribute the toner. 3.

User Manual
Page 54
... the imaging cartridge more often. See "Running a test print," earlier in this chapter. 2-12 Testing and Connecting Your Printer Notes: l Increasing the print density increases toner consumption. Enhancing Print Quality 6.
... the imaging cartridge more often. See "Running a test print," earlier in this chapter. 2-12 Testing and Connecting Your Printer Notes: l Increasing the print density increases toner consumption. Enhancing Print Quality 6.

User Manual
Page 108
... the best original possible. The printer forms an image by the paper. The type of the dots fall into indentations on many tiny dots of toner to make reproductions. You should use , the smoother your paper supply in a humid or damp environment. The printer is rough, the edges of letters become...
... the best original possible. The printer forms an image by the paper. The type of the dots fall into indentations on many tiny dots of toner to make reproductions. You should use , the smoother your paper supply in a humid or damp environment. The printer is rough, the edges of letters become...

User Manual
Page 123
... Replacing the imaging cartridge 5-2 5-3 5-5 5-7 5-8 5-10 Cleaning the Printer Replacing the ozone filter Cleaning inside the printer Cleaning the roller in the paper path Removing spilled toner Cleaning the printer case 5-14 5-14 5-17 5-18 5-20 5-21 Transporting Your Printer 5-22 Packing for transportation 5-22 Unpacking the printer after transportation 5-23 Maintenance...
... Replacing the imaging cartridge 5-2 5-3 5-5 5-7 5-8 5-10 Cleaning the Printer Replacing the ozone filter Cleaning inside the printer Cleaning the roller in the paper path Removing spilled toner Cleaning the printer case 5-14 5-14 5-17 5-18 5-20 5-21 Transporting Your Printer 5-22 Packing for transportation 5-22 Unpacking the printer after transportation 5-23 Maintenance...

User Manual
Page 124
...may print approximately 25 additional pages. Replace the cleaning pad. 5. Replace the imaging cartridge. 5-2 Maintenance and Transportation When the TONER OUT message appears, you must replace the imaging cartridge soon. Replacing Consumable Parts The printer's imaging cartridge can print up to...imaging cartridge. 2. you cannot print additional pages without replacing the imaging cartridge. Clean the glass lens. 4. TONER OUT No toner is left ; You see the TONER OUT message, perform these steps, described in the following messages when your printer starts to 8,000 pages, ...
...may print approximately 25 additional pages. Replace the cleaning pad. 5. Replace the imaging cartridge. 5-2 Maintenance and Transportation When the TONER OUT message appears, you must replace the imaging cartridge soon. Replacing Consumable Parts The printer's imaging cartridge can print up to...imaging cartridge. 2. you cannot print additional pages without replacing the imaging cartridge. Clean the glass lens. 4. TONER OUT No toner is left ; You see the TONER OUT message, perform these steps, described in the following messages when your printer starts to 8,000 pages, ...

User Manual
Page 133
Remove the new imaging cartridge from side to side several times to remove the clear sealing tape. Maintenance and Transportation 5-11 Replacing Consumable Parts 2. Hold the cartridge steady, and pull firmly to distribute the toner evenly. 3. Holding the cartridge in the position shown below, gently shake it from the aluminum bag.
Remove the new imaging cartridge from side to side several times to remove the clear sealing tape. Maintenance and Transportation 5-11 Replacing Consumable Parts 2. Hold the cartridge steady, and pull firmly to distribute the toner evenly. 3. Holding the cartridge in the position shown below, gently shake it from the aluminum bag.

User Manual
Page 134
Push the cartridge in gently as far as shown below to further distribute the toner. 5. Replacing Consumable Parts 4. Now, gently shake the imaging cartridge a few times as it will go. 5-12 Maintenance and Transportation Carefully slide the plastic runners on either side of the imaging cartridge into the green grooves inside the printer.
Push the cartridge in gently as far as shown below to further distribute the toner. 5. Replacing Consumable Parts 4. Now, gently shake the imaging cartridge a few times as it will go. 5-12 Maintenance and Transportation Carefully slide the plastic runners on either side of the imaging cartridge into the green grooves inside the printer.

User Manual
Page 142
...a small vacuum cleaner (available from computer supply stores) to remove it may cause the toner to leave a permanent stain. 5-20 Maintenance and Transportation it . Cleaning the Printer Removing spilled toner If toner spills inside of the printer with a damp cloth. 2. Be sure to touch the transfer... use it on your vacuum cleaner before you spill toner on spilled toner. If a large amount of toner is present, use hot water; l When you remove all the spilled toner. Follow these steps: 1. If only a small amount of toner is present, carefully wipe out the inside the printer...
...a small vacuum cleaner (available from computer supply stores) to remove it may cause the toner to leave a permanent stain. 5-20 Maintenance and Transportation it . Cleaning the Printer Removing spilled toner If toner spills inside of the printer with a damp cloth. 2. Be sure to touch the transfer... use it on your vacuum cleaner before you spill toner on spilled toner. If a large amount of toner is present, use hot water; l When you remove all the spilled toner. Follow these steps: 1. If only a small amount of toner is present, carefully wipe out the inside the printer...
User Manual
Page 144
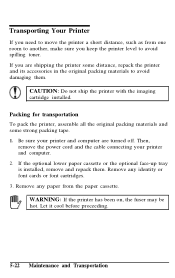
... the printer, assemble all the original packing materials and some distance, repack the printer and its accessories in the original packing materials to avoid spilling toner. Remove any paper from one room to another, make sure you are turned off. If the optional lower paper cassette or the optional face-up...
... the printer, assemble all the original packing materials and some distance, repack the printer and its accessories in the original packing materials to avoid spilling toner. Remove any paper from one room to another, make sure you are turned off. If the optional lower paper cassette or the optional face-up...

User Manual
Page 145
... front covers. 6. After all the components are packed in Chapter 1. 7. Unpack the printer as described in Chapter 1. Then open the printer's top cover to prevent toner spills. 5. CAUTION: Hold the imaging cartridge level as described earlier in Chapter 1. Pack the printer components in the reverse order of the unpacking procedure described... remove it to the lower position and remove the imaging cartridge as you unpack the imaging cartridge, use a clean soft cloth to wipe off any toner that spilled during shipment. 2.
... front covers. 6. After all the components are packed in Chapter 1. 7. Unpack the printer as described in Chapter 1. Then open the printer's top cover to prevent toner spills. 5. CAUTION: Hold the imaging cartridge level as described earlier in Chapter 1. Pack the printer components in the reverse order of the unpacking procedure described... remove it to the lower position and remove the imaging cartridge as you unpack the imaging cartridge, use a clean soft cloth to wipe off any toner that spilled during shipment. 2.

User Manual
Page 154
... correct the paper mismatch, press CONTINUE. [S] WARMING UP Printer is warming up to LT or A4 paper, respectively. [W] TONER LOW The printer is almost out of toner. After you correct the paper mismatch, press CONTINUE. [E] TRAY SET STD XXX The specified paper size does not match the... lower paper cassette. The display indicates the expected paper size and the currently selected cassette. You must replace the imaging cartridge soon. [E] TONER OUT You must replace the imaging cartridge. Status and Error Messages [E] START UP ERROR If this message, you can either change the paper...
... correct the paper mismatch, press CONTINUE. [S] WARMING UP Printer is warming up to LT or A4 paper, respectively. [W] TONER LOW The printer is almost out of toner. After you correct the paper mismatch, press CONTINUE. [E] TRAY SET STD XXX The specified paper size does not match the... lower paper cassette. The display indicates the expected paper size and the currently selected cassette. You must replace the imaging cartridge soon. [E] TONER OUT You must replace the imaging cartridge. Status and Error Messages [E] START UP ERROR If this message, you can either change the paper...

User Manual
Page 157
... you resume normal printing, the first few pages that meets the specifications. When you spill toner on your clothing, rinse it . Note: l Because the toner on the paper inside the printer, do not use hot water or the toner may leave a permanent stain. Do not use the printer until you remove the paper... JAM and PAPER JAM errors. Make sure you detailed instructions for your hands while you remove all of these messages appears on choosing paper. l If toner spills inside the printer may not be fixed on the page, it may be slightly smeared with cold water. When one of the spilled...
... you resume normal printing, the first few pages that meets the specifications. When you spill toner on your clothing, rinse it . Note: l Because the toner on the paper inside the printer, do not use hot water or the toner may leave a permanent stain. Do not use the printer until you remove the paper... JAM and PAPER JAM errors. Make sure you detailed instructions for your hands while you remove all of these messages appears on choosing paper. l If toner spills inside the printer may not be fixed on the page, it may be slightly smeared with cold water. When one of the spilled...

User Manual
Page 169
... ). Check both ends of the cable between the printer and the computer. See Chapter 2. The printer stops printing and the display reads PAPER OUT or TONER OUT.
... ). Check both ends of the cable between the printer and the computer. See Chapter 2. The printer stops printing and the display reads PAPER OUT or TONER OUT.

User Manual
Page 179
... cannot change the PAGE SIZE setting and save it with the PAGE SIZE option may accumulate on , indicating that is smaller than the SelecType setting, toner may not match your printing. l You may be trying to use matches the PAGE SIZE setting. If the FEED light is lost. Next, change the...
... cannot change the PAGE SIZE setting and save it with the PAGE SIZE option may accumulate on , indicating that is smaller than the SelecType setting, toner may not match your printing. l You may be trying to use matches the PAGE SIZE setting. If the FEED light is lost. Next, change the...


