Brochure
Page 2
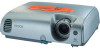
... a bold warning message on password enabled - security warning message The new Epson EMP-82e LCD projector combines enhanced anti-theft security features, a three-year onsite warranty, superb image quality and multimedia capabilities, all at just 30 dB*.... to be entered whenever reconnected to ensure security and prevent unauthorised use, simply keep the password confidential and the remote control in operation. In addition, each time the EMP-82e is equipped with the EMP-82e you see this product Power on the case and it's also supplied with a security pack which mean that ...
... a bold warning message on password enabled - security warning message The new Epson EMP-82e LCD projector combines enhanced anti-theft security features, a three-year onsite warranty, superb image quality and multimedia capabilities, all at just 30 dB*.... to be entered whenever reconnected to ensure security and prevent unauthorised use, simply keep the password confidential and the remote control in operation. In addition, each time the EMP-82e is equipped with the EMP-82e you see this product Power on the case and it's also supplied with a security pack which mean that ...
Brochure
Page 3
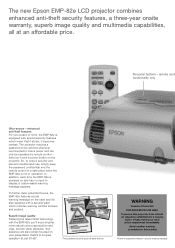
...to ± 30º), images are instantly aligned no delays G Quick start menu saves you time and effort G Convenient, intuitive remote control G Three-year next day on-site warranty for projector and lamp* G Lightweight, portable with our automatic keystone correction. Using the optional... security message rol Multimedia and audio capability The Epson EMP-82e accepts input data up to SXGA and from standard height ceiling mounts when necessary. Exceptional image quality through Epson's 3LCD technology G 'Instant Off' keeps you in control with its enhanced security features, it can be...
...to ± 30º), images are instantly aligned no delays G Quick start menu saves you time and effort G Convenient, intuitive remote control G Three-year next day on-site warranty for projector and lamp* G Lightweight, portable with our automatic keystone correction. Using the optional... security message rol Multimedia and audio capability The Epson EMP-82e accepts input data up to SXGA and from standard height ceiling mounts when necessary. Exceptional image quality through Epson's 3LCD technology G 'Instant Off' keeps you in control with its enhanced security features, it can be...
Brochure
Page 4
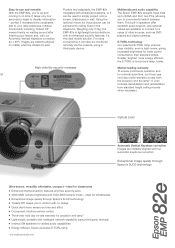
... RCA (Yellow) x 1; Video-RGB: Mini D-sub 15pin Blue-molding (in low brightness mode only (default). Remote Control, Batteries: AAA Alkaline battery x 2, Air Filter, Manuals, User's Guide CD-ROM, Security features information pack, ...Epson EMP-82e Specifications Projection Technology Projection Method RGB Liquid Crystal Shutter Projection System Front / Rear / Ceiling Mount LCD Panels Projection Lens Lamp Screen Size (Projected Distance) Brightness High Brightness Mode Low Brightness Mode (default) Contrast Brightness Uniformity Colour Reproduction Sound Output Function Remote Control...
... RCA (Yellow) x 1; Video-RGB: Mini D-sub 15pin Blue-molding (in low brightness mode only (default). Remote Control, Batteries: AAA Alkaline battery x 2, Air Filter, Manuals, User's Guide CD-ROM, Security features information pack, ...Epson EMP-82e Specifications Projection Technology Projection Method RGB Liquid Crystal Shutter Projection System Front / Rear / Ceiling Mount LCD Panels Projection Lens Lamp Screen Size (Projected Distance) Brightness High Brightness Mode Low Brightness Mode (default) Contrast Brightness Uniformity Colour Reproduction Sound Output Function Remote Control...
User Manual
Page 2
Setup i • Using the remote control i Connecting to Visual Equipment ii Turning on and Projecting iii • No image is projected iii • Adjusting Position and Focus iii • Turning the Projector off iii Projection Procedure This explains the basic operations for preparing the projector before use and for starting projection.
Setup i • Using the remote control i Connecting to Visual Equipment ii Turning on and Projecting iii • No image is projected iii • Adjusting Position and Focus iii • Turning the Projector off iii Projection Procedure This explains the basic operations for preparing the projector before use and for starting projection.
User Manual
Page 3
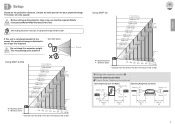
... of the screen. View from above Screen Using EMP-62 Using EMP-X3/82 W : Maximum Zoom T : Minimum Zoom * Distance from the center of the lens to the screen, the projected image is not placed parallel to the base of the screen. ˔ Using the remote control ˔ Insert the batteries provided. Before setting up...
... of the screen. View from above Screen Using EMP-62 Using EMP-X3/82 W : Maximum Zoom T : Minimum Zoom * Distance from the center of the lens to the screen, the projected image is not placed parallel to the base of the screen. ˔ Using the remote control ˔ Insert the batteries provided. Before setting up...
User Manual
Page 5
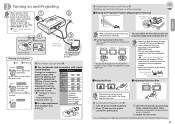
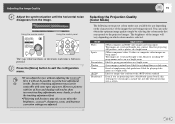
...of tilt. • When the "Auto Keystone" function is turned "Off" in the configuration menu, automatic keystone correction is not performed. (EMP-82/62 only) • You can adjust the front foot to raise the projection angle up to the default setting. • Adjust ...If the image is retracted. Correcting Keystone Distortion You can select them by turning the left rear foot. User's Guide "Extended Menu" Control Panel Remote Control (Accessory Power Cable) Power Indicator Reading the Indicators Lit Flashing Orange Standby Press to a maximum of about 30°*. In this ...
...of tilt. • When the "Auto Keystone" function is turned "Off" in the configuration menu, automatic keystone correction is not performed. (EMP-82/62 only) • You can adjust the front foot to raise the projection angle up to the default setting. • Adjust ...If the image is retracted. Correcting Keystone Distortion You can select them by turning the left rear foot. User's Guide "Extended Menu" Control Panel Remote Control (Accessory Power Cable) Power Indicator Reading the Indicators Lit Flashing Orange Standby Press to a maximum of about 30°*. In this ...
User Manual
Page 6
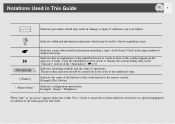
Click on the control panel or the remote control. sp.68 Indicates operating methods and the order of the buttons on the page number to display that an explanation of the underlined word or ...
Click on the control panel or the remote control. sp.68 Indicates operating methods and the order of the buttons on the page number to display that an explanation of the underlined word or ...
User Manual
Page 7
... Focus iii Turning the Projector off iii Projector Features 4 Part Names and Functions 6 Front/Top 6 Control Panel 7 Rear (EMP-X3 8 Rear (EMP-82/62 9 Base 10 Remote Control 11 Adjusting and changing the image Adjusting the Image Quality 13 Adjusting Computer Images and RGB Video Images...Projected Image (Source Search 18 Automatically Detect Incoming Signals and Change the Projected Image (Source Search 18 Changing Directly from the Remote Control 18 Useful Functions Functions for Enhancing Projection 20 Pausing the Image and Sound (A/V Mute 20 Freezing the Image (Freeze 20 ...
... Focus iii Turning the Projector off iii Projector Features 4 Part Names and Functions 6 Front/Top 6 Control Panel 7 Rear (EMP-X3 8 Rear (EMP-82/62 9 Base 10 Remote Control 11 Adjusting and changing the image Adjusting the Image Quality 13 Adjusting Computer Images and RGB Video Images...Projected Image (Source Search 18 Automatically Detect Incoming Signals and Change the Projected Image (Source Search 18 Changing Directly from the Remote Control 18 Useful Functions Functions for Enhancing Projection 20 Pausing the Image and Sound (A/V Mute 20 Freezing the Image (Freeze 20 ...
User Manual
Page 11
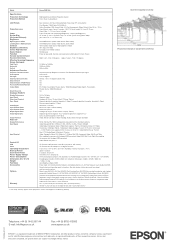
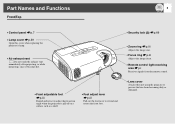
Part Names and Functions 6 Front/Top • Control panel sp.7 • Lamp cover sp.59 Open this cover when replacing the projector's lamp. • Air exhaust vent Do not touch the exhaust vent .... • Security lock ( ) sp.69 • Zoom ring sp.iii Adjusts the image size. • Focus ring sp.iii Adjusts the image focus. • Remote control light-receiving area sp.i Receives signals from the remote control. • Lens cover Attach when not using the projector to prevent the lens from becoming dirty or damaged.
Part Names and Functions 6 Front/Top • Control panel sp.7 • Lamp cover sp.59 Open this cover when replacing the projector's lamp. • Air exhaust vent Do not touch the exhaust vent .... • Security lock ( ) sp.69 • Zoom ring sp.iii Adjusts the image size. • Focus ring sp.iii Adjusts the image focus. • Remote control light-receiving area sp.i Receives signals from the remote control. • Lens cover Attach when not using the projector to prevent the lens from becoming dirty or damaged.

User Manual
Page 13
...EMP-X3) • Computer port sp.i Inputs analogue RGB video signals from a computer and RGB video signals and component videog signals from other video sources. • USB port sp.23, p.70 Connects the projector to a computer via the USBg cable when using the USB cable to connect the computer. • Remote control... light-receiving area sp.i Receives signals from the remote control. • Audio port sp.ii Input audio signals from the source that use an audio selector. •...
...EMP-X3) • Computer port sp.i Inputs analogue RGB video signals from a computer and RGB video signals and component videog signals from other video sources. • USB port sp.23, p.70 Connects the projector to a computer via the USBg cable when using the USB cable to connect the computer. • Remote control... light-receiving area sp.i Receives signals from the remote control. • Audio port sp.ii Input audio signals from the source that use an audio selector. •...
User Manual
Page 14
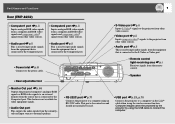
...Power inlet sp.iii Connects to the power cable. • Rear adjustable foot • Remote control light-receiving area sp.i Receives signals from the remote control. • Speaker • Monitor Out port sp.66 Outputs the projected computer's analogue RGB... signals or RGB video signals to an external monitor from the currentlyselected input source to external speakers. • RS-232C port sp.71 Connects the projector to the Computer1 port. Part Names and Functions 9 Rear (EMP...
...Power inlet sp.iii Connects to the power cable. • Rear adjustable foot • Remote control light-receiving area sp.i Receives signals from the remote control. • Speaker • Monitor Out port sp.66 Outputs the projected computer's analogue RGB... signals or RGB video signals to an external monitor from the currentlyselected input source to external speakers. • RS-232C port sp.71 Connects the projector to the Computer1 port. Part Names and Functions 9 Rear (EMP...
User Manual
Page 16
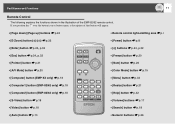
... following explains the functions shown in the illustration of that button will appear. • [Page down] [Page up] buttons sp.24 • Remote control light-emitting area sp.i • [E-Zoom] button ( ) ( ) sp.22 • [Power] button sp.iii • [Enter] button sp.24, p.32 • [ ] buttons sp.24, p.32 &#....18 • [Auto] button sp.13 • Numeric buttons sp.26 If you position the over the button icon or button name, a description of the EMP-82/62 remote control.
... following explains the functions shown in the illustration of that button will appear. • [Page down] [Page up] buttons sp.24 • Remote control light-emitting area sp.i • [E-Zoom] button ( ) ( ) sp.22 • [Power] button sp.iii • [Enter] button sp.24, p.32 • [ ] buttons sp.24, p.32 &#....18 • [Auto] button sp.13 • Numeric buttons sp.26 If you position the over the button icon or button name, a description of the EMP-82/62 remote control.
User Manual
Page 17
... Changing the Projected Image (Source Search 18 • Automatically Detect Incoming Signals and Change the Projected Image (Source Search 18 • Changing Directly from the Remote Control 18 Adjusting and changing the image This chapter explains how to adjust the quality of the image, the volume, the colour mode selection and so...
... Changing the Projected Image (Source Search 18 • Automatically Detect Incoming Signals and Change the Projected Image (Source Search 18 • Changing Directly from the Remote Control 18 Adjusting and changing the image This chapter explains how to adjust the quality of the image, the volume, the colour mode selection and so...
User Manual
Page 18
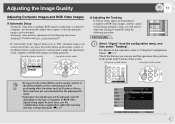
...Freeze, these signals so that the optimum images can use the configuration menu commands to "Using the Configuration Menu". Using the remote control Using the control panel • If you will need to make the adjustment while computer or RGB video images are canceled and then the ... projected computer or RGB video images, and this operation, refer to adjust the tracking and sync settings manually. Using the remote control Using the control panel 13 Adjusting the Tracking If vertical stripes appear in the guide at the bottom of computer or RGB video signals being...
...Freeze, these signals so that the optimum images can use the configuration menu commands to "Using the Configuration Menu". Using the remote control Using the control panel • If you will need to make the adjustment while computer or RGB video images are canceled and then the ... projected computer or RGB video images, and this operation, refer to adjust the tracking and sync settings manually. Using the remote control Using the control panel 13 Adjusting the Tracking If vertical stripes appear in the guide at the bottom of computer or RGB video signals being...
User Manual
Page 19
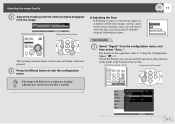
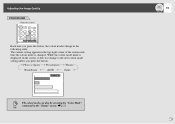
...will flash when continuous tracking adjustment is carried out, but this cannot be fixed using the following procedure. Using the remote control Using the control panel The tracking value increases or decreases each time a button is normal. Adjusting the Image Quality B Adjust the tracking...the vertical stripes disappear from the configuration menu, and then select "Sync.". PROCEDURE A Select "Signal" from the image. Using the remote control Using the control panel The image will need to "Using the Configuration Menu". C Press the [Menu] button to exit the configuration menu. 14...
...will flash when continuous tracking adjustment is carried out, but this cannot be fixed using the following procedure. Using the remote control Using the control panel The tracking value increases or decreases each time a button is normal. Adjusting the Image Quality B Adjust the tracking...the vertical stripes disappear from the configuration menu, and then select "Sync.". PROCEDURE A Select "Signal" from the image. Using the remote control Using the control panel The image will need to "Using the Configuration Menu". C Press the [Menu] button to exit the configuration menu. 14...
User Manual
Page 20
... the colour mode that are being input) The images are vivid and brought into contrast. Ideal for watching films in a bright room. Using the remote control Using the control panel The sync value increases or decreases each time a button is selected. Excels at emphasising dark gradations. Ideal for giving presentations in a bright room...
... the colour mode that are being input) The images are vivid and brought into contrast. Ideal for watching films in a bright room. Using the remote control Using the control panel The sync value increases or decreases each time a button is selected. Excels at emphasising dark gradations. Ideal for giving presentations in a bright room...
User Manual
Page 21
The current setting appears in the top-right corner of the screen each time the colour mode is displayed on the screen, it does not change to the next colour mode setting unless you press the button, the colour modes change in the "Image" menu. sp.33 While the colour mode name is changed. The colour mode can also be set using the "Color Mode" command in the following order. Adjusting the Image Quality 16 PROCEDURE Remote control Each time you press the button.
The current setting appears in the top-right corner of the screen each time the colour mode is displayed on the screen, it does not change to the next colour mode setting unless you press the button, the colour modes change in the "Image" menu. sp.33 While the colour mode name is changed. The colour mode can also be set using the "Color Mode" command in the following order. Adjusting the Image Quality 16 PROCEDURE Remote control Each time you press the button.
User Manual
Page 22
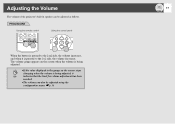
PROCEDURE Using the remote control Using the control panel When the button is pressed to the [ ] side, the volume decreases. The volume gauge appears on the screen stops changing when the volume is ...
PROCEDURE Using the remote control Using the control panel When the button is pressed to the [ ] side, the volume decreases. The volume gauge appears on the screen stops changing when the volume is ...
User Manual
Page 23
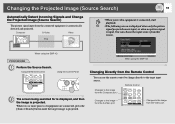
... signal is projected. Changes to the image from the Computer port. Using the Remote Control Using the Control Panel B The screen being searched for is displayed, and then the image is input. When using the EMP-X3 Changing Directly from the Remote Control You can choose the input source from the connected equipment is projected. When...
... signal is projected. Changes to the image from the Computer port. Using the Remote Control Using the Control Panel B The screen being searched for is displayed, and then the image is input. When using the EMP-X3 Changing Directly from the Remote Control You can choose the input source from the connected equipment is projected. When...
User Manual
Page 24
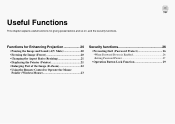
... 20 • Changing the Aspect Ratio (Resizing 21 • Displaying the Pointer (Pointer 21 • Enlarging Part of the Image (E-Zoom 22 • Using the Remote Control to Operate the Mouse Pointer (Wireless Mouse 23 Security functions 26 • Preventing theft (Password Protect 26 •When Password Protect is Enabled 26 •...
... 20 • Changing the Aspect Ratio (Resizing 21 • Displaying the Pointer (Pointer 21 • Enlarging Part of the Image (E-Zoom 22 • Using the Remote Control to Operate the Mouse Pointer (Wireless Mouse 23 Security functions 26 • Preventing theft (Password Protect 26 •When Password Protect is Enabled 26 •...


