
Owners Manual
Page 2
... handle the new bulb. Use a cloth or gloves to qualified service personnel. Never let children look into the lens when it is switched on . Warning: Never open any covers on your eyes. Caution: When you replace the lamp, never touch the new bulb with bags may be shorten the bulb life. Important Safety Information Warning: Never look into the projector lens when the lamp is on as specifically directed in...
... handle the new bulb. Use a cloth or gloves to qualified service personnel. Never let children look into the lens when it is switched on . Warning: Never open any covers on your eyes. Caution: When you replace the lamp, never touch the new bulb with bags may be shorten the bulb life. Important Safety Information Warning: Never look into the projector lens when the lamp is on as specifically directed in...

Owners Manual
Page 3
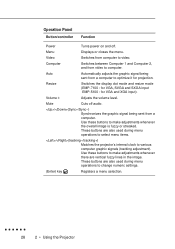
...buttons to video. These buttons are also used during menu operations to select menu items. /(tracking-/tracking+) Matches the projector's internal clock to make adjustments whenever the overall image is EMP-7100) Operation Panel foot releace bottan Operation Panel Button/controller front foot Function Power Turns power on and off audio. /(Sync+/Sync-) Synchronizes the graphic signal being sent from a computer to computer. Resize Switches the display dot mode and resize mode (EMP-7100 : for VGA, SVGA and SXGA input, EMP-5100 : for projection. Auto Automatically adjusts...
...buttons to video. These buttons are also used during menu operations to select menu items. /(tracking-/tracking+) Matches the projector's internal clock to make adjustments whenever the overall image is EMP-7100) Operation Panel foot releace bottan Operation Panel Button/controller front foot Function Power Turns power on and off audio. /(Sync+/Sync-) Synchronizes the graphic signal being sent from a computer to computer. Resize Switches the display dot mode and resize mode (EMP-7100 : for VGA, SVGA and SXGA input, EMP-5100 : for projection. Auto Automatically adjusts...

Owners Manual
Page 4
... buttons for projection. Switches the display dot mode and resize mode (EMP-7100 : for VGA, SVGA and SXGA input EMP-5100 : for the custom function assigned using the ELP Link II software that came with the projector. Switches to black display or user logo display. During menu selection, emulates the (Enter) operation panel button. Adjusts the volume level. During menu selection, emulates the (Enter) operation panel button. Button for VGA and XGA input ). Connecting to a PC laptop computer Mouse port Serial port Com port Audio port Monitor port PS/2 mouse cable Computer...
... buttons for projection. Switches the display dot mode and resize mode (EMP-7100 : for VGA, SVGA and SXGA input EMP-5100 : for the custom function assigned using the ELP Link II software that came with the projector. Switches to black display or user logo display. During menu selection, emulates the (Enter) operation panel button. Adjusts the volume level. During menu selection, emulates the (Enter) operation panel button. Button for VGA and XGA input ). Connecting to a PC laptop computer Mouse port Serial port Com port Audio port Monitor port PS/2 mouse cable Computer...
Owners Manual
Page 8
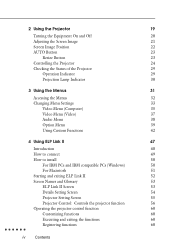
... Projector 19 Turning the Equipment On and Off 20 Adjusting the Screen Image 21 Screen Image Position 22 AUTO Button 23 Resize Button 23 Controlling the Projector 24 Checking the Status of the Projector 29 Operation Indicator 29 Projection Lamp Indicator 30 3 Using the Menus 31 Accessing the Menus 32 Changing Menu Settings 33 Video Menu (Computer) 35 Video Menu (Video) 37 Audio Menu 38 Option Menu 39 Using Custom Functions 42 4 Using ELP Link II 47 Introduction 48 How to connect 49 How to install...
... Projector 19 Turning the Equipment On and Off 20 Adjusting the Screen Image 21 Screen Image Position 22 AUTO Button 23 Resize Button 23 Controlling the Projector 24 Checking the Status of the Projector 29 Operation Indicator 29 Projection Lamp Indicator 30 3 Using the Menus 31 Accessing the Menus 32 Changing Menu Settings 33 Video Menu (Computer) 35 Video Menu (Video) 37 Audio Menu 38 Option Menu 39 Using Custom Functions 42 4 Using ELP Link II 47 Introduction 48 How to connect 49 How to install...

Owners Manual
Page 9
... Setting 68 Initial Screen for the User Logo Setting 68 Logo Data 69 User Logo Edit Screen 69 Color Property Setting 70 5 Maintenance 71 Cleaning the Lens 72 Cleaning the Projector Case 72 Cleaning the Air Filter 72 Replacing the Lamp 74 6 Troubleshooting 79 Problems with the Projector 80 Problems with the Image or Sound 83 A Technical Specifications 85 General 85 Optical 86 Projector Lamp 86 Mechanical 86 Electrical 87 Environmental 87 Supported Monitor Displays (EMP-7100) 88 Supported Monitor Displays (EMP-5100) 89 Supported Modes (EMP-7100...
... Setting 68 Initial Screen for the User Logo Setting 68 Logo Data 69 User Logo Edit Screen 69 Color Property Setting 70 5 Maintenance 71 Cleaning the Lens 72 Cleaning the Projector Case 72 Cleaning the Air Filter 72 Replacing the Lamp 74 6 Troubleshooting 79 Problems with the Projector 80 Problems with the Image or Sound 83 A Technical Specifications 85 General 85 Optical 86 Projector Lamp 86 Mechanical 86 Electrical 87 Environmental 87 Supported Monitor Displays (EMP-7100) 88 Supported Monitor Displays (EMP-5100) 89 Supported Modes (EMP-7100...

Owners Manual
Page 11
...; computer image sources plus on video source such as a wireless mouse to control mouse operations on features that comes with enough light to make presentations more effective. The projector produces bright images that is rich and powerful. The ELP LINK II™ software that are displayed in XGA (EMP-7100) and SVGA (EMP-5100) compatible full color (16,670,000 colors) at a resolution of beautiful images every time. The projector also features a new patented...
...; computer image sources plus on video source such as a wireless mouse to control mouse operations on features that comes with enough light to make presentations more effective. The projector produces bright images that is rich and powerful. The ELP LINK II™ software that are displayed in XGA (EMP-7100) and SVGA (EMP-5100) compatible full color (16,670,000 colors) at a resolution of beautiful images every time. The projector also features a new patented...

Owners Manual
Page 14
... earthed socket. Failure to important information about the EMP-7100/5100. If you are used throughout the manual to draw your attention to do so may cause fire or electric shock. Safety Instructions These graphics are not sure of the type of dust before inserting it . Do not use the projector near water or sources of power source indicated on an unstable...
... earthed socket. Failure to important information about the EMP-7100/5100. If you are used throughout the manual to draw your attention to do so may cause fire or electric shock. Safety Instructions These graphics are not sure of the type of dust before inserting it . Do not use the projector near water or sources of power source indicated on an unstable...

Owners Manual
Page 18
... The projector may not respond to remote control commands under the following solutions: • The remote control unit's batteries may be operated by remote control via infrared (IR) receivers located at the front of fluorescent lighting are used. • A strong light source shines into the IR receiver. • Other equipment that emits infrared energy. These conditions commonly cause problems for most infraredcontrolled equipment. Remote control information The EMP-7100...
... The projector may not respond to remote control commands under the following solutions: • The remote control unit's batteries may be operated by remote control via infrared (IR) receivers located at the front of fluorescent lighting are used. • A strong light source shines into the IR receiver. • Other equipment that emits infrared energy. These conditions commonly cause problems for most infraredcontrolled equipment. Remote control information The EMP-7100...

Owners Manual
Page 33
Switch off the projector and video source if they are on the video source. (The red and white plugs carry audio signals. By default, it to detect a single broadcast format. (See "Video menu" in Chapter 3.) Note that came with your composite video uses an RCA-type composite video connector, you will need to provide YOUR OWN S-Video cable or use the SVideo cable that the projector will need to connect the video source to the...
Switch off the projector and video source if they are on the video source. (The red and white plugs carry audio signals. By default, it to detect a single broadcast format. (See "Video menu" in Chapter 3.) Note that came with your composite video uses an RCA-type composite video connector, you will need to provide YOUR OWN S-Video cable or use the SVideo cable that the projector will need to connect the video source to the...

Owners Manual
Page 39
... projector's lens. Rotate the zoom ring clockwise to make it fits properly on the screen. Before pressing the Power button again, wait until the lamp has cooled and the power indicator is EMP-7100) foot adjustment button front foot Adjusting the Screen Image Focus and zoom After an image appears on the screen, check to make the image larger, and counterclockwise to see if it is flashing green. To adjust the focus of the image, rotate the inner zoom ring. operation panel projection lamp indicator operation indicator remote control...
... projector's lens. Rotate the zoom ring clockwise to make it fits properly on the screen. Before pressing the Power button again, wait until the lamp has cooled and the power indicator is EMP-7100) foot adjustment button front foot Adjusting the Screen Image Focus and zoom After an image appears on the screen, check to make the image larger, and counterclockwise to see if it is flashing green. To adjust the focus of the image, rotate the inner zoom ring. operation panel projection lamp indicator operation indicator remote control...
Owners Manual
Page 46
... it for VGA and XGA input). Resize Switches the display dot mode and resize mode (EMP-7100 : for VGA, SVGA and SXGA input EMP-5100 : for projection. Use these buttons to make adjustments whenever there are also used during menu operations to various computer graphic signals (tracking adjustment). Video Switches from video to make adjustments whenever the overall image is fuzzy or streaked. Menu Displays or closes the menu. Use these buttons to computer. Operation Panel Button/controller Function Power Turns power on and off audio. /(Sync+/Sync-) Synchronizes the...
... it for VGA and XGA input). Resize Switches the display dot mode and resize mode (EMP-7100 : for VGA, SVGA and SXGA input EMP-5100 : for projection. Use these buttons to make adjustments whenever there are also used during menu operations to various computer graphic signals (tracking adjustment). Video Switches from video to make adjustments whenever the overall image is fuzzy or streaked. Menu Displays or closes the menu. Use these buttons to computer. Operation Panel Button/controller Function Power Turns power on and off audio. /(Sync+/Sync-) Synchronizes the...

Owners Manual
Page 49
... to the remote control's Custom button (Custom Menu) • Return all settings to do the following: • Adjust the brightness, contrast, synchronization, tracking, vertical and horizontal alignment, and color balance of the computer screen, and mouse/serial locking (Computer Menu) • Adjust the brightness, contrast, color saturation, tint, and signal system of the video screen (Video Menu) • Adjust the volume level, tone setting, and Spatializer (Audio Menu) • Select color temperature, rear projection, ceiling mount, screen blank-
... to the remote control's Custom button (Custom Menu) • Return all settings to do the following: • Adjust the brightness, contrast, synchronization, tracking, vertical and horizontal alignment, and color balance of the computer screen, and mouse/serial locking (Computer Menu) • Adjust the brightness, contrast, color saturation, tint, and signal system of the video screen (Video Menu) • Adjust the volume level, tone setting, and Spatializer (Audio Menu) • Select color temperature, rear projection, ceiling mount, screen blank-

Owners Manual
Page 61
... times.) 3. Press the [Custom] button on the remote control. (The image returns to black. (This lasts approx. 4 seconds.) Changing Menu Settings 43 The screen turns to previous size.) Preview 1. However, if you want to change the function you have customized the above steps 1 to zoom display mode.) 2. The Zoom function is being entered, no supported signal is cancelled by using the [Pointer] on the remote control. 5. Press the [Custom] button on the screen...
... times.) 3. Press the [Custom] button on the remote control. (The image returns to black. (This lasts approx. 4 seconds.) Changing Menu Settings 43 The screen turns to previous size.) Preview 1. However, if you want to change the function you have customized the above steps 1 to zoom display mode.) 2. The Zoom function is being entered, no supported signal is cancelled by using the [Pointer] on the remote control. 5. Press the [Custom] button on the screen...

Owners Manual
Page 68
... to be displayed after a while. When the termination screen appears, click the [OK] button to finish the installation. • If you inserted the disk with the ELP Link II software into which you use the software often, place it on. Select the Run command from the File menu in the [Command Line] box and click the [OK] button. Type [A: SETUP.EXE] in...
... to be displayed after a while. When the termination screen appears, click the [OK] button to finish the installation. • If you inserted the disk with the ELP Link II software into which you use the software often, place it on. Select the Run command from the File menu in the [Command Line] box and click the [OK] button. Type [A: SETUP.EXE] in...
Owners Manual
Page 92
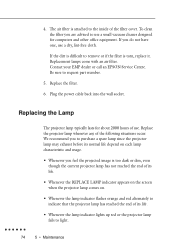
... the lamp indicator lights up red or the projector lamp fails to purchase a spare lamp since the projector lamp may exhaust before its normal life depend on . • Whenever the lamp indicator flashes orange and red alternately to the inside of use. Replacement lamps come with an air filter. Replace the filter. 6. Contact your EMP dealer or call an EPSON Service Centre. Plug the power cable back into the wall socket. 4. If you are advised to request part number...
... the lamp indicator lights up red or the projector lamp fails to purchase a spare lamp since the projector lamp may exhaust before its normal life depend on . • Whenever the lamp indicator flashes orange and red alternately to the inside of use. Replacement lamps come with an air filter. Replace the filter. 6. Contact your EMP dealer or call an EPSON Service Centre. Plug the power cable back into the wall socket. 4. If you are advised to request part number...

Owners Manual
Page 99
... of its life and needs to be replaced. „ The operation indicator is securely connected to make sure they are not blocked. Check to clean the filters. Check the air vents on page 75 to ensure that the projector lamp cover is overheated. Contact your nearest service provider. „ The projection lamp indicator is flashing red. Contact your nearest service provider. „ The operation indicator is red. Problems with the projector's internal circuitry that the power cable is red.
... of its life and needs to be replaced. „ The operation indicator is securely connected to make sure they are not blocked. Check to clean the filters. Check the air vents on page 75 to ensure that the projector lamp cover is overheated. Contact your nearest service provider. „ The projection lamp indicator is flashing red. Contact your nearest service provider. „ The operation indicator is red. Problems with the projector's internal circuitry that the power cable is red.

Owners Manual
Page 100
Contact your nearest service provider. „ Important! Never try to perform any maintenance on . If this manual. 82 6 • Troubleshooting „ The projection lamp indicator is not specifically covered in this does not solve the problem, there is a problem with a new one and turn the projector back on the projector that requires servicing. Replace the projection lamp with the projector lamp's internal circuitry that is flashing red.
Contact your nearest service provider. „ Important! Never try to perform any maintenance on . If this manual. 82 6 • Troubleshooting „ The projection lamp indicator is not specifically covered in this does not solve the problem, there is a problem with a new one and turn the projector back on the projector that requires servicing. Replace the projection lamp with the projector lamp's internal circuitry that is flashing red.

Owners Manual
Page 104
Optical Aspect ratio Zoom ratio 4 × 3 (horizontal × vertical) 1:1.3 Projector Lamp Type Power Parts No Discharge Lamp 150W ELPLP04 Mechanical (with lens and feet) Height 15.9 cm (6.3 inches) Width 24.5 cm (9.7 inches) Depth 38.0 cm (15.0 inches) Weight (EMP-7100) 6.7 kg (14.7 lb.) (EMP-5100) 6.5 kg (14.4 lb.) 86 A • Technical Specifications
Optical Aspect ratio Zoom ratio 4 × 3 (horizontal × vertical) 1:1.3 Projector Lamp Type Power Parts No Discharge Lamp 150W ELPLP04 Mechanical (with lens and feet) Height 15.9 cm (6.3 inches) Width 24.5 cm (9.7 inches) Depth 38.0 cm (15.0 inches) Weight (EMP-7100) 6.7 kg (14.7 lb.) (EMP-5100) 6.5 kg (14.4 lb.) 86 A • Technical Specifications

Owners Manual
Page 117
Position Display, 54 Power, 20, 24, 28, 30 Power button, viii power connector, 6 Power cord, 2 power indicator, 6 Power Macintosh, vii PowerBook, vii, 3, 7, 12, 13 PowerBook output cable, 3 Power Point, 48 Presentation, x, xiv, 48 Preview, 42, 43, 57, 67 Problems, x, 80, 81 Projection Lamp, 21, 29, 30 Projector, 2 Projector Control, 48, 56, 58, 65 Projector Set Screen, 54 PROMPT, 39 Prompt, 39, 57, 66 Properties, 61, 62, 63, 64, 70 Property, 54, 59...
Position Display, 54 Power, 20, 24, 28, 30 Power button, viii power connector, 6 Power cord, 2 power indicator, 6 Power Macintosh, vii PowerBook, vii, 3, 7, 12, 13 PowerBook output cable, 3 Power Point, 48 Presentation, x, xiv, 48 Preview, 42, 43, 57, 67 Problems, x, 80, 81 Projection Lamp, 21, 29, 30 Projector, 2 Projector Control, 48, 56, 58, 65 Projector Set Screen, 54 PROMPT, 39 Prompt, 39, 57, 66 Properties, 61, 62, 63, 64, 70 Property, 54, 59...

Owners Manual
Page 118
..., 38 Troubleshooting, x, 79 U unlock, 22 unpack, 1, 2 Unpacking the projector, 2, 3 user logo, 40, 48, 53, 55, 66, 68, 69, 70 user setting file, 68 Using, ix, x, xiii V Vertical, 31, 53 VGA, vii, 23, 27 VIDEO, 38 Video, vii, viii, ix, 1, 2 Video Input Switch, 55 Video Menu, 31, 35, 37, 38 Video source, vii, ix, 1, 14 video tape deck, vii video-out, 7, 12, 15, 16 video-out cable, 13 video-out connector, 13 Video/audio cable...
..., 38 Troubleshooting, x, 79 U unlock, 22 unpack, 1, 2 Unpacking the projector, 2, 3 user logo, 40, 48, 53, 55, 66, 68, 69, 70 user setting file, 68 Using, ix, x, xiii V Vertical, 31, 53 VGA, vii, 23, 27 VIDEO, 38 Video, vii, viii, ix, 1, 2 Video Input Switch, 55 Video Menu, 31, 35, 37, 38 Video source, vii, ix, 1, 14 video tape deck, vii video-out, 7, 12, 15, 16 video-out cable, 13 video-out connector, 13 Video/audio cable...


