Quick Start
Page 1
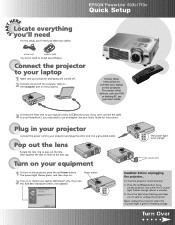
... two cables: EPSON® PowerLite® 503c/713c Quick Setup power cord computer cable You won't need to your laptop's video or monitor port. See your projector and plug the other end to install any software. The power light flashes green, and then stays on or restart your laptop. (Windows® only: If you see your projector and laptop are turned off. 2 Connect one end of the computer cable to use an adapter. Let the projector cool...
... two cables: EPSON® PowerLite® 503c/713c Quick Setup power cord computer cable You won't need to your laptop's video or monitor port. See your projector and plug the other end to install any software. The power light flashes green, and then stays on or restart your laptop. (Windows® only: If you see your projector and laptop are turned off. 2 Connect one end of the computer cable to use an adapter. Let the projector cool...
Quick Start
Page 2
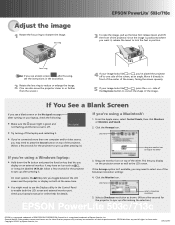
... time. 4. Select a Simulscan resolution as the LCD screen. Move it . Click the Monitor icon. From the Apple menu, select Control Panels, then click Monitors or Monitors and Sound. 2. lens ring EPSON® PowerLite® 503c/713c 3 To raise the image, pull up after making the selection.) EPSON PowerLite 503c/713c EPSON is a registered trademark of the image. Adjust the image 1 Rotate the focus ring to one side of their respective owners...
... time. 4. Select a Simulscan resolution as the LCD screen. Move it . Click the Monitor icon. From the Apple menu, select Control Panels, then click Monitors or Monitors and Sound. 2. lens ring EPSON® PowerLite® 503c/713c 3 To raise the image, pull up after making the selection.) EPSON PowerLite 503c/713c EPSON is a registered trademark of the image. Adjust the image 1 Rotate the focus ring to one side of their respective owners...
User Manual
Page 2
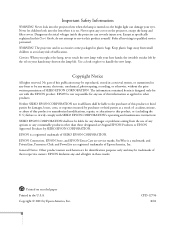
...-12796 8/01 Important Safety Information WARNING: Never look into the projector lens when the lamp is turned on the projector, except the lamp and filter covers. WARNING: The projector and its affiliates shall be liable for any damages or problems arising from small children to service this EPSON product. Use a cloth or glove to strictly comply with SEIKO EPSON CORPORATION's operating and maintenance instructions. The information contained herein...
...-12796 8/01 Important Safety Information WARNING: Never look into the projector lens when the lamp is turned on the projector, except the lamp and filter covers. WARNING: The projector and its affiliates shall be liable for any damages or problems arising from small children to service this EPSON product. Use a cloth or glove to strictly comply with SEIKO EPSON CORPORATION's operating and maintenance instructions. The information contained herein...
User Manual
Page 5
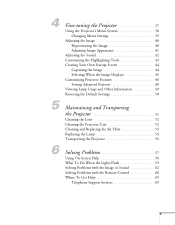
... Viewing Lamp Usage and Other Information 49 Restoring the Default Settings 50 Maintaining and Transporting the Projector 51 Cleaning the Lens 52 Cleaning the Projector Case 52 Cleaning and Replacing the Air Filter 53 Replacing the Lamp 54 Transporting the Projector 56 Solving Problems 57 Using On-Screen Help 58 What To Do When the Lights Flash 59 Solving Problems with the Image or Sound 62 Solving Problems with the Remote Control 68 Where To Get Help 69 Telephone Support Services...
... Viewing Lamp Usage and Other Information 49 Restoring the Default Settings 50 Maintaining and Transporting the Projector 51 Cleaning the Lens 52 Cleaning the Projector Case 52 Cleaning and Replacing the Air Filter 53 Replacing the Lamp 54 Transporting the Projector 56 Solving Problems 57 Using On-Screen Help 58 What To Do When the Lights Flash 59 Solving Problems with the Image or Sound 62 Solving Problems with the Remote Control 68 Where To Get Help 69 Telephone Support Services...
User Manual
Page 10
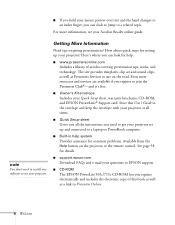
... Gives you need to install any software to use on giving presentations? I Built-in the envelope and keep the envelope with your projector at all the instructions you all times. How about quick steps for setting up and connected to a laptop or PowerBook computer. See page 58 for common problems. Available from the Help button on the projector or the remote control. Here's where you register...
... Gives you need to install any software to use on giving presentations? I Built-in the envelope and keep the envelope with your projector at all the instructions you all times. How about quick steps for setting up and connected to a laptop or PowerBook computer. See page 58 for common problems. Available from the Help button on the projector or the remote control. Here's where you register...
User Manual
Page 18
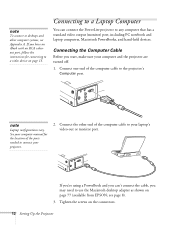
... end of the computer cable to your laptop's video-out or monitor port. If you're using a PowerBook and you can connect the PowerLite projector to a video device on page 15. Connecting to a Laptop Computer You can 't connect the cable, you may need to the projector's Computer port. Tighten the screws on page 77 (available from EPSON; If you start, make sure your computer manual for connecting to any computer...
... end of the computer cable to your laptop's video-out or monitor port. If you're using a PowerBook and you can connect the PowerLite projector to a video device on page 15. Connecting to a Laptop Computer You can 't connect the cable, you may need to the projector's Computer port. Tighten the screws on page 77 (available from EPSON; If you start, make sure your computer manual for connecting to any computer...

User Manual
Page 21
... the A/V cable to the left and right Audio jacks (insert the white plug into the L port and the red plug into the R port). Connect the plugs on the other video source are turned off. 1. Connect the yellow plug on one end of connection. The projector supports NTSC, PAL, and SECAM, and automatically detects the video format. Then connect the audio plugs to the projector's Video jack. Connecting to Video Sources You can use it...
... the A/V cable to the left and right Audio jacks (insert the white plug into the L port and the red plug into the R port). Connect the plugs on the other video source are turned off. 1. Connect the yellow plug on one end of connection. The projector supports NTSC, PAL, and SECAM, and automatically detects the video format. Then connect the audio plugs to the projector's Video jack. Connecting to Video Sources You can use it...

User Manual
Page 25
Press the red Power button on in place. This can damage the cap. 5. The heat generated by the lens can damage your eyes, and is on. Squeeze the lens cap tabs and remove the lens cap. The power light stays green. squeeze here caution Do not use the projector with the lens cap in about 30 seconds. Using the Projector 19 Power button power light The power light flashes green as the projector warms up, and the projection lamp comes on top of the projector. warning Never look into the lens when the lamp is especially dangerous for children. 4.
Press the red Power button on in place. This can damage the cap. 5. The heat generated by the lens can damage your eyes, and is on. Squeeze the lens cap tabs and remove the lens cap. The power light stays green. squeeze here caution Do not use the projector with the lens cap in about 30 seconds. Using the Projector 19 Power button power light The power light flashes green as the projector warms up, and the projection lamp comes on top of the projector. warning Never look into the lens when the lamp is especially dangerous for children. 4.
User Manual
Page 26
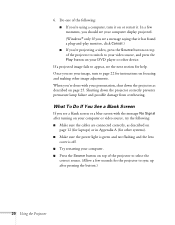
... your image, turn it on focusing and making other device. In a few seconds for help. If a projected image fails to sync up after turning on page 25. When you're done with the message No Signal after pressing the button.) 20 Using the Projector Shutting down the projector as described on your DVD player or other image adjustments. I Make sure the power light is green and not flashing and the lens cover is...
... your image, turn it on focusing and making other device. In a few seconds for help. If a projected image fails to sync up after turning on page 25. When you're done with the message No Signal after pressing the button.) 20 Using the Projector Shutting down the projector as described on your DVD player or other image adjustments. I Make sure the power light is green and not flashing and the lens cover is...

User Manual
Page 31
... other button.) Power button note When the projector has not received any other video source, turn the projector on the projector or remote control. Press the Power button again. When the projector has cooled, the orange light stays on and the exhaust fan shuts off the projector, press the red Power button on again, wait until the orange light stops flashing. Replace the lens cap, retract the lens, and unplug the power cord. 5. To turn off the projector lamp and enters "sleep mode." The power light flashes orange...
... other button.) Power button note When the projector has not received any other video source, turn the projector on the projector or remote control. Press the Power button again. When the projector has cooled, the orange light stays on and the exhaust fan shuts off the projector, press the red Power button on again, wait until the orange light stops flashing. Replace the lens cap, retract the lens, and unplug the power cord. 5. To turn off the projector lamp and enters "sleep mode." The power light flashes orange...
User Manual
Page 55
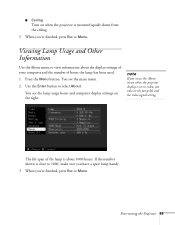
... Esc or Menu. Press the Menu button. The life span of hours the lamp has been used. 1. Fine-tuning the Projector 49 You see the lamp life and the video signal setting. You see the lamp usage hours and computer display settings on when the projector is close to view information about 1000 hours. Use the Enter button to video, you only see the main menu. 2. If the number shown is mounted upside-down from the ceiling. 5. Viewing Lamp Usage...
... Esc or Menu. Press the Menu button. The life span of hours the lamp has been used. 1. Fine-tuning the Projector 49 You see the lamp life and the video signal setting. You see the lamp usage hours and computer display settings on when the projector is close to view information about 1000 hours. Use the Enter button to video, you only see the main menu. 2. If the number shown is mounted upside-down from the ceiling. 5. Viewing Lamp Usage...
User Manual
Page 60
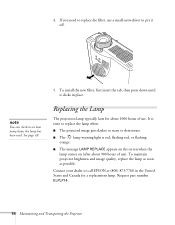
... replace the lamp when: I The message LAMP REPLACE appears on the screen when the lamp comes on (after about 1000 hours of use). See page 49. 5. Request part number ELPLP14. 54 Maintaining and Transporting the Projector Replacing the Lamp The projection lamp typically lasts for a replacement lamp. I The lamp warning light is time to replace the filter, use . note You can check to deteriorate. It is red, flashing red, or flashing orange. I The projected image gets darker or starts to see how many hours the lamp...
... replace the lamp when: I The message LAMP REPLACE appears on the screen when the lamp comes on (after about 1000 hours of use). See page 49. 5. Request part number ELPLP14. 54 Maintaining and Transporting the Projector Replacing the Lamp The projection lamp typically lasts for a replacement lamp. I The lamp warning light is time to replace the filter, use . note You can check to deteriorate. It is red, flashing red, or flashing orange. I The projected image gets darker or starts to see how many hours the lamp...
User Manual
Page 68
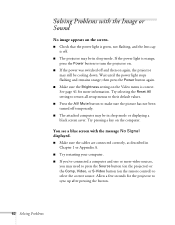
... Problems with the message No Signal displayed. then press the Power button again. I Press the A/V Mute button to select the correct source. Try selecting the Reset All setting to return all setup menus to press the Source button (on the projector) or the Comp, Video, or S-Video button (on the Video menu is off temporarily. I Try restarting your computer. You see a blue screen with the Image or Sound No image appears on again, the projector...
... Problems with the message No Signal displayed. then press the Power button again. I Press the A/V Mute button to select the correct source. Try selecting the Reset All setting to return all setup menus to press the Source button (on the projector) or the Comp, Video, or S-Video button (on the Video menu is off temporarily. I Try restarting your computer. You see a blue screen with the Image or Sound No image appears on again, the projector...
User Manual
Page 78
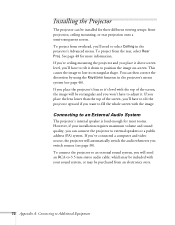
... the whole screen with the image. If you place the lens lower than the top of the screen, the image will automatically switch the audio whenever you will need to select Ceiling in the projector's menu system (see page 30). See page 48 for three different viewing setups: front projection, ceiling mounting, or rear projection onto a semi-transparent screen. If you've connected a computer and video source, the projector will be...
... the whole screen with the image. If you place the lens lower than the top of the screen, the image will automatically switch the audio whenever you will need to select Ceiling in the projector's menu system (see page 30). See page 48 for three different viewing setups: front projection, ceiling mounting, or rear projection onto a semi-transparent screen. If you've connected a computer and video source, the projector will be...

User Manual
Page 88
... the operating instructions, or if it , use the correct power cord for service. I Except as specifically explained in performance, indicating a need for that country. I If you use the projector in a country other than where you to dangerous voltages and other soft surface, or in a closed-in a hot location. I Do not place the projector and remote control on . Refer all servicing to remove the lamp immediately after use liquid...
... the operating instructions, or if it , use the correct power cord for service. I Except as specifically explained in performance, indicating a need for that country. I If you use the projector in a country other than where you to dangerous voltages and other soft surface, or in a closed-in a hot location. I Do not place the projector and remote control on . Refer all servicing to remove the lamp immediately after use liquid...
User Manual
Page 92
... rating label or serial number be removed or should the product fail to the manufacturer's specifications and will , at its original container or an equivalent, along with non-EPSON products, or service other than by this limited warranty statement that the warranty period is not considered normal use in presenting your EPSON product for projector lamps). However, each replacement lamp carries the...
... rating label or serial number be removed or should the product fail to the manufacturer's specifications and will , at its original container or an equivalent, along with non-EPSON products, or service other than by this limited warranty statement that the warranty period is not considered normal use in presenting your EPSON product for projector lamps). However, each replacement lamp carries the...
User Manual
Page 101
... 49 Air filter, cleaning and replacing, 53 to 54 Anti-theft device, 8, 11 Aspect ratio, 89 Audio adjusting tone, 42 adjusting volume, 30, 42 connecting desktop, 76, 79 connecting laptop, 14 connecting video device, 15 to 16 menu, 38, 42 outputting to external sound system, 72 to 73 problems, troubleshooting, 67 turning off (using A/V Mute), 31 Audio Out jack, 73 Auto button, 40 Auto Setup setting, 41 AV cable, 15 to 16 B Bass, adjusting, 42 Batteries, installing...
... 49 Air filter, cleaning and replacing, 53 to 54 Anti-theft device, 8, 11 Aspect ratio, 89 Audio adjusting tone, 42 adjusting volume, 30, 42 connecting desktop, 76, 79 connecting laptop, 14 connecting video device, 15 to 16 menu, 38, 42 outputting to external sound system, 72 to 73 problems, troubleshooting, 67 turning off (using A/V Mute), 31 Audio Out jack, 73 Auto button, 40 Auto Setup setting, 41 AV cable, 15 to 16 B Bass, adjusting, 42 Batteries, installing...
User Manual
Page 102
..., 89 L Lamp automatic shutoff, 25 number of hours used, 49 replacing, 54 to 56 specifications, 90 status light, 59 Language setting, 48, 58 Laptop computer connecting to, 12 to 14 displaying on, 22, 63 Laser disc player, connecting to, 15 to 16 Lens cap, 19 cleaning, 52 extending, 18 specifications, 89 Light button (on remote control), 28 Lights, status, 59 to 62 Lines, drawing on screen, 35 to 36 Logo, saving on projector, 44...
..., 89 L Lamp automatic shutoff, 25 number of hours used, 49 replacing, 54 to 56 specifications, 90 status light, 59 Language setting, 48, 58 Laptop computer connecting to, 12 to 14 displaying on, 22, 63 Laser disc player, connecting to, 15 to 16 Lens cap, 19 cleaning, 52 extending, 18 specifications, 89 Light button (on remote control), 28 Lights, status, 59 to 62 Lines, drawing on screen, 35 to 36 Logo, saving on projector, 44...

User Manual
Page 103
..., 72 Power button, 19 consumption, 90 saving, 25, 47 status light, 59 supply, 90 PowerBook, connecting to, 12 to 14 Presenters Online, 4, 69 PrivateLine Support, 5, 69 Problems color, 66 image, 62 to 66 remote control, 68, 83 sound, 67 Projection lamp See Lamp Projector carrying case, 8, 56 cleaning, 52 distance from screen, 10, 89 feet, adjusting height with, 23 installing, 72 to 73 lamp specifications, 90 options, 8 positioning, 10 to 11 resolution, 1, 89 shutting off, 25 software, 4 specifications...
..., 72 Power button, 19 consumption, 90 saving, 25, 47 status light, 59 supply, 90 PowerBook, connecting to, 12 to 14 Presenters Online, 4, 69 PrivateLine Support, 5, 69 Problems color, 66 image, 62 to 66 remote control, 68, 83 sound, 67 Projection lamp See Lamp Projector carrying case, 8, 56 cleaning, 52 distance from screen, 10, 89 feet, adjusting height with, 23 installing, 72 to 73 lamp specifications, 90 options, 8 positioning, 10 to 11 resolution, 1, 89 shutting off, 25 software, 4 specifications...
User Manual
Page 104
Remote control light button, 28 numbered buttons, 33 problems, 68, 83 specifications, 90 troubleshooting, 68, 83 turning on, 28 using, 27 to 36 wireless mouse, using as, 36 Replacing lamp, 54 to 56 Reset All menu, 38, 50 Resetting menu options, 39, 50 Resize button, 32 Resizing image, 32 Resolution, 1, 89 S Safety instructions, 81 to 83 Screen image See Image Screen, distance from projector, 10 Screens, portable, 8 Setting menu, 38, 46 to 47 Sharpness setting, 41 Sleep mode, 25, 47 Software, 4 Sound See Audio Source button, 20 Source, selecting, 30 Speaker...
Remote control light button, 28 numbered buttons, 33 problems, 68, 83 specifications, 90 troubleshooting, 68, 83 turning on, 28 using, 27 to 36 wireless mouse, using as, 36 Replacing lamp, 54 to 56 Reset All menu, 38, 50 Resetting menu options, 39, 50 Resize button, 32 Resizing image, 32 Resolution, 1, 89 S Safety instructions, 81 to 83 Screen image See Image Screen, distance from projector, 10 Screens, portable, 8 Setting menu, 38, 46 to 47 Sharpness setting, 41 Sleep mode, 25, 47 Software, 4 Sound See Audio Source button, 20 Source, selecting, 30 Speaker...


