
User Manual
Page 2
..., Inc. No part of SEIKO EPSON CORPORATION. and PrivateLine, Presenters Club, and PowerLite are service marks; WARNING: The projector and its affiliates shall be liable for any damages or problems arising from small children to avoid any and all servicing to handle the new lamp. the bright light can severely injure you replace the lamp, never touch the new lamp with SEIKO EPSON CORPORATION's operating and maintenance instructions.
..., Inc. No part of SEIKO EPSON CORPORATION. and PrivateLine, Presenters Club, and PowerLite are service marks; WARNING: The projector and its affiliates shall be liable for any damages or problems arising from small children to avoid any and all servicing to handle the new lamp. the bright light can severely injure you replace the lamp, never touch the new lamp with SEIKO EPSON CORPORATION's operating and maintenance instructions.
User Manual
Page 4
... Remote Control 32 Controlling the Picture and Sound 32 Switching Between Picture Sources 32 Turning Off the Picture and Sound 33 Stopping Action 33 Zooming Your Image 33 Using the Remote Control as a Wireless Mouse 34 Replacing the Battery 35 Fine-tuning the Projector 37 Using the Projector's Menu System 38 Changing Menu Settings 39 Adjusting the Image 40 Repositioning the Image 40 Adjusting Image Appearance 40 Adjusting the Sound 42 Creating Your Own Startup Screen 43 Capturing the Image 43 Selecting When the Image Displays...
... Remote Control 32 Controlling the Picture and Sound 32 Switching Between Picture Sources 32 Turning Off the Picture and Sound 33 Stopping Action 33 Zooming Your Image 33 Using the Remote Control as a Wireless Mouse 34 Replacing the Battery 35 Fine-tuning the Projector 37 Using the Projector's Menu System 38 Changing Menu Settings 39 Adjusting the Image 40 Repositioning the Image 40 Adjusting Image Appearance 40 Adjusting the Sound 42 Creating Your Own Startup Screen 43 Capturing the Image 43 Selecting When the Image Displays...
User Manual
Page 11
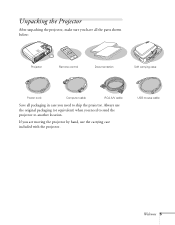
... you are moving the projector by hand, use the original packaging (or equivalent) when you need to another location. USB mouse cable Welcome 5 Unpacking the Projector After unpacking the projector, make sure you have all the parts shown below: Projector Page down Page up Computer Power S-Video/Video Color Mode A/V Mute Freeze Menu E-Zoom Enter ESC Auto Remote control Documentation Soft carrying case Power cord Computer cable RCA A/V cable Save all packaging in...
... you are moving the projector by hand, use the original packaging (or equivalent) when you need to another location. USB mouse cable Welcome 5 Unpacking the Projector After unpacking the projector, make sure you have all the parts shown below: Projector Page down Page up Computer Power S-Video/Video Color Mode A/V Mute Freeze Menu E-Zoom Enter ESC Auto Remote control Documentation Soft carrying case Power cord Computer cable RCA A/V cable Save all packaging in...
User Manual
Page 18
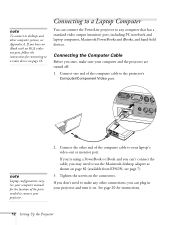
... desktop adapter as shown on . Connect the other end of the ports needed to connect your laptop's video-out or monitor port. See your computer manual for the location of the computer cable to your projector. 2. see Appendix A. Connecting the Computer Cable Before you can plug in your computer and the projector are turned off. 1. If you're using a PowerBook or iBook and you can connect the PowerLite projector...
... desktop adapter as shown on . Connect the other end of the ports needed to connect your laptop's video-out or monitor port. See your computer manual for the location of the computer cable to your projector. 2. see Appendix A. Connecting the Computer Cable Before you can plug in your computer and the projector are turned off. 1. If you're using a PowerBook or iBook and you can connect the PowerLite projector...

User Manual
Page 26
... the power cord to it. Connect one end of the projector turns orange, indicating that the projector is receiving power but stays lit orange. 20 Using the Projector Remove the lens cap. The heat generated by any order, but if you have both a computer and video source connected, you 've connected to the projector's power inlet. 3. Connect the other equipment are set up and connected correctly, as described below, followed by the lamp can turn...
... the power cord to it. Connect one end of the projector turns orange, indicating that the projector is receiving power but stays lit orange. 20 Using the Projector Remove the lens cap. The heat generated by any order, but if you have both a computer and video source connected, you 've connected to the projector's power inlet. 3. Connect the other equipment are set up and connected correctly, as described below, followed by the lamp can turn...

User Manual
Page 27
... down Page up Power Computer S-Video/Video Color Mode Menu A/V Mute Freeze E-Zoom Enter Auto ESC Projector Remote control The power light flashes green as described on focusing and making other device. When you 're projecting a video, press the Source button on top of the projector or on the remote control. This can damage your DVD player or other image adjustments. The power light stays green. 5. Shutting down the projector as the projector warms up, and the projection lamp comes on your eyes...
... down Page up Power Computer S-Video/Video Color Mode Menu A/V Mute Freeze E-Zoom Enter Auto ESC Projector Remote control The power light flashes green as described on focusing and making other device. When you 're projecting a video, press the Source button on top of the projector or on the remote control. This can damage your DVD player or other image adjustments. The power light stays green. 5. Shutting down the projector as the projector warms up, and the projection lamp comes on your eyes...

User Manual
Page 35
... exhaust fan shuts off. You see a confirmation message. (If you don't want to start projecting again, press the P Power button. 3. Press the P Power button again. When the projector has cooled, the orange light stays on the projector or remote control. Using the Projector 29 If you're using a computer, shut it down. This extends the life of the lamp. If you want to turn the projector on again, wait until the orange light stops flashing. Then...
... exhaust fan shuts off. You see a confirmation message. (If you don't want to start projecting again, press the P Power button. 3. Press the P Power button again. When the projector has cooled, the orange light stays on the projector or remote control. Using the Projector 29 If you're using a computer, shut it down. This extends the life of the lamp. If you want to turn the projector on again, wait until the orange light stops flashing. Then...

User Manual
Page 45
Press up Power Computer S-Video/Video Color Mode Menu A/V Mute Freeze E-Zoom Menus Video Audio Setting User's Logo Advanced About Reset All Position Adjust Tracking : 0000 Sync . :0 Brightness : 0 - + Contrast : 0 - + Sharpness : 0 - + Color Mode Select [Normal ] Input Signal: Select : [Computer ] Auto Setup : ON OFF Reset Execute Enter Auto ESC [ ]: Select [ ]: Enter [Menu]: Exit The seven menus are listed on the left, and the options available for the highlighted menu are shown on the right. 2. Use the directional buttons to...
Press up Power Computer S-Video/Video Color Mode Menu A/V Mute Freeze E-Zoom Menus Video Audio Setting User's Logo Advanced About Reset All Position Adjust Tracking : 0000 Sync . :0 Brightness : 0 - + Contrast : 0 - + Sharpness : 0 - + Color Mode Select [Normal ] Input Signal: Select : [Computer ] Auto Setup : ON OFF Reset Execute Enter Auto ESC [ ]: Select [ ]: Enter [Menu]: Exit The seven menus are listed on the left, and the options available for the highlighted menu are shown on the right. 2. Use the directional buttons to...
User Manual
Page 53
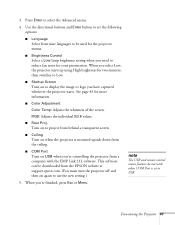
..., press Esc or Menu. Fine-tuning the Projector 47 Use the directional buttons and Enter button to set to project from behind a transparent screen. ■ Ceiling Turn on when the projector is mounted upside-down from a computer with the EMP Link 21L software. 3. When you 're controlling the projector from the ceiling. ■ COM Port Turn on to USB. Press Enter to reduce fan noise for more information. ■ Color Adjustment Color Temp: Adjusts the whiteness of the...
..., press Esc or Menu. Fine-tuning the Projector 47 Use the directional buttons and Enter button to set to project from behind a transparent screen. ■ Ceiling Turn on when the projector is mounted upside-down from a computer with the EMP Link 21L software. 3. When you 're controlling the projector from the ceiling. ■ COM Port Turn on to USB. Press Enter to reduce fan noise for more information. ■ Color Adjustment Color Temp: Adjusts the whiteness of the...

User Manual
Page 57
... projector, except the lamp and filter covers. All you need to cool the projector and cause overheating. If any cover on a regular basis is keep the lens clean. A clogged air filter can injure you should replace are the lamp and air filter. You also need to service this User's Guide. This chapter covers the following: ■ Cleaning the lens ■ Cleaning the projector case ■ Cleaning and replacing the air filter ■ Replacing the lamp ■ Resetting the lamp timer ■ Transporting the projector...
... projector, except the lamp and filter covers. All you need to cool the projector and cause overheating. If any cover on a regular basis is keep the lens clean. A clogged air filter can injure you should replace are the lamp and air filter. You also need to service this User's Guide. This chapter covers the following: ■ Cleaning the lens ■ Cleaning the projector case ■ Cleaning and replacing the air filter ■ Replacing the lamp ■ Resetting the lamp timer ■ Transporting the projector...

User Manual
Page 61
... to locate a dealer. Request part number V13H010L21. Maintaining and Transporting the Projector 55 In Canada, please call EPSON at least one hour (if it . Turn the projector upside-down period to replace the lamp: 1. Contact your dealer or call (800) 463-7766 to avoid injury. 2. Allow the projector to deteriorate. ■ The warning light is red, flashing red, or flashing orange. ■ The message LAMP REPLACE appears on the screen when the lamp comes...
... to locate a dealer. Request part number V13H010L21. Maintaining and Transporting the Projector 55 In Canada, please call EPSON at least one hour (if it . Turn the projector upside-down period to replace the lamp: 1. Contact your dealer or call (800) 463-7766 to avoid injury. 2. Allow the projector to deteriorate. ■ The warning light is red, flashing red, or flashing orange. ■ The message LAMP REPLACE appears on the screen when the lamp comes...
User Manual
Page 71
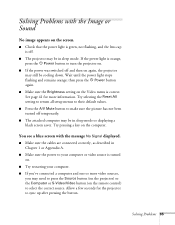
... press the Source button (on the projector) or the Computer or S-Video/Video button (on the remote control) to select the correct source. Solving Problems 65 See page 41 for the projector to sync up after pressing the button. Try pressing a key on the computer. You see a blue screen with the Image or Sound No image appears on the screen. ■ Check that the power light is green, not flashing, and the lens cap is...
... press the Source button (on the projector) or the Computer or S-Video/Video button (on the remote control) to select the correct source. Solving Problems 65 See page 41 for the projector to sync up after pressing the button. Try pressing a key on the computer. You see a blue screen with the Image or Sound No image appears on the screen. ■ Check that the power light is green, not flashing, and the lens cap is...
User Manual
Page 76
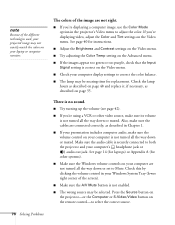
... Solving Problems Press the Source button on the projector-or the Computer or S-Video/Video button on page 55. The colors of the image are connected correctly, as described on the remote control-to adjust the color. See page 40 for instructions. ■ Adjust the Brightness and Contrast settings on the Video menu. ■ Try adjusting the Color Temp setting on the Advanced menu. ■ If the images appear too green or too purple, check that the Input Signal setting...
... Solving Problems Press the Source button on the projector-or the Computer or S-Video/Video button on page 55. The colors of the image are connected correctly, as described on the remote control-to adjust the color. See page 40 for instructions. ■ Adjust the Brightness and Contrast settings on the Video menu. ■ Try adjusting the Color Temp setting on the Advanced menu. ■ If the images appear too green or too purple, check that the Input Signal setting...

User Manual
Page 82
... section for the following: ■ Connecting the computer cable ■ Connecting a monitor to view your display on the desktop computer screen ■ Connecting the mouse cable (if you want to use the Auto Keystone function when you're projecting in ceiling or rear projection mode.) If you 'll be projecting with audio) Follow the steps in the projector's Advanced menu. This causes the image to Additional Equipment This section includes...
... section for the following: ■ Connecting the computer cable ■ Connecting a monitor to view your display on the desktop computer screen ■ Connecting the mouse cable (if you want to use the Auto Keystone function when you're projecting in ceiling or rear projection mode.) If you 'll be projecting with audio) Follow the steps in the projector's Advanced menu. This causes the image to Additional Equipment This section includes...
User Manual
Page 92
... purchased it does not operate normally when you use the correct power cord for long periods of the pixels may damage the cap. ■ The liquid crystal display panel contains more than where you to rain or water. If it , use the projector in performance, indicating a need for extended periods. ■ Do not place the projector and remote control on it will...
... purchased it does not operate normally when you use the correct power cord for long periods of the pixels may damage the cap. ■ The liquid crystal display panel contains more than where you to rain or water. If it , use the projector in performance, indicating a need for extended periods. ■ Do not place the projector and remote control on it will...

User Manual
Page 93
replace it. ■ Dim the ambient lighting and/or turn off any fluorescent lights. ■ Close any window coverings and/or move the projector out of direct sunlight. ■ Turn off other equipment that emits infrared energy, such as a radiant room heater, is in the room. If the remote control still does not work correctly, you can operate the projector by remote control via a line-of...
replace it. ■ Dim the ambient lighting and/or turn off any fluorescent lights. ■ Close any window coverings and/or move the projector out of direct sunlight. ■ Turn off other equipment that emits infrared energy, such as a radiant room heater, is in the room. If the remote control still does not work correctly, you can operate the projector by remote control via a line-of...

User Manual
Page 105
... connecting laptop, 14 menu, 38, 42 problems, troubleshooting, 70 turning off, 33 Auto button, 40 Auto Keystone correction, 11, 27, 38, 45 Auto Setup setting, 40 B Battery, replacing, 35 Blank screen, 22 to 24 Blurry image, 69 Brightness, 1, 47, 93 Brightness Control setting, 47 Brightness setting, 41 C Cables, 5 to 7 Camcorder, connecting to, 15 to 17 Carrying case, 5, 7, 59 Ceiling mount, 7, 47, 76 Cleaning air filter, 53 to 54 lens, 52 projector case, 52 Color adjusting, 47 problems, 70 specifications, 93 Color Mode Prompt setting, 46 Color Mode setting...
... connecting laptop, 14 menu, 38, 42 problems, troubleshooting, 70 turning off, 33 Auto button, 40 Auto Keystone correction, 11, 27, 38, 45 Auto Setup setting, 40 B Battery, replacing, 35 Blank screen, 22 to 24 Blurry image, 69 Brightness, 1, 47, 93 Brightness Control setting, 47 Brightness setting, 41 C Cables, 5 to 7 Camcorder, connecting to, 15 to 17 Carrying case, 5, 7, 59 Ceiling mount, 7, 47, 76 Cleaning air filter, 53 to 54 lens, 52 projector case, 52 Color adjusting, 47 problems, 70 specifications, 93 Color Mode Prompt setting, 46 Color Mode setting...

User Manual
Page 106
..., 27, 45, 68 size and projection distance, 10, 93 size range, 93 turning off, 33 zooming, 25, 33 Input Signal setting, 42 Installing projector, 76 100 Index K Kensington anti-theft device, 7, 11 Keystone correction, 27, 45, 68, 76, 93 L Lamp automatic shutoff, 29 number of hours used, 48 replacing, 55 to 58 specifications, 94 status light, 63 to 64 Language setting, 47, 62 Laptop computer connecting to, 12 to 15 displaying on, 22 to...
..., 27, 45, 68 size and projection distance, 10, 93 size range, 93 turning off, 33 zooming, 25, 33 Input Signal setting, 42 Installing projector, 76 100 Index K Kensington anti-theft device, 7, 11 Keystone correction, 27, 45, 68, 76, 93 L Lamp automatic shutoff, 29 number of hours used, 48 replacing, 55 to 58 specifications, 94 status light, 63 to 64 Language setting, 47, 62 Laptop computer connecting to, 12 to 15 displaying on, 22 to...
User Manual
Page 107
... projector, 10 to 11, 76 Power button, 21, 29 consumption, 94 light, 63 to 64 saving, 29, 46 supply, 94 PowerBook, connecting to, 12 to 15 Presenters Online, 3, 72 PrivateLine Support, 4, 72 to 73 Problems color, 70 image, 65 to 70 remote control, 71, 87 sound, 70 USB, 71 Projection lamp, see Lamp Projector carrying case, 5, 7, 59 cleaning, 51 to 54 distance from screen, 10, 93 feet, adjusting height with, 26 installing, 76 lamp specifications...
... projector, 10 to 11, 76 Power button, 21, 29 consumption, 94 light, 63 to 64 saving, 29, 46 supply, 94 PowerBook, connecting to, 12 to 15 Presenters Online, 3, 72 PrivateLine Support, 4, 72 to 73 Problems color, 70 image, 65 to 70 remote control, 71, 87 sound, 70 USB, 71 Projection lamp, see Lamp Projector carrying case, 5, 7, 59 cleaning, 51 to 54 distance from screen, 10, 93 feet, adjusting height with, 26 installing, 76 lamp specifications...
User Manual
Page 108
... S-Video/Video button, 32 Sync, adjusting, 40 T Technical support, 3 to 4, 72 to 73 Temperature light, 63 to 64 requirements, 95 Timer, lamp, 58 Tint setting, 41 Tracking, adjusting, 40 Transporting projector, 59 Troubleshooting image and sound problems, 65 to 70 projector problems, 61 to 70 remote control problems, 71 Turning off picture, 33 Turning off projector, 29 to 30 Turning on projector, 20 to 21 U Unpacking projector, 5 USB mouse cable, 5, 13, 71, 78, 82 User's Logo, displaying, 38, 43 to 44 V VCR, connecting to...
... S-Video/Video button, 32 Sync, adjusting, 40 T Technical support, 3 to 4, 72 to 73 Temperature light, 63 to 64 requirements, 95 Timer, lamp, 58 Tint setting, 41 Tracking, adjusting, 40 Transporting projector, 59 Troubleshooting image and sound problems, 65 to 70 projector problems, 61 to 70 remote control problems, 71 Turning off picture, 33 Turning off projector, 29 to 30 Turning on projector, 20 to 21 U Unpacking projector, 5 USB mouse cable, 5, 13, 71, 78, 82 User's Logo, displaying, 38, 43 to 44 V VCR, connecting to...


