Product Information Guide
Page 7
EPSON PowerLite 5500C/7500C Multimedia Projector Information Reference List Engineering Change Notices None. Related Documentation CPD 8045 EPSON PowerLite 5500C/7500C User’s Guide CPD 7218R1 EPSON PowerLite 5500C/7500C Easy Setup Card SM-ELP5500C EPSON PowerLite 5500C Multimedia Projector Service Manual SM-ELP7500C EPSON PowerLite 7500C Multimedia Projector Service Manual Addendum PL-ELP5500C EPSON PowerLite 5500C Multimedia Projector Parts Price List PL-ELP7500C EPSON PowerLite 7500C Multimedia Projector Parts Price List 2/99 PowerLite 5500C/7500C Multimedia Projector -...
EPSON PowerLite 5500C/7500C Multimedia Projector Information Reference List Engineering Change Notices None. Related Documentation CPD 8045 EPSON PowerLite 5500C/7500C User’s Guide CPD 7218R1 EPSON PowerLite 5500C/7500C Easy Setup Card SM-ELP5500C EPSON PowerLite 5500C Multimedia Projector Service Manual SM-ELP7500C EPSON PowerLite 7500C Multimedia Projector Service Manual Addendum PL-ELP5500C EPSON PowerLite 5500C Multimedia Projector Parts Price List PL-ELP7500C EPSON PowerLite 7500C Multimedia Projector Parts Price List 2/99 PowerLite 5500C/7500C Multimedia Projector -...
User Manual
Page 5
Contents Introduction 1 Getting the Most Out of Your Projector 3 Remote Control 3 Sleep Mode 3 Control Panel 3 Optional Accessories 4 About This Manual 5 Safety Instructions 6 Where to Get Help 8 Electronic Support Services 8 Automated Telephone Services 9 1 Installation 11 Unpacking the Projector 12 Additional Components 14 Attaching the Hand Strap 15 v
Contents Introduction 1 Getting the Most Out of Your Projector 3 Remote Control 3 Sleep Mode 3 Control Panel 3 Optional Accessories 4 About This Manual 5 Safety Instructions 6 Where to Get Help 8 Electronic Support Services 8 Automated Telephone Services 9 1 Installation 11 Unpacking the Projector 12 Additional Components 14 Attaching the Hand Strap 15 v
User Manual
Page 13
... This Manual This manual describes how to turn on how to set up your projector and connect it to control the projector or configure special effects. Chapter 2, "Using the Projector," describes how to install and use the EPSON PowerLite 5500C and PowerLite 7500C projectors. Read the installation procedures that apply to clean your configuration. Chapter 5, "Maintenance," describes how to your projector...
... This Manual This manual describes how to turn on how to set up your projector and connect it to control the projector or configure special effects. Chapter 2, "Using the Projector," describes how to install and use the EPSON PowerLite 5500C and PowerLite 7500C projectors. Read the installation procedures that apply to clean your configuration. Chapter 5, "Maintenance," describes how to your projector...

User Manual
Page 14
A Glossary and Index are provided at the end of the manual. 6 Introduction Chapter 7, "Technical Specifications," lists the technical specifications for the projector.
A Glossary and Index are provided at the end of the manual. 6 Introduction Chapter 7, "Technical Specifications," lists the technical specifications for the projector.

User Manual
Page 30
...connect the other end of the projector video cable to a PC Desktop Computer Before beginning, turn off the projector and computer if they are on. 1. b. Connecting to the computer's video port. Connect the projector video cable and monitor cable. ...a. Computer Out port Computer In port projector video cable monitor cable Note: Computer configurations vary. Connect either end of the ports needed to the projector's Computer In port. See your computer manual for the location of the projector video cable to connect your projector...
...connect the other end of the projector video cable to a PC Desktop Computer Before beginning, turn off the projector and computer if they are on. 1. b. Connecting to the computer's video port. Connect the projector video cable and monitor cable. ...a. Computer Out port Computer In port projector video cable monitor cable Note: Computer configurations vary. Connect either end of the ports needed to the projector's Computer In port. See your computer manual for the location of the projector video cable to connect your projector...

User Manual
Page 33
See your projector. a. Tighten the screws on . 1. b. Connect the projector video cable. Connect either end of the projector video cable to connect your computer manual for the location of the projector video cable to a PC Laptop Computer Before beginning, turn off the projector and computer if they are on both connectors. 24 1 • Installation c. Computer In port projector video cable Note: Laptop configurations vary. Connecting to the laptop's video (monitor) port. Connect the other end of the ports needed to the projector's Computer In port.
See your projector. a. Tighten the screws on . 1. b. Connect the projector video cable. Connect either end of the projector video cable to connect your computer manual for the location of the projector video cable to a PC Laptop Computer Before beginning, turn off the projector and computer if they are on both connectors. 24 1 • Installation c. Computer In port projector video cable Note: Laptop configurations vary. Connecting to the laptop's video (monitor) port. Connect the other end of the ports needed to the projector's Computer In port.

User Manual
Page 36
a. Connecting to a Desktop Macintosh Before beginning, turn off the projector and Macintosh if they are on. 1. Connect the projector video cable and monitor cable. Computer Out port Computer In port Macintosh desktop adapter Macintosh monitor adapter projector video cable Note: Macintosh computer configurations vary. Connecting to a Computer 27 See your computer manual for the location of the projector video cable to connect your projector. Connect either end of the ports needed to the projector's Computer In port.
a. Connecting to a Desktop Macintosh Before beginning, turn off the projector and Macintosh if they are on. 1. Connect the projector video cable and monitor cable. Computer Out port Computer In port Macintosh desktop adapter Macintosh monitor adapter projector video cable Note: Macintosh computer configurations vary. Connecting to a Computer 27 See your computer manual for the location of the projector video cable to connect your projector. Connect either end of the ports needed to the projector's Computer In port.
User Manual
Page 40
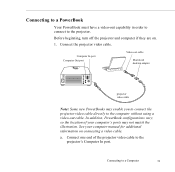
... cable. See your computer's ports may enable you to connect the projector video cable directly to the projector's Computer In port. a. Connect one end of your computer manual for additional information on . 1. Connecting to the projector. Before beginning, turn off the projector and computer if they are on connecting a video cable. Connecting to a PowerBook Your...
... cable. See your computer's ports may enable you to connect the projector video cable directly to the projector's Computer In port. a. Connect one end of your computer manual for additional information on . 1. Connecting to the projector. Before beginning, turn off the projector and computer if they are on connecting a video cable. Connecting to a PowerBook Your...
User Manual
Page 74
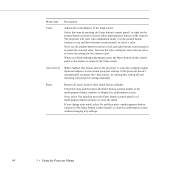
... input and adjust it to adjust the selected color. Next, use the pointer button (remote) or left and right buttons (control panel) to the current projector settings. Use the pointer button (remote) or up and down buttons (control panel) to reset the menu. Next, select Yes and then press the Enter... button (control panel) or a multi-purpose button (remote) to select a color. When you change your projector settings manually. Menu item Description Color Adjusts the color balance of the input source.
... input and adjust it to adjust the selected color. Next, use the pointer button (remote) or left and right buttons (control panel) to the current projector settings. Use the pointer button (remote) or up and down buttons (control panel) to reset the menu. Next, select Yes and then press the Enter... button (control panel) or a multi-purpose button (remote) to select a color. When you change your projector settings manually. Menu item Description Color Adjusts the color balance of the input source.
User Manual
Page 76
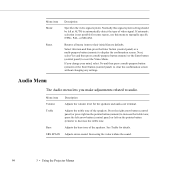
Select this menu to manually specify NTSC, PAL, or SECAM. Returns all menu items to reset the Video Menu. Audio Menu The Audio menu lets you change your mind, select ... (control panel) or press right on the pointer button (remote) to increase the treble tone; Increasing the value widens the sound. 66 3 • Using the Projector Menus SRS SPACE Adjusts stereo sound. If you make adjustments related to clear the confirmation screen without changing any settings. Menu item Description Volume Adjusts...
Select this menu to manually specify NTSC, PAL, or SECAM. Returns all menu items to reset the Video Menu. Audio Menu The Audio menu lets you change your mind, select ... (control panel) or press right on the pointer button (remote) to increase the treble tone; Increasing the value widens the sound. 66 3 • Using the Projector Menus SRS SPACE Adjusts stereo sound. If you make adjustments related to clear the confirmation screen without changing any settings. Menu item Description Volume Adjusts...

User Manual
Page 91
Configure your laptop's manual or online help for instructions. 9. Go to page 85 to the mouse port on your laptop. 7. To configure the projector from your laptop using the ELP Link III software or to use the ELP Link III software if your laptop has only one end of the 9-pin serial cable ...to appear on all connectors. 8. Tighten the screws on both the laptop's screen and the projector. Note: You may have...
Configure your laptop's manual or online help for instructions. 9. Go to page 85 to the mouse port on your laptop. 7. To configure the projector from your laptop using the ELP Link III software or to use the ELP Link III software if your laptop has only one end of the 9-pin serial cable ...to appear on all connectors. 8. Tighten the screws on both the laptop's screen and the projector. Note: You may have...

User Manual
Page 97
...Software License Agreement screen. After a moment, you return to install the software for the software. Insert the Projector Software CD into your screen saver.) 10. Then the Installer copies the ELP Link III files to install them. 13. 6. If you can view your system. 11. Follow the ...and ELP Link User's Guide are checked. If you selected to install the online User's Guide and Acrobat Reader, follow the on your system, also check Acrobat Reader to install the program so you don't have Adobe® Acrobat® Reader on -screen instructions to your online manual....
...Software License Agreement screen. After a moment, you return to install the software for the software. Insert the Projector Software CD into your screen saver.) 10. Then the Installer copies the ELP Link III files to install them. 13. 6. If you can view your system. 11. Follow the ...and ELP Link User's Guide are checked. If you selected to install the online User's Guide and Acrobat Reader, follow the on your system, also check Acrobat Reader to install the program so you don't have Adobe® Acrobat® Reader on -screen instructions to your online manual....
User Manual
Page 136
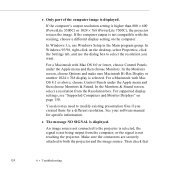
... screen, choose Options and make sure Macintosh Hi-Res Display or another 1024 × 768 display is higher than 800 × 600 (PowerLite 5500C) or 1024 × 768 (PowerLite 7500C), the projector resizes the image. You also may need to select the resolution you created them for specific information. ◗ The message NO SIGNAL... under the Apple menu and then choose Monitors. In Windows 3.x, use the dialog box to modify existing presentation files if you want. See your software manual for a different resolution.
... screen, choose Options and make sure Macintosh Hi-Res Display or another 1024 × 768 display is higher than 800 × 600 (PowerLite 5500C) or 1024 × 768 (PowerLite 7500C), the projector resizes the image. You also may need to select the resolution you created them for specific information. ◗ The message NO SIGNAL... under the Apple menu and then choose Monitors. In Windows 3.x, use the dialog box to modify existing presentation files if you want. See your software manual for a different resolution.
Product Brochure
Page 2
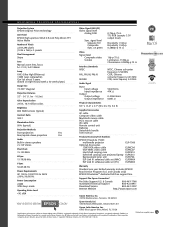
..._o_n__g_r_e_e_n_____0_._2_8_6_V_p__-p__7_5 Video Pixel Arrangement Signal level S__tr_ip__e Lens Manual zoom lens, focus f_=_1__.7_-_2_.0__, ...Accessory Part Numbers Audio EPSON PowerLite 7500C Built-in stereo speakers multimedia projector ELP-7500 2__x__1_W__s_t_e_r_e_o Pixel Clock Optional...I O N S Projection System Video Signal RGB (PC) E__P_S_O_N__O__r_ig_i_n_a_l _P_r_is_m___te_c_h_n__o_lo_g__y LCD Panel Video signal level Analog RGB 0.7Vp-p 75 Ω TTL RGB (accepts 3.3V EPSON high aperture SVGA 0.9-inch Poly-Silicon TFT output level) A__c_ti_v_e_M__a_t_ri_x Sync. ...
..._o_n__g_r_e_e_n_____0_._2_8_6_V_p__-p__7_5 Video Pixel Arrangement Signal level S__tr_ip__e Lens Manual zoom lens, focus f_=_1__.7_-_2_.0__, ...Accessory Part Numbers Audio EPSON PowerLite 7500C Built-in stereo speakers multimedia projector ELP-7500 2__x__1_W__s_t_e_r_e_o Pixel Clock Optional...I O N S Projection System Video Signal RGB (PC) E__P_S_O_N__O__r_ig_i_n_a_l _P_r_is_m___te_c_h_n__o_lo_g__y LCD Panel Video signal level Analog RGB 0.7Vp-p 75 Ω TTL RGB (accepts 3.3V EPSON high aperture SVGA 0.9-inch Poly-Silicon TFT output level) A__c_ti_v_e_M__a_t_ri_x Sync. ...


