Technical Brief (Multimedia Projectors)
Page 2
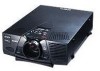
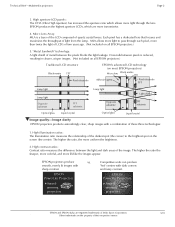
.... (Not included on all EPSON projectors.) 5. and fuzzy contrast. EPSON PowerLite Projectors EPSON Powerlite Projectors ➤ Awardwinning projectors ➤ Awardwinning projectors EPSON Sales Training EPSON and EPSON Stylus are registered trademarks of Seiko Epson Corporation. 3/01 Other trademarks are more transmissive. 4. Each pixel has a dedicated lens that focuses and maximizes the throughput of their respective owners. EPSON produces the highest aperture LCD's, which allows more than twice...
.... (Not included on all EPSON projectors.) 5. and fuzzy contrast. EPSON PowerLite Projectors EPSON Powerlite Projectors ➤ Awardwinning projectors ➤ Awardwinning projectors EPSON Sales Training EPSON and EPSON Stylus are registered trademarks of Seiko Epson Corporation. 3/01 Other trademarks are more transmissive. 4. Each pixel has a dedicated lens that focuses and maximizes the throughput of their respective owners. EPSON produces the highest aperture LCD's, which allows more than twice...
Product Information Guide
Page 1
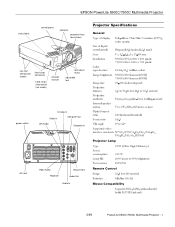
EPSON PowerLite 5500C/7500C Multimedia Projector status lights control panel speakers projection lens/ focus/zoom rear feet (left foot not visible) hand strap connectors hand strap slider button (not visible) infrared receiver foot adjust levers adjustable foot ...power switch S-Video In Video In Computer Out Left Audio Computer In AC inlet Right Audio Repeater Mouse/Com Audio Out Audio In Projector Specifications...
EPSON PowerLite 5500C/7500C Multimedia Projector status lights control panel speakers projection lens/ focus/zoom rear feet (left foot not visible) hand strap connectors hand strap slider button (not visible) infrared receiver foot adjust levers adjustable foot ...power switch S-Video In Video In Computer Out Left Audio Computer In AC inlet Right Audio Repeater Mouse/Com Audio Out Audio In Projector Specifications...
User Manual
Page 6
... to a Video Source 35 Connecting to an External Speaker or PA System 37 2 Using the Projector 39 Turning the Equipment On and Off 41 Turning the Projector On and Off 41 Positioning the Projector 43 Calculating Image Size and Projection Distance 45 Focusing and Positioning the Screen Image 47 Resize Button 49 Controlling the...
... to a Video Source 35 Connecting to an External Speaker or PA System 37 2 Using the Projector 39 Turning the Equipment On and Off 41 Turning the Projector On and Off 41 Positioning the Projector 43 Calculating Image Size and Projection Distance 45 Focusing and Positioning the Screen Image 47 Resize Button 49 Controlling the...

User Manual
Page 48
2 Using the Projector This chapter provides the following information about using your projector: q Turning the equipment on and off q Positioning the projector relative to the screen q Focusing and positioning the screen image q Controlling the projector with the remote control and the control panel q Monitoring the projector's operating status 39
2 Using the Projector This chapter provides the following information about using your projector: q Turning the equipment on and off q Positioning the projector relative to the screen q Focusing and positioning the screen image q Controlling the projector with the remote control and the control panel q Monitoring the projector's operating status 39

User Manual
Page 49
The illustration below identifies the parts of your projector. status lights control panel speakers projection lens/focus/zoom rear feet (left foot not visible) hand strap connectors infrared receiver foot adjust levers adjustable foot 40 2 • Using the Projector
The illustration below identifies the parts of your projector. status lights control panel speakers projection lens/focus/zoom rear feet (left foot not visible) hand strap connectors infrared receiver foot adjust levers adjustable foot 40 2 • Using the Projector

User Manual
Page 57
zoom ring focus ring q To focus the image, rotate the focus ring (the front ring on the screen. q To adjust the size of the image, rotate the zoom ring (the rear ring). Rotate the zoom ring clockwise to make the screen image larger or counterclockwise to make it is in focus and correctly positioned on the lens). Focusing and Positioning the Screen Image When an image appears on screen, check that it smaller. 48 2 • Using the Projector
zoom ring focus ring q To focus the image, rotate the focus ring (the front ring on the screen. q To adjust the size of the image, rotate the zoom ring (the rear ring). Rotate the zoom ring clockwise to make the screen image larger or counterclockwise to make it is in focus and correctly positioned on the lens). Focusing and Positioning the Screen Image When an image appears on screen, check that it smaller. 48 2 • Using the Projector

User Manual
Page 58
...1. While lifting the foot adjust levers, raise or lower the projector until the screen image is correctly positioned. 3. This unlocks the foot so it while you need to drop the projector. ✦ Caution: Don't hold or lift the projector by its new position. If you lift the blue foot adjust... levers above the adjustable foot. Focusing and Positioning the Screen Image 49 Be careful not to raise or lower...
...1. While lifting the foot adjust levers, raise or lower the projector until the screen image is correctly positioned. 3. This unlocks the foot so it while you need to drop the projector. ✦ Caution: Don't hold or lift the projector by its new position. If you lift the blue foot adjust... levers above the adjustable foot. Focusing and Positioning the Screen Image 49 Be careful not to raise or lower...
User Manual
Page 115
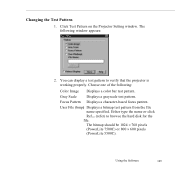
... focus pattern. You can display a test pattern to browse the hard disk for the file. Click Test Pattern on the Projector Setting window. The following : Color Image Displays a color bar test pattern. User File (bmp) Displays a bitmap test pattern from the file name specified. The bitmap should be 1024 × 768 pixels (PowerLite 7500C...
... focus pattern. You can display a test pattern to browse the hard disk for the file. Click Test Pattern on the Projector Setting window. The following : Color Image Displays a color bar test pattern. User File (bmp) Displays a bitmap test pattern from the file name specified. The bitmap should be 1024 × 768 pixels (PowerLite 7500C...

User Manual
Page 130
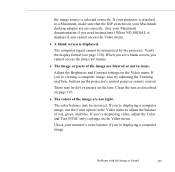
... and follow all suggestions that can be performed within the Help menu to your dealer or contact EPSON as described on the control panel or the remote control. Help for the following problems is available...: q The image does not appear on the screen q The image is not in focus q The image is blurred q The image is not displayed fully on the screen q The colors of... Help menu, press the Help button on page 8. If none of the submenus above, actual projector adjustments can resolve some of the suggestions solve the problem, call your problem. Using the Online ...
... and follow all suggestions that can be performed within the Help menu to your dealer or contact EPSON as described on the control panel or the remote control. Help for the following problems is available...: q The image does not appear on the screen q The image is not in focus q The image is blurred q The image is not displayed fully on the screen q The colors of... Help menu, press the Help button on page 8. If none of the submenus above, actual projector adjustments can resolve some of the suggestions solve the problem, call your problem. Using the Online ...
User Manual
Page 137
Verify the display format (see a blank screen, you 're displaying a computer image, use the Color option in focus. There may be incorrect. If you cannot access the projector menus. ◗ The image or parts of red, green, and blue. If you 're displaying a computer image. When you see page 130...the Video menu. the image source is displayed. Problems with the Image or Sound 125 The computer signal cannot be dirt or smears on the projector's control panel or remote control. Adjust the Brightness and Contrast settings on page 110. ◗ The colors of the image are set correctly...
Verify the display format (see a blank screen, you 're displaying a computer image, use the Color option in focus. There may be incorrect. If you cannot access the projector menus. ◗ The image or parts of red, green, and blue. If you 're displaying a computer image. When you see page 130...the Video menu. the image source is displayed. Problems with the Image or Sound 125 The computer signal cannot be dirt or smears on the projector's control panel or remote control. Adjust the Brightness and Contrast settings on page 110. ◗ The colors of the image are set correctly...

User Manual
Page 151
... and recalling assignments, 97 Electrical specifications, 129 Ellipse, 93, 96 ELP Link III software installing, 85 to 88 launching, 88 to 90 using, 91 to 108 Environmental specifications, 129 EPSON electronic support, 8 to 9 F FaxAdvice, EPSON, 9 Focus ring, 47 Focusing, 47 to 48 Foot, raising or lowering image, 48 to 49...49, 63, 100 focusing, 47 to 49 leaving a copy on the screen, 94 problems, 123 to 126 resizing, 49, 55 size range, 127 Image Gamma, 105 Infrared receiver, location, 40 Installing the ELP Link III software, 85 to 45 Distance, calculating distance from projector to screen, 43 to...
... and recalling assignments, 97 Electrical specifications, 129 Ellipse, 93, 96 ELP Link III software installing, 85 to 88 launching, 88 to 90 using, 91 to 108 Environmental specifications, 129 EPSON electronic support, 8 to 9 F FaxAdvice, EPSON, 9 Focus ring, 47 Focusing, 47 to 48 Foot, raising or lowering image, 48 to 49...49, 63, 100 focusing, 47 to 49 leaving a copy on the screen, 94 problems, 123 to 126 resizing, 49, 55 size range, 127 Image Gamma, 105 Infrared receiver, location, 40 Installing the ELP Link III software, 85 to 45 Distance, calculating distance from projector to screen, 43 to...
User Manual
Page 153
Projector calculating distance to screen, 19, 45 to 46 changing ELP Link III settings, 99 to 103 connecting, 20 to 38 focusing, 47 to 48 hanging from the ceiling, 45, 67, 103 lamp specifications, 128 parts identified, 40 positioning, 43 to 45 positioning the screen image, 47 ... status lights, 56 to 57, 119 to 121 turning on and off, 41 to 42 using the Quick Change Toolbar, 99 Projector case, cleaning, 110 Projector Control window, 99 to 103 Projector Setting window, 98 to 99 Prompt menu option, 67, 103 Q Quick Change Toolbar, 99 R Rear projection, 68, 103 Remote control buttons...
Projector calculating distance to screen, 19, 45 to 46 changing ELP Link III settings, 99 to 103 connecting, 20 to 38 focusing, 47 to 48 hanging from the ceiling, 45, 67, 103 lamp specifications, 128 parts identified, 40 positioning, 43 to 45 positioning the screen image, 47 ... status lights, 56 to 57, 119 to 121 turning on and off, 41 to 42 using the Quick Change Toolbar, 99 Projector case, cleaning, 110 Projector Control window, 99 to 103 Projector Setting window, 98 to 99 Prompt menu option, 67, 103 Q Quick Change Toolbar, 99 R Rear projection, 68, 103 Remote control buttons...
Product Brochure
Page 2
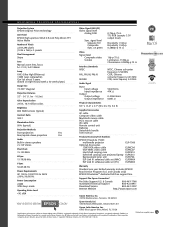
...AT I O N S Projection System Video Signal RGB (PC) E__P_S_O_N__O__r_ig_i_n_a_l _P_r_is_m___te_c_h_n__o_lo_g__y LCD Panel Video signal level Analog RGB 0.7Vp-p 75 Ω TTL RGB (accepts 3.3V EPSON high aperture SVGA 0.9-inch Poly-Silicon TFT output level) A__c_ti_v_e_M__a_t_ri_x Sync. and ...Video Pixel Arrangement Signal level S__tr_ip__e Lens Manual zoom lens, focus f_=_1__.7_-_2_.0__, _f=__3_7_-4__8_m__m Lamp ...Product/Accessory Part Numbers Audio EPSON PowerLite 7500C Built-in stereo speakers multimedia projector ELP-7500 2__x__1_W__s_t_e_r_e_o Pixel Clock Optional ...
...AT I O N S Projection System Video Signal RGB (PC) E__P_S_O_N__O__r_ig_i_n_a_l _P_r_is_m___te_c_h_n__o_lo_g__y LCD Panel Video signal level Analog RGB 0.7Vp-p 75 Ω TTL RGB (accepts 3.3V EPSON high aperture SVGA 0.9-inch Poly-Silicon TFT output level) A__c_ti_v_e_M__a_t_ri_x Sync. and ...Video Pixel Arrangement Signal level S__tr_ip__e Lens Manual zoom lens, focus f_=_1__.7_-_2_.0__, _f=__3_7_-4__8_m__m Lamp ...Product/Accessory Part Numbers Audio EPSON PowerLite 7500C Built-in stereo speakers multimedia projector ELP-7500 2__x__1_W__s_t_e_r_e_o Pixel Clock Optional ...