Product Information Guide
Page 2
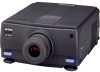
... Documents Engineering Change Notices None. Product Support Bulletins None. EPSON ELP-3000 Data/Video Projector Status Lights The status lights at the top of the Y-cable: the LCD connector, the VGA connector, and the Monitor connector. Related Documentation 4003816 EPSON ELP-3000 Data/Video Projector Owner's Manual PL-ELP3000 EPSON ELP-3000 Data/Video Projector Parts Price List TM-ELP3000 EPSON ELP-3000 Data/Video Projector Service Manual 7 IGreendigRal 9 Redanalog 16 Blue digital 17 Red digital...
... Documents Engineering Change Notices None. Product Support Bulletins None. EPSON ELP-3000 Data/Video Projector Status Lights The status lights at the top of the Y-cable: the LCD connector, the VGA connector, and the Monitor connector. Related Documentation 4003816 EPSON ELP-3000 Data/Video Projector Owner's Manual PL-ELP3000 EPSON ELP-3000 Data/Video Projector Parts Price List TM-ELP3000 EPSON ELP-3000 Data/Video Projector Service Manual 7 IGreendigRal 9 Redanalog 16 Blue digital 17 Red digital...
User Manual
Page 4
Introduction vii Getting the Most Out of Your Projector viii Optional Accessories X About This Manual Xi Safety Instructions Xii Where to Get Help xiv CompuServe online support xv 1 Installation 1 Unpacking the Projector 2 Additional components 3 Setting Up the Projector 4 Connecting to a Computer 6 Connecting to a PC desktop computer 7 Connecting to a PC laptop computer 8 Contents 111
Introduction vii Getting the Most Out of Your Projector viii Optional Accessories X About This Manual Xi Safety Instructions Xii Where to Get Help xiv CompuServe online support xv 1 Installation 1 Unpacking the Projector 2 Additional components 3 Setting Up the Projector 4 Connecting to a Computer 6 Connecting to a PC desktop computer 7 Connecting to a PC laptop computer 8 Contents 111
User Manual
Page 6
Video menu 36 Display menu 37 Audio menu Options menu 39 40 Custom menu 41 4 Remote Control of the Computer 43 ELP Remote Programmer Templates 44 Starting the ELP Remote Programmer 45 Assigning a Macro to a Programmable Button 48 Using record mode 49 Using manual mode 51 Activating a Template 51 ELP Remote Programmer Menus 52 5 Maintenance 53 Cleaning the Lens 54 Cleaning the Projector Case 54 Cleaning the Air Filter 54 Cleaning the Trackball 56 Replacing the Lamp 58 Replacing the Fuse 61 Contents V
Video menu 36 Display menu 37 Audio menu Options menu 39 40 Custom menu 41 4 Remote Control of the Computer 43 ELP Remote Programmer Templates 44 Starting the ELP Remote Programmer 45 Assigning a Macro to a Programmable Button 48 Using record mode 49 Using manual mode 51 Activating a Template 51 ELP Remote Programmer Menus 52 5 Maintenance 53 Cleaning the Lens 54 Cleaning the Projector Case 54 Cleaning the Air Filter 54 Cleaning the Trackball 56 Replacing the Lamp 58 Replacing the Fuse 61 Contents V
User Manual
Page 12
Read the installation procedures that apply to your computer, video source, and optional other equipment. control simple projector settings using the remote control, the operation panel, and the ELP Link software; and set up the projector and connecting it to your environment. Chapter 6, "Troubleshooting,"... Computer," explains how to use the ELP Remote Programmer so you how to interpret the projector's status lights and gives helpful information for rear projection. It also describes how you how to turn on the projector; About This Manual Chapter 1, "Installation," gives step-by...
Read the installation procedures that apply to your computer, video source, and optional other equipment. control simple projector settings using the remote control, the operation panel, and the ELP Link software; and set up the projector and connecting it to your environment. Chapter 6, "Troubleshooting,"... Computer," explains how to use the ELP Remote Programmer so you how to interpret the projector's status lights and gives helpful information for rear projection. It also describes how you how to turn on the projector; About This Manual Chapter 1, "Installation," gives step-by...

User Manual
Page 14
... the wall outlet and refer servicing to service this Owner's Manual, do not attempt to qualified service personnel under the following conditions: A. If liquid has been spilled into it or it exhibits a distinct change in the projector. 11. Refer all servicing to dangerous voltages and other hazards. D. Opening or removing covers... spill liquid of any kind in performance, indicating a need for extended periods. 13. Never push objects of any kind through cabinet slots. Unplug the projector during lightning storms or when it has been dropped or the cabinet has been damaged.
... the wall outlet and refer servicing to service this Owner's Manual, do not attempt to qualified service personnel under the following conditions: A. If liquid has been spilled into it or it exhibits a distinct change in the projector. 11. Refer all servicing to dangerous voltages and other hazards. D. Opening or removing covers... spill liquid of any kind in performance, indicating a need for extended periods. 13. Never push objects of any kind through cabinet slots. Unplug the projector during lightning storms or when it has been dropped or the cabinet has been damaged.

User Manual
Page 25
...8 1 l Installation Connecting to a PC laptop computer Before beginning, turn off the projector and computer if they are on the right side of the projector, under the handle. 1. To access the connectors on the projector, push open the cover located on . When the external graphics port is activated,... some laptop computers automatically turn off their internal display See your computer manual for all connectors to ...
...8 1 l Installation Connecting to a PC laptop computer Before beginning, turn off the projector and computer if they are on the right side of the projector, under the handle. 1. To access the connectors on the projector, push open the cover located on . When the external graphics port is activated,... some laptop computers automatically turn off their internal display See your computer manual for all connectors to ...
User Manual
Page 63
...screen. See page 51 for more keyboard keys. l In record mode, you have a PC, use record mode or manual mode. On the Macintosh, some non-character keys cannot be typed in the text box to the button, with special ...Buttons of the Special menu. 46 4 l Remote Control of the screen and select the appropriate mouse command. You can use manual mode to enter key combinations, such as Ctrl + Alt + S. To assign a mouse command, open the Special menu ...assign keyboard keys, you want to a Programmable Button To assign a macro, start the ELP Remote Programmer. Assigning a Macro to edit.
...screen. See page 51 for more keyboard keys. l In record mode, you have a PC, use record mode or manual mode. On the Macintosh, some non-character keys cannot be typed in the text box to the button, with special ...Buttons of the Special menu. 46 4 l Remote Control of the screen and select the appropriate mouse command. You can use manual mode to enter key combinations, such as Ctrl + Alt + S. To assign a mouse command, open the Special menu ...assign keyboard keys, you want to a Programmable Button To assign a macro, start the ELP Remote Programmer. Assigning a Macro to edit.
User Manual
Page 65
... Buttons.) On the PC, use the Link symbol under Mouse/Special Buttons between each button you want to create key combinations. Note: In Windows, the ELP Remote Programmer assumes use COM2 port, choose COM2 in the Special menu 50 4 l Remote Control of the COM1 serial port. For example, to program ..., press the Scroll Lock key 7. On the Macintosh, you have connected the RS-232C cable as Command + 0, while in record mode. To do so, use manual mode to program. 6. Turn off record mode. Choose Save or Save As in the File menu. To use of the Computer This makes the new...
... Buttons.) On the PC, use the Link symbol under Mouse/Special Buttons between each button you want to create key combinations. Note: In Windows, the ELP Remote Programmer assumes use COM2 port, choose COM2 in the Special menu 50 4 l Remote Control of the COM1 serial port. For example, to program ..., press the Scroll Lock key 7. On the Macintosh, you have connected the RS-232C cable as Command + 0, while in record mode. To do so, use manual mode to program. 6. Turn off record mode. Choose Save or Save As in the File menu. To use of the Computer This makes the new...

User Manual
Page 66
... save a template before you need to activate the template to be able to a button, you activate it. For example, the code for the key. Using manual mode Use manual mode if you have a PC and want to program key combinations on the PC: To program Ah + X, enter [ [A]X]. To...
... save a template before you need to activate the template to be able to a button, you activate it. For example, the code for the key. Using manual mode Use manual mode if you have a PC and want to program key combinations on the PC: To program Ah + X, enter [ [A]X]. To...
User Manual
Page 82
...In Windows, use Windows Setup in standby mode. Press the Video button on the lamp. For a Macintosh, choose Control Panels under the Apple menu and then Monitors; See your software manual for a resolution higher than 640 x 480, and the projector is set correctly, Use the Brightness button to adjust the ...the remote control or operation panel to turn on the remote control or operation panel to choose a different monitor display setting. The projector may not be in the Main program group. For supported display settings, see Appendix A. You need to both the image source and...
...In Windows, use Windows Setup in standby mode. Press the Video button on the lamp. For a Macintosh, choose Control Panels under the Apple menu and then Monitors; See your software manual for a resolution higher than 640 x 480, and the projector is set correctly, Use the Brightness button to adjust the ...the remote control or operation panel to turn on the remote control or operation panel to choose a different monitor display setting. The projector may not be in the Main program group. For supported display settings, see Appendix A. You need to both the image source and...
User Replaceable Parts List
Page 1
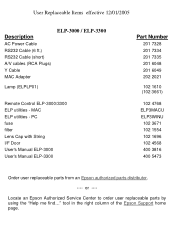
... with String I/F Door User's Manual ELP-3000 User's Manual ELP-3300 Part Number 201 7328 201 7334 201 7335 201 6048 201 6049 202 2021 102 1610 (102 3661) 102 4768 ELP3MACU ELP3WINU 102 3671 102 1554 102 1696 102 4568 400 3816 400 5473 Order user replaceable parts from an Epson authorized parts distributor. ---- tool...
... with String I/F Door User's Manual ELP-3000 User's Manual ELP-3300 Part Number 201 7328 201 7334 201 7335 201 6048 201 6049 202 2021 102 1610 (102 3661) 102 4768 ELP3MACU ELP3WINU 102 3671 102 1554 102 1696 102 4568 400 3816 400 5473 Order user replaceable parts from an Epson authorized parts distributor. ---- tool...
User Setup Information
Page 1
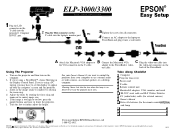
.... Connect an AC adapter to control the projector from your Owner's Manual if you may be trademarks of their respective owners. If the image is a registered trademark of the PowerBook. If you need help or EPSON Road Service, call 1-800-922-8911.... c. Turn the feet to the PowerBook's video- Copyright 8 1996 by rotating the zoom ring. ELP-3000/3300 EPSON® Easy Setup 2 Plug the VGA connector on both the computer's screen and the projector. Using The Projector a. d. Take Along Checklist 0 Computer Cl Projector lens cover IJ Power cord 0 Y-cable 0...
.... Connect an AC adapter to control the projector from your Owner's Manual if you may be trademarks of their respective owners. If the image is a registered trademark of the PowerBook. If you need help or EPSON Road Service, call 1-800-922-8911.... c. Turn the feet to the PowerBook's video- Copyright 8 1996 by rotating the zoom ring. ELP-3000/3300 EPSON® Easy Setup 2 Plug the VGA connector on both the computer's screen and the projector. Using The Projector a. d. Take Along Checklist 0 Computer Cl Projector lens cover IJ Power cord 0 Y-cable 0...

