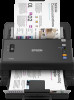

User Manual
Page 3
Contents DS-760/DS-860 User's Guide ...7 Scanner Basics...8 Scanner Parts Locations ...8 Scanner Parts...9 Scanner Buttons and Lights...11 Page Separation Lever...12 User Replaceable Epson Scanner Parts 13 Changing the Power Off Setting ...14 Loading Originals...15 Loading Originals in the Input ... Computers from the Network Interface Unit 40 Scanning ...41 Starting a Scan from a Scanner Button 41 Adding and Assigning Scan Jobs 42 Scanning with Document Capture Pro 43 Scanning with Epson Scan...46 Available Image Adjustments ...48 Scanning Special Projects...49 Scanning Two Originals onto...
Contents DS-760/DS-860 User's Guide ...7 Scanner Basics...8 Scanner Parts Locations ...8 Scanner Parts...9 Scanner Buttons and Lights...11 Page Separation Lever...12 User Replaceable Epson Scanner Parts 13 Changing the Power Off Setting ...14 Loading Originals...15 Loading Originals in the Input ... Computers from the Network Interface Unit 40 Scanning ...41 Starting a Scan from a Scanner Button 41 Adding and Assigning Scan Jobs 42 Scanning with Document Capture Pro 43 Scanning with Epson Scan...46 Available Image Adjustments ...48 Scanning Special Projects...49 Scanning Two Originals onto...

User Manual
Page 4
... Does Not Work as Expected 79 Scanning Software Does Not Operate Correctly 79 Cannot Start Epson Scan ...80 Original Feeds Incorrectly in Scanner 80 Original Jams in Scanner...81 Scanning is Slow ...83 Solving Network Interface Unit Problems 84 Solving Scanned Image Quality Problems 84 Back of Original Image Appears in Scanned Image...
... Does Not Work as Expected 79 Scanning Software Does Not Operate Correctly 79 Cannot Start Epson Scan ...80 Original Feeds Incorrectly in Scanner 80 Original Jams in Scanner...81 Scanning is Slow ...83 Solving Network Interface Unit Problems 84 Solving Scanned Image Quality Problems 84 Back of Original Image Appears in Scanned Image...

User Manual
Page 8
Scanner Basics See these sections to learn about the basic features of your scanner. Scanner Parts Scanner Buttons and Lights Page Separation Lever Parent topic: Scanner Basics 8 Scanner Parts Locations User Replaceable Epson Scanner Parts Changing the Power Off Setting Scanner Parts Locations See these sections to identify the parts on your scanner.
Scanner Basics See these sections to learn about the basic features of your scanner. Scanner Parts Scanner Buttons and Lights Page Separation Lever Parent topic: Scanner Basics 8 Scanner Parts Locations User Replaceable Epson Scanner Parts Changing the Power Off Setting Scanner Parts Locations See these sections to identify the parts on your scanner.
User Manual
Page 9
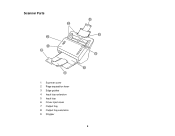
Scanner Parts 1 Scanner cover 2 Page separation lever 3 Edge guides 4 Input tray extension 5 Input tray 6 Cover open lever 7 Output tray 8 Output tray extension 9 Stopper 9
Scanner Parts 1 Scanner cover 2 Page separation lever 3 Edge guides 4 Input tray extension 5 Input tray 6 Cover open lever 7 Output tray 8 Output tray extension 9 Stopper 9
User Manual
Page 11
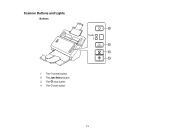
Scanner Buttons and Lights Buttons 1 The power button 2 The Job Select button 3 The stop button 4 The start button 11
Scanner Buttons and Lights Buttons 1 The power button 2 The Job Select button 3 The stop button 4 The start button 11
User Manual
Page 12
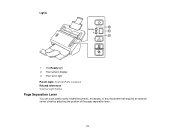
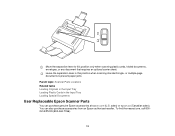
Lights 1 The Ready light 2 The numeric display 3 The ! error light Parent topic: Scanner Parts Locations Related references Scanner Light Status Page Separation Lever You can scan plastic cards, folded documents, envelopes, or any document that requires an optional carrier sheet by adjusting the position of the page separation lever. 12
Lights 1 The Ready light 2 The numeric display 3 The ! error light Parent topic: Scanner Parts Locations Related references Scanner Light Status Page Separation Lever You can scan plastic cards, folded documents, envelopes, or any document that requires an optional carrier sheet by adjusting the position of the page separation lever. 12
User Manual
Page 13
... find the nearest one, call 800GO-EPSON (800-463-7766). 13 sales) or epson.ca (Canadian sales). You can purchase genuine Epson accessories at epson.com (U.S. Leave the separation lever in the Input Tray Loading Special Documents User Replaceable Epson Scanner Parts You can also purchase accessories from an Epson authorized reseller. or multiple-page documents to...
... find the nearest one, call 800GO-EPSON (800-463-7766). 13 sales) or epson.ca (Canadian sales). You can purchase genuine Epson accessories at epson.com (U.S. Leave the separation lever in the Input Tray Loading Special Documents User Replaceable Epson Scanner Parts You can also purchase accessories from an Epson authorized reseller. or multiple-page documents to...

User Manual
Page 14
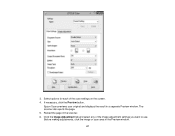
...Carrier sheet Roller assembly kit Part number B12B808441 B12B813431 B12B813581 Parent topic: Scanner Basics Changing the Power Off Setting You can use the Epson Scan Settings utility to the Apps screen and select EPSON Scan Settings. • Windows (other versions): Click or Start, and... All Programs or Programs. Select Epson, then EPSON Scan, then click EPSON Scan Settings. 2. Enter the time period you enter a value of the following to access the Epson Scan Settings utility: • Windows 8.x: Navigate to change the time period before the scanner turns off automatically. 1. Click ...
...Carrier sheet Roller assembly kit Part number B12B808441 B12B813431 B12B813581 Parent topic: Scanner Basics Changing the Power Off Setting You can use the Epson Scan Settings utility to the Apps screen and select EPSON Scan Settings. • Windows (other versions): Click or Start, and... All Programs or Programs. Select Epson, then EPSON Scan, then click EPSON Scan Settings. 2. Enter the time period you enter a value of the following to access the Epson Scan Settings utility: • Windows 8.x: Navigate to change the time period before the scanner turns off automatically. 1. Click ...
User Manual
Page 15
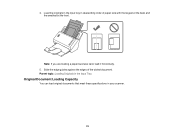
... into the input tray. This may wrinkle or damage the original. Caution: Do not load photos, or valuable original documents or artwork, directly into the scanner.
... into the input tray. This may wrinkle or damage the original. Caution: Do not load photos, or valuable original documents or artwork, directly into the scanner.
User Manual
Page 23
Slide the edge guides against the edges of paper size with the largest at the back and the smallest at the front. Parent topic: Loading Originals in the Input Tray Original Document Loading Capacity You can load original documents that meet these specifications in descending order of the widest document. Load the originals in the input tray in your scanner. 23 4. Note: If you are loading a paper business card, load it horizontally. 5.
Slide the edge guides against the edges of paper size with the largest at the back and the smallest at the front. Parent topic: Loading Originals in the Input Tray Original Document Loading Capacity You can load original documents that meet these specifications in descending order of the widest document. Load the originals in the input tray in your scanner. 23 4. Note: If you are loading a paper business card, load it horizontally. 5.
User Manual
Page 24
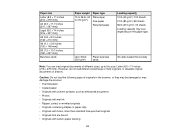
... Up to 56 lb (210 g/m²) Paper business cards 30 cards loaded horizontally Note: You can load original documents of originals in the scanner, or they may be damaged or may vary depending on the paper type. Caution: Do not load the following types of different sizes, up...Loading capacity 10 lb (40 g/m²): 100 sheets 21 lb (80 g/m²): 80 sheets 56 lb (210 g/m²): 30 sheets Loading capacity may damage the scanner: • Thermal paper • Coated paper • Originals with uneven surfaces, such as embossed documents • Photos • Originals with wet ink •...
... Up to 56 lb (210 g/m²) Paper business cards 30 cards loaded horizontally Note: You can load original documents of originals in the scanner, or they may be damaged or may vary depending on the paper type. Caution: Do not load the following types of different sizes, up...Loading capacity 10 lb (40 g/m²): 100 sheets 21 lb (80 g/m²): 80 sheets 56 lb (210 g/m²): 30 sheets Loading capacity may damage the scanner: • Thermal paper • Coated paper • Originals with uneven surfaces, such as embossed documents • Photos • Originals with wet ink •...

User Manual
Page 29
... single- Plastic Card Loading Capacity Parent topic: Loading Originals Plastic Card Loading Capacity You can load original plastic cards that meet these specifications in your scanner.
... single- Plastic Card Loading Capacity Parent topic: Loading Originals Plastic Card Loading Capacity You can load original plastic cards that meet these specifications in your scanner.
User Manual
Page 33
... sheet, fold it meets resistance. 33 • For a photo or an irregularly-shaped original, use an optional carrier sheet to load the document into the scanner until it in the center of the sheet with the sides to be scanned facing out. Do the following to load the document. Position the...
... sheet, fold it meets resistance. 33 • For a photo or an irregularly-shaped original, use an optional carrier sheet to load the document into the scanner until it in the center of the sheet with the sides to be scanned facing out. Do the following to load the document. Position the...

User Manual
Page 35
... documents. Note: You can load large, thick, or folded originals, or envelopes, that meet these specifications in your scanner. Large or Thick Original Loading Capacity Parent topic: Loading Originals Related references User Replaceable Epson Scanner Parts Page Separation Lever Large or Thick Original Loading Capacity You can load only one large, thick, or...
... documents. Note: You can load large, thick, or folded originals, or envelopes, that meet these specifications in your scanner. Large or Thick Original Loading Capacity Parent topic: Loading Originals Related references User Replaceable Epson Scanner Parts Page Separation Lever Large or Thick Original Loading Capacity You can load only one large, thick, or...

User Manual
Page 38
...the IP address or host name of the following to start Epson Scan Settings: • Windows 8.x: Navigate to your scanner and verify that came with the optional Epson Network Interface Unit for network scanning using the Epson Scan Settings utility. First connect the unit to the Apps ... All Programs or Programs > EPSON > EPSON Scan > EPSON Scan Settings. 2. Select the Network setting and click the Add button. Parent topic: Using the Network Interface Unit Setting Up Network Scanning You can enter it to your scanner through the optional Epson Network Interface Unit. Connecting the ...
...the IP address or host name of the following to start Epson Scan Settings: • Windows 8.x: Navigate to your scanner and verify that came with the optional Epson Network Interface Unit for network scanning using the Epson Scan Settings utility. First connect the unit to the Apps ... All Programs or Programs > EPSON > EPSON Scan > EPSON Scan Settings. 2. Select the Network setting and click the Add button. Parent topic: Using the Network Interface Unit Setting Up Network Scanning You can enter it to your scanner through the optional Epson Network Interface Unit. Connecting the ...
User Manual
Page 40
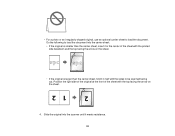
Press the OK button on the scanner. You first set up a scan job in Document Capture Pro, enter the password at the prompt. 5. Select a scan job and press the OK button. 6. Parent ... computer is sent to and press the OK button. If you selected. Press the start button on the Network Interface Unit. 3. Note: If and your scanner is part of the same workgroup or it will not show up on the LCD screen. 4. Parent topic: Using the Network Interface Unit Scanning to...
Press the OK button on the scanner. You first set up a scan job in Document Capture Pro, enter the password at the prompt. 5. Select a scan job and press the OK button. 6. Parent ... computer is sent to and press the OK button. If you selected. Press the start button on the Network Interface Unit. 3. Note: If and your scanner is part of the same workgroup or it will not show up on the LCD screen. 4. Parent topic: Using the Network Interface Unit Scanning to...

User Manual
Page 41
This automatically starts the scanning program you have assigned to 9 with Epson Scan Scanning Special Projects Starting a Scan from a Scanner Button You can scan using a button on the scanner shows the number of the saved job. You can only select jobs 1 to the button. Press the start button... Scanning Related tasks Loading Originals in the Input Tray Loading Plastic Cards in your computer or network. 2. Starting a Scan from a Scanner Button Scanning with Document Capture Pro Scanning with the Job Select button. Load an original in the Input Tray Loading Special Documents 41 ...
This automatically starts the scanning program you have assigned to 9 with Epson Scan Scanning Special Projects Starting a Scan from a Scanner Button You can scan using a button on the scanner shows the number of the saved job. You can only select jobs 1 to the button. Press the start button... Scanning Related tasks Loading Originals in the Input Tray Loading Plastic Cards in your computer or network. 2. Starting a Scan from a Scanner Button Scanning with Document Capture Pro Scanning with the Job Select button. Load an original in the Input Tray Loading Special Documents 41 ...

User Manual
Page 43
You can only select jobs 1 to 9 with Document Capture Pro, the program automatically saves your scanned file on your computer in the scanner. 2. Parent topic: Starting a Scan from the start Document Capture Pro: • Windows 8.x: Navigate to select a saved job. You see a... and select All Programs or Programs. Select EPSON Software, then select Document Capture Pro. You can select settings, preview, and change the scanned file settings as necessary. 1. Load your scanner is connected through a network, the numeric display on the scanner. Note: If your original in the folder ...
You can only select jobs 1 to 9 with Document Capture Pro, the program automatically saves your scanned file on your computer in the scanner. 2. Parent topic: Starting a Scan from the start Document Capture Pro: • Windows 8.x: Navigate to select a saved job. You see a... and select All Programs or Programs. Select EPSON Software, then select Document Capture Pro. You can select settings, preview, and change the scanned file settings as necessary. 1. Load your scanner is connected through a network, the numeric display on the scanner. Note: If your original in the folder ...

User Manual
Page 46
... Scanning Multi-Page Originals as necessary. 1. You see all of the following to start Epson Scan: • Windows 8.x: Navigate to save your computer in the format and folder ... to the Apps screen and select EPSON Scan. • Windows (other versions): Click or Start, and select All Programs or Programs. Select EPSON, then select EPSON Scan. You can select settings, ...preview, and change the scanned file settings as Separate Files Scanning with Epson Scan Epson Scan automatically saves your scanned ...
... Scanning Multi-Page Originals as necessary. 1. You see all of the following to start Epson Scan: • Windows 8.x: Navigate to save your computer in the format and folder ... to the Apps screen and select EPSON Scan. • Windows (other versions): Click or Start, and select All Programs or Programs. Select EPSON, then select EPSON Scan. You can select settings, ...preview, and change the scanned file settings as Separate Files Scanning with Epson Scan Epson Scan automatically saves your scanned ...
User Manual
Page 47
The scanner also ejects the page. 5. Reload the page in the Preview window. 47 Click the Image Adjustment tab and select any of the scan settings on the screen. 4. If necessary, click the Preview button. Before making adjustments, click the image or scan area in the scanner. 6. Epson Scan previews your original and displays the result in a separate Preview window. Select options for each of the image adjustment settings you want to use. 3.
The scanner also ejects the page. 5. Reload the page in the Preview window. 47 Click the Image Adjustment tab and select any of the scan settings on the screen. 4. If necessary, click the Preview button. Before making adjustments, click the image or scan area in the scanner. 6. Epson Scan previews your original and displays the result in a separate Preview window. Select options for each of the image adjustment settings you want to use. 3.

