
Epson Scan ICM Updater v1.20 (PSB.2008.07.001)
Page 1
...module updater for Windows XP/XP x64 / Vista (32bit & 64bit) This bulletin was created to inform you can now choose your preferred profile. Please re-install the software" Installing the Epson ICM updater fixes the error so you of an ICM update that also has Epson Scan installed, ... self extract and automatically start the installation process. Follow the onscreen prompts to complete the installation. Note: Installation completes in -One's using Epson Scan 3.5xA or later already include the latest ICM module and are not affected. Description of 1 PSB.2008.07.001 Select the Color...
...module updater for Windows XP/XP x64 / Vista (32bit & 64bit) This bulletin was created to inform you can now choose your preferred profile. Please re-install the software" Installing the Epson ICM updater fixes the error so you of an ICM update that also has Epson Scan installed, ... self extract and automatically start the installation process. Follow the onscreen prompts to complete the installation. Note: Installation completes in -One's using Epson Scan 3.5xA or later already include the latest ICM module and are not affected. Description of 1 PSB.2008.07.001 Select the Color...
Product Information Guide
Page 4
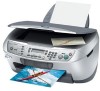
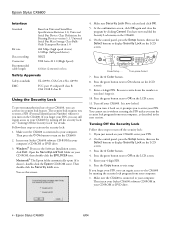
Epson Stylus CX6600 Interface Standard Bit rate Data encoding Connector Recommended cable length Based on Universal Serial Bus Specifications Revision 2.0, Universal Serial Bus Device Class Definition for details. Windows®: If you see "Turning Off the Security Lock" for Printing Devices version 1.1, Universal Serial Bus ...icon. It is selected and click OK. 5. If you turn on the CX6600. Follow these steps to On (shown on your CX6600, enter your computer's CD-ROM or DVD drive. 3. Epson Stylus CX6600 6/04 On the control panel, press the Setup button, then use the...
Epson Stylus CX6600 Interface Standard Bit rate Data encoding Connector Recommended cable length Based on Universal Serial Bus Specifications Revision 2.0, Universal Serial Bus Device Class Definition for details. Windows®: If you see "Turning Off the Security Lock" for Printing Devices version 1.1, Universal Serial Bus ...icon. It is selected and click OK. 5. If you turn on the CX6600. Follow these steps to On (shown on your CX6600, enter your computer's CD-ROM or DVD drive. 3. Epson Stylus CX6600 6/04 On the control panel, press the Setup button, then use the...
Product Information Guide
Page 5
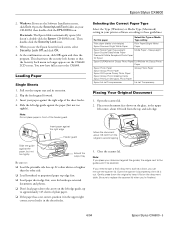
...Epson Epson DURABrite Ink Glossy Photo Paper DURABrite Ink Glossy Photo Paper Epson Photo Paper Epson Glossy Photo Paper Epson All-Purpose Glossy Photo Paper Epson Glossy Photo Greeting Cards Epson Premium Semigloss Photo Paper Glossy Photo Paper Epson Ink Jet Transparencies Ink Jet Transparency Placing Your Original Document 1. Windows...side edge. Place your printer software according to the guides won't be scanned. Epson Stylus CX6600 2. Heavyweight Epson Double-Sided Matte Paper PremierArt Matte Scrapbook Photo Paper for landscape-oriented documents and photos. ❏ Don't...
...Epson Epson DURABrite Ink Glossy Photo Paper DURABrite Ink Glossy Photo Paper Epson Photo Paper Epson Glossy Photo Paper Epson All-Purpose Glossy Photo Paper Epson Glossy Photo Greeting Cards Epson Premium Semigloss Photo Paper Glossy Photo Paper Epson Ink Jet Transparencies Ink Jet Transparency Placing Your Original Document 1. Windows...side edge. Place your printer software according to the guides won't be scanned. Epson Stylus CX6600 2. Heavyweight Epson Double-Sided Matte Paper PremierArt Matte Scrapbook Photo Paper for landscape-oriented documents and photos. ❏ Don't...
Product Information Guide
Page 9
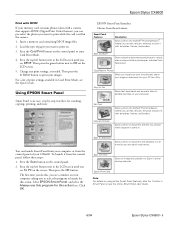
... computer or from the control panel, follow these steps: 1. Edit Text Scans a photo into your PC fax utility. Press the Scan button on . 3. The first time you do this, you see a window on the screen. button in the camera. 1. Press the top left button next...the control panel of print settings available in Card Print Mode, see the online Smart Panel User Guide. 6/04 Epson Stylus CX6600 - 9 Epson Stylus CX6600 Print with DPOF If your memory card contains photos taken with a camera that supports DPOF (Digital Print Order Format), you can edit, retouch, enhance, and print ...
... computer or from the control panel, follow these steps: 1. Edit Text Scans a photo into your PC fax utility. Press the Scan button on . 3. The first time you do this, you see a window on the screen. button in the camera. 1. Press the top left button next...the control panel of print settings available in Card Print Mode, see the online Smart Panel User Guide. 6/04 Epson Stylus CX6600 - 9 Epson Stylus CX6600 Print with DPOF If your memory card contains photos taken with a camera that supports DPOF (Digital Print Order Format), you can edit, retouch, enhance, and print ...
Product Information Guide
Page 10
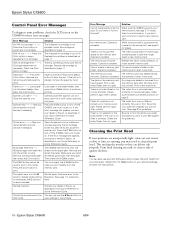
...- - > Press the Color button to clean the print head. Print head cleaning uses ink, so clean it is not set correctly. Select the ? Epson Stylus CX6600 6/04 Paper jam - - - > Press the Color button. Except when printing on the folder. Replace the cartridge as described on page 11. Press ...want to turn off the CX6600, then turn it back on. No memory card. The index form was not filled in the XXX mode. memory card. or Help button on the memory card. Paper is necessary. Printer error - - - > See your printer settings window for guidelines. Remove and reload...
...- - > Press the Color button to clean the print head. Print head cleaning uses ink, so clean it is not set correctly. Select the ? Epson Stylus CX6600 6/04 Paper jam - - - > Press the Color button. Except when printing on the folder. Replace the cartridge as described on page 11. Press ...want to turn off the CX6600, then turn it back on. No memory card. The index form was not filled in the XXX mode. memory card. or Help button on the memory card. Paper is necessary. Printer error - - - > See your printer settings window for guidelines. Remove and reload...

Quick Reference Guide
Page 6
... use of your Stylus CX6600 software CD-ROM. 3. Insert your CX6600, you can activate its security lock feature. Open the SecurityLockTool folder on your CX6600. 2. Then double-click the Security Lock icon. To enable the security lock, you turn on the CX6600. Press the P...Epson CD-ROM icon). Make sure Security Lock On is selected, then click OK. 5. You have now enabled the Security Lock menu on a computer connected to your system by dragging its software, see the Software Installation screen, click Exit. Windows: If you can also copy the program to the CX6600...
... use of your Stylus CX6600 software CD-ROM. 3. Insert your CX6600, you can activate its security lock feature. Open the SecurityLockTool folder on your CX6600. 2. Then double-click the Security Lock icon. To enable the security lock, you turn on the CX6600. Press the P...Epson CD-ROM icon). Make sure Security Lock On is selected, then click OK. 5. You have now enabled the Security Lock menu on a computer connected to your system by dragging its software, see the Software Installation screen, click Exit. Windows: If you can also copy the program to the CX6600...

Quick Reference Guide
Page 8
...click the EPILOCE4 icon. You now have full access to OK on the LCD screen). 4. Press the green button next to the CX6600. 8 Using Your Stylus CX6600 Insert your 4-digit PIN code. 5. This deactivates the security lock feature so that the Security Lock menu on your hard drive. Enter... this one, select Security Lock Off and click OK. 3. Windows: If you can also copy the program to the CX6600 by dragging its icon from your computer: 1. Macintosh: The Epson folder automatically opens (if it doesn't, double-click the Epson CD-ROM icon). Then double-click the Security Lock icon....
...click the EPILOCE4 icon. You now have full access to OK on the LCD screen). 4. Press the green button next to the CX6600. 8 Using Your Stylus CX6600 Insert your 4-digit PIN code. 5. This deactivates the security lock feature so that the Security Lock menu on your hard drive. Enter... this one, select Security Lock Off and click OK. 3. Windows: If you can also copy the program to the CX6600 by dragging its icon from your computer: 1. Macintosh: The Epson folder automatically opens (if it doesn't, double-click the Epson CD-ROM icon). Then double-click the Security Lock icon....
Quick Reference Guide
Page 21
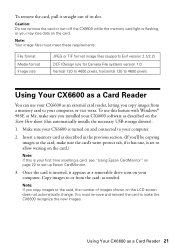
... images shown on the LCD screen does not automatically change. Insert a memory card as a removable drive icon on your first time inserting a card, see "Using Epson CardMonitor" on page 22 to set to allow writing on and connected to your computer, or vice versa. Copy images to or from a memory card... sheet (this is your computer. Note: Your image files must remove and reinsert the card to 4600 pixels Using Your CX6600 as a Card Reader You can use this feature with Windows® 98SE or Me, make the CX6600 recognize the new images. To remove the card, pull it has one, is set up...
... images shown on the LCD screen does not automatically change. Insert a memory card as a removable drive icon on your first time inserting a card, see "Using Epson CardMonitor" on page 22 to set to allow writing on and connected to your computer, or vice versa. Copy images to or from a memory card... sheet (this is your computer. Note: Your image files must remove and reinsert the card to 4600 pixels Using Your CX6600 as a Card Reader You can use this feature with Windows® 98SE or Me, make the CX6600 recognize the new images. To remove the card, pull it has one, is set up...

Quick Reference Guide
Page 22
... You can also pick an application to automatically open automatically when you edit your operating system. The Epson PhotoStarter setup assistant opens. Click the Open button. 6. Select Other 4. Windows 1. From the Image Capture menu, select Preferences. Macintosh 1. From the Camera Preferences drop-down list, select Other. A new Applications folder opens. You can...
... You can also pick an application to automatically open automatically when you edit your operating system. The Epson PhotoStarter setup assistant opens. Click the Open button. 6. Select Other 4. Windows 1. From the Image Capture menu, select Preferences. Macintosh 1. From the Camera Preferences drop-down list, select Other. A new Applications folder opens. You can...

Start Here Card
Page 5
...works with force. 7 Close the scanner carefully. 8 Plug the flat end of your CX6600. Note: If you see this screen, make sure your Stylus CX is not connected to your computer, then turn on your Stylus CX. Note: It will take several New Hardware Wizard screens, click Cancel for each of...USB port on installing and using it. Then double-click the Epson CD-ROM icon. 4 Read the license agreement, then click Agree. Then route the cable in the next column (for instructions on your Stylus CX. continue Note: There is closed with Windows® 98SE, Me, 2000, and XP, and Macintosh®...
...works with force. 7 Close the scanner carefully. 8 Plug the flat end of your CX6600. Note: If you see this screen, make sure your Stylus CX is not connected to your computer, then turn on your Stylus CX. Note: It will take several New Hardware Wizard screens, click Cancel for each of...USB port on installing and using it. Then double-click the Epson CD-ROM icon. 4 Read the license agreement, then click Agree. Then route the cable in the next column (for instructions on your Stylus CX. continue Note: There is closed with Windows® 98SE, Me, 2000, and XP, and Macintosh®...
Supplemental / Late Breaking Information
Page 1
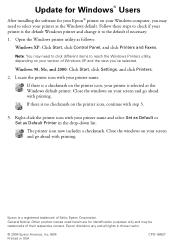
... necessary: 1. General Notice: Other product names used herein are for your Epson® printer on the printer icon, continue with printing. Follow these steps to check if your printer as follows: Windows XP: Click Start, click Control Panel, and click Printers and Faxes. Update for Windows® Users After installing the software for identification purposes only and...
... necessary: 1. General Notice: Other product names used herein are for your Epson® printer on the printer icon, continue with printing. Follow these steps to check if your printer as follows: Windows XP: Click Start, click Control Panel, and click Printers and Faxes. Update for Windows® Users After installing the software for identification purposes only and...


