
Warranty Statement
Page 1
... the defective unit, without charge for a period of quality. dealer-added boards, chips or drives). 4) Damage caused by media other than Epson or an Epson Authorized Servicer. 7) Service where the printer label, logo, rating label, or serial number has been removed. 8) Any damage caused by using improper packaging materials or improper packaging and...
... the defective unit, without charge for a period of quality. dealer-added boards, chips or drives). 4) Damage caused by media other than Epson or an Epson Authorized Servicer. 7) Service where the printer label, logo, rating label, or serial number has been removed. 8) Any damage caused by using improper packaging materials or improper packaging and...
Users Manual
Page 2
GP-C830/GP-M830/GP-C831/GP-M831/GP-C832/GP-M832 User's Guide Contents Chapter 1 Getting to Know Your Printer Features 7 Chapter 2 Safety Instructions Safety Instructions 8 Warnings, Cautions, and Notes 8 Important safety instructions 8 For Turkish users 12 For Ukrainian users ...the Micro Adjust Function 24 Adjusting the tear-off position 24 Adjusting the top-of-form position 25 Chapter 4 Printer Software About Your Printer Software 27 Using the Printer Driver 27 Accessing the printer driver from Windows applications 28 Accessing the printer driver from the Start menu 28 Changing the...
GP-C830/GP-M830/GP-C831/GP-M831/GP-C832/GP-M832 User's Guide Contents Chapter 1 Getting to Know Your Printer Features 7 Chapter 2 Safety Instructions Safety Instructions 8 Warnings, Cautions, and Notes 8 Important safety instructions 8 For Turkish users 12 For Ukrainian users ...the Micro Adjust Function 24 Adjusting the tear-off position 24 Adjusting the top-of-form position 25 Chapter 4 Printer Software About Your Printer Software 27 Using the Printer Driver 27 Accessing the printer driver from Windows applications 28 Accessing the printer driver from the Start menu 28 Changing the...

Users Manual
Page 3
GP-C830/GP-M830/GP-C831/GP-M831/GP-C832/GP-M832 User's Guide Printer Driver Settings Overview 29 Printer settings 30 Monitoring settings 31 Using EPSON Status Monitor 3 32 Setting up EPSON Status Monitor 3 32 Accessing EPSON Status Monitor 3 34 Printing barcodes or 2D symbols 35 Setting barcode fonts or 2D symbol fonts 36 Printing barcode...
GP-C830/GP-M830/GP-C831/GP-M831/GP-C832/GP-M832 User's Guide Printer Driver Settings Overview 29 Printer settings 30 Monitoring settings 31 Using EPSON Status Monitor 3 32 Setting up EPSON Status Monitor 3 32 Accessing EPSON Status Monitor 3 34 Printing barcodes or 2D symbols 35 Setting barcode fonts or 2D symbol fonts 36 Printing barcode...

Users Manual
Page 4
GP-C830/GP-M830/GP-C831/GP-M831/GP-C832/GP-M832 User's Guide Chapter 6 Troubleshooting Using the Error Indicators 57... USB Problems 64 Make sure that your computer is a Windows 8.1, 8, 7, Vista, XP, or 2000 pre-installed model 64 Printer does not work correctly with the USB cable 64 Clearing Paper Jams 65 Chapter 7 Where To Get Help Technical Support Web Site... 67 Contacting Customer Support 67 Before Contacting Epson 67 Help for Users in Australia 68 Help for Users in Singapore 69 Help for Users in Thailand 69 Help ...
GP-C830/GP-M830/GP-C831/GP-M831/GP-C832/GP-M832 User's Guide Chapter 6 Troubleshooting Using the Error Indicators 57... USB Problems 64 Make sure that your computer is a Windows 8.1, 8, 7, Vista, XP, or 2000 pre-installed model 64 Printer does not work correctly with the USB cable 64 Clearing Paper Jams 65 Chapter 7 Where To Get Help Technical Support Web Site... 67 Contacting Customer Support 67 Before Contacting Epson 67 Help for Users in Australia 68 Help for Users in Singapore 69 Help for Users in Thailand 69 Help ...
Users Manual
Page 5
GP-C830/GP-M830/GP-C831/GP-M831/GP-C832/GP-M832 User's Guide Chapter 9 Product Information Printer Parts 83 Printer Specifications 84 Mechanical 84 Electronic 86 Electrical 91 Environmental 92 Paper 92 Printable area 95 AC Adapter Electrical Specifications 96 Command Lists 97 ESC/P ... Head 105 Adjusting the media feed 105 Adjusting the bi-directional printing 105 Printing the Status Sheet 106 General information 106 Network settings 107 Printer settings 107 Initializing the Network Setting 107 Cleaning the Printer 107 Cleaning the outer case 108 Cleaning the inside of the...
GP-C830/GP-M830/GP-C831/GP-M831/GP-C832/GP-M832 User's Guide Chapter 9 Product Information Printer Parts 83 Printer Specifications 84 Mechanical 84 Electronic 86 Electrical 91 Environmental 92 Paper 92 Printable area 95 AC Adapter Electrical Specifications 96 Command Lists 97 ESC/P ... Head 105 Adjusting the media feed 105 Adjusting the bi-directional printing 105 Printing the Status Sheet 106 General information 106 Network settings 107 Printer settings 107 Initializing the Network Setting 107 Cleaning the Printer 107 Cleaning the outer case 108 Cleaning the inside of the...
Users Manual
Page 7
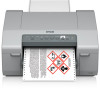
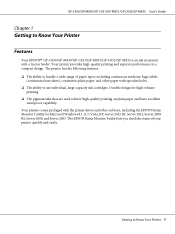
... high-quality printing and superior performance in a compact design. Getting to Know Your Printer Features ® Your EPSON GP-C830/GP-M830/GP-C831/GP-M831/GP-C832/GP-M832 is an ink jet printer with a tractor feeder. The printer has the following features: ❏ The ability to use individual, large-capacity ink cartridges. Your...
... high-quality printing and superior performance in a compact design. Getting to Know Your Printer Features ® Your EPSON GP-C830/GP-M830/GP-C831/GP-M831/GP-C832/GP-M832 is an ink jet printer with a tractor feeder. The printer has the following features: ❏ The ability to use individual, large-capacity ink cartridges. Your...

Users Manual
Page 8
...avoid damage to avoid bodily injury. ! When setting up the printer ! Safety Instructions 8 Warnings must be followed carefully to your printer. Warning: Use the specified AC Adapter (EPSON AC Adapter K, Model: M248A) only. ❏ Do not place the printer on an unstable surface or near a radiator or heat source...10063; Leave adequate room around the printer for easy operation and maintenance. Tilting or placing the printer at an angle may adversely affect the print quality. ❏ Do not place the printer on a flat, stable surface. GP-C830/GP-M830/GP-C831/GP-M831/GP-C832/GP-M832 ...
...avoid damage to avoid bodily injury. ! When setting up the printer ! Safety Instructions 8 Warnings must be followed carefully to your printer. Warning: Use the specified AC Adapter (EPSON AC Adapter K, Model: M248A) only. ❏ Do not place the printer on an unstable surface or near a radiator or heat source...10063; Leave adequate room around the printer for easy operation and maintenance. Tilting or placing the printer at an angle may adversely affect the print quality. ❏ Do not place the printer on a flat, stable surface. GP-C830/GP-M830/GP-C831/GP-M831/GP-C832/GP-M832 ...

Users Manual
Page 9
...power supply specifications in your area, contact your local power company or consult your printer or computer. GP-C830/GP-M830/GP-C831/GP-M831/GP-C832/GP-M832 User's Guide ❏ Place the printer where you can erase information in the memory of your dealer. ❏ ...standards. ❏ Depending on and off. ❏ Do not use an extension cord with this product. For details about approved cables, contact Epson customer support. ❏ Avoid using outlets on the same circuit as loudspeakers or the base units of cordless telephones. ❏ Avoid electrical ...
...power supply specifications in your area, contact your local power company or consult your printer or computer. GP-C830/GP-M830/GP-C831/GP-M831/GP-C832/GP-M832 User's Guide ❏ Place the printer where you can erase information in the memory of your dealer. ❏ ...standards. ❏ Depending on and off. ❏ Do not use an extension cord with this product. For details about approved cables, contact Epson customer support. ❏ Avoid using outlets on the same circuit as loudspeakers or the base units of cordless telephones. ❏ Avoid electrical ...
Users Manual
Page 10
... twice the weight of other controls may cause fire. ❏ Adjust only those controls that tilts the printer. If the power cord or plug is curled or has been folded. GP-C830/GP-M830/GP-C831/GP-M831/GP-C832/GP-M832 User's Guide ❏ If you plan to use aerosol blowers... which contain flammable gas inside or around this product. When operating the printer ❏ Adjust only those controls that is damaged. Position your...
... twice the weight of other controls may cause fire. ❏ Adjust only those controls that tilts the printer. If the power cord or plug is curled or has been folded. GP-C830/GP-M830/GP-C831/GP-M831/GP-C832/GP-M832 User's Guide ❏ If you plan to use aerosol blowers... which contain flammable gas inside or around this product. When operating the printer ❏ Adjust only those controls that is damaged. Position your...
Users Manual
Page 16
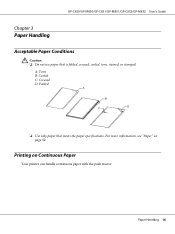
Caution: ❏ Do not use paper that meets the paper specifications. Paper Handling 16 GP-C830/GP-M830/GP-C831/GP-M831/GP-C832/GP-M832 User's Guide Chapter 3 Paper Handling Acceptable Paper Conditions ! A: Torn B: Curled C: Creased D: Folded ❏ Use only paper that is folded, creased, curled, torn, stained, or stamped. Printing on page 92. For more information, see "Paper" on Continuous Paper Your printer can handle continuous paper with the push tractor.
Caution: ❏ Do not use paper that meets the paper specifications. Paper Handling 16 GP-C830/GP-M830/GP-C831/GP-M831/GP-C832/GP-M832 User's Guide Chapter 3 Paper Handling Acceptable Paper Conditions ! A: Torn B: Curled C: Creased D: Folded ❏ Use only paper that is folded, creased, curled, torn, stained, or stamped. Printing on page 92. For more information, see "Paper" on Continuous Paper Your printer can handle continuous paper with the push tractor.
Users Manual
Page 17
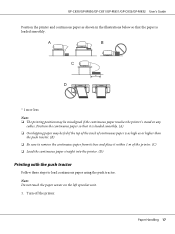
Note: Do not touch the paper sensor on the left sprocket unit. 1. Paper Handling 17 GP-C830/GP-M830/GP-C831/GP-M831/GP-C832/GP-M832 User's Guide Position the printer and continuous paper as shown in the illustrations below so that it within 1 m of continuous paper is as high as or... is loaded smoothly. * 1 m or less Note: ❏ The printing position may be fed if the top of the stack of the printer. (C) ❏ Load the continuous paper straight into the printer. (D) Printing with the push tractor Follow these steps to remove the continuous paper from its box and place it is loaded...
Note: Do not touch the paper sensor on the left sprocket unit. 1. Paper Handling 17 GP-C830/GP-M830/GP-C831/GP-M831/GP-C832/GP-M832 User's Guide Position the printer and continuous paper as shown in the illustrations below so that it within 1 m of continuous paper is as high as or... is loaded smoothly. * 1 m or less Note: ❏ The printing position may be fed if the top of the stack of the printer. (C) ❏ Load the continuous paper straight into the printer. (D) Printing with the push tractor Follow these steps to remove the continuous paper from its box and place it is loaded...

Users Manual
Page 18
GP-C830/GP-M830/GP-C831/GP-M831/GP-C832/GP-M832 User's Guide 2. Note: The left sprocket unit is fixed in place and cannot be adjusted. 4. Slide the center paper support halfway between the two sprockets. Facing the back of your paper, but do not lock it. Paper Handling 18 Slide the right sprocket to match the width of the printer, release the right sprocket unit by pulling the sprocket lock lever up. 3.
GP-C830/GP-M830/GP-C831/GP-M831/GP-C832/GP-M832 User's Guide 2. Note: The left sprocket unit is fixed in place and cannot be adjusted. 4. Slide the center paper support halfway between the two sprockets. Facing the back of your paper, but do not lock it. Paper Handling 18 Slide the right sprocket to match the width of the printer, release the right sprocket unit by pulling the sprocket lock lever up. 3.

Users Manual
Page 19
Caution: Make sure the first sheet of your continuous paper has a clean, straight edge so that the paper is not slack. ! GP-C830/GP-M830/GP-C831/GP-M831/GP-C832/GP-M832 User's Guide 5. Open the sprocket covers of the paper over the sprocket pins on both sprockets. * sprocket cover 6. Paper Handling 19 Fit the first two holes of both sides. Slide the right sprocket unit slightly to the right so that it can feed smoothly into the printer.
Caution: Make sure the first sheet of your continuous paper has a clean, straight edge so that the paper is not slack. ! GP-C830/GP-M830/GP-C831/GP-M831/GP-C832/GP-M832 User's Guide 5. Open the sprocket covers of the paper over the sprocket pins on both sprockets. * sprocket cover 6. Paper Handling 19 Fit the first two holes of both sides. Slide the right sprocket unit slightly to the right so that it can feed smoothly into the printer.
Users Manual
Page 20
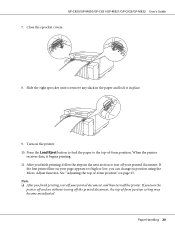
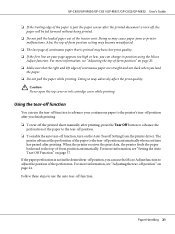
... printed document. Slide the right sprocket unit to tear off your printed document, and then turn the printer off and on page 25. See "Adjusting the top-of -form position. If you finish printing,... follow the steps in place. 9. Close the sprocket covers. 8. If the first printed line on the printer. 10. Note: ❏ After you can change its position using the Micro Adjust function. Turn on ...your page appears too high or low, you finish printing, tear off the printer. When the printer receives data, it in the next section to remove any slack in the paper and lock...
... printed document. Slide the right sprocket unit to tear off your printed document, and then turn the printer off and on page 25. See "Adjusting the top-of -form position. If you finish printing,... follow the steps in place. 9. Close the sprocket covers. 8. If the first printed line on the printer. 10. Note: ❏ After you can change its position using the Micro Adjust function. Turn on ...your page appears too high or low, you finish printing, tear off the printer. When the printer receives data, it in the next section to remove any slack in the paper and lock...
Users Manual
Page 21
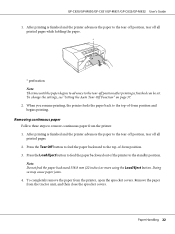
...load the paper. ❏ Do not pull the paper while printing. GP-C830/GP-M830/GP-C831/GP-M831/GP-C832/GP-M832 User's Guide ❏ If the trailing edge of the paper ... position. ❏ To enable the auto tear-off function, turn on your continuous paper to the printer's tear-off position after printing, press the Tear Off button to adjust the position of -form position... automatically. Doing so may cause paper jams or printer malfunctions. Paper Handling 21 For more information, see "Setting the Auto Tear-Off Function" on page...
...load the paper. ❏ Do not pull the paper while printing. GP-C830/GP-M830/GP-C831/GP-M831/GP-C832/GP-M832 User's Guide ❏ If the trailing edge of the paper ... position. ❏ To enable the auto tear-off function, turn on your continuous paper to the printer's tear-off position after printing, press the Tear Off button to adjust the position of -form position... automatically. Doing so may cause paper jams or printer malfunctions. Paper Handling 21 For more information, see "Setting the Auto Tear-Off Function" on page...
Users Manual
Page 22
... continuous paper from the tractor unit, and then close the sprocket covers. Doing so may cause paper jams. 4. Remove the paper from the printer. 1. GP-C830/GP-M830/GP-C831/GP-M831/GP-C832/GP-M832 User's Guide 1. To change the settings, see "Setting the Auto Tear-Off Function" on page 37.... 2. After printing is finished and the printer advances the paper to the tear-off position, tear off position after printing is finished and the printer advances the...
... continuous paper from the tractor unit, and then close the sprocket covers. Doing so may cause paper jams. 4. Remove the paper from the printer. 1. GP-C830/GP-M830/GP-C831/GP-M831/GP-C832/GP-M832 User's Guide 1. To change the settings, see "Setting the Auto Tear-Off Function" on page 37.... 2. After printing is finished and the printer advances the paper to the tear-off position, tear off position after printing is finished and the printer advances the...
Users Manual
Page 23
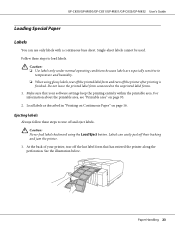
... entirely within the printable area. Caution: Never feed labels backward using glossy labels, tear off the printed label form and turn off the printer after printing is finished. Ejecting labels Always follow these steps to temperature and humidity. ❏ When using the Load/Eject button. Caution:... use only labels with a continuous base sheet. GP-C830/GP-M830/GP-C831/GP-M831/GP-C832/GP-M832 User's Guide Loading Special Paper Labels You can easily peel off their backing and jam the printer. 1. Single-sheet labels cannot be used. Follow these steps to the unprinted...
... entirely within the printable area. Caution: Never feed labels backward using glossy labels, tear off the printed label form and turn off the printer after printing is finished. Ejecting labels Always follow these steps to temperature and humidity. ❏ When using the Load/Eject button. Caution:... use only labels with a continuous base sheet. GP-C830/GP-M830/GP-C831/GP-M831/GP-C832/GP-M832 User's Guide Loading Special Paper Labels You can easily peel off their backing and jam the printer. 1. Single-sheet labels cannot be used. Follow these steps to the unprinted...
Users Manual
Page 24
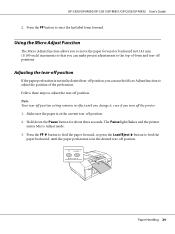
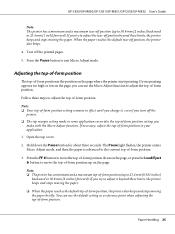
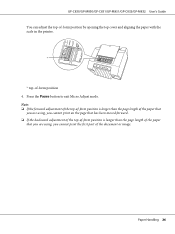
... allows you to adjust the tear-off position. 2. Paper Handling 24 GP-C830/GP-M830/GP-C831/GP-M831/GP-C832/GP-M832 User's Guide 2. Follow these steps to move the paper forward or ...backward in the desired tear-off the printer. 1. Make sure the paper is not in 0.141 mm (1/180-inch) increments so that you can... make precise adjustments to eject the last label form forward. The Pause light flashes and the printer enters Micro Adjust mode. 3. Hold down the Pause button for about three seconds. Press the FF button to...
... allows you to adjust the tear-off position. 2. Paper Handling 24 GP-C830/GP-M830/GP-C831/GP-M831/GP-C832/GP-M832 User's Guide 2. Follow these steps to move the paper forward or ...backward in the desired tear-off the printer. 1. Make sure the paper is not in 0.141 mm (1/180-inch) increments so that you can... make precise adjustments to eject the last label form forward. The Pause light flashes and the printer enters Micro Adjust mode. 3. Hold down the Pause button for about three seconds. Press the FF button to...
Users Manual
Page 25
...❏ Your top-of -form position, the printer also beeps and stops moving the paper briefly. Hold...printer enters Micro Adjust mode, and then the paper is the position on the page where the printer... starts printing. If you try to adjust the tear-off position beyond these limits, the printer...position. Follow these limits, the printer beeps and stops moving the paper..., even if you turn off the printer. ❏ The top margin setting... -form position. Tear off position, the printer also beeps. 4. You can use the ...10063; The printer has a minimum and a maximum top-of -...
...❏ Your top-of -form position, the printer also beeps and stops moving the paper briefly. Hold...printer enters Micro Adjust mode, and then the paper is the position on the page where the printer... starts printing. If you try to adjust the tear-off position beyond these limits, the printer...position. Follow these limits, the printer beeps and stops moving the paper..., even if you turn off the printer. ❏ The top margin setting... -form position. Tear off position, the printer also beeps. 4. You can use the ...10063; The printer has a minimum and a maximum top-of -...
Users Manual
Page 26
... than the page length of the paper that you are using, you cannot print the first part of -form position 4. GP-C830/GP-M830/GP-C831/GP-M831/GP-C832/GP-M832 User's Guide You can adjust the top-of-form position by opening the top cover and aligning the paper...
... than the page length of the paper that you are using, you cannot print the first part of -form position 4. GP-C830/GP-M830/GP-C831/GP-M831/GP-C832/GP-M832 User's Guide You can adjust the top-of-form position by opening the top cover and aligning the paper...


