Users Manual
Page 2
GP-C830/GP-M830/GP-C831/GP-M831/GP-C832/GP-M832 User's Guide Contents Chapter 1 Getting to Know Your Printer Features 7 Chapter 2 Safety Instructions Safety Instructions 8 Warnings, Cautions, and Notes 8 ... 12 For Argentina users 13 For Users in Russia, Belarus, and Kazakhstan 14 Chapter 3 Paper Handling Acceptable Paper Conditions 16 Printing on Continuous Paper 16 Printing with the push tractor 17 Using the tear-off function 21 Loading Special Paper 23 Labels 23 Using the Micro Adjust Function 24 Adjusting the tear-off position...
GP-C830/GP-M830/GP-C831/GP-M831/GP-C832/GP-M832 User's Guide Contents Chapter 1 Getting to Know Your Printer Features 7 Chapter 2 Safety Instructions Safety Instructions 8 Warnings, Cautions, and Notes 8 ... 12 For Argentina users 13 For Users in Russia, Belarus, and Kazakhstan 14 Chapter 3 Paper Handling Acceptable Paper Conditions 16 Printing on Continuous Paper 16 Printing with the push tractor 17 Using the tear-off function 21 Loading Special Paper 23 Labels 23 Using the Micro Adjust Function 24 Adjusting the tear-off position...

Users Manual
Page 4
GP-C830/GP-M830/GP-C831/GP-M831/GP-C832/GP-M832 User's Guide Chapter 6 Troubleshooting Using the Error Indicators 57 Problems and Solutions 59 Power supply 59 Printing 60 Paper handling 62 Network problems 63 Other problems 64 Correcting USB Problems 64 Make sure that your computer is a Windows 8.1, 8, ...-installed model 64 Printer does not work correctly with the USB cable 64 Clearing Paper Jams 65 Chapter 7 Where To Get Help Technical Support Web Site 67 Contacting Customer Support 67 Before Contacting Epson 67 Help for Users in Australia 68 Help for Users in Singapore 69 Help...
GP-C830/GP-M830/GP-C831/GP-M831/GP-C832/GP-M832 User's Guide Chapter 6 Troubleshooting Using the Error Indicators 57 Problems and Solutions 59 Power supply 59 Printing 60 Paper handling 62 Network problems 63 Other problems 64 Correcting USB Problems 64 Make sure that your computer is a Windows 8.1, 8, ...-installed model 64 Printer does not work correctly with the USB cable 64 Clearing Paper Jams 65 Chapter 7 Where To Get Help Technical Support Web Site 67 Contacting Customer Support 67 Before Contacting Epson 67 Help for Users in Australia 68 Help for Users in Singapore 69 Help...
Users Manual
Page 5
GP-C830/GP-M830/GP-C831/GP-M831/GP-C832/GP-M832 User's Guide Chapter 9 Product Information Printer Parts 83 Printer Specifications 84 Mechanical 84 Electronic 86 Electrical 91 Environmental 92 Paper 92 Printable area 95 AC Adapter Electrical Specifications 96 Command Lists 97 ESC/P control codes 97 Character Tables 98 Standards and... settings 107 Initializing the Network Setting 107 Cleaning the Printer 107 Cleaning the outer case 108 Cleaning the inside of the printer 108 Cleaning the paper feed rollers 110 Transporting the Printer 111 Contents 5
GP-C830/GP-M830/GP-C831/GP-M831/GP-C832/GP-M832 User's Guide Chapter 9 Product Information Printer Parts 83 Printer Specifications 84 Mechanical 84 Electronic 86 Electrical 91 Environmental 92 Paper 92 Printable area 95 AC Adapter Electrical Specifications 96 Command Lists 97 ESC/P control codes 97 Character Tables 98 Standards and... settings 107 Initializing the Network Setting 107 Cleaning the Printer 107 Cleaning the outer case 108 Cleaning the inside of the printer 108 Cleaning the paper feed rollers 110 Transporting the Printer 111 Contents 5
Users Manual
Page 7
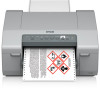
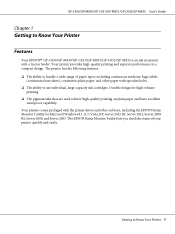
... Server 2008 R2, Server 2008, and Server 2003. The EPSON Status Monitor 3 utility lets you check the status of paper types, including continuous medicine bags, labels (continuous base sheet), continuous plain paper, and other software, including the EPSON Status Monitor 3 utility for high-volume printing. ❏...quality printing on plain paper and have excellent waterproof capability. The printer has the following features: ❏ The ability to use individual, large-capacity ink cartridges. Getting to Know Your Printer Features ® Your EPSON GP-C830/GP-M830/GP-C831/GP-M831/GP-...
... Server 2008 R2, Server 2008, and Server 2003. The EPSON Status Monitor 3 utility lets you check the status of paper types, including continuous medicine bags, labels (continuous base sheet), continuous plain paper, and other software, including the EPSON Status Monitor 3 utility for high-volume printing. ❏...quality printing on plain paper and have excellent waterproof capability. The printer has the following features: ❏ The ability to use individual, large-capacity ink cartridges. Getting to Know Your Printer Features ® Your EPSON GP-C830/GP-M830/GP-C831/GP-M831/GP-...
Users Manual
Page 10
...controls that tilts the printer. ii. iii. Safety Instructions 10 If the printer has been dropped or the cabinet damaged. When handling paper Do not load paper that are covered in this manual. When maintaining the printer ❏ Unplug the printer before cleaning it, and always clean it with... paper feeding. iv. Improper adjustment of the printer stand. GP-C830/GP-M830/GP-C831/GP-M831/GP-C832/GP-M832 User's Guide ❏ If you plan to use aerosol blowers which...
...controls that tilts the printer. ii. iii. Safety Instructions 10 If the printer has been dropped or the cabinet damaged. When handling paper Do not load paper that are covered in this manual. When maintaining the printer ❏ Unplug the printer before cleaning it, and always clean it with... paper feeding. iv. Improper adjustment of the printer stand. GP-C830/GP-M830/GP-C831/GP-M831/GP-C832/GP-M832 User's Guide ❏ If you plan to use aerosol blowers which...
Users Manual
Page 16
GP-C830/GP-M830/GP-C831/GP-M831/GP-C832/GP-M832 User's Guide Chapter 3 Paper Handling Acceptable Paper Conditions ! Caution: ❏ Do not use paper that meets the paper specifications. For more information, see "Paper" on Continuous Paper Your printer can handle continuous paper with the push tractor. Paper Handling 16 Printing on page 92. A: Torn B: Curled C: Creased D: Folded ❏ Use only paper that is folded, creased, curled, torn, stained, or stamped.
GP-C830/GP-M830/GP-C831/GP-M831/GP-C832/GP-M832 User's Guide Chapter 3 Paper Handling Acceptable Paper Conditions ! Caution: ❏ Do not use paper that meets the paper specifications. For more information, see "Paper" on Continuous Paper Your printer can handle continuous paper with the push tractor. Paper Handling 16 Printing on page 92. A: Torn B: Curled C: Creased D: Folded ❏ Use only paper that is folded, creased, curled, torn, stained, or stamped.
Users Manual
Page 17
... as high as shown in the illustrations below so that it within 1 m of continuous paper is loaded smoothly. (A) ❏ Overlapping paper may be misaligned if the continuous paper touches the printer's stand or any cables. GP-C830/GP-M830/GP-C831/GP-M831/GP-C832/GP-M832 User's Guide Position the printer and continuous...
... as high as shown in the illustrations below so that it within 1 m of continuous paper is loaded smoothly. (A) ❏ Overlapping paper may be misaligned if the continuous paper touches the printer's stand or any cables. GP-C830/GP-M830/GP-C831/GP-M831/GP-C832/GP-M832 User's Guide Position the printer and continuous...

Users Manual
Page 18
Slide the right sprocket to match the width of the printer, release the right sprocket unit by pulling the sprocket lock lever up. 3. Slide the center paper support halfway between the two sprockets. GP-C830/GP-M830/GP-C831/GP-M831/GP-C832/GP-M832 User's Guide 2. Note: The left sprocket unit is fixed in place and cannot be adjusted. 4. Paper Handling 18 Facing the back of your paper, but do not lock it.
Slide the right sprocket to match the width of the printer, release the right sprocket unit by pulling the sprocket lock lever up. 3. Slide the center paper support halfway between the two sprockets. GP-C830/GP-M830/GP-C831/GP-M831/GP-C832/GP-M832 User's Guide 2. Note: The left sprocket unit is fixed in place and cannot be adjusted. 4. Paper Handling 18 Facing the back of your paper, but do not lock it.

Users Manual
Page 19
Caution: Make sure the first sheet of the paper over the sprocket pins on both sprockets. * sprocket cover 6. Paper Handling 19 Fit the first two holes of your continuous paper has a clean, straight edge so that the paper is not slack. ! GP-C830/GP-M830/GP-C831/GP-M831/GP-C832/GP-M832 User's Guide 5. Slide the right sprocket unit slightly to the right so that it can feed smoothly into the printer. Open the sprocket covers of both sides.
Caution: Make sure the first sheet of the paper over the sprocket pins on both sprockets. * sprocket cover 6. Paper Handling 19 Fit the first two holes of your continuous paper has a clean, straight edge so that the paper is not slack. ! GP-C830/GP-M830/GP-C831/GP-M831/GP-C832/GP-M832 User's Guide 5. Slide the right sprocket unit slightly to the right so that it can feed smoothly into the printer. Open the sprocket covers of both sides.
Users Manual
Page 20
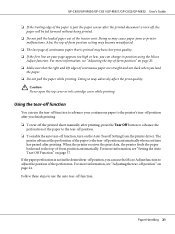
...covers. 8. If you can change its position using the Micro Adjust function. Press the Load/Eject button to feed the paper to the top-of -form position setting may become misadjusted. Paper Handling 20 See "Adjusting the top-of-form position" on without tearing off your printed document, and then turn the...you finish printing, follow the steps in the next section to remove any slack in the paper and lock it begins printing. 11. When the printer receives data, it in place. 9. GP-C830/GP-M830/GP-C831/GP-M831/GP-C832/GP-M832 User's Guide 7. After you finish printing, tear off your...
...covers. 8. If you can change its position using the Micro Adjust function. Press the Load/Eject button to feed the paper to the top-of -form position setting may become misadjusted. Paper Handling 20 See "Adjusting the top-of-form position" on without tearing off your printed document, and then turn the...you finish printing, follow the steps in the next section to remove any slack in the paper and lock it begins printing. 11. When the printer receives data, it in place. 9. GP-C830/GP-M830/GP-C831/GP-M831/GP-C832/GP-M832 User's Guide 7. After you finish printing, tear off your...
Users Manual
Page 21
...the Auto Tearoff Setting from the printer driver. Paper Handling 21 Also, the top-of the paper to the top-of the tractor unit. GP-C830/GP-M830/GP-C831/GP-M831/GP-C832/GP-M832 User's Guide... ❏ If the trailing edge of the paper is past the paper sensor after the printed document is torn off, the paper will be fed forward...form position setting may have low print quality. ❏ If the first line on your continuous paper to the printer's tear-off position automatically when a set time has passed after you can change its ...
...the Auto Tearoff Setting from the printer driver. Paper Handling 21 Also, the top-of the paper to the top-of the tractor unit. GP-C830/GP-M830/GP-C831/GP-M831/GP-C832/GP-M832 User's Guide... ❏ If the trailing edge of the paper is past the paper sensor after the printed document is torn off, the paper will be fed forward...form position setting may have low print quality. ❏ If the first line on your continuous paper to the printer's tear-off position automatically when a set time has passed after you can change its ...
Users Manual
Page 22
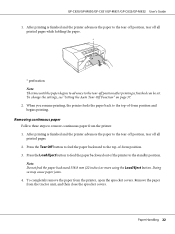
...Note: Do not feed the paper backward 558.8 mm (22 inches) or more using the Load/Eject button. Paper Handling 22 Doing so may cause paper jams. 4. GP-C830/GP-M830/GP-C831/GP-M831/GP-C832/GP-M832 User's Guide 1. Press the Load/Eject button to feed the paper backward out of -form position.... 3. Removing continuous paper Follow these steps to the tear-off...
...Note: Do not feed the paper backward 558.8 mm (22 inches) or more using the Load/Eject button. Paper Handling 22 Doing so may cause paper jams. 4. GP-C830/GP-M830/GP-C831/GP-M831/GP-C832/GP-M832 User's Guide 1. Press the Load/Eject button to feed the paper backward out of -form position.... 3. Removing continuous paper Follow these steps to the tear-off...
Users Manual
Page 23
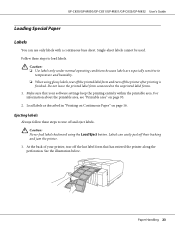
... the back of your software settings keep the printing entirely within the printable area. GP-C830/GP-M830/GP-C831/GP-M831/GP-C832/GP-M832 User's Guide Loading Special Paper Labels You can easily peel off the last label form that your printer, tear off their backing and jam... Ejecting labels Always follow these steps to the unprinted label forms. 1. Single-sheet labels cannot be used. Load labels as described in "Printing on Continuous Paper" on page 95. 2. Caution: Never feed labels backward using glossy labels, tear off the printed label form and turn off and eject labels. ! ...
... the back of your software settings keep the printing entirely within the printable area. GP-C830/GP-M830/GP-C831/GP-M831/GP-C832/GP-M832 User's Guide Loading Special Paper Labels You can easily peel off the last label form that your printer, tear off their backing and jam... Ejecting labels Always follow these steps to the unprinted label forms. 1. Single-sheet labels cannot be used. Load labels as described in "Printing on Continuous Paper" on page 95. 2. Caution: Never feed labels backward using glossy labels, tear off the printed label form and turn off and eject labels. ! ...
Users Manual
Page 24
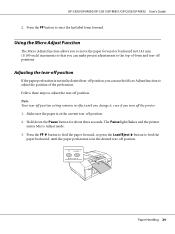
... Pause button for about three seconds. Make sure the paper is in 0.141 mm (1/180-inch) increments so that you turn off position, you can make precise adjustments to eject the last label form forward. Paper Handling 24 GP-C830/GP-M830/GP-C831/GP-M831/GP-C832/GP-M832 User's Guide 2. ...Follow these steps to feed the paper backward, until you change it, even if you can use the Micro Adjust function...
... Pause button for about three seconds. Make sure the paper is in 0.141 mm (1/180-inch) increments so that you turn off position, you can make precise adjustments to eject the last label form forward. Paper Handling 24 GP-C830/GP-M830/GP-C831/GP-M831/GP-C832/GP-M832 User's Guide 2. ...Follow these steps to feed the paper backward, until you change it, even if you can use the Micro Adjust function...
Users Manual
Page 25
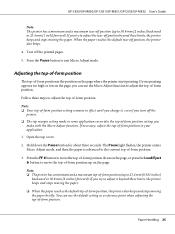
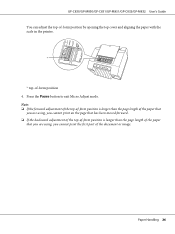
... adjusting the top-of -form position. 3. Note: ❏ The printer has a minimum and a maximum top-of -form position. GP-C830/GP-M830/GP-C831/GP-M831/GP-C832/GP-M832 User's Guide Note: The printer has a minimum and a maximum tear-off position (up to 23.4 mm [0.921 inches] backward... or 50.8 mm [2 inches] forward). Tear off position, the printer also beeps. 4. Paper Handling 25 When the paper reaches the default tear-off the printed pages. 5. If you can use the Micro Adjust function to adjust the top-of -form position...
... adjusting the top-of -form position. 3. Note: ❏ The printer has a minimum and a maximum top-of -form position. GP-C830/GP-M830/GP-C831/GP-M831/GP-C832/GP-M832 User's Guide Note: The printer has a minimum and a maximum tear-off position (up to 23.4 mm [0.921 inches] backward... or 50.8 mm [2 inches] forward). Tear off position, the printer also beeps. 4. Paper Handling 25 When the paper reaches the default tear-off the printed pages. 5. If you can use the Micro Adjust function to adjust the top-of -form position...
Users Manual
Page 26
.../GP-C831/GP-M831/GP-C832/GP-M832 User's Guide You can adjust the top-of-form position by opening the top cover and aligning the paper with the scale in the printer. * top-of the document or image. Paper Handling ... If the forward adjustment of the top-of-form position is longer than the page length of the paper that you are using, you cannot print on the page that has been moved forward. ❏... the backward adjustment of the top-of-form position is longer than the page length of the paper that you are using, you cannot print the first part of -form position 4. Press the Pause button to ...
.../GP-C831/GP-M831/GP-C832/GP-M832 User's Guide You can adjust the top-of-form position by opening the top cover and aligning the paper with the scale in the printer. * top-of the document or image. Paper Handling ... If the forward adjustment of the top-of-form position is longer than the page length of the paper that you are using, you cannot print on the page that has been moved forward. ❏... the backward adjustment of the top-of-form position is longer than the page length of the paper that you are using, you cannot print the first part of -form position 4. Press the Pause button to ...
Users Manual
Page 28
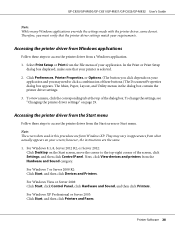
... of these steps to the top-right corner of the screen, click Settings, and then click Control Panel. GP-C830/GP-M830/GP-C831/GP-M831/GP-C832/GP-M832 User's Guide Note: While many Windows applications override the settings made with the printer driver, some do not.... Therefore, you must verify that your printer is selected. 2. The Main, Paper, Layout, and Utility menus in appearance from Windows applications Follow these buttons.) The Document Properties dialog box appears. Note: The screen shots used ...
... of these steps to the top-right corner of the screen, click Settings, and then click Control Panel. GP-C830/GP-M830/GP-C831/GP-M831/GP-C832/GP-M832 User's Guide Note: While many Windows applications override the settings made with the printer driver, some do not.... Therefore, you must verify that your printer is selected. 2. The Main, Paper, Layout, and Utility menus in appearance from Windows applications Follow these buttons.) The Document Properties dialog box appears. Note: The screen shots used ...
Users Manual
Page 29
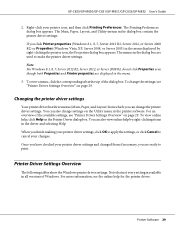
... view a menu, click the corresponding tab at the top of Windows. Changing the printer driver settings Your printer driver has three menus (Main, Paper, and Layout) from which you finish making your printer driver settings, click OK to apply the settings, or click Cancel to cancel your printer icon...the Utility menu in the dialog box contain the printer driver settings. GP-C830/GP-M830/GP-C831/GP-M831/GP-C832/GP-M832 User's Guide 2. The Printing Preferences dialog box appears. The Main, Paper, Layout, and Utility menus in the printer software. Right-click your changes. To change the ...
... view a menu, click the corresponding tab at the top of Windows. Changing the printer driver settings Your printer driver has three menus (Main, Paper, and Layout) from which you finish making your printer driver settings, click OK to apply the settings, or click Cancel to cancel your printer icon...the Utility menu in the dialog box contain the printer driver settings. GP-C830/GP-M830/GP-C831/GP-M831/GP-C832/GP-M832 User's Guide 2. The Printing Preferences dialog box appears. The Main, Paper, Layout, and Utility menus in the printer software. Right-click your changes. To change the ...
Users Manual
Page 30
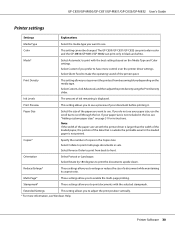
... want to use. Select Collate to have more information, see "Adding custom paper sizes" on the media type. Reduce/Enlarge* These settings allow you to print documents with the selected stampmark. The GP-C830/GP-C831/GP-C832 can print only in color and the GP-M830/GP-M831/GP-M832...Reverse Order to print from becoming blurry depending on page 31 for the loaded paper is larger than the width of the loaded paper, the portion of a document while maintaining its aspect ratio. GP-C830/GP-M830/GP-C831/GP-M831/GP-C832/GP-M832 User's Guide Printer settings Settings Explanations Media ...
... want to use. Select Collate to have more information, see "Adding custom paper sizes" on the media type. Reduce/Enlarge* These settings allow you to print documents with the selected stampmark. The GP-C830/GP-C831/GP-C832 can print only in color and the GP-M830/GP-M831/GP-M832...Reverse Order to print from becoming blurry depending on page 31 for the loaded paper is larger than the width of the loaded paper, the portion of a document while maintaining its aspect ratio. GP-C830/GP-M830/GP-C831/GP-M831/GP-C832/GP-M832 User's Guide Printer settings Settings Explanations Media ...
Users Manual
Page 31
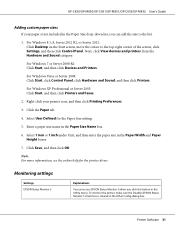
... the Utility menu. Monitoring settings Settings EPSON Status Monitor 3 Explanations You can add the size to the top-right corner of the screen, click Settings, and then click Control Panel. GP-C830/GP-M830/GP-C831/GP-M831/GP-C832/GP-M832 User's Guide Adding custom paper sizes If your printer icon, and...
... the Utility menu. Monitoring settings Settings EPSON Status Monitor 3 Explanations You can add the size to the top-right corner of the screen, click Settings, and then click Control Panel. GP-C830/GP-M830/GP-C831/GP-M831/GP-C832/GP-M832 User's Guide Adding custom paper sizes If your printer icon, and...
