Reference Manual
Page 6
... a Network For Windows 159 Sharing the printer 159 Setting up your printer as a shared printer 160 Using an additional driver 162 Setting up a clients 168 Installing the printer driver from the CD-ROM 176 For Macintosh 178 Sharing the printer 178 Setting up your printer as a shared printer 178 Accessing the shared printer 179 For Mac OS X 181... the Adobe PostScript 3 ROM module 213 Interface Cards 216 Removing an interface card 219 Chapter 7 Replacing Consumable Products Replacement Messages 221 Toner Cartridge 222 Photoconductor unit 228 Fuser unit 234 Transfer unit 238 6
... a Network For Windows 159 Sharing the printer 159 Setting up your printer as a shared printer 160 Using an additional driver 162 Setting up a clients 168 Installing the printer driver from the CD-ROM 176 For Macintosh 178 Sharing the printer 178 Setting up your printer as a shared printer 178 Accessing the shared printer 179 For Mac OS X 181... the Adobe PostScript 3 ROM module 213 Interface Cards 216 Removing an interface card 219 Chapter 7 Replacing Consumable Products Replacement Messages 221 Toner Cartridge 222 Photoconductor unit 228 Fuser unit 234 Transfer unit 238 6
Reference Manual
Page 10
Photoconductor unit 370 Transfer unit 370 Fuser unit 120/220 371 Appendix B Working with Fonts EPSON BarCode Fonts (Windows Only 373 System requirements 375 Installing EPSON BarCode Fonts 375 Printing with EPSON BarCode Fonts 377 BarCode Font specifications 381 Available Fonts 392 LJ4/GL2 mode 393 ESC/P 2 and FX modes ...FX Modes 405 International character sets 407 Characters available with the ESC (^ command 407 In the I239X Emulation Mode 408 In the EPSON GL/ 2 Mode 408 Contacting Customer Support 409 For users in Latin America 410 For users in Australia 410 For users in Singapore...
Photoconductor unit 370 Transfer unit 370 Fuser unit 120/220 371 Appendix B Working with Fonts EPSON BarCode Fonts (Windows Only 373 System requirements 375 Installing EPSON BarCode Fonts 375 Printing with EPSON BarCode Fonts 377 BarCode Font specifications 381 Available Fonts 392 LJ4/GL2 mode 393 ESC/P 2 and FX modes ...FX Modes 405 International character sets 407 Characters available with the ESC (^ command 407 In the I239X Emulation Mode 408 In the EPSON GL/ 2 Mode 408 Contacting Customer Support 409 For users in Latin America 410 For users in Australia 410 For users in Singapore...

Reference Manual
Page 17
... an imaging cartridge after moving it from condensation. 17 Dispose of used toner cartridges, photoconductor units, fuser units, or transfer units in fire, as some components are sharp and may cause injury. ❏ Avoid touching the components inside the printer unless instructed to prevent damage from a cool to a warm environment to do not use a broom...
... an imaging cartridge after moving it from condensation. 17 Dispose of used toner cartridges, photoconductor units, fuser units, or transfer units in fire, as some components are sharp and may cause injury. ❏ Avoid touching the components inside the printer unless instructed to prevent damage from a cool to a warm environment to do not use a broom...
Reference Manual
Page 27
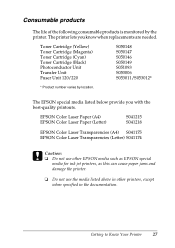
... Transfer Unit Fuser Unit 120/220 S053006 S053011/S053012* 1 * Product number varies by the printer. Consumable products 1 The life of the following consumable products is monitored by location. 1 The EPSON special media listed below provide you know when replacements are needed. The printer lets you with the best-quality printouts. 1 EPSON Color Laser Paper (A4) S041215 EPSON Color Laser Paper (Letter) S041218 1 EPSON Color Laser...
... Transfer Unit Fuser Unit 120/220 S053006 S053011/S053012* 1 * Product number varies by the printer. Consumable products 1 The life of the following consumable products is monitored by location. 1 The EPSON special media listed below provide you know when replacements are needed. The printer lets you with the best-quality printouts. 1 EPSON Color Laser Paper (A4) S041215 EPSON Color Laser Paper (Letter) S041218 1 EPSON Color Laser...
Reference Manual
Page 221
... cartridge when the Replace Toner xxxx message appears. 7 LCD Panel Description Message 7 Worn The photoconductor unit has Photoconductor reached the end of EPSON Status Monitor 3, replace the appropriate consumable products. Worn Transfer Unit The transfer unit is near the end of your printer. 7 Note: 7 Do not replace the toner cartridge when the XXXX Toner Low message appears...
... cartridge when the Replace Toner xxxx message appears. 7 LCD Panel Description Message 7 Worn The photoconductor unit has Photoconductor reached the end of EPSON Status Monitor 3, replace the appropriate consumable products. Worn Transfer Unit The transfer unit is near the end of your printer. 7 Note: 7 Do not replace the toner cartridge when the XXXX Toner Low message appears...

Reference Manual
Page 222
...toner cartridge is recommended. When this position, indicating the color of the toner to the engine. For example, the message Y Toner Low means that the amount of toner remaining in this happens, the printer cannot resume printing until you replace the depleted consumable products.... or approved by EPSON. 222 Replacing Consumable Products Printing has stopped to avoid damage to be liable for any damages or problems arising from the use of EPSON Status Monitor 3. LCD Panel Message Replace Toner xxxx* Replace Photocondctr Replace Transfer Unit Description The indicated toner...
...toner cartridge is recommended. When this position, indicating the color of the toner to the engine. For example, the message Y Toner Low means that the amount of toner remaining in this happens, the printer cannot resume printing until you replace the depleted consumable products.... or approved by EPSON. 222 Replacing Consumable Products Printing has stopped to avoid damage to be liable for any damages or problems arising from the use of EPSON Status Monitor 3. LCD Panel Message Replace Toner xxxx* Replace Photocondctr Replace Transfer Unit Description The indicated toner...
Reference Manual
Page 238
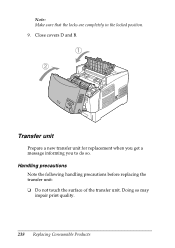
Transfer unit Prepare a new transfer unit for replacement when you get a message informing you to do so. Handling precautions Note the following handling precautions before replacing the transfer unit: ❏ Do not touch the surface of the transfer unit. Close covers D and B. Doing so may impair print quality. 238 Replacing Consumable Products Note: Make sure that the locks are completely in the locked position. 9.
Transfer unit Prepare a new transfer unit for replacement when you get a message informing you to do so. Handling precautions Note the following handling precautions before replacing the transfer unit: ❏ Do not touch the surface of the transfer unit. Close covers D and B. Doing so may impair print quality. 238 Replacing Consumable Products Note: Make sure that the locks are completely in the locked position. 9.
Reference Manual
Page 239
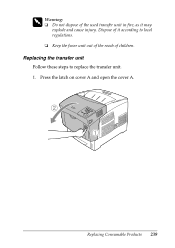
Dispose of children. 7 Replacing the transfer unit 7 Follow these steps to replace the transfer unit. 1. w Warning: ❏ Do not dispose of the used transfer unit in fire, as it according to local 7 regulations. ❏ Keep the fuser unit out of the reach of it may explode and cause injury. Press the latch on cover A and open the cover A. 7 7 7 7 7 7 7 7 7 Replacing Consumable Products 239
Dispose of children. 7 Replacing the transfer unit 7 Follow these steps to replace the transfer unit. 1. w Warning: ❏ Do not dispose of the used transfer unit in fire, as it according to local 7 regulations. ❏ Keep the fuser unit out of the reach of it may explode and cause injury. Press the latch on cover A and open the cover A. 7 7 7 7 7 7 7 7 7 Replacing Consumable Products 239

Reference Manual
Page 240
Take the new transfer unit from its package. 240 Replacing Consumable Products 2. Pull the transfer unit out of the printer. 3. Grasp the two orange tabs and pull the unit forward and down, then lift the unit out of the printer. 4.
Take the new transfer unit from its package. 240 Replacing Consumable Products 2. Pull the transfer unit out of the printer. 3. Grasp the two orange tabs and pull the unit forward and down, then lift the unit out of the printer. 4.

Reference Manual
Page 241
Hold the new transfer unit by the orange tabs and lower it 7 into the printer, making sure that it clicks into the guides. 5. Close cover A. 7 7 7 7 7 7 Replacing Consumable Products 241 Push the transfer unit in and up until it fits into place. 7 7 7 7 7 6.
Hold the new transfer unit by the orange tabs and lower it 7 into the printer, making sure that it clicks into the guides. 5. Close cover A. 7 7 7 7 7 7 Replacing Consumable Products 241 Push the transfer unit in and up until it fits into place. 7 7 7 7 7 6.
Reference Manual
Page 298
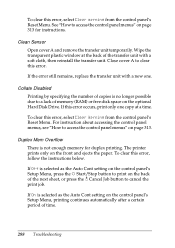
... from the control panel's Reset Menu. Wipe the transparent plastic window at a time. If the error still remains, replace the transfer unit with a soft cloth, then reinstall the transfer unit. For instruction about accessing the control panel menus, see "How to clear this error occurs, print only one . Duplex Mem ...control panel menus" on the optional Hard Disk Drive. To clear this error, select Clear Warning from the control panel's Reset Menu. The printer prints only on page 313 for duplex printing. If Off is selected as the Auto Cont setting on the control panel's Setup Menu, ...
... from the control panel's Reset Menu. Wipe the transparent plastic window at a time. If the error still remains, replace the transfer unit with a soft cloth, then reinstall the transfer unit. For instruction about accessing the control panel menus, see "How to clear this error occurs, print only one . Duplex Mem ...control panel menus" on the optional Hard Disk Drive. To clear this error, select Clear Warning from the control panel's Reset Menu. The printer prints only on page 313 for duplex printing. If Off is selected as the Auto Cont setting on the control panel's Setup Menu, ...

Reference Manual
Page 301
... properly. Install TransferUnit 8 There is no photoconductor unit installed or the photoconductor unit is not 8 installed properly. Remove the fuser unit, then reinstall it 8 properly. Then open cover D. Close 8 covers D and B. Turn off the printer, open cover A, and then open cover B and D. Install Photoconductor 8 8 There is no transfer unit installed or the transfer unit is not installed properly.
... properly. Install TransferUnit 8 There is no photoconductor unit installed or the photoconductor unit is not 8 installed properly. Remove the fuser unit, then reinstall it 8 properly. Then open cover D. Close 8 covers D and B. Turn off the printer, open cover A, and then open cover B and D. Install Photoconductor 8 8 There is no transfer unit installed or the transfer unit is not installed properly.

Reference Manual
Page 302
... the protective tape from a toner cartridge. (The letters C, M, Y, or K appear in place of XXXX and indicate the colors Cyan, Magenta, Yellow, and Black respectively.) Install the indicated cartridges. Turn off the printer, open cover A, and remove the transfer unit. Turn off the printer and remove the module. 302 Troubleshooting The error clears automatically if the...
... the protective tape from a toner cartridge. (The letters C, M, Y, or K appear in place of XXXX and indicate the colors Cyan, Magenta, Yellow, and Black respectively.) Install the indicated cartridges. Turn off the printer, open cover A, and remove the transfer unit. Turn off the printer and remove the module. 302 Troubleshooting The error clears automatically if the...

Reference Manual
Page 307
The maximum number of XXXX and indicate the colors Cyan, Magenta, Yellow, and Black respectively.) 8 See "Toner Cartridge" on page 313. Turn off the printer, then replace the transfer unit with a new one. However, other interfaces are out of toner and need to be 8 replaced. (The letters C, M, Y, or K appear in place of print jobs stored...
The maximum number of XXXX and indicate the colors Cyan, Magenta, Yellow, and Black respectively.) 8 See "Toner Cartridge" on page 313. Turn off the printer, then replace the transfer unit with a new one. However, other interfaces are out of toner and need to be 8 replaced. (The letters C, M, Y, or K appear in place of print jobs stored...

Reference Manual
Page 309
...menus" on page 222. 8 Unable Clear Error 8 The printer cannot clear an error message because the error status still remains. Turn the printer off, and reinstall the unit after you that the fuser unit has reached the end of its service life. For instruction about... and continue printing, select Clear 8 All Warning from the control panel's Reset Menu. Worn Fuser 8 This message indicates that the transfer unit is not guaranteed. Troubleshooting 309 Install the indicated cartridges. Try solving the problem again. The error clears automatically after it has cooled off...
...menus" on page 222. 8 Unable Clear Error 8 The printer cannot clear an error message because the error status still remains. Turn the printer off, and reinstall the unit after you that the fuser unit has reached the end of its service life. For instruction about... and continue printing, select Clear 8 All Warning from the control panel's Reset Menu. Worn Fuser 8 This message indicates that the transfer unit is not guaranteed. Troubleshooting 309 Install the indicated cartridges. Try solving the problem again. The error clears automatically after it has cooled off...
Reference Manual
Page 370
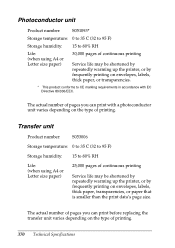
...temperature: 0 to 35°C (32 to 95°F) Storage humidity: 15 to CE marking requirements in accordance with a photoconductor unit varies depending on the type of printing. Transfer unit Product number: S053006 Storage temperature: 0 to 35°C (32 to 95°F) Storage humidity: 15 to 80% RH Life...: (when using A4 or Letter size paper) 25,000 pages of continuous printing Service life may be shortened by repeatedly warming up the printer, ...
...temperature: 0 to 35°C (32 to 95°F) Storage humidity: 15 to CE marking requirements in accordance with a photoconductor unit varies depending on the type of printing. Transfer unit Product number: S053006 Storage temperature: 0 to 35°C (32 to 95°F) Storage humidity: 15 to 80% RH Life...: (when using A4 or Letter size paper) 25,000 pages of continuous printing Service life may be shortened by repeatedly warming up the printer, ...
Reference Manual
Page 421
... as downloaded fonts) is stored in which characters are printed on the page). See also RAM and ROM. photoconductor unit A component of the printer that contains a photosensitive print drum, developer unit, and intermediate transfer unit. Some information is fixed and is used to print this data. PCL The command language built into the Hewlett-Packard...
... as downloaded fonts) is stored in which characters are printed on the page). See also RAM and ROM. photoconductor unit A component of the printer that contains a photosensitive print drum, developer unit, and intermediate transfer unit. Some information is fixed and is used to print this data. PCL The command language built into the Hewlett-Packard...

Reference Manual
Page 425
... Numerics 500-Sheet/1000 Sheet Optionall Paper Cassette Unit installing, 184 500-Sheet/1000-Sheet Optional Paper Cassette Unit about, 184 500-Sheet/1000 Sheet Paper Cassette Unit specifications, 367 550-Sheet Universal Paper Cassette Unit specifications, 367 A Additional Driver using, 162 ... 170 Confidential Job (Macintosh), 146 Confidential Job (Windows), 92 ConfidentialJob Menu, 336 Consumables fuser unit, 234 photoconductor unit, 228 replacement messages, 221 transfer unit, 238 Contacting EPSON, 409 Control panel settings, 313 Control panel menus overview of available menus, 319 Control panel...
... Numerics 500-Sheet/1000 Sheet Optionall Paper Cassette Unit installing, 184 500-Sheet/1000-Sheet Optional Paper Cassette Unit about, 184 500-Sheet/1000 Sheet Paper Cassette Unit specifications, 367 550-Sheet Universal Paper Cassette Unit specifications, 367 A Additional Driver using, 162 ... 170 Confidential Job (Macintosh), 146 Confidential Job (Windows), 92 ConfidentialJob Menu, 336 Consumables fuser unit, 234 photoconductor unit, 228 replacement messages, 221 transfer unit, 238 Contacting EPSON, 409 Control panel settings, 313 Control panel menus overview of available menus, 319 Control panel...
Reference Manual
Page 431
... EPSON GL/ 2 mode, 408 ESC/P 2 mode, 405 FX mode, 405 I239X mode, 408 international character sets, 407 introduction, 401 ISO sets, 404 LJ4 mode, 401 T Technical support, 409 Thick paper driver settings, 53 specifications, 359 Toner cartridges specifications, 369 Transfer unit ...handling precautions, 238 replacing, 239 specifications, 370 Transparencies driver settings, 48, 54 loading, 49 the use of, 48 Transporting the printer for long distances, 242 for short distances, 243 Troubleshooting error...
... EPSON GL/ 2 mode, 408 ESC/P 2 mode, 405 FX mode, 405 I239X mode, 408 international character sets, 407 introduction, 401 ISO sets, 404 LJ4 mode, 401 T Technical support, 409 Thick paper driver settings, 53 specifications, 359 Toner cartridges specifications, 369 Transfer unit ...handling precautions, 238 replacing, 239 specifications, 370 Transparencies driver settings, 48, 54 loading, 49 the use of, 48 Transporting the printer for long distances, 242 for short distances, 243 Troubleshooting error...
