User Manual
Page 3
... against any damages or problems arising from the use of the FCC Rules. This equipment generates, uses, and can radiate radio frequency energy and, if not installed and used in accordance with the instruction manual, may be liable against harmful interference when the equipment is operated in a commercial environment. No part of Seiko Epson Corporation. TM-H6000 User's Manual 1 Neither is assumed with...
... against any damages or problems arising from the use of the FCC Rules. This equipment generates, uses, and can radiate radio frequency energy and, if not installed and used in accordance with the instruction manual, may be liable against harmful interference when the equipment is operated in a commercial environment. No part of Seiko Epson Corporation. TM-H6000 User's Manual 1 Neither is assumed with...
User Manual
Page 4
... period. 2 TM-H6000 User's Manual If water or other than those mentioned in this product may result in ways other liquid spills into the equipment. Be sure to set this equipment, unplug the power cord immediately, and then contact your dealer or a SEIKO EPSON service center for advice. Improper repair work can be dangerous. Connection to an improper power source may...
... period. 2 TM-H6000 User's Manual If water or other than those mentioned in this product may result in ways other liquid spills into the equipment. Be sure to set this equipment, unplug the power cord immediately, and then contact your dealer or a SEIKO EPSON service center for advice. Improper repair work can be dangerous. Connection to an improper power source may...
User Manual
Page 5
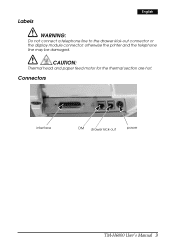
CAUTION: Thermal head and paper feed motor for the thermal section are hot. Labels English WARNING: Do not connect a telephone line to the drawer kick-out connector or the display module connector; otherwise the printer and the telephone line may be damaged. Connectors interface DM drawer kick-out power TM-H6000 User's Manual 3
CAUTION: Thermal head and paper feed motor for the thermal section are hot. Labels English WARNING: Do not connect a telephone line to the drawer kick-out connector or the display module connector; otherwise the printer and the telephone line may be damaged. Connectors interface DM drawer kick-out power TM-H6000 User's Manual 3
User Manual
Page 6
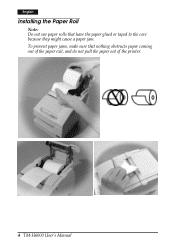
English Installing the Paper Roll Note: Do not use paper rolls that nothing obstructs paper coming out of the paper exit, and do not pull the paper out of the printer. 4 TM-H6000 User's Manual To prevent paper jams, make sure that have the paper glued or taped to the core because they might cause a paper jam.
English Installing the Paper Roll Note: Do not use paper rolls that nothing obstructs paper coming out of the paper exit, and do not pull the paper out of the printer. 4 TM-H6000 User's Manual To prevent paper jams, make sure that have the paper glued or taped to the core because they might cause a paper jam.
User Manual
Page 7
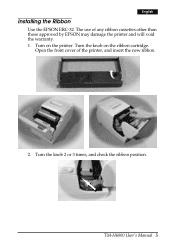
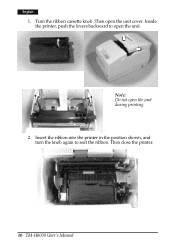
TM-H6000 User's Manual 5 Turn on the ribbon cartridge. Open the front cover of any ribbon cassettes other than those approved by EPSON may damage the printer and will void the warranty. 1. Turn the knob on the printer. Turn the knob 2 or 3 times, and check the ribbon position. The use of the printer, and insert the new ribbon. . 2. English Installing the Ribbon Use the EPSON ERC-32.
TM-H6000 User's Manual 5 Turn on the ribbon cartridge. Open the front cover of any ribbon cassettes other than those approved by EPSON may damage the printer and will void the warranty. 1. Turn the knob on the printer. Turn the knob 2 or 3 times, and check the ribbon position. The use of the printer, and insert the new ribbon. . 2. English Installing the Ribbon Use the EPSON ERC-32.
User Manual
Page 8
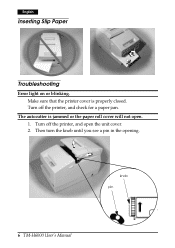
Turn off the printer, and check for a paper jam. The autocutter is properly closed. Then turn the knob until you see a pin in the opening. knob pin 6 TM-H6000 User's Manual Make sure that the printer cover is jammed or the paper roll cover will not open the unit cover. 2. Turn off the printer, and open . 1. English Inserting Slip Paper ➀ ➁ Troubleshooting Error light on or blinking.
Turn off the printer, and check for a paper jam. The autocutter is properly closed. Then turn the knob until you see a pin in the opening. knob pin 6 TM-H6000 User's Manual Make sure that the printer cover is jammed or the paper roll cover will not open the unit cover. 2. Turn off the printer, and open . 1. English Inserting Slip Paper ➀ ➁ Troubleshooting Error light on or blinking.

User Manual
Page 9
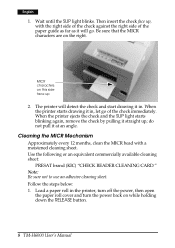
... . This may cause paper jams, MICR reading errors, and damage to maintain receipt print quality. . Open the paper roll cover, and clean the thermal element (the green part) of the print head with a cotton swab moistened with staples in them. TM-H6000 User's Manual 7 Be sure the checks are flat, without curls, folds, or wrinkles. Cleaning the Print Head English CAUTION: After printing, the print head can be very hot...
... . This may cause paper jams, MICR reading errors, and damage to maintain receipt print quality. . Open the paper roll cover, and clean the thermal element (the green part) of the print head with a cotton swab moistened with staples in them. TM-H6000 User's Manual 7 Be sure the checks are flat, without curls, folds, or wrinkles. Cleaning the Print Head English CAUTION: After printing, the print head can be very hot...
User Manual
Page 10
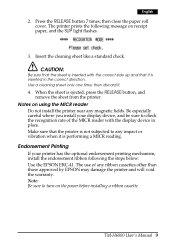
... this side face up 2. Then insert the check face up ; Follow the steps below: 1. English 1. Wait until the SLIP light blinks. MICR characters on the right. When the printer starts drawing it at an angle. do not pull it in the printer, turn off the power, then open the paper roll cover and turn the power back on while holding down the RELEASE button. 8 TM-H6000 User's Manual
... this side face up 2. Then insert the check face up ; Follow the steps below: 1. English 1. Wait until the SLIP light blinks. MICR characters on the right. When the printer starts drawing it at an angle. do not pull it in the printer, turn off the power, then open the paper roll cover and turn the power back on while holding down the RELEASE button. 8 TM-H6000 User's Manual
User Manual
Page 11
... RELEASE button 7 times; When the sheet is inserted in place. Make sure that the printer is performing a MICR reading. English 2. Use a cleaning sheet only one time; Note: Be sure to any impact or vibration when it is not subjected to turn on the power before installing a ribbon cassette. Insert the cleaning sheet like a standard check. TM-H6000 User's Manual 9 Notes on receipt paper, and the SLIP light flashes. 3. Be...
... RELEASE button 7 times; When the sheet is inserted in place. Make sure that the printer is performing a MICR reading. English 2. Use a cleaning sheet only one time; Note: Be sure to any impact or vibration when it is not subjected to turn on the power before installing a ribbon cassette. Insert the cleaning sheet like a standard check. TM-H6000 User's Manual 9 Notes on receipt paper, and the SLIP light flashes. 3. Be...
User Manual
Page 12
Turn the ribbon cassette knob. Insert the ribbon into the printer in the position shown, and turn the knob again to open the unit during printing. 2. Inside the printer, push the levers backward to seat the ribbon. Note: Do not open the unit. Then close the printer. 10 TM-H6000 User's Manual English 1. Then open the unit cover.
Turn the ribbon cassette knob. Insert the ribbon into the printer in the position shown, and turn the knob again to open the unit during printing. 2. Inside the printer, push the levers backward to seat the ribbon. Note: Do not open the unit. Then close the printer. 10 TM-H6000 User's Manual English 1. Then open the unit cover.
User Manual
Page 13
English EPSON Ecology Label This product is in compliance with the EPSON ecology label requirements. Please see the following link for detailed information on label criteria. (http://www.epson.co.jp/e/) TM-H6000 User's Manual 11
English EPSON Ecology Label This product is in compliance with the EPSON ecology label requirements. Please see the following link for detailed information on label criteria. (http://www.epson.co.jp/e/) TM-H6000 User's Manual 11
User Manual
Page 14
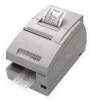
... Slip: 1 original + 3 copies Inked ribbon: Slip: ERC-32(P), Endorsement: ERC-41(P) Ribbon life: Slip: 6 million characters, Endorsement: 1 million characters Interface (compatible): RS-232C / Bi-directional parallel / RS-485 (dealer option) Data buffer: Selectable for 45 bytes or 4 KB using DIP switch D.K.D. function: 2 drives Power supply: +24 VDC ± 10% (Option: PS-170) Current consumption: Slip: Approximately 1.7 A (mean) Receipt: Approximately 1.8 A (mean) Temperature: Operating: 5 to 45°C {41...
... Slip: 1 original + 3 copies Inked ribbon: Slip: ERC-32(P), Endorsement: ERC-41(P) Ribbon life: Slip: 6 million characters, Endorsement: 1 million characters Interface (compatible): RS-232C / Bi-directional parallel / RS-485 (dealer option) Data buffer: Selectable for 45 bytes or 4 KB using DIP switch D.K.D. function: 2 drives Power supply: +24 VDC ± 10% (Option: PS-170) Current consumption: Slip: Approximately 1.7 A (mean) Receipt: Approximately 1.8 A (mean) Temperature: Operating: 5 to 45°C {41...


