
User Manual
Page 2
... Glass 8 Using the Automatic Document Feeder 8 Copying a Document 10 Copying a Document 10 Printing From a Memory Card 12 Inserting the Card 12 Printing Photos From the LCD Screen 13 Printing From Your Computer 14 Printing in Windows 14 Printing With a Macintosh 15 Selecting the Correct Paper Type 17 Faxing a Document 18 Connecting a Phone or Answering Machine 18 Setting Up Fax Features 19 Sending a Fax From the Control Panel 21 Receiving Faxes 22 Scanning a Document or Photo 23 Quick Scanning With the Scan Button 23 Scanning With Epson Scan Software 24 Scanning With Mac OS...
... Glass 8 Using the Automatic Document Feeder 8 Copying a Document 10 Copying a Document 10 Printing From a Memory Card 12 Inserting the Card 12 Printing Photos From the LCD Screen 13 Printing From Your Computer 14 Printing in Windows 14 Printing With a Macintosh 15 Selecting the Correct Paper Type 17 Faxing a Document 18 Connecting a Phone or Answering Machine 18 Setting Up Fax Features 19 Sending a Fax From the Control Panel 21 Receiving Faxes 22 Scanning a Document or Photo 23 Quick Scanning With the Scan Button 23 Scanning With Epson Scan Software 24 Scanning With Mac OS...
User Manual
Page 5
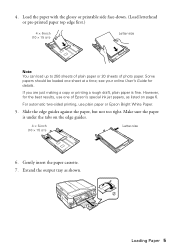
.... Extend the output tray as listed on the edge guides. 4 × 6-inch (10 × 15 cm) Letter-size 6. Loading Paper 5 For automatic two-sided printing, use one sheet at a time; 4. If you are just making a copy or printing a rough draft, plain paper is under the tabs on page 6. Some papers should be loaded one of photo paper. Load the paper with the glossy or printable side face-down. (Load letterhead or pre-printed paper top edge first...
.... Extend the output tray as listed on the edge guides. 4 × 6-inch (10 × 15 cm) Letter-size 6. Loading Paper 5 For automatic two-sided printing, use one sheet at a time; 4. If you are just making a copy or printing a rough draft, plain paper is under the tabs on page 6. Some papers should be loaded one of photo paper. Load the paper with the glossy or printable side face-down. (Load letterhead or pre-printed paper top edge first...
User Manual
Page 10
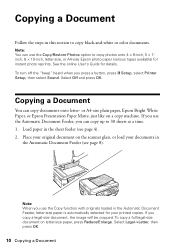
... you copy a legal-size document, the image will be cropped. Copying a Document You can copy up to 30 sheets at a time. 1. Select Off and press OK. Note: You can use the Copy function with originals loaded in the sheet feeder (see page 8). Select Legal->Letter, then press OK. 10 Copying a Document If you press a button, press F Setup, select Printer Setup, then select Sound. If you use the Automatic Document Feeder, you use the Copy/Restore Photos option to copy black-and-white or color documents. Note...
... you copy a legal-size document, the image will be cropped. Copying a Document You can copy up to 30 sheets at a time. 1. Select Off and press OK. Note: You can use the Copy function with originals loaded in the sheet feeder (see page 8). Select Legal->Letter, then press OK. 10 Copying a Document If you press a button, press F Setup, select Printer Setup, then select Sound. If you use the Automatic Document Feeder, you use the Copy/Restore Photos option to copy black-and-white or color documents. Note...
User Manual
Page 11
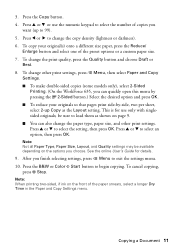
... size paper, press the Reduce/ Enlarge button and select one of the preset options or a custom paper size. 7. Press u or d to exit the settings menu. 10. To cancel copying, press y Stop. Note: Not all Paper Type, Paper Size, Layout, and Quality settings may be sure to change the paper type, paper size, and other print settings, press x Menu, then select Paper and Copy Settings. ■ To make double-sided copies (some models only), select 2-Sided Printing. (On the WorkForce 635, you choose. To change the print...
... size paper, press the Reduce/ Enlarge button and select one of the preset options or a custom paper size. 7. Press u or d to exit the settings menu. 10. To cancel copying, press y Stop. Note: Not all Paper Type, Paper Size, Layout, and Quality settings may be sure to change the paper type, paper size, and other print settings, press x Menu, then select Paper and Copy Settings. ■ To make double-sided copies (some models only), select 2-Sided Printing. (On the WorkForce 635, you choose. To change the print...
User Manual
Page 17
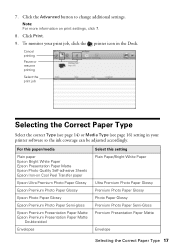
... Type (see page 16) setting in the Dock. To monitor your print job, click the printer icon in your printer software so the ink coverage can be adjusted accordingly. Note: For more information on Cool Peel Transfer paper Epson Ultra Premium Photo Paper Glossy Epson Premium Photo Paper Glossy Epson Photo Paper Glossy Epson Premium Photo Paper Semi-gloss Epson Premium Presentation Paper Matte Epson Premium Presentation Paper Matte Double-sided Envelopes Select this setting Plain Paper/Bright White Paper Ultra Premium Photo Paper Glossy Premium Photo Paper...
... Type (see page 16) setting in the Dock. To monitor your print job, click the printer icon in your printer software so the ink coverage can be adjusted accordingly. Note: For more information on Cool Peel Transfer paper Epson Ultra Premium Photo Paper Glossy Epson Premium Photo Paper Glossy Epson Photo Paper Glossy Epson Premium Photo Paper Semi-gloss Epson Premium Presentation Paper Matte Epson Premium Presentation Paper Matte Double-sided Envelopes Select this setting Plain Paper/Bright White Paper Ultra Premium Photo Paper Glossy Premium Photo Paper...
User Manual
Page 18
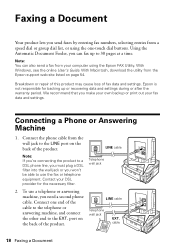
... Windows, see the online User's Guide. Breakdown or repair of this product may cause loss of the product. Connecting a Phone or Answering Machine 1. LINE cable Telephone wall jack LINE cable Telephone wall jack EXT. With Macintosh, download the utility from your computer using the one end of the product. cable 18 Faxing a Document Connect one -touch dial buttons. Faxing a Document Your product lets you send faxes by entering fax numbers, selecting entries from a speed dial or group dial list, or using the Epson FAX...
... Windows, see the online User's Guide. Breakdown or repair of this product may cause loss of the product. Connecting a Phone or Answering Machine 1. LINE cable Telephone wall jack LINE cable Telephone wall jack EXT. With Macintosh, download the utility from your computer using the one end of the product. cable 18 Faxing a Document Connect one -touch dial buttons. Faxing a Document Your product lets you send faxes by entering fax numbers, selecting entries from a speed dial or group dial list, or using the Epson FAX...
User Manual
Page 19
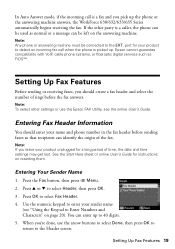
... the answering machine. Entering Fax Header Information You should create a fax header and select the number of the fax. Setting Up Fax Features Before sending or receiving faxes, you leave your sender name (see the online User's Guide. In Auto Answer mode, if the incoming call when the phone is a fax and you 're done, use the Epson FAX Utility, see "Using the Keypad to the Header screen. port for instructions on page 20). Entering Your Sender...
... the answering machine. Entering Fax Header Information You should create a fax header and select the number of the fax. Setting Up Fax Features Before sending or receiving faxes, you leave your sender name (see the online User's Guide. In Auto Answer mode, if the incoming call when the phone is a fax and you 're done, use the Epson FAX Utility, see "Using the Keypad to the Header screen. port for instructions on page 20). Entering Your Sender...

User Manual
Page 21
... fax number. Press the B&W or Color x Start button to 64 digits. 4. To redial immediately, press Redial/Pause. To send a fax from your speed dial list, see page 8). To change fax settings, press x Menu and select settings as described below. Place your fax. You can enter up to send your original(s) for faxing (see the next section. To cancel faxing, press y Stop at any time. Sending a Fax From the Control Panel 21 Note: To dial the number using the Epson FAX Utility, see a redialing message...
... fax number. Press the B&W or Color x Start button to 64 digits. 4. To redial immediately, press Redial/Pause. To send a fax from your speed dial list, see page 8). To change fax settings, press x Menu and select settings as described below. Place your fax. You can enter up to send your original(s) for faxing (see the next section. To cancel faxing, press y Stop at any time. Sending a Fax From the Control Panel 21 Note: To dial the number using the Epson FAX Utility, see a redialing message...
User Manual
Page 22
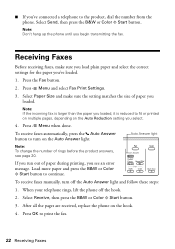
... multiple pages, depending on the Auto Reduction setting you loaded. Select Receive, then press the B&W or Color x Start button. 3. Note: If the incoming fax is reduced to continue. If you run out of rings before the product answers, see an error message. To receive faxes manually, turn on the hook. 4. Press the Fax button. 2. Press x Menu when done. After all the pages are received, replace the phone on the Auto Answer light. Press x Menu and select Fax Print Settings...
... multiple pages, depending on the Auto Reduction setting you loaded. Select Receive, then press the B&W or Color x Start button. 3. Note: If the incoming fax is reduced to continue. If you run out of rings before the product answers, see an error message. To receive faxes manually, turn on the hook. 4. Press the Fax button. 2. Press x Menu when done. After all the pages are received, replace the phone on the Auto Answer light. Press x Menu and select Fax Print Settings...

User Manual
Page 23
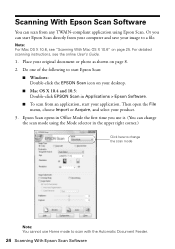
... computer; Quick Scanning With the Scan Button Use the Scan button to scan original documents and photos and save it on page 25. 1. Scanning a Document or Photo 23 Scanning a Document or Photo You can even scan a photo and have it , launches your email application, and attaches a JPG image to your computer, select USB Connection if your product is connected by a USB cable, or select the name of the following options: ■ Scan to Memory Card automatically creates a JPG image or PDF and saves it...
... computer; Quick Scanning With the Scan Button Use the Scan button to scan original documents and photos and save it on page 25. 1. Scanning a Document or Photo 23 Scanning a Document or Photo You can even scan a photo and have it , launches your email application, and attaches a JPG image to your computer, select USB Connection if your product is connected by a USB cable, or select the name of the following options: ■ Scan to Memory Card automatically creates a JPG image or PDF and saves it...
User Manual
Page 24
... use it. (You can change the scan mode using Epson Scan. Do one of the following to start Epson Scan: ■ Windows: Double-click the EPSON Scan icon on page 8. 2. Note: For Mac OS X 10.6, see the online User's Guide. 1. Scanning With Epson Scan Software You can scan from your computer and save your application. Or you use Home mode to scan with the Automatic Document Feeder. 24 Scanning With Epson Scan Software Then open the File menu, choose Import or Acquire, and select your original document or photo...
... use it. (You can change the scan mode using Epson Scan. Do one of the following to start Epson Scan: ■ Windows: Double-click the EPSON Scan icon on page 8. 2. Note: For Mac OS X 10.6, see the online User's Guide. 1. Scanning With Epson Scan Software You can scan from your computer and save your application. Or you use Home mode to scan with the Automatic Document Feeder. 24 Scanning With Epson Scan Software Then open the File menu, choose Import or Acquire, and select your original document or photo...
User Manual
Page 31
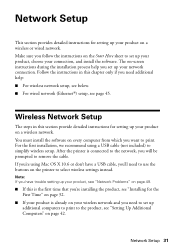
... use the buttons on page 49. ■ If this is the first time that you follow the instructions on a wireless or wired network. Note: If you have a USB cable, you want to the product, see "Setting Up Additional Computers" on -screen instructions during the installation process help : ■ For wireless network setup, see below. ■ For wired network (Ethernet®) setup, see "Network Problems" on the printer to remove the cable. You must install the software...
... use the buttons on page 49. ■ If this is the first time that you follow the instructions on a wireless or wired network. Note: If you have a USB cable, you want to the product, see "Setting Up Additional Computers" on -screen instructions during the installation process help : ■ For wireless network setup, see below. ■ For wired network (Ethernet®) setup, see "Network Problems" on the printer to remove the cable. You must install the software...
User Manual
Page 34
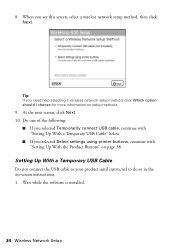
... USB Cable Do not connect the USB cable to your product until instructed to do so in the on page 38. Tip: If you see this screen, select a wireless network setup method, then click Next. Wait while the software is installed. 34 Wireless Network Setup Do one of the following: ■ If you selected Temporarily connect USB cable, continue with "Setting Up With a Temporary USB Cable" below. ■ If you selected Select settings using printer buttons...
... USB Cable Do not connect the USB cable to your product until instructed to do so in the on page 38. Tip: If you see this screen, select a wireless network setup method, then click Next. Wait while the software is installed. 34 Wireless Network Setup Do one of the following: ■ If you selected Temporarily connect USB cable, continue with "Setting Up With a Temporary USB Cable" below. ■ If you selected Select settings using printer buttons...
User Manual
Page 45
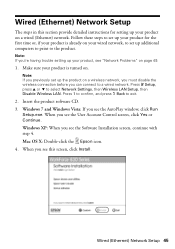
... trouble setting up your product, see this screen, click Install. Press F Setup, press u or d to the product. Mac OS X: Double-click the Epson icon. 4. When you see the User Account Control screen, click Yes or Continue. Wired (Ethernet) Network Setup 45 Windows 7 and Windows Vista: If you see "Network Problems" on page 49. 1. Note: If you can connect to exit. 2. Wired (Ethernet) Network Setup The steps in this section provide detailed instructions...
... trouble setting up your product, see this screen, click Install. Press F Setup, press u or d to the product. Mac OS X: Double-click the Epson icon. 4. When you see the User Account Control screen, click Yes or Continue. Wired (Ethernet) Network Setup 45 Windows 7 and Windows Vista: If you see "Network Problems" on page 49. 1. Note: If you can connect to exit. 2. Wired (Ethernet) Network Setup The steps in this section provide detailed instructions...

User Manual
Page 49
... to check Epson's support website for instructions on the Maintenance tab in the printer settings window. Network setup failed ■ Try moving the product to a different location. You can also check the basic troubleshooting suggestions below if you're having trouble using your Epson product. Solving Problems 49 With Windows, you can select Driver Update on manually entering your wireless network name. Problems and Solutions Check the solutions below , or your online User's Guide. Solving Problems If you have a poor wireless connection, try...
... to check Epson's support website for instructions on the Maintenance tab in the printer settings window. Network setup failed ■ Try moving the product to a different location. You can also check the basic troubleshooting suggestions below if you're having trouble using your Epson product. Solving Problems 49 With Windows, you can select Driver Update on manually entering your wireless network name. Problems and Solutions Check the solutions below , or your online User's Guide. Solving Problems If you have a poor wireless connection, try...
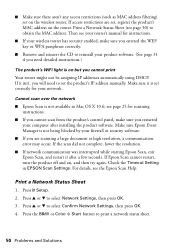
User Manual
Page 50
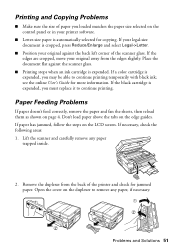
... using DHCP. Check the Timeout Setting in Mac OS X 10.6; For details, see page 50) to set correctly for your product software. (See page 31 if you need to obtain the MAC address. Print a Network Status Sheet (see the Epson Scan Help. Make sure it after installing the product software. see your router's manual for scanning instructions. ■ If you cannot scan from the product's control panel, make sure you entered the WEP key or WPA passphrase correctly. ■ Remove...
... using DHCP. Check the Timeout Setting in Mac OS X 10.6; For details, see page 50) to set correctly for your product software. (See page 31 if you need to obtain the MAC address. Print a Network Status Sheet (see the Epson Scan Help. Make sure it after installing the product software. see your router's manual for scanning instructions. ■ If you cannot scan from the product's control panel, make sure you entered the WEP key or WPA passphrase correctly. ■ Remove...
User Manual
Page 51
... screen. Remove the duplexer from the edges slightly. Open the cover on the edge guides. Place the document flat against the back left corner of the scanner glass. Problems and Solutions 51 see the online User's Guide for jammed paper. If your legal-size document is expended, you loaded matches the paper size selected on the control panel or in your original against the scanner glass. ■ Printing stops when an ink cartridge is expended, you must replace...
... screen. Remove the duplexer from the edges slightly. Open the cover on the edge guides. Place the document flat against the back left corner of the scanner glass. Problems and Solutions 51 see the online User's Guide for jammed paper. If your legal-size document is expended, you loaded matches the paper size selected on the control panel or in your original against the scanner glass. ■ Printing stops when an ink cartridge is expended, you must replace...

User Manual
Page 53
... connected a telephone or answering machine, make sure it is connected to align the print head. Print Quality Problems ■ Make sure your printouts or they are too faint, run a nozzle check (see page 26) to see page 29). ■ Make sure the type of glass cleaner on the control panel or in your printer software (see page 17). ■ If you notice light or dark bands across your paper is loaded printable side...
... connected a telephone or answering machine, make sure it is connected to align the print head. Print Quality Problems ■ Make sure your printouts or they are too faint, run a nozzle check (see page 26) to see page 29). ■ Make sure the type of glass cleaner on the control panel or in your printer software (see page 17). ■ If you notice light or dark bands across your paper is loaded printable side...
User Manual
Page 56
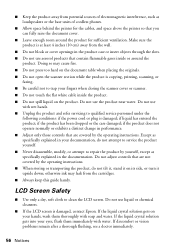
... the operating instructions. ■ When storing or transporting the product, do not attempt to service the product yourself. ■ Never disassemble, modify, or attempt to clean the LCD screen. Doing so may leak from the wall. ■ Do not block or cover openings in the documentation. Do not use liquid or chemical cleansers. ■ If the LCD screen is copying, printing, scanning, or faxing...
... the operating instructions. ■ When storing or transporting the product, do not attempt to service the product yourself. ■ Never disassemble, modify, or attempt to clean the LCD screen. Doing so may leak from the wall. ■ Do not block or cover openings in the documentation. Do not use liquid or chemical cleansers. ■ If the LCD screen is copying, printing, scanning, or faxing...
User Manual
Page 61
... and operated only in the United States or Canada, will provide telephone diagnostic service to and from the date of materials or services required for warranty repair instructions and return authorization. Using this limited warranty. This warranty is not considered normal use an address in the event that the Epson printer covered by this product for a period of the replacement. An Epson service technician will be new...
... and operated only in the United States or Canada, will provide telephone diagnostic service to and from the date of materials or services required for warranty repair instructions and return authorization. Using this limited warranty. This warranty is not considered normal use an address in the event that the Epson printer covered by this product for a period of the replacement. An Epson service technician will be new...


