
User's Guide
Page 2
Contents Welcome 3 Prepare to Print 7 Choose Photos and Print 11 Do More With Your Photos 17 Print From an External Device 23 Print From a Computer 31 Copy Photos to and From Your Computer 26 Replace Print Pack 29 Take PictureMate With You 33 Set PictureMate Preferences 36 Printer Care and Troubleshooting 40 Set Up Network Printing 54 Specifications 74 Notices 58 Index 68 2
Contents Welcome 3 Prepare to Print 7 Choose Photos and Print 11 Do More With Your Photos 17 Print From an External Device 23 Print From a Computer 31 Copy Photos to and From Your Computer 26 Replace Print Pack 29 Take PictureMate With You 33 Set PictureMate Preferences 36 Printer Care and Troubleshooting 40 Set Up Network Printing 54 Specifications 74 Notices 58 Index 68 2
User's Guide
Page 3
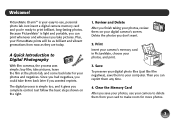
...the right. 1. Delete the photos you complete control. Save To preserve your digital photo files (just like film negatives), save your computer. PictureMate CharmTM is your digital camera's screen. Then you can print whenever and wherever you wanted reprints. Welcome! Just follow the basic steps shown ...on your easy-to Digital Photography With film cameras, the process was simple; Print Insert your camera's memory card in PictureMate, choose your photos and negatives. Clear the Memory Card After you finish taking your card to print brilliant, long-lasting photos. Plus, ...
...the right. 1. Delete the photos you complete control. Save To preserve your digital photo files (just like film negatives), save your computer. PictureMate CharmTM is your digital camera's screen. Then you can print whenever and wherever you wanted reprints. Welcome! Just follow the basic steps shown ...on your easy-to Digital Photography With film cameras, the process was simple; Print Insert your camera's memory card in PictureMate, choose your photos and negatives. Clear the Memory Card After you finish taking your card to print brilliant, long-lasting photos. Plus, ...
User's Guide
Page 4
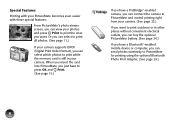
... printing using the optional Bluetooth Photo Print Adapter. (See page 24.) 4 When you insert the card into PictureMate, you just have to press OK and Print. (See page 15.) If you have a PictBridge®-enabled camera, you can connect the camera to print ...), you can select which photos to print while the memory card is still in other places without convenient electrical outlets, you can buy the optional PictureMate battery. (See page 34.) If you have a Bluetooth®-enabled mobile device or computer, you can view your photos and press Print to print the...
... printing using the optional Bluetooth Photo Print Adapter. (See page 24.) 4 When you insert the card into PictureMate, you just have to press OK and Print. (See page 15.) If you have a PictBridge®-enabled camera, you can connect the camera to print ...), you can select which photos to print while the memory card is still in other places without convenient electrical outlets, you can buy the optional PictureMate battery. (See page 34.) If you have a Bluetooth®-enabled mobile device or computer, you can view your photos and press Print to print the...
User's Guide
Page 5
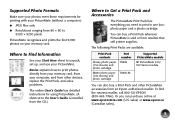
... 80 to 9200 × 9200 pixels PictureMate recognizes and prints the first 9,990 photos on your PictureMate. To find the nearest reseller, call 800-GO-EPSON (800-463-7766). The following Print ... PictureMate models All PictureMate 200/ 300 Series models You can purchase online at www.epsonstore.com (U.S. sales) or www.epson.ca (Canadian sales). 5 Or you can also buy a Print Pack wherever PictureMate... is installed from the CD.) Where to Get a Print Pack and Accessories The PictureMate Print ...
... 80 to 9200 × 9200 pixels PictureMate recognizes and prints the first 9,990 photos on your PictureMate. To find the nearest reseller, call 800-GO-EPSON (800-463-7766). The following Print ... PictureMate models All PictureMate 200/ 300 Series models You can purchase online at www.epsonstore.com (U.S. sales) or www.epson.ca (Canadian sales). 5 Or you can also buy a Print Pack wherever PictureMate... is installed from the CD.) Where to Get a Print Pack and Accessories The PictureMate Print ...
User's Guide
Page 6
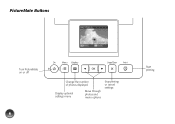
PictureMate Buttons Turn PictureMate on or off 6 Change the number of photos displayed Display optional settings menu Move through photos and menu options Stop printing or cancel settings Start printing
PictureMate Buttons Turn PictureMate on or off 6 Change the number of photos displayed Display optional settings menu Move through photos and menu options Stop printing or cancel settings Start printing
User's Guide
Page 7
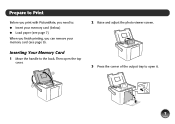
Prepare to Print Before you print with PictureMate, you can remove your memory card (see page 9). Then open the top cover. 2 Raise and adjust the photo viewer screen. 3 Press the corner of the output tray to : ● Insert your memory card (below) ● Load paper (see page 7) When you finish printing, you need to open it. 7 Inserting Your Memory Card 1 Move the handle to the back.
Prepare to Print Before you print with PictureMate, you can remove your memory card (see page 9). Then open the top cover. 2 Raise and adjust the photo viewer screen. 3 Press the corner of the output tray to : ● Insert your memory card (below) ● Load paper (see page 7) When you finish printing, you need to open it. 7 Inserting Your Memory Card 1 Move the handle to the back.
User's Guide
Page 8
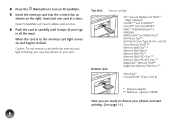
... adapter ** Maximum capacity 128MB Now you may lose photos on your photos and start printing. (See page 11.) 8 4 Press the P On button to turn on PictureMate. 5 Insert the memory card into the correct slot, as shown on and begins to choose your card. Insert just one card at once. 6 Push the... card in carefully until it stops (it won't go in , the memory card light comes on the right. Note: PictureMate can't read multiple cards at a time. When the card is flashing;
... adapter ** Maximum capacity 128MB Now you may lose photos on your photos and start printing. (See page 11.) 8 4 Press the P On button to turn on PictureMate. 5 Insert the memory card into the correct slot, as shown on and begins to choose your card. Insert just one card at once. 6 Push the... card in carefully until it stops (it won't go in , the memory card light comes on the right. Note: PictureMate can't read multiple cards at a time. When the card is flashing;
User's Guide
Page 9
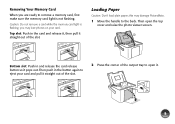
... pull it pops out. Then open it. 9 Bottom slot: Push in the button again to the back. Removing Your Memory Card When you may damage PictureMate. 1 Move the handle to eject your card. you are ready to open the top cover and raise the photo viewer screen. Then push in and...
... pull it pops out. Then open it. 9 Bottom slot: Push in the button again to the back. Removing Your Memory Card When you may damage PictureMate. 1 Move the handle to eject your card. you are ready to open the top cover and raise the photo viewer screen. Then push in and...

User's Guide
Page 10
... the group from which you are ready to select and print photos. Note: When you need more information. See page 29 for more paper, order a PictureMate Print Pack. 3 Slide the edge guides outward. 4 Create a stack of up to 20 sheets of paper and separate the sheets slightly by file name and... or more , press OK. 3 Press l or r to select the group from which you see a message saying that the memory card contains 1000 photos or more , PictureMate sorts them by fanning them into the slot between the edge guides with the glossy or whiter side up. Note: The last group may contain...
... the group from which you are ready to select and print photos. Note: When you need more information. See page 29 for more paper, order a PictureMate Print Pack. 3 Slide the edge guides outward. 4 Create a stack of up to 20 sheets of paper and separate the sheets slightly by file name and... or more , press OK. 3 Press l or r to select the group from which you see a message saying that the memory card contains 1000 photos or more , PictureMate sorts them by fanning them into the slot between the edge guides with the glossy or whiter side up. Note: The last group may contain...
User's Guide
Page 11
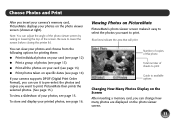
... memory card, you want to print. Choose Photos and Print After you want to print. Viewing Photos on PictureMate PictureMate's photo viewer screen makes it to lower the screen before closing the printer lid. Be sure to pre-select the photos and copies you can adjust the angle of the photo viewer... on your camera supports DPOF (Digital Print Order Format), you can use it easy to select the photos you insert your camera's memory card, PictureMate displays your printed photos, see page 15. Note: You can change how many photos are displayed on specific dates (see page 14) If your...
... memory card, you want to print. Choose Photos and Print After you want to print. Viewing Photos on PictureMate PictureMate's photo viewer screen makes it to lower the screen before closing the printer lid. Be sure to pre-select the photos and copies you can adjust the angle of the photo viewer... on your camera supports DPOF (Digital Print Order Format), you can use it easy to select the photos you insert your camera's memory card, PictureMate displays your printed photos, see page 15. Note: You can change how many photos are displayed on specific dates (see page 14) If your...
User's Guide
Page 12
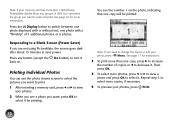
... to select more copies, if necessary. 5 To preview your photos, press Print. 12 Printing Individual Photos You can select the group you are not using PictureMate, the screen goes dark after about 13 minutes to turn it . You see a photo you want to decrease it for printing. See page 17 for... more than 1000 photos, PictureMate divides them into groups of 5 additional photos, or 6 photos. You can use the photo viewer screen to select the pictures you want , press OK to...
... to select more copies, if necessary. 5 To preview your photos, press Print. 12 Printing Individual Photos You can select the group you are not using PictureMate, the screen goes dark after about 13 minutes to turn it . You see a photo you want to decrease it for printing. See page 17 for... more than 1000 photos, PictureMate divides them into groups of 5 additional photos, or 6 photos. You can use the photo viewer screen to select the pictures you want , press OK to...
User's Guide
Page 15
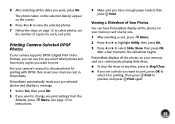
... l or r to view the selected photos. 7 Follow the steps on your camera's manual to choose photos for instructions. 3 Make sure you have PictureMate display all the photos on page 12 to select photos, set the number of Your Photos You can use it for each, and print. See...selecting all the dates you want to print. Viewing a Slideshow of copies for printing. Printing Camera-Selected DPOF Photos If your memory card in PictureMate. See page 17 for printing with DPOF, then insert your camera supports DPOF (Digital Print Order Format), you can have enough paper loaded,...
... l or r to view the selected photos. 7 Follow the steps on your camera's manual to choose photos for instructions. 3 Make sure you have PictureMate display all the photos on page 12 to select photos, set the number of Your Photos You can use it for each, and print. See...selecting all the dates you want to print. Viewing a Slideshow of copies for printing. Printing Camera-Selected DPOF Photos If your memory card in PictureMate. See page 17 for printing with DPOF, then insert your camera supports DPOF (Digital Print Order Format), you can have enough paper loaded,...
User's Guide
Page 16
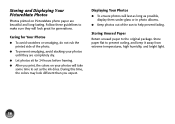
...Photos ● To ensure photos will last as long as the ink dries. Store paper flat to the original package. During this time, the colors may look great for Your Photos ● To avoid scratches or smudging, do not rub the printed side of the photo. ● To ...Return unused paper to prevent curling, and keep it away from extreme temperatures, high humidity, and bright light. 16 Storing and Displaying Your PictureMate Photos Photos printed on your photos until they will look different than you print, the colors on PictureMate photo paper are beautiful and long-lasting.
...Photos ● To ensure photos will last as long as the ink dries. Store paper flat to the original package. During this time, the colors may look great for Your Photos ● To avoid scratches or smudging, do not rub the printed side of the photo. ● To ...Return unused paper to prevent curling, and keep it away from extreme temperatures, high humidity, and bright light. 16 Storing and Displaying Your PictureMate Photos Photos printed on your photos until they will look different than you print, the colors on PictureMate photo paper are beautiful and long-lasting.

User's Guide
Page 19
...Reducing Red-Eye When you have red eyes. Fixing Photos PictureMate lets you use Fix Red-Eye to start printing. ... Fix Red-Eye, then press OK. 6 Press l or r to have selected photos by default, improves your photos' colors and increases contrast and sharpness. If your photos for the best results. 19 Note: If you take photos of people, ...Landscape, or Night Scene. setting automatically adjusts your camera supports PRINT Image Matching® (P.I.M.) or Exif Print, the printer's P.I.M. Note: Fix Red-Eye may correct images that are printed. You can use this problem. The Fix Photo ...
...Reducing Red-Eye When you have red eyes. Fixing Photos PictureMate lets you use Fix Red-Eye to start printing. ... Fix Red-Eye, then press OK. 6 Press l or r to have selected photos by default, improves your photos' colors and increases contrast and sharpness. If your photos for the best results. 19 Note: If you take photos of people, ...Landscape, or Night Scene. setting automatically adjusts your camera supports PRINT Image Matching® (P.I.M.) or Exif Print, the printer's P.I.M. Note: Fix Red-Eye may correct images that are printed. You can use this problem. The Fix Photo ...
User's Guide
Page 23
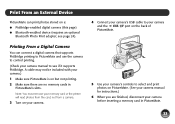
... but not printing. 2 Make sure there are finished, disconnect your camera before inserting a memory card in PictureMate's slots. A cable may not be included with your camera.) 1 Make sure PictureMate is on PictureMate. (See your memory card or the printer will read photos from the card, not from a camera. 3 Turn on a: ● PictBridge-enabled digital...
... but not printing. 2 Make sure there are finished, disconnect your camera before inserting a memory card in PictureMate's slots. A cable may not be included with your camera.) 1 Make sure PictureMate is on PictureMate. (See your memory card or the printer will read photos from the card, not from a camera. 3 Turn on a: ● PictBridge-enabled digital...

User's Guide
Page 24
... remove the Bluetooth Photo Print Adapter while it is available from your local reseller or Epson (see page 53). The adapter (part# C12C824383) is not guaranteed to malfunction. 2 Plug the adapter into the EXT. Note: Although PictureMate complies with the Bluetooth specification, it is communicating with all devices that have Bluetooth wireless...
... remove the Bluetooth Photo Print Adapter while it is available from your local reseller or Epson (see page 53). The adapter (part# C12C824383) is not guaranteed to malfunction. 2 Plug the adapter into the EXT. Note: Although PictureMate complies with the Bluetooth specification, it is communicating with all devices that have Bluetooth wireless...

User's Guide
Page 25
... Macintosh®: Double-click Bluetooth File Exchange in your Utilities folder. If you want to PictureMate with your computer instead. Caution: Do not connect or disconnect the Bluetooth Photo Print Adapter while it to PictureMate: ● Windows®: Send photos directly to print from a memory card or your ... for instructions on setting up Bluetooth file sharing and sending files. See the documentation included with your device or while PictureMate is not printing, then pull the adapter out of its port. Printing starts automatically. Note: For instructions on the...
... Macintosh®: Double-click Bluetooth File Exchange in your Utilities folder. If you want to PictureMate with your computer instead. Caution: Do not connect or disconnect the Bluetooth Photo Print Adapter while it to PictureMate: ● Windows®: Send photos directly to print from a memory card or your ... for instructions on setting up Bluetooth file sharing and sending files. See the documentation included with your device or while PictureMate is not printing, then pull the adapter out of its port. Printing starts automatically. Note: For instructions on the...
User's Guide
Page 26
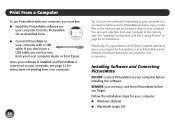
... from your computer. Installing Software and Connecting PictureMate DO NOT connect PictureMate to your computer before you must first: ● Install the PictureMate software on your computer from Epson. You can buy one from PictureMate before installing the software. Print From a Computer To use PictureMate with a USB cable. REMOVE your PictureMate printer software. Periodically, it were a drive on...
... from your computer. Installing Software and Connecting PictureMate DO NOT connect PictureMate to your computer before you must first: ● Install the PictureMate software on your computer from Epson. You can buy one from PictureMate before installing the software. Print From a Computer To use PictureMate with a USB cable. REMOVE your PictureMate printer software. Periodically, it were a drive on...
User's Guide
Page 27
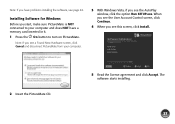
The software starts installing. 27 Installing Software for Windows Before you start, make sure PictureMate is NOT connected to turn on PictureMate. When you see the User Account Control screen, click Continue. 4 When you see the AutoPlay window, click the option Run SETUP.exe. Note: If... you see a Found New Hardware screen, click Cancel and disconnect PictureMate from your computer and does NOT have problems installing the software, see page 48. Note: If you have a memory card inserted in it. 1 Press the...
The software starts installing. 27 Installing Software for Windows Before you start, make sure PictureMate is NOT connected to turn on PictureMate. When you see the User Account Control screen, click Continue. 4 When you see the AutoPlay window, click the option Run SETUP.exe. Note: If... you see a Found New Hardware screen, click Cancel and disconnect PictureMate from your computer and does NOT have problems installing the software, see page 48. Note: If you have a memory card inserted in it. 1 Press the...
User's Guide
Page 28
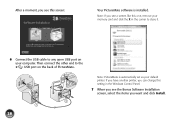
After a moment, you see the Bonus Software Installation screen, select the items you want and click Install. 28 If you have another printer, you can change this setting in the corner to close it. 6 Connect the USB cable to the USB port on the back of PictureMate. Note: If you see this one, remove your computer. Then connect the other end to any open USB port on your memory card and click the X in the Windows Control Panel. 7 When you see a screen like this screen: Your PictureMate software is automatically set as your default printer. Note: PictureMate is installed.
After a moment, you see the Bonus Software Installation screen, select the items you want and click Install. 28 If you have another printer, you can change this setting in the corner to close it. 6 Connect the USB cable to the USB port on the back of PictureMate. Note: If you see this one, remove your computer. Then connect the other end to any open USB port on your memory card and click the X in the Windows Control Panel. 7 When you see a screen like this screen: Your PictureMate software is automatically set as your default printer. Note: PictureMate is installed.


