
User's Guide
Page 2
...'s Guide 6 Getting to Know Your PictureMate 7 Loading Paper 8 Supported Paper Types 9 Printing From Your Computer 10 Printing From a Windows Computer 10 Printing From a Macintosh Computer 13 Printing Photos Using Film Factory ... Paper 32 Printing Without a Computer 34 Compatible Memory Cards 34 Photo Image File Requirements 35 Inserting Your Memory Card 36 Printing a Proof Sheet from the PictureMate Print Wizard 37 1
...'s Guide 6 Getting to Know Your PictureMate 7 Loading Paper 8 Supported Paper Types 9 Printing From Your Computer 10 Printing From a Windows Computer 10 Printing From a Macintosh Computer 13 Printing Photos Using Film Factory ... Paper 32 Printing Without a Computer 34 Compatible Memory Cards 34 Photo Image File Requirements 35 Inserting Your Memory Card 36 Printing a Proof Sheet from the PictureMate Print Wizard 37 1
User's Guide
Page 3
... Photos From the PictureMate Print Wizard 39 Viewing the PictureMate Main Menu 40 Selecting the Photos You Want to Print 41 Setting the Number of Copies in the Main Menu 46 Choosing a Layout 47 Confirming and Printing 47 Doing More With Your Prints 48 Adjusting Printer Settings 54 Printing ...Print Head Directly from PictureMate 78 Aligning the Print Head Directly From PictureMate 80 Checking the Print Quality Using the Computer 81 Cleaning the Print Head Using the Computer 82 Aligning the Print Head Using the Computer 84 Solving Problems 87 Control Panel Messages 87 Running a Printer Check 89 2
... Photos From the PictureMate Print Wizard 39 Viewing the PictureMate Main Menu 40 Selecting the Photos You Want to Print 41 Setting the Number of Copies in the Main Menu 46 Choosing a Layout 47 Confirming and Printing 47 Doing More With Your Prints 48 Adjusting Printer Settings 54 Printing ...Print Head Directly from PictureMate 78 Aligning the Print Head Directly From PictureMate 80 Checking the Print Quality Using the Computer 81 Cleaning the Print Head Using the Computer 82 Aligning the Print Head Using the Computer 84 Solving Problems 87 Control Panel Messages 87 Running a Printer Check 89 2

User's Guide
Page 4
... 92 Print Quality Problems 93 Problems With Paper Feeding 94 Miscellaneous Printout Problems 95 Where To Get Help 97 Uninstalling PictureMate Software 98 Uninstalling From a Windows Computer 98 Uninstalling From a Macintosh Using OS X 99 Uninstalling From a Macintosh ...9 106 System Requirements 109 Windows System Requirements 109 Macintosh System Requirements 109 Important Safety Instructions 111 PictureMate Safety Instructions 111 Photo Cartridge Safety Instructions 112 PictureMate Screen (LCD) Safety Instructions 113 Specifications 115 Printing 115 Paper 115 Photo Cartridge 116 Mechanical 117...
... 92 Print Quality Problems 93 Problems With Paper Feeding 94 Miscellaneous Printout Problems 95 Where To Get Help 97 Uninstalling PictureMate Software 98 Uninstalling From a Windows Computer 98 Uninstalling From a Macintosh Using OS X 99 Uninstalling From a Macintosh ...9 106 System Requirements 109 Windows System Requirements 109 Macintosh System Requirements 109 Important Safety Instructions 111 PictureMate Safety Instructions 111 Photo Cartridge Safety Instructions 112 PictureMate Screen (LCD) Safety Instructions 113 Specifications 115 Printing 115 Paper 115 Photo Cartridge 116 Mechanical 117...

User's Guide
Page 5
AC Adapter 119 Built-in Card Slots 120 External Storage Devices 120 Standards and Approvals 121 Notices 123 How many photos will I get from a PictureMate Print Pack? 123 PictureMate Print Pack Satisfaction Guarantee: 124 Copyright Notice 124 A Note Concerning Responsible Use of Copyrighted Materials 125 Trademarks 125 4
AC Adapter 119 Built-in Card Slots 120 External Storage Devices 120 Standards and Approvals 121 Notices 123 How many photos will I get from a PictureMate Print Pack? 123 PictureMate Print Pack Satisfaction Guarantee: 124 Copyright Notice 124 A Note Concerning Responsible Use of Copyrighted Materials 125 Trademarks 125 4
User's Guide
Page 7
... photos, and more. See these instructions: Warnings must be followed carefully to print from PictureMate,TM print from a computer, troubleshoot PictureMate, save your PictureMate software CD. Cautions must be observed to avoid damage to printing without a computer, see the Using PictureMate Without a Computer book. ■ To install software for better printing. 6 Notes contain important...
... photos, and more. See these instructions: Warnings must be followed carefully to print from PictureMate,TM print from a computer, troubleshoot PictureMate, save your PictureMate software CD. Cautions must be observed to avoid damage to printing without a computer, see the Using PictureMate Without a Computer book. ■ To install software for better printing. 6 Notes contain important...
User's Guide
Page 8
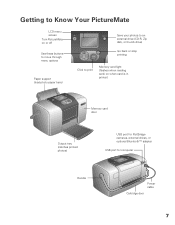
Getting to Know Your PictureMate LCD menu screen Turn PictureMate on when card is in printer) Memory card door Output tray (catches printed photos) USB port for PictBridge cameras, external drives, or optional BluetoothTM adapter USB port for computer Handle Power cable Cartridge door 7 on or off Use these buttons to move through menu options Paper support (load photo paper here) Save your photos to an external drive (CD-R, Zip disk, or thumb drive) Go back or stop printing Click to print Memory card light (flashes when reading card;
Getting to Know Your PictureMate LCD menu screen Turn PictureMate on when card is in printer) Memory card door Output tray (catches printed photos) USB port for PictBridge cameras, external drives, or optional BluetoothTM adapter USB port for computer Handle Power cable Cartridge door 7 on or off Use these buttons to move through menu options Paper support (load photo paper here) Save your photos to an external drive (CD-R, Zip disk, or thumb drive) Go back or stop printing Click to print Memory card light (flashes when reading card;

User's Guide
Page 9
Open the output tray. Place your PictureMate Photo Paper against the right edge, with the glossy side up the top of the paper support. 4. Note: Load a maximum of the paper. 8 Make sure ..., don't touch the glossy surface of 20 sheets at one time. Load glossy side up Open and pull up to load more than 20 photos, PictureMate will prompt you are printing more paper. If you when it is glossy side up paper support Move handle all the way down Open output...
Open the output tray. Place your PictureMate Photo Paper against the right edge, with the glossy side up the top of the paper support. 4. Note: Load a maximum of the paper. 8 Make sure ..., don't touch the glossy surface of 20 sheets at one time. Load glossy side up Open and pull up to load more than 20 photos, PictureMate will prompt you are printing more paper. If you when it is glossy side up paper support Move handle all the way down Open output...
User's Guide
Page 10
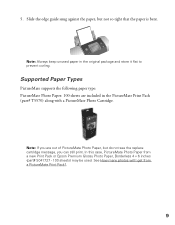
... bent. Note: If you can still print. In this case, PictureMate Photo Paper from a PictureMate Print Pack?. 9 Note: Always keep unused paper in the PictureMate Print Pack (part# T5570) along with a PictureMate Photo Cartridge. See How many photos will I get from a new Print Pack or Epson Premium Glossy Photo Paper, Borderless 4 × 6 inches (part# S041727...
... bent. Note: If you can still print. In this case, PictureMate Photo Paper from a PictureMate Print Pack?. 9 Note: Always keep unused paper in the PictureMate Print Pack (part# T5570) along with a PictureMate Photo Cartridge. See How many photos will I get from a new Print Pack or Epson Premium Glossy Photo Paper, Borderless 4 × 6 inches (part# S041727...

User's Guide
Page 11
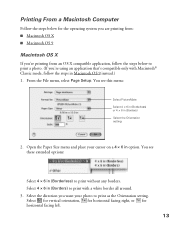
..., you can use these technologies to open your program. 2. You see a Print window like this one: Select EPSON PictureMate here Click here to ensure the most accurate reproduction of your PictureMate software is installed as Adobe® Photoshop.® Before you can edit, enhance, and organize your photos, using ...your photo software, such as described in Windows.® 1. or P.I .M. See Printing Photos Using Film Factory. Open your photo in your PictureMate software 10 From the File menu, click Print. II) or Exif Print, you start, make sure your photographs.
..., you can use these technologies to open your program. 2. You see a Print window like this one: Select EPSON PictureMate here Click here to ensure the most accurate reproduction of your PictureMate software is installed as Adobe® Photoshop.® Before you can edit, enhance, and organize your photos, using ...your photo software, such as described in Windows.® 1. or P.I .M. See Printing Photos Using Film Factory. Open your photo in your PictureMate software 10 From the File menu, click Print. II) or Exif Print, you start, make sure your photographs.

User's Guide
Page 12
... screen.) You see a Setup, Printer, or Options button, click it is wide, select Portrait orientation; Select Auto Correction to automatically adjust colors, Sepia to change the colors to brown for an old-fashioned look, Black & White to adjust your photo is longer than it is selected. 4. Make sure EPSON PictureMate is long, select Landscape. ■...
... screen.) You see a Setup, Printer, or Options button, click it is wide, select Portrait orientation; Select Auto Correction to automatically adjust colors, Sepia to change the colors to brown for an old-fashioned look, Black & White to adjust your photo is longer than it is selected. 4. Make sure EPSON PictureMate is long, select Landscape. ■...
User's Guide
Page 14
You see this menu: Select PictureMate Select 4 × 6 in (Borderless) or 4 × 6 in (Borders) Select the Orientation setting 2. You see these extended options: Select 4 × 6 in (Borderless) to print without any ...
You see this menu: Select PictureMate Select 4 × 6 in (Borderless) or 4 × 6 in (Borders) Select the Orientation setting 2. You see these extended options: Select 4 × 6 in (Borderless) to print without any ...
User's Guide
Page 15
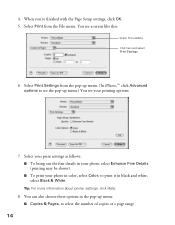
... settings as follows: ■ To bring out the fine details in the pop-up menu.) You see a screen like this: Select PictureMate Click here and select Print Settings 6. Select Print from the pop-up menu. (In iPhoto,™ click Advanced options to see the ...Color; When you're finished with the Page Setup settings, click OK. 5. You can also choose these options in your photo, select Enhance Fine Details (printing may be slower). ■ To print your printing options: 7. You see your photo in black and white, select Black & White. Tip: For more information about printer...
... settings as follows: ■ To bring out the fine details in the pop-up menu.) You see a screen like this: Select PictureMate Click here and select Print Settings 6. Select Print from the pop-up menu. (In iPhoto,™ click Advanced options to see the ...Color; When you're finished with the Page Setup settings, click OK. 5. You can also choose these options in your photo, select Enhance Fine Details (printing may be slower). ■ To print your printing options: 7. You see your photo in black and white, select Black & White. Tip: For more information about printer...

User's Guide
Page 16
...options ■ Output Options, to save your print job as a PDF file ■ Summary, to move it appears in the PictureMate or Print Center window. Click Print. 10. If you want one to print before the other(s), select the job and click ...the Status arrow to view a list of your print job, click the PictureMate or Print Center icon when it up. 12. When you're finished, choose File > Quit in the dock. From this ...click Resume ■ If multiple print jobs are listed and you clicked the Print Center icon, double-click PictureMate.
...options ■ Output Options, to save your print job as a PDF file ■ Summary, to move it appears in the PictureMate or Print Center window. Click Print. 10. If you want one to print before the other(s), select the job and click ...the Status arrow to view a list of your print job, click the PictureMate or Print Center icon when it up. 12. When you're finished, choose File > Quit in the dock. From this ...click Resume ■ If multiple print jobs are listed and you clicked the Print Center icon, double-click PictureMate.

User's Guide
Page 17
... wide, select Portrait orientation; You see the following: Make sure you need to print with a white border all around. ■ If your photo 2. You see PictureMate Select the orientation of your photo is longer than it is selected. Click OK. 5. From the File menu, select Print. if it is wider than...
... wide, select Portrait orientation; You see the following: Make sure you need to print with a white border all around. ■ If your photo 2. You see PictureMate Select the orientation of your photo is longer than it is selected. Click OK. 5. From the File menu, select Print. if it is wider than...

User's Guide
Page 19
Opening Your Photos in the Using PictureMate With a Computer booklet. See Storing and Displaying Your Printed Photos for steps on properly storing your ink levels, click . Printing Photos Using Film Factory You ...
Opening Your Photos in the Using PictureMate With a Computer booklet. See Storing and Displaying Your Printed Photos for steps on properly storing your ink levels, click . Printing Photos Using Film Factory You ...

User's Guide
Page 21
... or Calendars; Click Standard Prints on the left side of the screen. You see this screen: Click to print, click the Print Assignment button. PictureMate doesn't support these print options. When you can also select other print options on the left side of the screen. If you have another... printer that supports larger paper sizes, you 're ready to print the date with larger paper sizes. Printing Your Photos in Film Factory 1. You see...
... or Calendars; Click Standard Prints on the left side of the screen. You see this screen: Click to print, click the Print Assignment button. PictureMate doesn't support these print options. When you can also select other print options on the left side of the screen. If you have another... printer that supports larger paper sizes, you 're ready to print the date with larger paper sizes. Printing Your Photos in Film Factory 1. You see...
User's Guide
Page 22
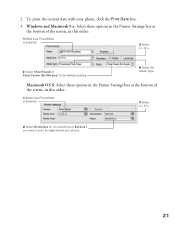
...bottom of the screen, in this order: 1 Make sure PictureMate is selected 3 Select 4 × 6 in 2 Select Sheet Feeder or Sheet Feeder (No Margins) for borderless printing 4 Select the Media Type Macintosh OS X: Select these options in the Printer Settings box at the bottom of the screen, in this... order: 1 Make sure PictureMate is selected 3 Select 4 × 6 in 2 Select Borderless for normal photos or Borders if you ...
...bottom of the screen, in this order: 1 Make sure PictureMate is selected 3 Select 4 × 6 in 2 Select Sheet Feeder or Sheet Feeder (No Margins) for borderless printing 4 Select the Media Type Macintosh OS X: Select these options in the Printer Settings box at the bottom of the screen, in this... order: 1 Make sure PictureMate is selected 3 Select 4 × 6 in 2 Select Borderless for normal photos or Borders if you ...

User's Guide
Page 23
...: Select the number of the screen. Follow the steps in the preview, click the Back button to print. You can insert the memory card into a PictureMate memory card slot and copy the photos to print Leave these sections: 22 Select the number of the screen. ■ Windows: Your pictures are printed...
...: Select the number of the screen. Follow the steps in the preview, click the Back button to print. You can insert the memory card into a PictureMate memory card slot and copy the photos to print Leave these sections: 22 Select the number of the screen. ■ Windows: Your pictures are printed...

User's Guide
Page 24
... Copying Photos ■ Configuring PhotoStarter ■ Preparing to Remove a Memory Card Compatible Memory Cards You can insert any of these types of memory cards into PictureMate: ■ CompactFlashTM ■ MicrodriveTM ■ SD (Secure Digital) ■ miniSDTM (requires miniSD adapter) ■ MMCTM (MultiMediaCard™) ■ xD Picture CardTM ■ Sony Memory Stick...
... Copying Photos ■ Configuring PhotoStarter ■ Preparing to Remove a Memory Card Compatible Memory Cards You can insert any of these types of memory cards into PictureMate: ■ CompactFlashTM ■ MicrodriveTM ■ SD (Secure Digital) ■ miniSDTM (requires miniSD adapter) ■ MMCTM (MultiMediaCard™) ■ xD Picture CardTM ■ Sony Memory Stick...

User's Guide
Page 25
Note: PictureMate supports P.I.M. (PRINT Image Matching) and Exif Print image enhancement features. Insert the memory card into its slot, as shown. See your camera manual to see ...) SD (Secure Digital), or MMC (MultiMediaCard) (middle) xD Picture Card (top) Memory Stick (middle) SmartMedia (top) 24 Inserting Your Memory Card and Copying Photos 1. Your PictureMate recognizes and prints the first 999 photos on your memory card. Make sure...
Note: PictureMate supports P.I.M. (PRINT Image Matching) and Exif Print image enhancement features. Insert the memory card into its slot, as shown. See your camera manual to see ...) SD (Secure Digital), or MMC (MultiMediaCard) (middle) xD Picture Card (top) Memory Stick (middle) SmartMedia (top) 24 Inserting Your Memory Card and Copying Photos 1. Your PictureMate recognizes and prints the first 999 photos on your memory card. Make sure...

