
Network Guide
Page 4
5. Select Install driver for network connection, then click Next. Note: If you see a Windows Security Alert, click Allow Access or Unblock. 4 Click Install. 6.
5. Select Install driver for network connection, then click Next. Note: If you see a Windows Security Alert, click Allow Access or Unblock. 4 Click Install. 6.
Start Here
Page 3
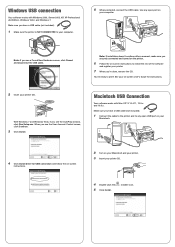
...If installation doesn't continue after a moment, make sure you securely connected and turned on the printer. 6 Follow the on your Macintosh. 4 Click Install driver for instructions. 2 Insert your printer CD. 4 Double-click the 5 Click Install. installer icon. Use any open port on ...your Macintosh and your printer. 3 Insert your printer CD. See your on-screen User's Guide for USB connection and...
...If installation doesn't continue after a moment, make sure you securely connected and turned on the printer. 6 Follow the on your Macintosh. 4 Click Install driver for instructions. 2 Insert your printer CD. 4 Double-click the 5 Click Install. installer icon. Use any open port on ...your Macintosh and your printer. 3 Insert your printer CD. See your on-screen User's Guide for USB connection and...
Start Here
Page 4
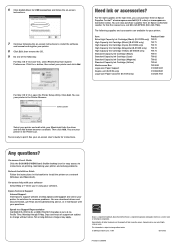
... driver and the Add button becomes available. You see your printer in XXXXXX Then click Add. Epson Technical Support Internet Support Visit Epson's support website at www.epson.com/ink3 (U.S. The following supplies and accessories are available for instructions. Click Add. See your on-screen User's Guide for your printer: Item Extra High Capacity Ink Cartridge (Black) (B-510DN...
... driver and the Add button becomes available. You see your printer in XXXXXX Then click Add. Epson Technical Support Internet Support Visit Epson's support website at www.epson.com/ink3 (U.S. The following supplies and accessories are available for instructions. Click Add. See your on-screen User's Guide for your printer: Item Extra High Capacity Ink Cartridge (Black) (B-510DN...
User's Guide
Page 3
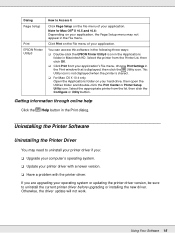
... 9 Setting Up the Printer 9 Choosing a Place for the Printer 10 Using the Printer 10 Handling Ink Cartridges 11 Warnings, Cautions, and Notes 12 Chapter 1 Using Your Software Overview of Printer Driver and Status Monitor 14 Accessing the Printer Driver for Windows 14 Accessing the Printer Driver for Mac OS X 15 Uninstalling the Printer Software 16 Uninstalling the Printer Driver 16 Uninstalling the User...
... 9 Setting Up the Printer 9 Choosing a Place for the Printer 10 Using the Printer 10 Handling Ink Cartridges 11 Warnings, Cautions, and Notes 12 Chapter 1 Using Your Software Overview of Printer Driver and Status Monitor 14 Accessing the Printer Driver for Windows 14 Accessing the Printer Driver for Mac OS X 15 Uninstalling the Printer Software 16 Uninstalling the Printer Driver 16 Uninstalling the User...

User's Guide
Page 14
To make settings that application. From Windows Applications 1. Accessing the Printer Driver for Windows You can access the printer driver from Windows XP. Note: Screen shots of the printer driver windows in this User's Guide are using, access the printer driver from that apply to get the best printing results. Windows 7: Click the Start button, and select Devices and...
To make settings that application. From Windows Applications 1. Accessing the Printer Driver for Windows You can access the printer driver from Windows XP. Note: Screen shots of the printer driver windows in this User's Guide are using, access the printer driver from that apply to get the best printing results. Windows 7: Click the Start button, and select Devices and...

User's Guide
Page 15
..., the Speed & Progress button, and then the Monitoring Preferences button. Accessing the Printer Driver for Windows XP and 2000 only). From the Shortcut Icon on the Taskbar Right-click the printer icon on the File menu. Getting Information through Online Help You can access online ...help for items in Category View, click Printers and Other Hardware, then click Printers and Faxes.) Windows 2000: Click Start, point to the Windows taskbar, first access the printer driver from your application or the Windows Start menu. & See "Accessing the Printer Driver for Windows" on page 14. Windows...
..., the Speed & Progress button, and then the Monitoring Preferences button. Accessing the Printer Driver for Windows XP and 2000 only). From the Shortcut Icon on the Taskbar Right-click the printer icon on the File menu. Getting Information through Online Help You can access online ...help for items in Category View, click Printers and Other Hardware, then click Printers and Faxes.) Windows 2000: Click Start, point to the Windows taskbar, first access the printer driver from your application or the Windows Start menu. & See "Accessing the Printer Driver for Windows" on page 14. Windows...
User's Guide
Page 16
...Macintosh HD. If you : ❏ Upgrade your computer's operating system. ❏ Update your printer driver with a newer version. ❏ Have a problem with the printer driver. Dialog Page Setup Print EPSON Printer Utility3 How to Access It Click Page Setup on the File menu of your hard drive, ... of your operating system or updating the printer driver version, be sure to uninstall your printer driver if you are upgrading your application. You can access this software in the following three ways: ❏ Double-click the EPSON Printer Utility3 icon in the Applications folder in the...
...Macintosh HD. If you : ❏ Upgrade your computer's operating system. ❏ Update your printer driver with a newer version. ❏ Have a problem with the printer driver. Dialog Page Setup Print EPSON Printer Utility3 How to Access It Click Page Setup on the File menu of your hard drive, ... of your operating system or updating the printer driver version, be sure to uninstall your printer driver if you are upgrading your application. You can access this software in the following three ways: ❏ Double-click the EPSON Printer Utility3 icon in the Applications folder in the...

User's Guide
Page 17
...from the list. 4. Windows XP and 2000: Select Add/Remove Programs and then select EPSON Printer Software from the list. Using Your Software 17 Windows 2000: Click Start, point to uninstall the printer driver. Windows 7 and Windows Vista and Server 2008: Click Uninstall/Change. Windows XP and... ❏ To uninstall programs in Windows 2000, you must log on to a Computer Administrator account. Turn off the printer and disconnect its interface cable. 2. Insert the Epson printer software CD-ROM into your printer and click OK. 6. Windows XP, Server 2003, and 2000: Click Change/Remove. 5.
...from the list. 4. Windows XP and 2000: Select Add/Remove Programs and then select EPSON Printer Software from the list. Using Your Software 17 Windows 2000: Click Start, point to uninstall the printer driver. Windows 7 and Windows Vista and Server 2008: Click Uninstall/Change. Windows XP and... ❏ To uninstall programs in Windows 2000, you must log on to a Computer Administrator account. Turn off the printer and disconnect its interface cable. 2. Insert the Epson printer software CD-ROM into your printer and click OK. 6. Windows XP, Server 2003, and 2000: Click Change/Remove. 5.

User's Guide
Page 18
... agreement and click Accept. 6. Select Uninstall from the menu in the Epson folder. Windows 7 and Windows Vista and Server 2008: Click Uninstall a program from Printer List and click Delete. Click Custom Install. 4. Turn off the printer and disconnect its interface cable. 2. Windows 7 and Windows Vista and ... standard user. ❏ To uninstall programs in Windows XP, you must log on as a user with administrative privileges (belonging to uninstall the printer driver. Note for Mac OS X 10.4: If the name of your password or phrase and click OK. 5. Follow the on to Settings, and ...
... agreement and click Accept. 6. Select Uninstall from the menu in the Epson folder. Windows 7 and Windows Vista and Server 2008: Click Uninstall a program from Printer List and click Delete. Click Custom Install. 4. Turn off the printer and disconnect its interface cable. 2. Windows 7 and Windows Vista and ... standard user. ❏ To uninstall programs in Windows XP, you must log on as a user with administrative privileges (belonging to uninstall the printer driver. Note for Mac OS X 10.4: If the name of your password or phrase and click OK. 5. Follow the on to Settings, and ...
User's Guide
Page 31
...of your printout. 8. Select the paper source as the Source setting. 5. Select Portrait (tall) or Landscape (wide) to close the printer settings window. Select the appropriate Size setting. You can also define a custom paper size. Click OK to change the orientation of the ...10063; Text for text-only documents with text and images 4. Basic Printing 31 For details, see the online help. 7. & See "Accessing the Printer Driver for higher quality documents with higher text quality ❏ Text & Image for Windows" on page 28. 6. Select the appropriate Type setting. & ...
...of your printout. 8. Select the paper source as the Source setting. 5. Select Portrait (tall) or Landscape (wide) to close the printer settings window. Select the appropriate Size setting. You can also define a custom paper size. Click OK to change the orientation of the ...10063; Text for text-only documents with text and images 4. Basic Printing 31 For details, see the online help. 7. & See "Accessing the Printer Driver for higher quality documents with higher text quality ❏ Text & Image for Windows" on page 28. 6. Select the appropriate Type setting. & ...
User's Guide
Page 32
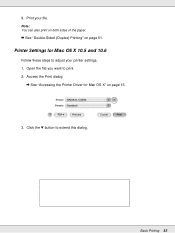
Printer Settings for Mac OS X" on page 51. Click the d button to print. 2. Open the file you want to extend this dialog. Note: You can also print on both sides of the paper. & See "Double-Sided (Duplex) Printing" on page 15. 3. 9. Basic Printing 32 Access the Print dialog. & See "Accessing the Printer Driver for Mac OS X 10.5 and 10.6 Follow these steps to adjust your file. Print your printer settings. 1.
Printer Settings for Mac OS X" on page 51. Click the d button to print. 2. Open the file you want to extend this dialog. Note: You can also print on both sides of the paper. & See "Double-Sided (Duplex) Printing" on page 15. 3. 9. Basic Printing 32 Access the Print dialog. & See "Accessing the Printer Driver for Mac OS X 10.5 and 10.6 Follow these steps to adjust your file. Print your printer settings. 1.
User's Guide
Page 35
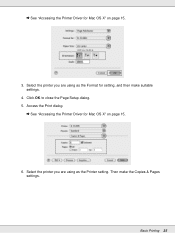
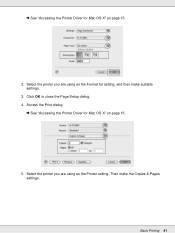
Select the printer you are using as the Printer setting. Then make suitable settings. 4. Select the printer you are using as the Format for setting, and then make the Copies & Pages settings. Click OK to close the Page Setup dialog. 5. Basic Printing 35 Access the Print dialog. & See "Accessing the Printer Driver for Mac OS X" on page 15. 3. & See "Accessing the Printer Driver for Mac OS X" on page 15. 6.
Select the printer you are using as the Printer setting. Then make suitable settings. 4. Select the printer you are using as the Format for setting, and then make the Copies & Pages settings. Click OK to close the Page Setup dialog. 5. Basic Printing 35 Access the Print dialog. & See "Accessing the Printer Driver for Mac OS X" on page 15. 3. & See "Accessing the Printer Driver for Mac OS X" on page 15. 6.
User's Guide
Page 37
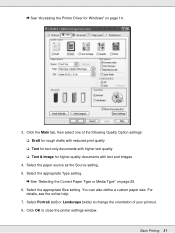
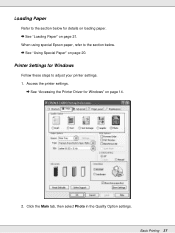
Click the Main tab, then select Photo in the Quality Option settings. Access the printer settings. & See "Accessing the Printer Driver for details on loading paper. & See "Loading Paper" on page 21. Basic Printing 37 Printer Settings for Windows Follow these steps to the section below . & See "Using Special Paper" on page 14. 2. Loading Paper Refer to adjust your printer settings. 1. When using special Epson paper, refer to the section below for Windows" on page 20.
Click the Main tab, then select Photo in the Quality Option settings. Access the printer settings. & See "Accessing the Printer Driver for details on loading paper. & See "Loading Paper" on page 21. Basic Printing 37 Printer Settings for Windows Follow these steps to the section below . & See "Using Special Paper" on page 14. 2. Loading Paper Refer to adjust your printer settings. 1. When using special Epson paper, refer to the section below for Windows" on page 20.

User's Guide
Page 38
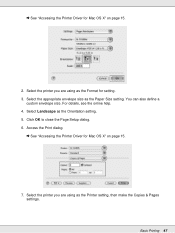
Select Portrait (tall) or Landscape (wide) to close the printer settings window. Access the Print dialog. & See "Accessing the Printer Driver for Mac OS X 10.5 and 10.6 Follow these steps to extend this dialog. Select the appropriate Type setting. & See "Selecting the... Correct Paper Type or Media Type" on page 15. 2. Click OK to change the orientation of your printer settings. 1. After completing the...
Select Portrait (tall) or Landscape (wide) to close the printer settings window. Access the Print dialog. & See "Accessing the Printer Driver for Mac OS X 10.5 and 10.6 Follow these steps to extend this dialog. Select the appropriate Type setting. & See "Selecting the... Correct Paper Type or Media Type" on page 15. 2. Click OK to change the orientation of your printer settings. 1. After completing the...
User's Guide
Page 41
Select the printer you are using as the Format for setting, and then make the Copies & Pages settings. Then make suitable settings. 3. & See "Accessing the Printer Driver for Mac OS X" on page 15. 2. Basic Printing 41 Access the Print dialog. & See "Accessing the Printer Driver for Mac OS X" on page 15. 5. Select the printer you are using as the Printer setting. Click OK to close the Page Setup dialog. 4.
Select the printer you are using as the Format for setting, and then make the Copies & Pages settings. Then make suitable settings. 3. & See "Accessing the Printer Driver for Mac OS X" on page 15. 2. Basic Printing 41 Access the Print dialog. & See "Accessing the Printer Driver for Mac OS X" on page 15. 5. Select the printer you are using as the Printer setting. Click OK to close the Page Setup dialog. 4.

User's Guide
Page 43
Printer Settings for the printable area. & See "Printable Area" on page 26. Click the Main tab, then select one of the following Quality Option settings: ❏ Text for Windows" on the envelope 3. Select Envelope as the Source setting. 4. Access the printer settings. & See "Accessing the Printer Driver for most envelopes ❏ Text & Image to the section below for Windows 1. Select Rear Tray as the Type setting. & See "Loading Envelopes" on page 171. Refer to print images on page 14. 2. Basic Printing 43
Printer Settings for the printable area. & See "Printable Area" on page 26. Click the Main tab, then select one of the following Quality Option settings: ❏ Text for Windows" on the envelope 3. Select Envelope as the Source setting. 4. Access the printer settings. & See "Accessing the Printer Driver for most envelopes ❏ Text & Image to the section below for Windows 1. Select Rear Tray as the Type setting. & See "Loading Envelopes" on page 171. Refer to print images on page 14. 2. Basic Printing 43

User's Guide
Page 44
... Size settings. Click the d button to close the printer settings window. 8. 5. Select the printer you are using as the Printer setting, and then select a suitable envelope size as the Orientation setting. 7. Printer Settings for Mac OS X" on page 15. 2. Access the Print dialog. & See "Accessing the Printer Driver for Mac OS X 10.5 and 10.6 Follow these...
... Size settings. Click the d button to close the printer settings window. 8. 5. Select the printer you are using as the Printer setting, and then select a suitable envelope size as the Orientation setting. 7. Printer Settings for Mac OS X" on page 15. 2. Access the Print dialog. & See "Accessing the Printer Driver for Mac OS X 10.5 and 10.6 Follow these...
User's Guide
Page 47
Select the appropriate envelope size as the Orientation setting. 5. Select Landscape as the Paper Size setting. Basic Printing 47 You can also define a custom envelope size. Click OK to close the Page Setup dialog. 6. For details, see the online help. 4. Access the Print dialog. & See "Accessing the Printer Driver for Mac OS X" on page 15. 2. & See "Accessing the Printer Driver for Mac OS X" on page 15. 7. Select the printer you are using as the Printer setting, then make the Copies & Pages settings. Select the printer you are using as the Format for setting. 3.
Select the appropriate envelope size as the Orientation setting. 5. Select Landscape as the Paper Size setting. Basic Printing 47 You can also define a custom envelope size. Click OK to close the Page Setup dialog. 6. For details, see the online help. 4. Access the Print dialog. & See "Accessing the Printer Driver for Mac OS X" on page 15. 2. & See "Accessing the Printer Driver for Mac OS X" on page 15. 7. Select the printer you are using as the Printer setting, then make the Copies & Pages settings. Select the printer you are using as the Format for setting. 3.
User's Guide
Page 51
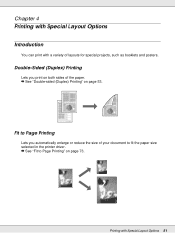
Double-Sided (Duplex) Printing Lets you automatically enlarge or reduce the size of your document to fit the paper size selected in the printer driver. & See "Fit to Page Printing Lets you print on both sides of layouts for special projects, such as booklets and posters. Printing with a variety of the paper. & See "Double-sided (Duplex) Printing" on page 73. Chapter 4 Printing with Special Layout Options Introduction You can print with Special Layout Options 51 Fit to Page Printing" on page 53.
Double-Sided (Duplex) Printing Lets you automatically enlarge or reduce the size of your document to fit the paper size selected in the printer driver. & See "Fit to Page Printing Lets you print on both sides of layouts for special projects, such as booklets and posters. Printing with a variety of the paper. & See "Double-sided (Duplex) Printing" on page 73. Chapter 4 Printing with Special Layout Options Introduction You can print with Special Layout Options 51 Fit to Page Printing" on page 53.
User's Guide
Page 55
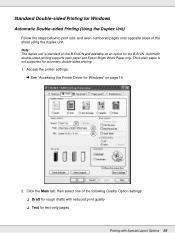
Access the printer settings. & See "Accessing the Printer Driver for automatic double-sided printing. 1. Thick plain paper is standard on page 14. 2....-only pages Printing with Special Layout Options 55 Note: The duplex unit is not supported for Windows" on the B-510DN and available as an option for Windows Automatic Double-sided Printing (Using the Duplex Unit) Follow the steps below to...-sided Printing for the B-310N. Automatic double-sided printing supports plain paper and Epson Bright White Paper only. Click the Main tab, then select one of the sheet using the duplex unit.
Access the printer settings. & See "Accessing the Printer Driver for automatic double-sided printing. 1. Thick plain paper is standard on page 14. 2....-only pages Printing with Special Layout Options 55 Note: The duplex unit is not supported for Windows" on the B-510DN and available as an option for Windows Automatic Double-sided Printing (Using the Duplex Unit) Follow the steps below to...-sided Printing for the B-310N. Automatic double-sided printing supports plain paper and Epson Bright White Paper only. Click the Main tab, then select one of the sheet using the duplex unit.


