Network Installation Guide
Page 15
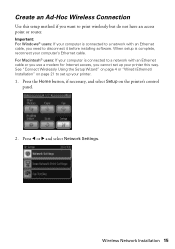
...Press l or r and select Network Settings. Important: For Windows® users: If your printer. 1. Wireless Network Installation 15 Press the Home button, if...up your computer's Ethernet cable. For Macintosh® users: If your computer is complete, reconnect your printer this setup method if you need to print wirelessly but do not have an access point or router.... See "Connect Wirelessly Using the Setup Wizard" on page 4 or "Wired (Ethernet) Installation" on the printer's control panel. 2. When setup is connected to a network with an Ethernet cable, you want to disconnect it...
...Press l or r and select Network Settings. Important: For Windows® users: If your printer. 1. Wireless Network Installation 15 Press the Home button, if...up your computer's Ethernet cable. For Macintosh® users: If your computer is complete, reconnect your printer this setup method if you need to print wirelessly but do not have an access point or router.... See "Connect Wirelessly Using the Setup Wizard" on page 4 or "Wired (Ethernet) Installation" on the printer's control panel. 2. When setup is connected to a network with an Ethernet cable, you want to disconnect it...
Network Installation Guide
Page 22
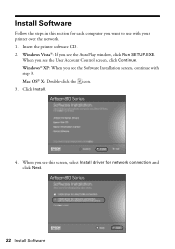
When you see the AutoPlay window, click Run SETUP.EXE. Mac OS® X: Double-click the icon. 3. Windows Vista®: If you see this section for network connection and click Next. 22 Install Software Install Software Follow the steps in this screen, select Install driver for each computer you want to use with step 3. When you see the User Account Control screen, click Continue. Windows® XP: When you see the Software Installation screen, continue with your printer over the network. 1. Click Install. 4. Insert the printer software CD. 2.
When you see the AutoPlay window, click Run SETUP.EXE. Mac OS® X: Double-click the icon. 3. Windows Vista®: If you see this section for network connection and click Next. 22 Install Software Install Software Follow the steps in this screen, select Install driver for each computer you want to use with step 3. When you see the User Account Control screen, click Continue. Windows® XP: When you see the Software Installation screen, continue with your printer over the network. 1. Click Install. 4. Insert the printer software CD. 2.
Network Installation Guide
Page 24
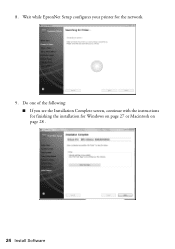
8. Do one of the following: ■ If you see the Installation Complete screen, continue with the instructions for finishing the installation for the network. 9. Wait while EpsonNet Setup configures your printer for Windows on page 27 or Macintosh on page 28 . 24 Install Software
8. Do one of the following: ■ If you see the Installation Complete screen, continue with the instructions for finishing the installation for the network. 9. Wait while EpsonNet Setup configures your printer for Windows on page 27 or Macintosh on page 28 . 24 Install Software
Network Installation Guide
Page 27
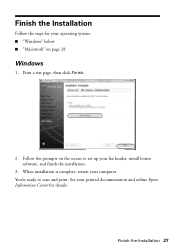
You're ready to set up your computer. Finish the Installation Follow the steps for your printed documentation and online Epson Information Center for details. Print a test page, then click Finish. 2. See your operating system: ■ "Windows" below ■ "Macintosh" on the screen to scan and print. Finish the Installation 27 Follow the prompts on page 28 Windows 1. When installation is complete, restart your fax header, install bonus software, and finish the installation. 3.
You're ready to set up your computer. Finish the Installation Follow the steps for your printed documentation and online Epson Information Center for details. Print a test page, then click Finish. 2. See your operating system: ■ "Windows" below ■ "Macintosh" on the screen to scan and print. Finish the Installation 27 Follow the prompts on page 28 Windows 1. When installation is complete, restart your fax header, install bonus software, and finish the installation. 3.
Network Installation Guide
Page 31
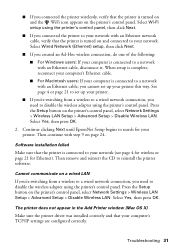
... you need to your network (see page 4 for wireless or page 21 for your printer. Select Yes, then press OK. The printer does not appear in the Add Printer window (Mac OS X) Make sure the printer driver was installed correctly and that your network. When setup is complete, reconnect your computer...you created an Ad-Hoc wireless connection, do one of the following: ■ For Windows users: If your computer is connected to a network with an Ethernet network cable, verify that the printer is turned on and the WiFi icon appears on the printer's control panel. Then remove and reinsert the ...
... you need to your network (see page 4 for wireless or page 21 for your printer. Select Yes, then press OK. The printer does not appear in the Add Printer window (Mac OS X) Make sure the printer driver was installed correctly and that your network. When setup is complete, reconnect your computer...you created an Ad-Hoc wireless connection, do one of the following: ■ For Windows users: If your computer is connected to a network with an Ethernet network cable, verify that the printer is turned on and the WiFi icon appears on the printer's control panel. Then remove and reinsert the ...
Product Brochure
Page 2
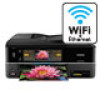
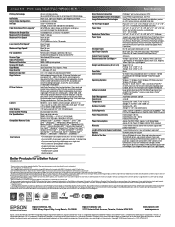
..., please visit www.epson.com/support/snowleopard Software Included Epson printer driver, Epson Print CD, Web to Page, Epson Scan, ArcSoft® Print Creations™, Epson scanner drivers, Presto...product registration4 Options Bluetooth photo print adapter What's In The Box Artisan 810 photo all -in-one year is a registered logomark and Better Products for the life ... 2.0, PictBridge, Bluetooth® Photo Print Adapter (optional) Operating Systems Windows® 7, Windows Vista®, Windows XP Professional x64, Windows XP, Windows 2000 Mac OS® X 10.3.9, 10.4.11, 10.5.x and...
..., please visit www.epson.com/support/snowleopard Software Included Epson printer driver, Epson Print CD, Web to Page, Epson Scan, ArcSoft® Print Creations™, Epson scanner drivers, Presto...product registration4 Options Bluetooth photo print adapter What's In The Box Artisan 810 photo all -in-one year is a registered logomark and Better Products for the life ... 2.0, PictBridge, Bluetooth® Photo Print Adapter (optional) Operating Systems Windows® 7, Windows Vista®, Windows XP Professional x64, Windows XP, Windows 2000 Mac OS® X 10.3.9, 10.4.11, 10.5.x and...
Quick Guide
Page 3
Printing From Your Computer 31 Printing in Windows 31 Printing With a Macintosh 33 Selecting the Correct Paper Type 37 Two-sided Printing 38 Scanning a Document or Photo 40 Basic Scanning 40 Scanning Multiple Pages 42 Maintaining Your All-in-One 43 Checking the Print Head Nozzles 43 Cleaning the Print Head 44 Checking the Ink Cartridge Status 45 Purchasing Epson Ink Cartridges 46 Replacing Ink Cartridges 47 Solving Problems 49 Checking for Software Updates 49 Problems and Solutions 50 Where to Get Help 53 Notices 54 3
Printing From Your Computer 31 Printing in Windows 31 Printing With a Macintosh 33 Selecting the Correct Paper Type 37 Two-sided Printing 38 Scanning a Document or Photo 40 Basic Scanning 40 Scanning Multiple Pages 42 Maintaining Your All-in-One 43 Checking the Print Head Nozzles 43 Cleaning the Print Head 44 Checking the Ink Cartridge Status 45 Purchasing Epson Ink Cartridges 46 Replacing Ink Cartridges 47 Solving Problems 49 Checking for Software Updates 49 Problems and Solutions 50 Where to Get Help 53 Notices 54 3
Quick Guide
Page 18
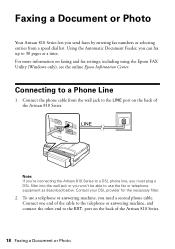
.... For more information on the back of the Artisan 810 Series. 18 Faxing a Document or Photo To use the fax or telephone equipment as described below. port on faxing and fax settings, including using the Epson FAX Utility (Windows only), see the online Epson Information Center. Connect one end of the cable to the telephone or...
.... For more information on the back of the Artisan 810 Series. 18 Faxing a Document or Photo To use the fax or telephone equipment as described below. port on faxing and fax settings, including using the Epson FAX Utility (Windows only), see the online Epson Information Center. Connect one end of the cable to the telephone or...

Quick Guide
Page 21
...if you placed your document. (To cancel, press y Cancel.) If you see this screen after one minute. Press the Home button, if necessary, and select Fax. 3. Then press OK. Press OK... You can send a fax by entering a fax number as described below. Press , then use the Epson FAX Utility (Windows only), see page 12). 2. If you used, press Redial. 4. Note: If the recipient's fax...the online Epson Information Center. 1. To redial immediately, press Redial. To set up to see a summary of your original on the scanner glass, you see a redialing message and the Artisan 810 Series ...
...if you placed your document. (To cancel, press y Cancel.) If you see this screen after one minute. Press the Home button, if necessary, and select Fax. 3. Then press OK. Press OK... You can send a fax by entering a fax number as described below. Press , then use the Epson FAX Utility (Windows only), see page 12). 2. If you used, press Redial. 4. Note: If the recipient's fax...the online Epson Information Center. 1. To redial immediately, press Redial. To set up to see a summary of your original on the scanner glass, you see a redialing message and the Artisan 810 Series ...
Quick Guide
Page 24
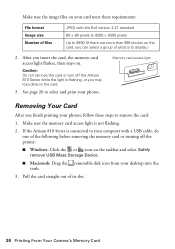
... not remove the card or turn off the printer: ■ Windows: Click the or icon on the taskbar and select Safely remove USB Mass Storage Device. ■ Macintosh: Drag the removable disk icon from your desktop into the trash. 3. If the Artisan 810 Series is connected to your computer with the Exif...your photos, follow these requirements: File format Image size Number of files JPEG with a USB cable, do one of the following before removing the memory card or turning off the Artisan 810 Series while the light is not flashing. 2. See page 26 to select and print your photos. Make sure...
... not remove the card or turn off the printer: ■ Windows: Click the or icon on the taskbar and select Safely remove USB Mass Storage Device. ■ Macintosh: Drag the removable disk icon from your desktop into the trash. 3. If the Artisan 810 Series is connected to your computer with the Exif...your photos, follow these requirements: File format Image size Number of files JPEG with a USB cable, do one of the following before removing the memory card or turning off the Artisan 810 Series while the light is not flashing. 2. See page 26 to select and print your photos. Make sure...
Quick Guide
Page 31
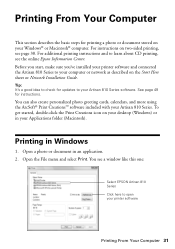
.... 2. For instructions on your desktop (Windows) or in your printer software Printing From Your Computer 31 Open a photo or document in Windows 1. You see page 38. See page 49 for instructions. To get started, double-click the Print Creations icon on two-sided printing, see a window like this one: Select EPSON Artisan 810 Series Click here to your...
.... 2. For instructions on your desktop (Windows) or in your printer software Printing From Your Computer 31 Open a photo or document in Windows 1. You see page 38. See page 49 for instructions. To get started, double-click the Print Creations icon on two-sided printing, see a window like this one: Select EPSON Artisan 810 Series Click here to your...
Quick Guide
Page 33
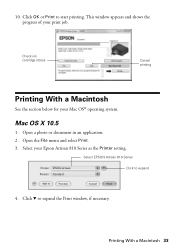
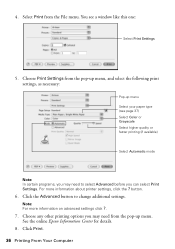
Select your Mac OS® operating system. Check ink cartridge status Cancel printing Printing With a Macintosh See the section below for your Epson Artisan 810 Series as the Printer setting. Click d to expand 4. 10. Mac OS X 10.5 1. Select EPSON Artisan 810 Series Click to expand the Print window, if necessary. This window appears and shows the progress of your print job. Open the File menu and select Print. 3. Printing With a Macintosh 33 Open a photo or document in an application. 2. Click OK or Print to start printing.
Select your Mac OS® operating system. Check ink cartridge status Cancel printing Printing With a Macintosh See the section below for your Epson Artisan 810 Series as the Printer setting. Click d to expand 4. 10. Mac OS X 10.5 1. Select EPSON Artisan 810 Series Click to expand the Print window, if necessary. This window appears and shows the progress of your print job. Open the File menu and select Print. 3. Printing With a Macintosh 33 Open a photo or document in an application. 2. Click OK or Print to start printing.
Quick Guide
Page 34
...) Select Color or Grayscale Select higher quality or faster printing (if available) Select Automatic mode 7. See the online Epson Information Center for it in the settings for your application at the bottom of this window. (If you're printing from Preview, you may need from the pop-up menu. For borderless photos...
...) Select Color or Grayscale Select higher quality or faster printing (if available) Select Automatic mode 7. See the online Epson Information Center for it in the settings for your application at the bottom of this window. (If you're printing from Preview, you may need from the pop-up menu. For borderless photos...
Quick Guide
Page 35
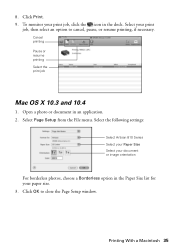
... the dock. Select Page Setup from the File menu. To monitor your print job, click the icon in an application. 2. Select the following settings: Select Artisan 810 Series Select your Paper Size Select your document or image orientation For borderless photos, choose a Borderless option in the Paper Size list for your print...
... the dock. Select Page Setup from the File menu. To monitor your print job, click the icon in an application. 2. Select the following settings: Select Artisan 810 Series Select your Paper Size Select your document or image orientation For borderless photos, choose a Borderless option in the Paper Size list for your print...
Quick Guide
Page 36
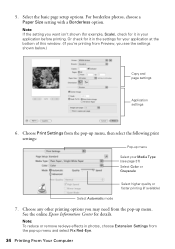
...the Advanced button to select Advanced before you can select Print Settings. 4. Choose Print Settings from the File menu. Note: For more information about printer settings, click the ? You see page 37) Select Color or Grayscale Select higher quality or faster printing (if available) Select Automatic mode Note:... In certain programs, you may need from the pop-up menu Select your paper type (see a window like this one: Select Print Settings 5. Choose any other printing options you may need to change additional settings. See the online...
...the Advanced button to select Advanced before you can select Print Settings. 4. Choose Print Settings from the File menu. Note: For more information about printer settings, click the ? You see page 37) Select Color or Grayscale Select higher quality or faster printing (if available) Select Automatic mode Note:... In certain programs, you may need from the pop-up menu Select your paper type (see a window like this one: Select Print Settings 5. Choose any other printing options you may need to change additional settings. See the online...
Quick Guide
Page 38
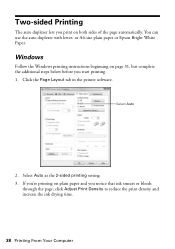
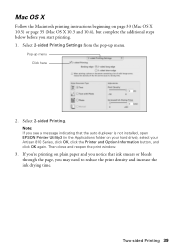
Click the Page Layout tab in the printer software. Select Auto as the 2-sided printing setting. 3. Select Auto 2. You can use the auto duplexer with letter- or A4-size plain paper or Epson Bright White Paper. Two-sided Printing The auto duplexer lets you notice that ink smears or bleeds through the page... Your Computer If you're printing on plain paper and you print on page 31, but complete the additional steps below before you start printing. 1. Windows Follow the Windows printing instructions beginning on both sides of the page automatically.
Click the Page Layout tab in the printer software. Select Auto as the 2-sided printing setting. 3. Select Auto 2. You can use the auto duplexer with letter- or A4-size plain paper or Epson Bright White Paper. Two-sided Printing The auto duplexer lets you notice that ink smears or bleeds through the page... Your Computer If you're printing on plain paper and you print on page 31, but complete the additional steps below before you start printing. 1. Windows Follow the Windows printing instructions beginning on both sides of the page automatically.
Quick Guide
Page 39
... Select 2-sided Printing. Pop-up menu. If you're printing on plain paper and you notice that the auto duplexer is not installed, open EPSON Printer Utility3 (in the Applications folder on page 33 (Mac OS X 10.5) or page 35 (Mac OS X 10.3 and 10.4), but complete...start printing. 1. Mac OS X Follow the Macintosh printing instructions beginning on your hard drive), select your Artisan 810 Series, click OK, click the Printer and Option Information button, and click OK again. Then close and reopen the print window. 3. Select 2-sided Printing Settings from the pop-up menu Click here 2.
... Select 2-sided Printing. Pop-up menu. If you're printing on plain paper and you notice that the auto duplexer is not installed, open EPSON Printer Utility3 (in the Applications folder on page 33 (Mac OS X 10.5) or page 35 (Mac OS X 10.3 and 10.4), but complete...start printing. 1. Mac OS X Follow the Macintosh printing instructions beginning on your hard drive), select your Artisan 810 Series, click OK, click the Printer and Option Information button, and click OK again. Then close and reopen the print window. 3. Select 2-sided Printing Settings from the pop-up menu Click here 2.
Quick Guide
Page 40
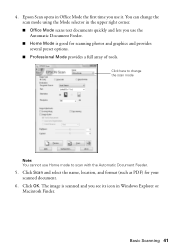
... cover gently so you can start Epson Scan directly from an application, start Epson Scan: ■ Windows: Double-click the EPSON Scan icon on your computer. Basic Scanning You can scan from your Artisan 810 Series control panel and send the images to a memory card or to your network- Do one of the following to start your...
... cover gently so you can start Epson Scan directly from an application, start Epson Scan: ■ Windows: Double-click the EPSON Scan icon on your computer. Basic Scanning You can scan from your Artisan 810 Series control panel and send the images to a memory card or to your network- Do one of the following to start your...
Quick Guide
Page 41
... preset options. ■ Professional Mode provides a full array of tools. Click here to scan with the Automatic Document Feeder. 5. Basic Scanning 41 Epson Scan opens in Office Mode the first time you see its icon in the upper right corner. ■ Office Mode scans text documents quickly and...use the Automatic Document Feeder. ■ Home Mode is scanned and you use Home mode to change the scan mode using the Mode selector in Windows Explorer or Macintosh Finder. The image is good for your scanned document. 6. You can change the scan mode Note: You cannot use it....
... preset options. ■ Professional Mode provides a full array of tools. Click here to scan with the Automatic Document Feeder. 5. Basic Scanning 41 Epson Scan opens in Office Mode the first time you see its icon in the upper right corner. ■ Office Mode scans text documents quickly and...use the Automatic Document Feeder. ■ Home Mode is scanned and you use Home mode to change the scan mode using the Mode selector in Windows Explorer or Macintosh Finder. The image is good for your scanned document. 6. You can change the scan mode Note: You cannot use it....
Quick Guide
Page 42
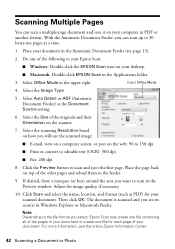
...PDF) for each page of the following to start Epson Scan: ■ Windows: Double-click the EPSON Scan icon on your computer in PDF or another format. Select the scanning Resolution based on how you select, Epson Scan may create one file containing all of the pages in your document ...or create one of your desktop. ■ Macintosh: Double-click EPSON Scan in the Automatic Document Feeder (see the online Epson Information Center. 42 Scanning a Document or Photo If desired, draw a marquee (or box) around the area you want to scan in Windows Explorer or Macintosh Finder....
...PDF) for each page of the following to start Epson Scan: ■ Windows: Double-click the EPSON Scan icon on your computer in PDF or another format. Select the scanning Resolution based on how you select, Epson Scan may create one file containing all of the pages in your document ...or create one of your desktop. ■ Macintosh: Double-click EPSON Scan in the Automatic Document Feeder (see the online Epson Information Center. 42 Scanning a Document or Photo If desired, draw a marquee (or box) around the area you want to scan in Windows Explorer or Macintosh Finder....


