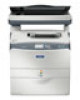
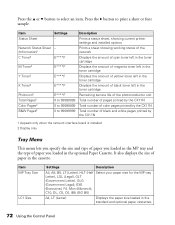
Basics
Page 72
... of black toner left in the toner cartridge Remaining service life of the photoconductor unit Total number of pages printed by the CX11N Total number of color pages printed by the CX11N Total number of black and white pages printed by the CX11N 1 Appears only when the network interface board is installed 2 Display only Tray...
... of black toner left in the toner cartridge Remaining service life of the photoconductor unit Total number of pages printed by the CX11N Total number of color pages printed by the CX11N Total number of black and white pages printed by the CX11N 1 Appears only when the network interface board is installed 2 Display only Tray...
Basics
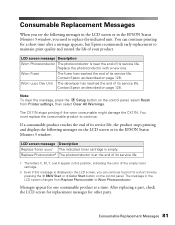
Page 81
... Start button on the control panel. Worn uuuu Dev Unit The developer has reached the end of its service life. The CX11N stops printing if the worn consumable might damage the CX11N. Replace Photocondctr2 The photoconductor is at a time. Consumable Replacement Messages 81 Contact Epson as described on the control panel, select Reset from Replace...
... Start button on the control panel. Worn uuuu Dev Unit The developer has reached the end of its service life. The CX11N stops printing if the worn consumable might damage the CX11N. Replace Photocondctr2 The photoconductor is at a time. Consumable Replacement Messages 81 Contact Epson as described on the control panel, select Reset from Replace...
Product Information Guide
Page 2
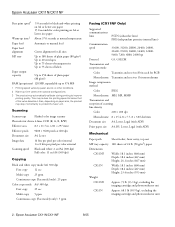
...automatically calibrate during printing to improve printing quality. This may reduce the printing speed to below that of the value described. Epson AcuLaser CX11N/CX11NF First print speed1 Warm-up time varies with ADF) Mechanical Paper path Sheet feeder, front entry, top out MP ...: 26.1 inches (667 mm) CX11N Width: 18.1 inches (460 mm) Depth: 18.4 inches (467 mm) Height: 23.4 inches (593 mm) Weight CX11NF Approx. 73 lb (33.1 kg), excluding the imaging cartridge and photoconductor uni CX11N Approx. 68.1 lb (30.9 kg), excluding the imaging cartridge and photoconductor unit 2 -
...automatically calibrate during printing to improve printing quality. This may reduce the printing speed to below that of the value described. Epson AcuLaser CX11N/CX11NF First print speed1 Warm-up time varies with ADF) Mechanical Paper path Sheet feeder, front entry, top out MP ...: 26.1 inches (667 mm) CX11N Width: 18.1 inches (460 mm) Depth: 18.4 inches (467 mm) Height: 23.4 inches (593 mm) Weight CX11NF Approx. 73 lb (33.1 kg), excluding the imaging cartridge and photoconductor uni CX11N Approx. 68.1 lb (30.9 kg), excluding the imaging cartridge and photoconductor unit 2 -
Product Information Guide
Page 3
Photoconductor Unit Temperature Storage Humidity Storage Unit life 32 to 95°F (0 to 35°C) 15 to 80% RH 14,000 pages under conditions of 5% printing ratio, color and black have a proportion of 5% printing ratio, color printing, and one page per job. 8/05 Epson AcuLaser CX11N/CX11NF -...5% printing ratio and color printing. 10,500 pages under conditions of two to the printer not covered by Epson's warranty. Epson AcuLaser CX11N/CX11NF Interfaces USB Interface Standard Bit rate Data encoding Adaptable connector Recommended cable length Based on Universal Serial Bus ...
Photoconductor Unit Temperature Storage Humidity Storage Unit life 32 to 95°F (0 to 35°C) 15 to 80% RH 14,000 pages under conditions of 5% printing ratio, color and black have a proportion of 5% printing ratio, color printing, and one page per job. 8/05 Epson AcuLaser CX11N/CX11NF -...5% printing ratio and color printing. 10,500 pages under conditions of two to the printer not covered by Epson's warranty. Epson AcuLaser CX11N/CX11NF Interfaces USB Interface Standard Bit rate Data encoding Adaptable connector Recommended cable length Based on Universal Serial Bus ...
Product Information Guide
Page 11
...toner cartridge. 8/05 Epson AcuLaser CX11N/CX11NF - 11 You can change , then press the r button. 5. Replace the photoconductor with a new one of your skin or clothes, wash it to Worn Photoconductor. Messages appear for a short time after a message appears, but Epson recommends replacement to maintain...in fire, as they may affect print quality. Changing a Low Toner Cartridge 1. LCD screen message Worn Photoconductor Worn Fuser Worn uuuu Dev Unit Description The photoconductor is at the end of them on your product. Replacing a Toner Cartridge When a toner cartridge is...
...toner cartridge. 8/05 Epson AcuLaser CX11N/CX11NF - 11 You can change , then press the r button. 5. Replace the photoconductor with a new one of your skin or clothes, wash it to Worn Photoconductor. Messages appear for a short time after a message appears, but Epson recommends replacement to maintain...in fire, as they may affect print quality. Changing a Low Toner Cartridge 1. LCD screen message Worn Photoconductor Worn Fuser Worn uuuu Dev Unit Description The photoconductor is at the end of them on your product. Replacing a Toner Cartridge When a toner cartridge is...
Product Information Guide
Page 16
...CPD-19582R1 CPD-19583R1 Epson AcuLaser CX11N/CX11NF Setup Guide Epson AcuLaser CX11N/CX11NF Basics Guide Epson AcuLaser CX11NF Fax Guide Epson AcuLaser CX11N/CX11NF CD-ROM with a soft dry cloth to transport your product for this difference as shown below. Epson AcuLaser CX11N/CX11NF 8/05 Caution:... paper ❏ Paper cassette unit (if installed) ❏ Photoconductor ❏ USB cable ❏ Power cord 6. Turn off the CX11N and remove the following items. ❏ Any loaded paper ❏ Paper cassette unit (if installed) ❏ Photoconductor ❏ USB cable ❏...
...CPD-19582R1 CPD-19583R1 Epson AcuLaser CX11N/CX11NF Setup Guide Epson AcuLaser CX11N/CX11NF Basics Guide Epson AcuLaser CX11NF Fax Guide Epson AcuLaser CX11N/CX11NF CD-ROM with a soft dry cloth to transport your product for this difference as shown below. Epson AcuLaser CX11N/CX11NF 8/05 Caution:... paper ❏ Paper cassette unit (if installed) ❏ Photoconductor ❏ USB cable ❏ Power cord 6. Turn off the CX11N and remove the following items. ❏ Any loaded paper ❏ Paper cassette unit (if installed) ❏ Photoconductor ❏ USB cable ❏...

Start Here Card
Page 1
...: • 4 toner cartridges (Cyan, Magenta, Yellow, Black) • Photoconductor unit • USB cable • Power cord • Documentation: Basics Guide, Fax Guide (CX11NF only) • 3 software CD-ROMs 2 Select a location for the CX11N. Cover C 6 Open cover A and remove the foam insert. a 36...e 11.8 in. (300 mm) The optional 500-Sheet Paper Cassette Unit adds 5.1 in. (130 mm) to ensure smooth operation. Then unlock the carriage lock. 8 Close the document cover. Start Here Epson AcuLaser® CX11N/CX11NF 1 Unpack Note: The illustrations show the CX11NF, but the instructions...
...: • 4 toner cartridges (Cyan, Magenta, Yellow, Black) • Photoconductor unit • USB cable • Power cord • Documentation: Basics Guide, Fax Guide (CX11NF only) • 3 software CD-ROMs 2 Select a location for the CX11N. Cover C 6 Open cover A and remove the foam insert. a 36...e 11.8 in. (300 mm) The optional 500-Sheet Paper Cassette Unit adds 5.1 in. (130 mm) to ensure smooth operation. Then unlock the carriage lock. 8 Close the document cover. Start Here Epson AcuLaser® CX11N/CX11NF 1 Unpack Note: The illustrations show the CX11NF, but the instructions...
Start Here Card
Page 3
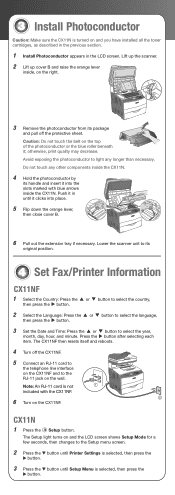
...CX11N 1 Press the Setup button. 3 Install Photoconductor Caution: Make sure the CX11N is turned on and you have installed all the toner cartridges, as described in the previous section. 1 Install Photoconductor...than necessary. The Setup light turns on the right. 3 Remove the photoconductor from its original position. 4 Set Fax/Printer Information CX11NF 1 Select... is not included with blue arrows inside the CX11N. 4 Hold the photoconductor by its handle and insert it in the LCD...Do not touch the belt on the top of the photoconductor or the blue roller beneath it clicks into the slots...
...CX11N 1 Press the Setup button. 3 Install Photoconductor Caution: Make sure the CX11N is turned on and you have installed all the toner cartridges, as described in the previous section. 1 Install Photoconductor...than necessary. The Setup light turns on the right. 3 Remove the photoconductor from its original position. 4 Set Fax/Printer Information CX11NF 1 Select... is not included with blue arrows inside the CX11N. 4 Hold the photoconductor by its handle and insert it in the LCD...Do not touch the belt on the top of the photoconductor or the blue roller beneath it clicks into the slots...

