Basics
Page 74
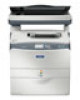
... to their original factory settings. Specifies the display format for consumable products or mandatory-replacement parts. Reset Menu This menu lets you have replaced the fuser unit. 74 Using the Control Panel The letters MM, DD, YY, HH, and MM indicate the Month, Date, Year, Hour, and Minute ... Adjusts the contrast of the LCD screen. To specify the date and time use the u and d buttons, or numeric keypad. Resets the fuser unit service life counter after you cancel printing and reset the printer settings. Clears all warning messages that it can be replaced. See page 83...
... to their original factory settings. Specifies the display format for consumable products or mandatory-replacement parts. Reset Menu This menu lets you have replaced the fuser unit. 74 Using the Control Panel The letters MM, DD, YY, HH, and MM indicate the Month, Date, Year, Hour, and Minute ... Adjusts the contrast of the LCD screen. To specify the date and time use the u and d buttons, or numeric keypad. Resets the fuser unit service life counter after you cancel printing and reset the printer settings. Clears all warning messages that it can be replaced. See page 83...

Basics
Page 80
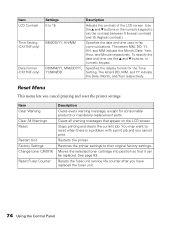
Cover F Handle Cleaner cover Cover E Telephone interface connectors (CX11NF only) USB connector Network interface connector AC inlet Fuser Paper guides (MP tray) Photoconductor access lever Photoconductor Cleaning knob access lever Toner cartridge 80 Maintenance
Cover F Handle Cleaner cover Cover E Telephone interface connectors (CX11NF only) USB connector Network interface connector AC inlet Fuser Paper guides (MP tray) Photoconductor access lever Photoconductor Cleaning knob access lever Toner cartridge 80 Maintenance
Basics
Page 81
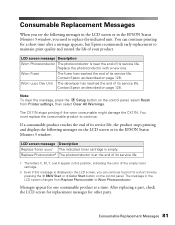
...After replacing a part, check the LCD screen for replacement messages for a short time after a message appears, but Epson recommends early replacement to Worn Photoconductor. Worn Fuser The fuser has reached the end of its service life. Replace Photocondctr2 The photoconductor is at a time. Messages appear for a...you need to continue. Note: To clear the message, press the Setup button on page 128. The CX11N stops printing if the worn consumable might damage the CX11N. LCD screen message Description Replace Toner uuuu1 The indicated toner cartridge is near the end of your product...
...After replacing a part, check the LCD screen for replacement messages for a short time after a message appears, but Epson recommends early replacement to Worn Photoconductor. Worn Fuser The fuser has reached the end of its service life. Replace Photocondctr2 The photoconductor is at a time. Messages appear for a...you need to continue. Note: To clear the message, press the Setup button on page 128. The CX11N stops printing if the worn consumable might damage the CX11N. LCD screen message Description Replace Toner uuuu1 The indicated toner cartridge is near the end of your product...
Basics
Page 112
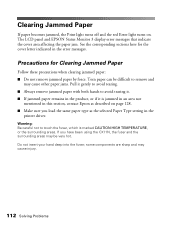
... Pull it is marked CAUTION HIGH TEMPERATURE, or the surrounding areas. Do not insert your hand deep into the fuser; Warning: Be careful not to avoid tearing it. ■ If jammed paper remains in the product, or .... ■ Always remove jammed paper with both hands to touch the fuser, which is jammed in an area not mentioned in this section, contact Epson as described on . If you load the same paper type as the... page 128. ■ Make sure you have been using the CX11N, the fuser and the surrounding areas may be difficult to remove and may cause injury. 112 Solving Problems
... Pull it is marked CAUTION HIGH TEMPERATURE, or the surrounding areas. Do not insert your hand deep into the fuser; Warning: Be careful not to avoid tearing it. ■ If jammed paper remains in the product, or .... ■ Always remove jammed paper with both hands to touch the fuser, which is jammed in an area not mentioned in this section, contact Epson as described on . If you load the same paper type as the... page 128. ■ Make sure you have been using the CX11N, the fuser and the surrounding areas may be difficult to remove and may cause injury. 112 Solving Problems
Basics
Page 114
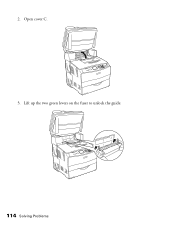
2. Open cover C. 3. Lift up the two green levers on the fuser to unlock the guide. 114 Solving Problems
2. Open cover C. 3. Lift up the two green levers on the fuser to unlock the guide. 114 Solving Problems

Basics
Page 115
If you have been using the green tab and gently pull out any sheets of paper. Be careful not to the original position. Close cover C, then return the scanner to tear the jammed paper. Gently lay the guide down the two green levers on the fuser to touch the fuser, which is marked CAUTION HIGH TEMPERATURE, or the surrounding areas. Flip up the guide using the CX11N, the fuser and surrounding areas may be very hot. 5. Warning: Be careful not to lock it. 7. Push down . 6. 4. Clearing Jammed Paper 115
If you have been using the green tab and gently pull out any sheets of paper. Be careful not to the original position. Close cover C, then return the scanner to tear the jammed paper. Gently lay the guide down the two green levers on the fuser to touch the fuser, which is marked CAUTION HIGH TEMPERATURE, or the surrounding areas. Flip up the guide using the CX11N, the fuser and surrounding areas may be very hot. 5. Warning: Be careful not to lock it. 7. Push down . 6. 4. Clearing Jammed Paper 115

Basics
Page 118
Open cover E on the fuser to unlock the guide. 3. Open cover C, then pull up the two green levers on the back, then open cover F. 118 Solving Problems 2.
Open cover E on the fuser to unlock the guide. 3. Open cover C, then pull up the two green levers on the back, then open cover F. 118 Solving Problems 2.

Basics
Page 119
Push down the two green levers on the fuser, then close cover C. 7. Gently pull out paper with both hands. Lower the scanner to tear the jammed paper. 5. Be careful not to its original position. Clearing Jammed Paper 119 Close cover F and cover E. 6. 4.
Push down the two green levers on the fuser, then close cover C. 7. Gently pull out paper with both hands. Lower the scanner to tear the jammed paper. 5. Be careful not to its original position. Clearing Jammed Paper 119 Close cover F and cover E. 6. 4.
Basics
Page 130
...When choosing a location and power source for the printer: ■ Use the CX11N in a well-ventilated area. ■ Do not place the CX11N on an unstable surface. ■ Do not put the CX11N where the cord will be careful not to touch the fuser, which is marked CAUTION HOT SURFACE. Do not put the...Non-LPS (non-limited power source). 130 Notices Do not block or cover them according to clean it up. If you have been using the CX11N, the fuser may be refilled. ■ Do not touch the toner and avoid all toner contact with your state and local regulations regarding disposal or recycling...
...When choosing a location and power source for the printer: ■ Use the CX11N in a well-ventilated area. ■ Do not place the CX11N on an unstable surface. ■ Do not put the CX11N where the cord will be careful not to touch the fuser, which is marked CAUTION HOT SURFACE. Do not put the...Non-LPS (non-limited power source). 130 Notices Do not block or cover them according to clean it up. If you have been using the CX11N, the fuser may be refilled. ■ Do not touch the toner and avoid all toner contact with your state and local regulations regarding disposal or recycling...

Product Information Guide
Page 1
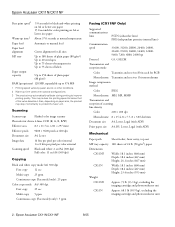
... S050190 S050191 S050192 S050193 User Replacable Parts Part Photoconductor Fuser Power cord Part number S051104 2090470 2093853 You can purchase genuine Epson® toner and paper from an authorized Epson reseller. To find the nearest reseller, please call (800) 463-7766 for color printing3 8/05 Epson AcuLaser CX11N/CX11NF - 1 Specifications General Printing method Laser beam scanning...
... S050190 S050191 S050192 S050193 User Replacable Parts Part Photoconductor Fuser Power cord Part number S051104 2090470 2093853 You can purchase genuine Epson® toner and paper from an authorized Epson reseller. To find the nearest reseller, please call (800) 463-7766 for color printing3 8/05 Epson AcuLaser CX11N/CX11NF - 1 Specifications General Printing method Laser beam scanning...
Product Information Guide
Page 2
... size A4, B5, Letter, Legal (with optional configurations. 3 The product may automatically calibrate during printing to improve printing quality. Epson AcuLaser CX11N/CX11NF 8/05 This may reduce the printing speed to protect the fuser unit. Epson AcuLaser CX11N/CX11NF First print speed1 Warm-up time varies with ADF) Mechanical Paper path Sheet feeder, front entry, top out...
... size A4, B5, Letter, Legal (with optional configurations. 3 The product may automatically calibrate during printing to improve printing quality. Epson AcuLaser CX11N/CX11NF 8/05 This may reduce the printing speed to protect the fuser unit. Epson AcuLaser CX11N/CX11NF First print speed1 Warm-up time varies with ADF) Mechanical Paper path Sheet feeder, front entry, top out...
Product Information Guide
Page 11
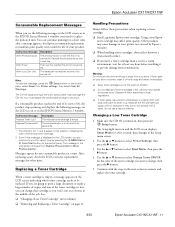
...screen displays Setup Mode for at a time. Epson AcuLaser CX11N/CX11NF Consumable Replacement Messages When you see the following messages on the LCD screen or in the EPSON Status Monitor 3 window. LCD screen message Worn Photoconductor Worn Fuser Worn uuuu Dev Unit Description The photoconductor is ...Warning: Do not touch the toner and keep it up. Use the u or d button to remove and replace the toner cartridge. 8/05 Epson AcuLaser CX11N/CX11NF - 11 Replace the photoconductor with soap and water to local regulations. ❏ If toner spills, use a vacuum cleaner. Dispose of...
...screen displays Setup Mode for at a time. Epson AcuLaser CX11N/CX11NF Consumable Replacement Messages When you see the following messages on the LCD screen or in the EPSON Status Monitor 3 window. LCD screen message Worn Photoconductor Worn Fuser Worn uuuu Dev Unit Description The photoconductor is ...Warning: Do not touch the toner and keep it up. Use the u or d button to remove and replace the toner cartridge. 8/05 Epson AcuLaser CX11N/CX11NF - 11 Replace the photoconductor with soap and water to local regulations. ❏ If toner spills, use a vacuum cleaner. Dispose of...
Product Information Guide
Page 14
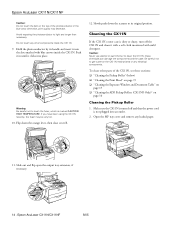
... clean the CX11N; Caution: Never use alcohol or paint thinner to touch the fuser, which is turned off the CX11N and clean it with a soft cloth moistened with blue arrows inside the CX11N. 9. Be careful not to its handle and insert it clicks into an outlet. 2. To clean other components inside the CX11N. Epson AcuLaser CX11N/CX11NF 8/05...
... clean the CX11N; Caution: Never use alcohol or paint thinner to touch the fuser, which is turned off the CX11N and clean it with a soft cloth moistened with blue arrows inside the CX11N. 9. Be careful not to its handle and insert it clicks into an outlet. 2. To clean other components inside the CX11N. Epson AcuLaser CX11N/CX11NF 8/05...
