Basics
Page 2
...copying of Seiko Epson Corporation. Trademarks Epson, Epson AcuLaser, and Print Image Matching are registered trademarks and Exceed Your Vision is not responsible for damages, losses, costs, or expenses incurred by Seiko Epson Corporation. A Note Concerning Responsible Use of Copyrighted Materials Printers, digital cameras,...only and may not be liable for use of this product or unauthorized modifications, repairs, or alterations to this Epson printer. Epson encourages each user to strictly comply with this product, or (excluding the U.S.) failure to be trademarks of copyrighted...
...copying of Seiko Epson Corporation. Trademarks Epson, Epson AcuLaser, and Print Image Matching are registered trademarks and Exceed Your Vision is not responsible for damages, losses, costs, or expenses incurred by Seiko Epson Corporation. A Note Concerning Responsible Use of Copyrighted Materials Printers, digital cameras,...only and may not be liable for use of this product or unauthorized modifications, repairs, or alterations to this Epson printer. Epson encourages each user to strictly comply with this product, or (excluding the U.S.) failure to be trademarks of copyrighted...

Basics
Page 6
About Your Software The CD-ROMs that came with your Epson AcuLaser CX11N include all the software you need for installation instructions. ■ Your printer driver lets you preview and retrieve images. ■ OfficeReady Essentials provides a variety of templates for creating colorful documents for your convenience. ■ Epson Web-to-Page™ automatically adjusts web pages...
About Your Software The CD-ROMs that came with your Epson AcuLaser CX11N include all the software you need for installation instructions. ■ Your printer driver lets you preview and retrieve images. ■ OfficeReady Essentials provides a variety of templates for creating colorful documents for your convenience. ■ Epson Web-to-Page™ automatically adjusts web pages...
Basics
Page 8
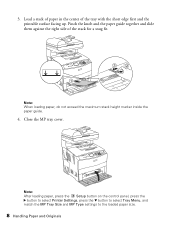
... maximum stack height marker inside the paper guide. 4. Note: After loading paper, press the Setup button on the control panel, press the r button to select Printer Settings, press the d button to select Tray Menu, and match the MP Tray Size and MP Type settings to the loaded paper size. 8 Handling Paper...
... maximum stack height marker inside the paper guide. 4. Note: After loading paper, press the Setup button on the control panel, press the r button to select Printer Settings, press the d button to select Tray Menu, and match the MP Tray Size and MP Type settings to the loaded paper size. 8 Handling Paper...
Basics
Page 11
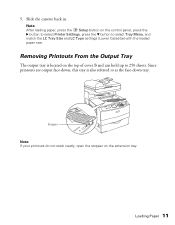
... on the extension tray. Stopper Note: If your printouts do not stack neatly, open the stopper on the control panel, press the r button to select Printer Settings, press the d button to select Tray Menu, and match the LC Tray Size and LC Type settings (Lower Cassette) with the loaded paper size...
... on the extension tray. Stopper Note: If your printouts do not stack neatly, open the stopper on the control panel, press the r button to select Printer Settings, press the d button to select Tray Menu, and match the LC Tray Size and LC Type settings (Lower Cassette) with the loaded paper size...
Basics
Page 12
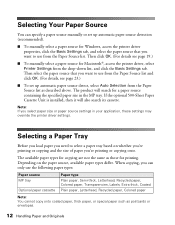
... paper Note: You cannot copy onto coated paper, thick paper, or special paper such as those for Macintosh®, access the printer driver, select Printer Settings from the Paper Source list. If the optional 500-Sheet Paper Cassette Unit is installed, then it will search for copying ... Paper and Originals The available paper types for a paper source containing the specified paper size in your application, these settings may override the printer driver settings. Then click OK. (For details see page 23.) ■ To set up automatic paper source detect, select Auto Selection ...
... paper Note: You cannot copy onto coated paper, thick paper, or special paper such as those for Macintosh®, access the printer driver, select Printer Settings from the Paper Source list. If the optional 500-Sheet Paper Cassette Unit is installed, then it will search for copying ... Paper and Originals The available paper types for a paper source containing the specified paper size in your application, these settings may override the printer driver settings. Then click OK. (For details see page 23.) ■ To set up automatic paper source detect, select Auto Selection ...
Basics
Page 19
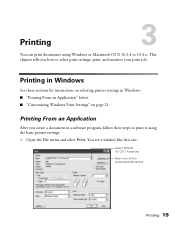
...tells you create a document in a software program, follow these steps to 10.4.x. Printing in Windows See these sections for instructions on selecting printer settings in Windows: ■ "Printing From an Application" below ■ "Customizing Windows Print Settings" on page 21 Printing From an ...Application After you how to select print settings, print, and monitor your printer properties/preferences Printing 19 You see a window like this one: Select EPSON AL-CX11 Advanced Open your print job. Open the File menu and select Print. Printing 3 You ...
...tells you create a document in a software program, follow these steps to 10.4.x. Printing in Windows See these sections for instructions on selecting printer settings in Windows: ■ "Printing From an Application" below ■ "Customizing Windows Print Settings" on page 21 Printing From an ...Application After you how to select print settings, print, and monitor your printer properties/preferences Printing 19 You see a window like this one: Select EPSON AL-CX11 Advanced Open your print job. Open the File menu and select Print. Printing 3 You ...

Basics
Page 20
... Text&Image: For documents with text and images with higher quality ■ Web: For text and images on the next screen.) You see a Setup, Printer, or Options button, click it. Make sure Automatic is selected. 3. Then click Properties or Preferences on a web site. ■ Photo: For photos... and graphics with good quality and speed Note: For more information about print settings, click the ? Make sure EPSON AL-CX11 Advanced is selected. 5. or Help button. 20 Printing Click the Properties or Preferences button. (If you see the Basic Settings window: 4. ...
... Text&Image: For documents with text and images with higher quality ■ Web: For text and images on the next screen.) You see a Setup, Printer, or Options button, click it. Make sure Automatic is selected. 3. Then click Properties or Preferences on a web site. ■ Photo: For photos... and graphics with good quality and speed Note: For more information about print settings, click the ? Make sure EPSON AL-CX11 Advanced is selected. 5. or Help button. 20 Printing Click the Properties or Preferences button. (If you see the Basic Settings window: 4. ...
Basics
Page 21
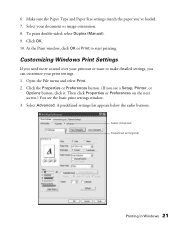
... and select Print. 2. Click the Properties or Preferences button. (If you 've loaded. 7. 6. Then click Properties or Preferences on the next screen.) You see a Setup, Printer, or Options button, click it. To print double-sided, select Duplex (Manual). 9. Make sure the Paper Type and Paper Size settings match the paper you...
... and select Print. 2. Click the Properties or Preferences button. (If you 've loaded. 7. 6. Then click Properties or Preferences on the next screen.) You see a Setup, Printer, or Options button, click it. To print double-sided, select Duplex (Manual). 9. Make sure the Paper Type and Paper Size settings match the paper you...

Basics
Page 23
Select AL-CX11 in the Format for instructions on selecting printer settings in Mac OS X: ■ "Printing From an Application" below ■ "Customizing Mac OS X Print Settings" on page 26 Printing From an Application After you ...
Select AL-CX11 in the Format for instructions on selecting printer settings in Mac OS X: ■ "Printing From an Application" below ■ "Customizing Mac OS X Print Settings" on page 26 Printing From an Application After you ...

Basics
Page 24
Select AL-CX11 from the pop-up menu. 8. You see a window like this one: Select AL-CX11 7. Make sure the Paper Type and Paper Size settings match the paper you've loaded. 10. Open the File menu and select Print. Click Automatic. 24 Printing Select Printer Settings Click Automatic Select a Resolution 9. 6. Select Printer Settings from the Printer pop-up menu.
Select AL-CX11 from the pop-up menu. 8. You see a window like this one: Select AL-CX11 7. Make sure the Paper Type and Paper Size settings match the paper you've loaded. 10. Open the File menu and select Print. Click Automatic. 24 Printing Select Printer Settings Click Automatic Select a Resolution 9. 6. Select Printer Settings from the Printer pop-up menu.
Basics
Page 25
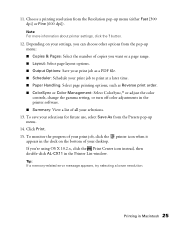
.... ■ ColorSync or Color Management: Select ColorSync,® or adjust the color controls, change the gamma setting, or turn off color adjustments in the printer software. ■ Summary: View a list of your selections. 13. Choose a printing resolution from the Presets pop-up menu. 14. To save your...dpi]). Tip: If a memory-related error message appears, try selecting a lower resolution. Printing in the Printer List window. 11. To monitor the progress of your print job, click the printer icon when it appears in the dock on your selections for future use, select Save As from the ...
.... ■ ColorSync or Color Management: Select ColorSync,® or adjust the color controls, change the gamma setting, or turn off color adjustments in the printer software. ■ Summary: View a list of your selections. 13. Choose a printing resolution from the Presets pop-up menu. 14. To save your...dpi]). Tip: If a memory-related error message appears, try selecting a lower resolution. Printing in the Printer List window. 11. To monitor the progress of your print job, click the printer icon when it appears in the dock on your selections for future use, select Save As from the ...
Basics
Page 26
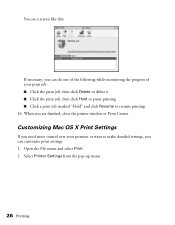
..., then click Hold to pause printing ■ Click a print job marked "Hold" and click Resume to make detailed settings, you can customize print settings. 1. Select Printer Settings from the pop-up menu. 26 Printing When you are finished, close the...
..., then click Hold to pause printing ■ Click a print job marked "Hold" and click Resume to make detailed settings, you can customize print settings. 1. Select Printer Settings from the pop-up menu. 26 Printing When you are finished, close the...
Basics
Page 28
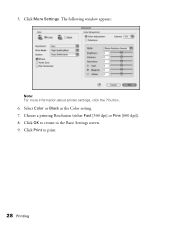
The following window appears: Note: For more information about printer settings, click the ? Choose a printing Resolution (either Fast [300 dpi] or Fine [600 dpi]). 8. button. 6. Select Color or Black as the Color setting. 7. Click OK to return to print. 28 Printing 5. Click Print to the Basic Settings screen. 9. Click More Settings.
The following window appears: Note: For more information about printer settings, click the ? Choose a printing Resolution (either Fast [300 dpi] or Fine [600 dpi]). 8. button. 6. Select Color or Black as the Color setting. 7. Click OK to return to print. 28 Printing 5. Click Print to the Basic Settings screen. 9. Click More Settings.
Basics
Page 30
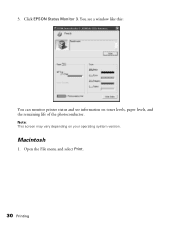
Note: This screen may vary depending on toner levels, paper levels, and the remaining life of the photoconductor. Click EPSON Status Monitor 3. Open the File menu and select Print. 30 Printing You see a window like this: You can monitor printer status and see information on your operating system version. Macintosh 1. 3.
Note: This screen may vary depending on toner levels, paper levels, and the remaining life of the photoconductor. Click EPSON Status Monitor 3. Open the File menu and select Print. 30 Printing You see a window like this: You can monitor printer status and see information on your operating system version. Macintosh 1. 3.

Basics
Page 31
Click your printer's icon 3. 2. Select Printer Settings from the pop-up menu, then select the Utility tab. You see a window like this: Using Epson Status Monitor 3 31 Click your printer's icon.
Click your printer's icon 3. 2. Select Printer Settings from the pop-up menu, then select the Utility tab. You see a window like this: Using Epson Status Monitor 3 31 Click your printer's icon.
Basics
Page 32
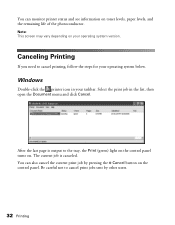
Select the print job in your operating system below. You can also cancel the current print job by other users. 32 Printing You can monitor printer status and see information on the control panel. Be careful not to cancel print jobs sent by pressing the y Cancel button on toner levels, ...paper levels, and the remaining life of the photoconductor. Windows Double-click the printer icon in the list, then open the Document menu and click Cancel. After the last page is canceled. The current job is output to cancel...
Select the print job in your operating system below. You can also cancel the current print job by other users. 32 Printing You can monitor printer status and see information on the control panel. Be careful not to cancel print jobs sent by pressing the y Cancel button on toner levels, ...paper levels, and the remaining life of the photoconductor. Windows Double-click the printer icon in the list, then open the Document menu and click Cancel. After the last page is canceled. The current job is output to cancel...
Basics
Page 33
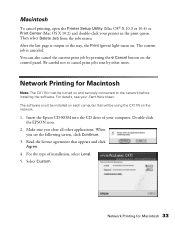
...and click Agree. 4. Select Custom. Network Printing for Macintosh Note: The CX11N must be using the CX11N on and securely connected to cancel print jobs sent by pressing the y Cancel button on . Macintosh To cancel printing, open the Printer Setup Utility (Mac OS® X 10.3 or 10.4) or Print ...Center (Mac OS X 10.2) and double-click your Start Here sheet. Insert the Epson CD...
...and click Agree. 4. Select Custom. Network Printing for Macintosh Note: The CX11N must be using the CX11N on and securely connected to cancel print jobs sent by pressing the y Cancel button on . Macintosh To cancel printing, open the Printer Setup Utility (Mac OS® X 10.3 or 10.4) or Print ...Center (Mac OS X 10.2) and double-click your Start Here sheet. Insert the Epson CD...
Basics
Page 34
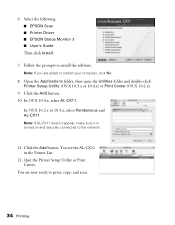
... turned on and securely connected to 10.3.x, select Rendezvous and AL-CX11. Open the Applications folder, then open the Utilities folder and double-click Printer Setup Utility (OS X 10.3.x or 10.4.x) or Print Center (OS X 10.2.x). 9. In OS X 10.4.x, select AL-CX11. Click the Add ... Utility or Print Center. In OS X 10.2.x to the network. 11. 6. Click the Add button. 10. Select the following: ■ EPSON Scan ■ Printer Driver ■ EPSON Status Monitor 3 ■ User's Guide Then click Install. 7. You are asked to print, copy, and scan. 34 Printing Note: If you are...
... turned on and securely connected to 10.3.x, select Rendezvous and AL-CX11. Open the Applications folder, then open the Utilities folder and double-click Printer Setup Utility (OS X 10.3.x or 10.4.x) or Print Center (OS X 10.2.x). 9. In OS X 10.4.x, select AL-CX11. Click the Add ... Utility or Print Center. In OS X 10.2.x to the network. 11. 6. Click the Add button. 10. Select the following: ■ EPSON Scan ■ Printer Driver ■ EPSON Status Monitor 3 ■ User's Guide Then click Install. 7. You are asked to print, copy, and scan. 34 Printing Note: If you are...
Basics
Page 49
... the Auto Exposure Type list and select Document or Photo. 2. Then click the arrow in the original. EPSON Scan selects a default resolution setting based on the web. ■ Printer for images you will view only on a computer screen or post on the original and destination settings you ...want to select a specific resolution for scanning a document or photo). Office Mode: Select ADF from the Document Source drop-down list. Selecting EPSON Scan Settings 49 ...
... the Auto Exposure Type list and select Document or Photo. 2. Then click the arrow in the original. EPSON Scan selects a default resolution setting based on the web. ■ Printer for images you will view only on a computer screen or post on the original and destination settings you ...want to select a specific resolution for scanning a document or photo). Office Mode: Select ADF from the Document Source drop-down list. Selecting EPSON Scan Settings 49 ...
Basics
Page 64
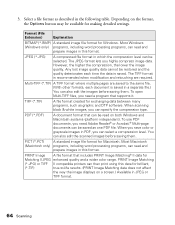
... format for Windows. PRINT Image A file format that can select a compression level. The TIFF format is saved. PRINT Image Matching (*.JPG) or TIFF II compatible printers can be available for Matching II JPEG enhanced quality and a wider color range. When you save color or grayscale images in a separate file.) You can...
... format for Windows. PRINT Image A file format that can select a compression level. The TIFF format is saved. PRINT Image Matching (*.JPG) or TIFF II compatible printers can be available for Matching II JPEG enhanced quality and a wider color range. When you save color or grayscale images in a separate file.) You can...


