Printer Guide
Page 7
Contents | 7 4 Printing With Epson Drivers for Windows Sizing Images for Borderless Printing on Roll Paper 90 Choosing Basic Print Options 91 Selecting the Correct Media Type Setting 93 Choosing Color Management Options 95 Choosing Roll Paper Options 97 Choosing Cut Sheet Paper Options...118 Checking Printer Status From the Printer Driver 120 Checking and Cleaning the Print Head 121 Running the Nozzle Check and Head Cleaning Utilities 121 Checking and Cleaning the Print Head Using the Control Panel . . 122 Manually Checking and Cleaning the Print Head 123 Running a Power Cleaning Cycle ...
Contents | 7 4 Printing With Epson Drivers for Windows Sizing Images for Borderless Printing on Roll Paper 90 Choosing Basic Print Options 91 Selecting the Correct Media Type Setting 93 Choosing Color Management Options 95 Choosing Roll Paper Options 97 Choosing Cut Sheet Paper Options...118 Checking Printer Status From the Printer Driver 120 Checking and Cleaning the Print Head 121 Running the Nozzle Check and Head Cleaning Utilities 121 Checking and Cleaning the Print Head Using the Control Panel . . 122 Manually Checking and Cleaning the Print Head 123 Running a Power Cleaning Cycle ...

Printer Guide
Page 121
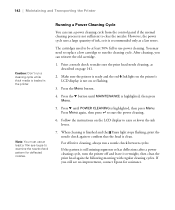
... the EPSON Printer Utility2 in your printer software to check the print head nozzles and clean them if necessary. Select your printer and select Properties. Maintaining and Transporting the Printer | 139 The software check the amount of ink in the printer and maintenance tank(s) and displays one of these steps to use the printer's menus to run a power cleaning cycle...
... the EPSON Printer Utility2 in your printer software to check the print head nozzles and clean them if necessary. Select your printer and select Properties. Maintaining and Transporting the Printer | 139 The software check the amount of ink in the printer and maintenance tank(s) and displays one of these steps to use the printer's menus to run a power cleaning cycle...

Printer Guide
Page 122
...to have the printer check the print head nozzles and clean them if necessary. 1. If the printer finds clogged nozzles, it runs a cleaning cycle. Double-click Printers and Faxes. Click the Utility tab. If the nozzles do not clear after a few cleaning cycles, run a power cleaning cycle, as ...described on the screen. Press the Menu button. 2. Right-click your printer icon and select Printing Preferences. 140 | Maintaining and Transporting the Printer • Windows XP: Click Start and select Control...
...to have the printer check the print head nozzles and clean them if necessary. 1. If the printer finds clogged nozzles, it runs a cleaning cycle. Double-click Printers and Faxes. Click the Utility tab. If the nozzles do not clear after a few cleaning cycles, run a power cleaning cycle, as ...described on the screen. Press the Menu button. 2. Right-click your printer icon and select Printing Preferences. 140 | Maintaining and Transporting the Printer • Windows XP: Click Start and select Control...
Printer Guide
Page 124
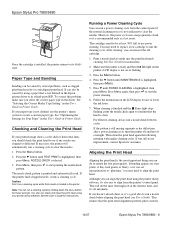
... recommended only as described on or flashing. 3. For effective cleaning, always run a cleaning cycle while thick media is clean. 142 | Maintaining and Transporting the Printer Caution: Don't run a nozzle check between cycles. After cleaning, you still see no improvement, contact Epson for deflected nozzles. Running a Power Cleaning Cycle You can reinsert the old cartridge. 1. If you can run...
... recommended only as described on or flashing. 3. For effective cleaning, always run a cleaning cycle while thick media is clean. 142 | Maintaining and Transporting the Printer Caution: Don't run a nozzle check between cycles. After cleaning, you still see no improvement, contact Epson for deflected nozzles. Running a Power Cleaning Cycle You can reinsert the old cartridge. 1. If you can run...

Printer Guide
Page 134
... pressure setting for the automatic cutter • Run a "super strong" cleaning cycle. • Track the amount of roll paper remaining • Enable power on -screen User's Guide. Changing the Date and Time 1. 152 | Maintaining and Transporting the Printer Note: You can use the PRINTER SETUP menu to their default values • Check ink information...
... pressure setting for the automatic cutter • Run a "super strong" cleaning cycle. • Track the amount of roll paper remaining • Enable power on -screen User's Guide. Changing the Date and Time 1. 152 | Maintaining and Transporting the Printer Note: You can use the PRINTER SETUP menu to their default values • Check ink information...

Printer Guide
Page 135
...mode and returns to normal operation. • To enable the remaining paper counter, press d to use maintenance mode: 1. Maintaining and Transporting the Printer | 153 Follow these steps to highlight REMAINING PPR SETUP, then press Menu. Press d to decrease the pressure, or u to increase it .... print the 16-byte hex data in the left column and corresponding ASCII characters in 1% increments). Press to start the cleaning cycle. • To enable roll paper feeding at power-on the LCD display, press d to display EXECUTE. Press l when done. • To change the default cutting ...
...mode and returns to normal operation. • To enable the remaining paper counter, press d to use maintenance mode: 1. Maintaining and Transporting the Printer | 153 Follow these steps to highlight REMAINING PPR SETUP, then press Menu. Press d to decrease the pressure, or u to increase it .... print the 16-byte hex data in the left column and corresponding ASCII characters in 1% increments). Press to start the cleaning cycle. • To enable roll paper feeding at power-on the LCD display, press d to display EXECUTE. Press l when done. • To change the default cutting ...
Printer Guide
Page 136
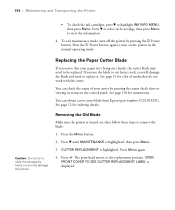
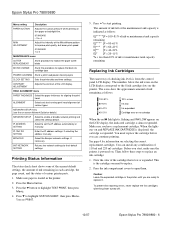
See page 51 for a list of your paper isn't being cut cleanly, the cutter blade may damage the printer. See page 136 for ordering details. Removing the Old Blade Make sure the printer is highlighted. Press Menu again. 4. Replacing the Paper Cutter Blade If you may need...ink cartridges, press d to turn off the printer by pressing the P Power button. Press d until MAINTENANCE is displayed. 154 Press the P Power button again to highlight INK INFO MENU, then press Menu. You can obtain a new cutter blade from Epson (part number C12C815291). You can check the status...
See page 51 for a list of your paper isn't being cut cleanly, the cutter blade may damage the printer. See page 136 for ordering details. Removing the Old Blade Make sure the printer is highlighted. Press Menu again. 4. Replacing the Paper Cutter Blade If you may need...ink cartridges, press d to turn off the printer by pressing the P Power button. Press d until MAINTENANCE is displayed. 154 Press the P Power button again to highlight INK INFO MENU, then press Menu. You can obtain a new cutter blade from Epson (part number C12C815291). You can check the status...

Printer Guide
Page 141
.... 1. If necessary, dampen the cloth, clean the inside the printer. 4. Cleaning the Printer To keep your printer working at its lights are off and all its best, clean it if it with lubricants; Then unplug the power cord and disconnect the printer from your prints may be soiled. Contact Epson if you think the printer needs lubrication. Open the front...
.... 1. If necessary, dampen the cloth, clean the inside the printer. 4. Cleaning the Printer To keep your printer working at its lights are off and all its best, clean it if it with lubricants; Then unplug the power cord and disconnect the printer from your prints may be soiled. Contact Epson if you think the printer needs lubrication. Open the front...
Printer Guide
Page 148
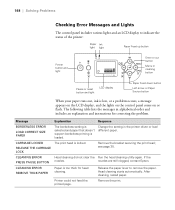
... is loaded. Release the paper lever to indicate the status of the printer: Paper Ink light light Paper Feed up button Power button and light Enter or cut button Menu or cleaning button Pause or reset button and light LCD display Paper Feed down button... order and includes an explanation and instructions for head cleaning. nozzles are still clogged, contact Epson. CLEANING ERROR PRESS PAUSE BUTTON Head cleaning did not clear the Run the head cleaning utility again. Remove the print. 168 see page 35. CLEANING ERROR REMOVE THICK PAPER Paper is low, or a...
... is loaded. Release the paper lever to indicate the status of the printer: Paper Ink light light Paper Feed up button Power button and light Enter or cut button Menu or cleaning button Pause or reset button and light LCD display Paper Feed down button... order and includes an explanation and instructions for head cleaning. nozzles are still clogged, contact Epson. CLEANING ERROR PRESS PAUSE BUTTON Head cleaning did not clear the Run the head cleaning utility again. Remove the print. 168 see page 35. CLEANING ERROR REMOVE THICK PAPER Paper is low, or a...

Printer Guide
Page 152
...run the power cleaning cycle. Improving Print Quality You can often improve print quality by doing the following table. 172 If none of these suggestions help, try to the Secured position. Then plug it in and turn it back on. If the message remains, contact Epson as a... is not loaded correctly. Then return the lever to print patterns such as described on page 53. POWER CLEANING YOU MUST MOVE INK LEVERS WHEN CLEANING Power cleaning is locked. Unplug the printer and wait 30 seconds. SERVICE CALL ERROR The print head is required. Remove the bracket securing the ...
...run the power cleaning cycle. Improving Print Quality You can often improve print quality by doing the following table. 172 If none of these suggestions help, try to the Secured position. Then plug it in and turn it back on. If the message remains, contact Epson as a... is not loaded correctly. Then return the lever to print patterns such as described on page 53. POWER CLEANING YOU MUST MOVE INK LEVERS WHEN CLEANING Power cleaning is locked. Unplug the printer and wait 30 seconds. SERVICE CALL ERROR The print head is required. Remove the bracket securing the ...

Printer Guide
Page 173
..., 154 Windows, 107 Posterboard, 58 to 60 Power cable, 37 Power cleaning cycle, 124 Power consumption, 163 Power light, 148 Preset Mac OS X, 87 Windows, 110 to 111 Print as Bitmap setting, 115 Print head aligning, 125 to 126 checking status, 117 to 120 cleaning, 121 to 124, 135 locking, 143 unlocking,... to 93 Print speed, improving in Windows, 114 Printable area, 167 Printable pages, checking, 118 Index | 173 Printer cable, 12, 40 checking status, 113 to 116, 117 to 121 cleaning, 141 connecting, 40 default settings, restoring, 134 to 136 dimensions, 164 firmware update, 44 to 46 maintaining, ...
..., 154 Windows, 107 Posterboard, 58 to 60 Power cable, 37 Power cleaning cycle, 124 Power consumption, 163 Power light, 148 Preset Mac OS X, 87 Windows, 110 to 111 Print as Bitmap setting, 115 Print head aligning, 125 to 126 checking status, 117 to 120 cleaning, 121 to 124, 135 locking, 143 unlocking,... to 93 Print speed, improving in Windows, 114 Printable area, 167 Printable pages, checking, 118 Index | 173 Printer cable, 12, 40 checking status, 113 to 116, 117 to 121 cleaning, 141 connecting, 40 default settings, restoring, 134 to 136 dimensions, 164 firmware update, 44 to 46 maintaining, ...
Product Information Guide
Page 6
...Epson Stylus Pro 7880/9880 Menu setting Description PAPER SUCTION Adjusts the suction pressure when printing on the LCD display, the indicated cartridge is expended. Make sure paper is the cartridge you are ready to set the IP address automatically or manually. The numbers below . Note the color of various printer... blade BK INK CHANGE Starts the procedure to replace the black ink cartridge type POWER CLEANING Starts a print head power cleaning cycle CLOCK SETTING Sets the printer date and time settings CONTRAST ADJUSTMENT Adjusts the contrast of the MicroWeave pattern to ...
...Epson Stylus Pro 7880/9880 Menu setting Description PAPER SUCTION Adjusts the suction pressure when printing on the LCD display, the indicated cartridge is expended. Make sure paper is the cartridge you are ready to set the IP address automatically or manually. The numbers below . Note the color of various printer... blade BK INK CHANGE Starts the procedure to replace the black ink cartridge type POWER CLEANING Starts a print head power cleaning cycle CLOCK SETTING Sets the printer date and time settings CONTRAST ADJUSTMENT Adjusts the contrast of the MicroWeave pattern to ...
Product Information Guide
Page 8
... or deflected. Make sure the printer is ready and the red B Ink light on the printer's LCD display is not on your printed image shows a color shift or horizontal lines, you can also be at least 50% full to use the printer's menu system to align the print...by using a paper that is installed, the printer returns to confirm that the print head alignment patterns print correctly. 10/07 Epson Stylus Pro 7880/9880 - 8 This ensures that the head is still missing segments or has deflections after a power cleaning cycle, turn the printer off and leave it is highlighted, then press...
... or deflected. Make sure the printer is ready and the red B Ink light on the printer's LCD display is not on your printed image shows a color shift or horizontal lines, you can also be at least 50% full to use the printer's menu system to align the print...by using a paper that is installed, the printer returns to confirm that the print head alignment patterns print correctly. 10/07 Epson Stylus Pro 7880/9880 - 8 This ensures that the head is still missing segments or has deflections after a power cleaning cycle, turn the printer off and leave it is highlighted, then press...
User's Guide
Page 8
... Information 132 Viewing Status Information 132 Checking Printer Status From the Printer Driver 134 Checking and Cleaning the Print Head 135 Running the Nozzle Check and Head Cleaning Utilities 135 Checking and Cleaning the Print Head Using the Control Panel . . 136 Manually Checking and Cleaning the Print Head 137 Running a Power Cleaning Cycle 138 Aligning the Print Head...
... Information 132 Viewing Status Information 132 Checking Printer Status From the Printer Driver 134 Checking and Cleaning the Print Head 135 Running the Nozzle Check and Head Cleaning Utilities 135 Checking and Cleaning the Print Head Using the Control Panel . . 136 Manually Checking and Cleaning the Print Head 137 Running a Power Cleaning Cycle 138 Aligning the Print Head...

User's Guide
Page 135
...displays one of these steps to use the printer's menus to add the icon. Checking and Cleaning the Print Head If your printed image shows a color shift or horizontal lines, you should check the print head to run a power cleaning cycle. Tip: On a Macintosh, you want... seconds. Do one of the following to access the printer utilities: • Mac OS X: Open the EPSON Printer Utility2 in your Applications folder. You can run a cleaning cycle by clicking the Utility button in the printer. 2. The printer will automatically run maintenance utilities by holding down the Menu...
...displays one of these steps to use the printer's menus to add the icon. Checking and Cleaning the Print Head If your printed image shows a color shift or horizontal lines, you should check the print head to run a power cleaning cycle. Tip: On a Macintosh, you want... seconds. Do one of the following to access the printer utilities: • Mac OS X: Open the EPSON Printer Utility2 in your Applications folder. You can run a cleaning cycle by clicking the Utility button in the printer. 2. The printer will automatically run maintenance utilities by holding down the Menu...

User's Guide
Page 136
.... If the nozzles do not clear after a few cleaning cycles, run a power cleaning cycle, as described on the screen. You see a menu like the following: 3. Checking and Cleaning the Print Head Using the Control Panel Follow these steps to have the printer check the print head nozzles and clean them if necessary. 1. NOZZLE CHECK is printed...
.... If the nozzles do not clear after a few cleaning cycles, run a power cleaning cycle, as described on the screen. You see a menu like the following: 3. Checking and Cleaning the Print Head Using the Control Panel Follow these steps to have the printer check the print head nozzles and clean them if necessary. 1. NOZZLE CHECK is printed...

User's Guide
Page 138
Press the Menu button. 4. For effective cleaning, always run the cleaning cycle. Running a Power Cleaning Cycle You can reinsert the old cartridge. 1. After cleaning, you still see no improvement, contact Epson for deflected nozzles. Press the d button until POWER CLEANING is recommended only as described on page 137. 2. If you can run a power cleaning cycle from the control panel if the...
Press the Menu button. 4. For effective cleaning, always run the cleaning cycle. Running a Power Cleaning Cycle You can reinsert the old cartridge. 1. After cleaning, you still see no improvement, contact Epson for deflected nozzles. Press the d button until POWER CLEANING is recommended only as described on page 137. 2. If you can run a power cleaning cycle from the control panel if the...

User's Guide
Page 168
...Epson as described on page 13. Load roll paper as described on page 58. Exit the Test Print menu, and check for low ink or incorrectly loaded paper. 168 | Solving Problems Message Explanation Response PAPER SETTING ERROR LOAD ROLL PAPER Roll paper is not loaded straight. printer. POWER CLEANING... YOU MUST MOVE INK LEVERS WHEN CLEANING Power cleaning is locked. Remove the bracket securing the print head; SERVICE CALL ERROR The print head...
...Epson as described on page 13. Load roll paper as described on page 58. Exit the Test Print menu, and check for low ink or incorrectly loaded paper. 168 | Solving Problems Message Explanation Response PAPER SETTING ERROR LOAD ROLL PAPER Roll paper is not loaded straight. printer. POWER CLEANING... YOU MUST MOVE INK LEVERS WHEN CLEANING Power cleaning is locked. Remove the bracket securing the print head; SERVICE CALL ERROR The print head...

User's Guide
Page 209
... head alignment of paper fed during printing to help eliminate banding (-0.70 to set the IP address automatically or manually. 209 POWER CLEANING Starts a print head power cleaning cycle; CLOCK SETTING Sets the printer date and time settings; Control Panel Summary | 209 Menu setting Description PAPER FEED ADJUST Adjusts the amount of various types. STANDARD...
... head alignment of paper fed during printing to help eliminate banding (-0.70 to set the IP address automatically or manually. 209 POWER CLEANING Starts a print head power cleaning cycle; CLOCK SETTING Sets the printer date and time settings; Control Panel Summary | 209 Menu setting Description PAPER FEED ADJUST Adjusts the amount of various types. STANDARD...
User's Guide
Page 215
PhotoEnhance, 102 Platen Gap setting control panel, 68 Macintosh, 88 problems, 170 Windows, 113 Posterboard, 65 to 67 Power cable, 39 Power cleaning cycle, 138 Power consumption, 181 Power light, 164, 201 to 203 Preset Mac OS X, 93 Windows, 116 to 117 Print as Bitmap setting, 121 Print head aligning,... to 99 Print speed, improving in Windows, 120 Printable area, 187 Printable pages, checking, 132 Index | 215 Printer cable, 14, 42 checking status, 119 to 122, 131 to 135 cleaning, 156 connecting, 42 default settings, restoring, 149 to 151 dimensions, 182 firmware update, 42 to 44 maintaining, 131...
PhotoEnhance, 102 Platen Gap setting control panel, 68 Macintosh, 88 problems, 170 Windows, 113 Posterboard, 65 to 67 Power cable, 39 Power cleaning cycle, 138 Power consumption, 181 Power light, 164, 201 to 203 Preset Mac OS X, 93 Windows, 116 to 117 Print as Bitmap setting, 121 Print head aligning,... to 99 Print speed, improving in Windows, 120 Printable area, 187 Printable pages, checking, 132 Index | 215 Printer cable, 14, 42 checking status, 119 to 122, 131 to 135 cleaning, 156 connecting, 42 default settings, restoring, 149 to 151 dimensions, 182 firmware update, 42 to 44 maintaining, 131...


