Printer Guide
Page 5
... Requirements 12 Important Safety Instructions 13 Ink Cartridge Safety Instructions 15 Printer Parts 16 1 Setting Up the Printer Unpacking and Assembling the Epson Stylus Pro 7880 17 Unpacking and Assembling the Stand 18 Unpacking the Printer 20 Mounting the Printer on the Stand 22 Attaching the Paper Basket 25 Unpacking and Assembling the Epson Stylus Pro 9880 27 Unpacking and Assembling the Stand...
... Requirements 12 Important Safety Instructions 13 Ink Cartridge Safety Instructions 15 Printer Parts 16 1 Setting Up the Printer Unpacking and Assembling the Epson Stylus Pro 7880 17 Unpacking and Assembling the Stand 18 Unpacking the Printer 20 Mounting the Printer on the Stand 22 Attaching the Paper Basket 25 Unpacking and Assembling the Epson Stylus Pro 9880 27 Unpacking and Assembling the Stand...
Printer Guide
Page 7
Contents | 7 4 Printing With Epson Drivers for Windows Sizing Images for Borderless Printing on Roll Paper 90 Choosing Basic Print Options 91 Selecting the Correct Media Type Setting 93 Choosing Color Management Options 95 Choosing Roll Paper Options 97 Choosing Cut Sheet Paper ... and Cleaning the Print Head 123 Running a Power Cleaning Cycle 124 Aligning the Print Head 125 Replacing Ink Cartridges 126 Switching Black Ink Cartridges 130 Draining the Old Ink 130 Installing the New Black Ink Cartridge 132 Updating the Printer Driver Information 133 Changing the Date and Time 134 7
Contents | 7 4 Printing With Epson Drivers for Windows Sizing Images for Borderless Printing on Roll Paper 90 Choosing Basic Print Options 91 Selecting the Correct Media Type Setting 93 Choosing Color Management Options 95 Choosing Roll Paper Options 97 Choosing Cut Sheet Paper ... and Cleaning the Print Head 123 Running a Power Cleaning Cycle 124 Aligning the Print Head 125 Replacing Ink Cartridges 126 Switching Black Ink Cartridges 130 Draining the Old Ink 130 Installing the New Black Ink Cartridge 132 Updating the Printer Driver Information 133 Changing the Date and Time 134 7
Printer Guide
Page 8
...Cutter Blade 138 Replacing the Maintenance Tank 139 Cleaning the Printer 141 Transporting or Storing the Printer 142 Preparing the Printer for Shipment 143 Moving the Printer on the Stand 145 Setting Up the Printer After Transportation 146 6 Solving Problems Diagnosing Problems 147 ...159 Clearing Paper Jams 160 Uninstalling and Reinstalling the Printer Driver 162 A Specifications Environmental 163 Electrical 163 Dimensions and Weight 164 Printer Interfaces 164 Safety Approvals 164 Media 164 Roll Paper 164 Cut Sheets 165 Printable Area 167 Ink Cartridges 167 Index 169 8
...Cutter Blade 138 Replacing the Maintenance Tank 139 Cleaning the Printer 141 Transporting or Storing the Printer 142 Preparing the Printer for Shipment 143 Moving the Printer on the Stand 145 Setting Up the Printer After Transportation 146 6 Solving Problems Diagnosing Problems 147 ...159 Clearing Paper Jams 160 Uninstalling and Reinstalling the Printer Driver 162 A Specifications Environmental 163 Electrical 163 Dimensions and Weight 164 Printer Interfaces 164 Safety Approvals 164 Media 164 Roll Paper 164 Cut Sheets 165 Printable Area 167 Ink Cartridges 167 Index 169 8
Printer Guide
Page 9
... on your CD-ROM, if you use and printer maintenance-loading paper, replacing ink cartridges and other components, cleaning and aligning the print head, and using the Epson® printer drivers, and replacing ink cartridges. Notes contain important information about the printer, drivers, and utility software. 11 Introduction This Printer Guide provides important information on the CD-ROM provides...
... on your CD-ROM, if you use and printer maintenance-loading paper, replacing ink cartridges and other components, cleaning and aligning the print head, and using the Epson® printer drivers, and replacing ink cartridges. Notes contain important information about the printer, drivers, and utility software. 11 Introduction This Printer Guide provides important information on the CD-ROM provides...

Printer Guide
Page 10
... Blade (see page 154) Ink Cartridges Part number C12C890191 C12C815291 See page 145 for accessories and options that are currently available. com for a complete list. 12 In addition, you can damage the printer's built-in cutter. or 3-inch Epson Stylus Pro 7880: Epson Stylus Pro 9880: Paper Roller Spindle (High Tension) - 2- 12 | Introduction Tip: Check the Epson Pro Imaging website at www...
... Blade (see page 154) Ink Cartridges Part number C12C890191 C12C815291 See page 145 for accessories and options that are currently available. com for a complete list. 12 In addition, you can damage the printer's built-in cutter. or 3-inch Epson Stylus Pro 7880: Epson Stylus Pro 9880: Paper Roller Spindle (High Tension) - 2- 12 | Introduction Tip: Check the Epson Pro Imaging website at www...
Printer Guide
Page 15
... the side of children and do not drink the ink. • Store ink cartridges in the ink supply port, making covers or plugs unnecessary, but care is consumed because the printer automatically performs a reliability check. • If you shake cartridges that the cartridge touches. • Do not touch the ink supply port, its surrounding area, or the green...
... the side of children and do not drink the ink. • Store ink cartridges in the ink supply port, making covers or plugs unnecessary, but care is consumed because the printer automatically performs a reliability check. • If you shake cartridges that the cartridge touches. • Do not touch the ink supply port, its surrounding area, or the green...
Printer Guide
Page 16
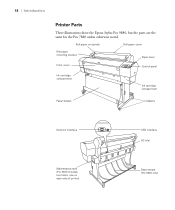
18 | Introduction Printer Parts These illustrations show the Epson Stylus Pro 9880, but the parts are the same for the Pro 7880 unless otherwise noted. Roll paper on spindle Roll paper cover Roll paper mounting bracket Paper lever Front cover Control panel Ink cartridge compartment Ink cartridge compartment Paper basket Casters Network interface Maintenance tank (Pro 9880 includes two tanks, one on each side of printer) 18 USB interface AC inlet Paper straps (Pro 9880 only)
18 | Introduction Printer Parts These illustrations show the Epson Stylus Pro 9880, but the parts are the same for the Pro 7880 unless otherwise noted. Roll paper on spindle Roll paper cover Roll paper mounting bracket Paper lever Front cover Control panel Ink cartridge compartment Ink cartridge compartment Paper basket Casters Network interface Maintenance tank (Pro 9880 includes two tanks, one on each side of printer) 18 USB interface AC inlet Paper straps (Pro 9880 only)
Printer Guide
Page 21
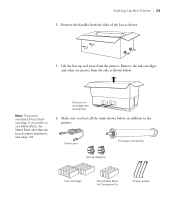
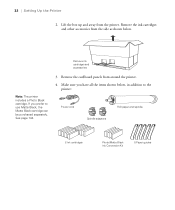
... as shown. 3. If you have all the items shown below . Note: The printer includes a Photo Black cartridge. Remove the ink cartridges and other accessories from the printer. Remove ink cartridges and accessories # " 4. Make sure you prefer to the printer: Power cord Roll paper and spindle Spindle adapters 8 Ink cartridges Photo/Matte Black Ink Conversion Kit 23 2 Paper guides See page 144.
... as shown. 3. If you have all the items shown below . Note: The printer includes a Photo Black cartridge. Remove the ink cartridges and other accessories from the printer. Remove ink cartridges and accessories # " 4. Make sure you prefer to the printer: Power cord Roll paper and spindle Spindle adapters 8 Ink cartridges Photo/Matte Black Ink Conversion Kit 23 2 Paper guides See page 144.
Printer Guide
Page 30
... items shown below . Remove the ink cartridges and other accessories from around the printer. 4. Remove the cardboard panels from the side as shown below , in addition to use Matte Black, the Matte Black cartridge can be purchased separately. Remove ink cartridges and accessories # " Note: The printer includes a Photo Black cartridge. 32 | Setting Up the Printer 2. See page 144. 3. Lift...
... items shown below . Remove the ink cartridges and other accessories from around the printer. 4. Remove the cardboard panels from the side as shown below , in addition to use Matte Black, the Matte Black cartridge can be purchased separately. Remove ink cartridges and accessories # " Note: The printer includes a Photo Black cartridge. 32 | Setting Up the Printer 2. See page 144. 3. Lift...
Printer Guide
Page 38
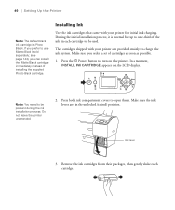
... turn on the LCD display. 40 | Setting Up the Printer Note: The default black ink cartridge is normal for initial ink charging. Press the P Power button to be used. Ink lever 3. The cartridges shipped with your printer are in each cartridge. 40 In a moment, INSTALL INK CARTRIDGE appears on the printer. If you prefer to open them. Make sure you can...
... turn on the LCD display. 40 | Setting Up the Printer Note: The default black ink cartridge is normal for initial ink charging. Press the P Power button to be used. Ink lever 3. The cartridges shipped with your printer are in each cartridge. 40 In a moment, INSTALL INK CARTRIDGE appears on the printer. If you prefer to open them. Make sure you can...
Printer Guide
Page 39
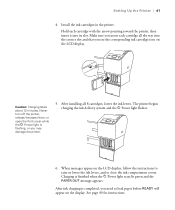
... open the front cover while the P Power light is completed, you may damage the printer. 5. After ink charging is flashing, or you need to close the ink compartment covers. Install the ink cartridges in the printer. Hold each cartridge with the arrow pointing toward the printer, then insert it into the correct slot and that you insert each...
... open the front cover while the P Power light is completed, you may damage the printer. 5. After ink charging is flashing, or you need to close the ink compartment covers. Install the ink cartridges in the printer. Hold each cartridge with the arrow pointing toward the printer, then insert it into the correct slot and that you insert each...
Printer Guide
Page 85
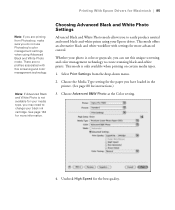
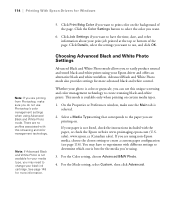
... printer. (See page 88 for the best quality. 95 Whether your black ink cartridge. Select Print Settings from Photoshop, make sure you can use Photoshop's color management settings when using your media type, you to create stunning black-and-white prints. Choose Advanced B&W Photo as the Color setting. 4. Uncheck High Speed for instructions.) 3. Printing With Epson...
... printer. (See page 88 for the best quality. 95 Whether your black ink cartridge. Select Print Settings from Photoshop, make sure you can use Photoshop's color management settings when using your media type, you to create stunning black-and-white prints. Choose Advanced B&W Photo as the Color setting. 4. Uncheck High Speed for instructions.) 3. Printing With Epson...
Printer Guide
Page 104
... Black and White Photo mode allows you want to print color on certain media types. 1. Advanced Black and White Photo mode also provides settings for more information. If your photo is best for your black ink cartridge. You may need to create stunning black-and-white prints.... Note: If Advanced Black and White Photo is not listed, check the instructions included with this unique screening and color management technology to change your media type, you 're using non-Epson media, choose...
... Black and White Photo mode allows you want to print color on certain media types. 1. Advanced Black and White Photo mode also provides settings for more information. If your photo is best for your black ink cartridge. You may need to create stunning black-and-white prints.... Note: If Advanced Black and White Photo is not listed, check the instructions included with this unique screening and color management technology to change your media type, you 're using non-Epson media, choose...

Printer Guide
Page 117
...tank, and other printer parts. This chapter describes the following routine procedures: • Checking printer status and part life • Checking and cleaning the print head • Aligning the print head • Replacing ink cartridges • Switching the black ink cartridge • Changing ... • Cleaning the printer • Transporting or storing the printer In addition to keep working at their best. For more information, see page 138). 135 135 Chapter 6: Maintaining and Transporting the Printer The Epson Stylus Pro 7880 and Pro 9880 require little maintenance to ...
...tank, and other printer parts. This chapter describes the following routine procedures: • Checking printer status and part life • Checking and cleaning the print head • Aligning the print head • Replacing ink cartridges • Switching the black ink cartridge • Changing ... • Cleaning the printer • Transporting or storing the printer In addition to keep working at their best. For more information, see page 138). 135 135 Chapter 6: Maintaining and Transporting the Printer The Epson Stylus Pro 7880 and Pro 9880 require little maintenance to ...

Printer Guide
Page 118
... need to be printed with each ink cartridge, press d to highlight PRINTABLE PAGES, then press Menu. 136 | Maintaining and Transporting the Printer Note: You can be replaced by an authorized Epson service technician. Press the d button until PRINTER STATUS is loaded in each cartridge. The amount of ink left or the maintenance tank capacity is indicated as...
... need to be printed with each ink cartridge, press d to highlight PRINTABLE PAGES, then press Menu. 136 | Maintaining and Transporting the Printer Note: You can be replaced by an authorized Epson service technician. Press the d button until PRINTER STATUS is loaded in each cartridge. The amount of ink left or the maintenance tank capacity is indicated as...

Printer Guide
Page 126
... the percentage of 110 ml and 220 ml cartridges. 144 see the electronic User's Guide. If you can store partially used ink cartridges for up to fine-tune the automatic alignment process, you do so, Epson recommends covering the openings with tape. 9. 144 | Maintaining and Transporting the Printer Tip: You can perform a manual head alignment...
... the percentage of 110 ml and 220 ml cartridges. 144 see the electronic User's Guide. If you can store partially used ink cartridges for up to fine-tune the automatic alignment process, you do so, Epson recommends covering the openings with tape. 9. 144 | Maintaining and Transporting the Printer Tip: You can perform a manual head alignment...
Printer Guide
Page 127
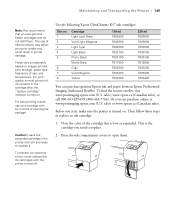
... the printer until you are ready to replace. 2. Caution: Leave the expended cartridge in printer damage. Use the following Epson UltraChrome K3™ ink cartridges: Slot no. 1 2 3 4 5 6 7 8 Cartridge Light ...color of ink remains in the cartridge after the "replace cartridge" indicator comes on . Press the ink compartment covers to replace an ink cartridge: 1. For print quality, a small amount of the cartridge that you start, make sure the printer is turned on . The use up a cartridge with the printer turned off. To prevent ink reporting errors, never replace the ink cartridges...
... the printer until you are ready to replace. 2. Caution: Leave the expended cartridge in printer damage. Use the following Epson UltraChrome K3™ ink cartridges: Slot no. 1 2 3 4 5 6 7 8 Cartridge Light ...color of ink remains in the cartridge after the "replace cartridge" indicator comes on . Press the ink compartment covers to replace an ink cartridge: 1. For print quality, a small amount of the cartridge that you start, make sure the printer is turned on . The use up a cartridge with the printer turned off. To prevent ink reporting errors, never replace the ink cartridges...

Printer Guide
Page 128
... the expended ink cartridge from its package. 6. Raise the ink levers to save your eyes, flush them thoroughly with water. 4. If ink gets in your first set of expended cartridges so you can use them for transporting the printer, if necessary. 5. It's a good idea to the unlocked position. Make sure the replacement cartridge is the correct color and...
... the expended ink cartridge from its package. 6. Raise the ink levers to save your eyes, flush them thoroughly with water. 4. If ink gets in your first set of expended cartridges so you can use them for transporting the printer, if necessary. 5. It's a good idea to the unlocked position. Make sure the replacement cartridge is the correct color and...
Printer Guide
Page 130
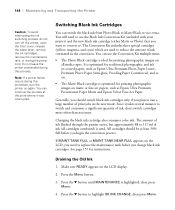
... you begin the conversion process. Changing the black ink cartridge also consumes color ink. The amount of ink flushed through the printer varies, but approximately 88 to 117 ml of ink, don't switch cartridges more often than necessary. Draining the Old Ink 1. Press the d button to reduce the amount... Photo Paper Semi-gloss, Proofing Paper Commercial, and so on all cartridges combined) is ideal for traditional photographic and ink jet-coated papers, such as Epson Ultra Premium Presentation Paper Matte and Epson Velvet Fine Art Paper. Press the d button until MAINTENANCE is optimized...
... you begin the conversion process. Changing the black ink cartridge also consumes color ink. The amount of ink flushed through the printer varies, but approximately 88 to 117 ml of ink, don't switch cartridges more often than necessary. Draining the Old Ink 1. Press the d button to reduce the amount... Photo Paper Semi-gloss, Proofing Paper Commercial, and so on all cartridges combined) is ideal for traditional photographic and ink jet-coated papers, such as Epson Ultra Premium Presentation Paper Matte and Epson Velvet Fine Art Paper. Press the d button until MAINTENANCE is optimized...
Printer Guide
Page 131
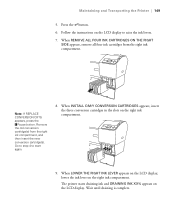
... LCD display. Maintaining and Transporting the Printer | 149 5. Follow the instructions on the right ink compartment. 9. Wait until draining is complete. 149 Press the button. 6. When REMOVE ALL FOUR INK CARTRIDGES ON THE RIGHT SIDE appears, remove all four ink cartridges from the right ink compartment, and then insert the new conversion cartridge(s). Note: If REPLACE CONVERSION CRTG...
... LCD display. Maintaining and Transporting the Printer | 149 5. Follow the instructions on the right ink compartment. 9. Wait until draining is complete. 149 Press the button. 6. When REMOVE ALL FOUR INK CARTRIDGES ON THE RIGHT SIDE appears, remove all four ink cartridges from the right ink compartment, and then insert the new conversion cartridge(s). Note: If REPLACE CONVERSION CRTG...


