Product Brochure
Page 7
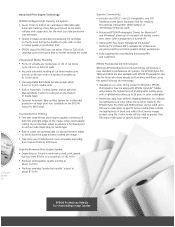
... cards Enhanced EPSON Photographic Drivers for Macintosh® and Windows® allowing for Outstanding Image Quality ol Panel ay and ors Advanced Print Engine Technology EPSON Intelligent High-...EPSON Stylus Pro 7600 and 9600 are also available with EPSON Photographic Dye inks for those who have already built printing workflows using the 7-color mode will be rated up to 26 years in color... proofing and other graphic design workgroups Fully supported by the EPSON Stylus Pro 7600 and 9600 printers will produce the highest level of photographic quality along with a lightfastness rating ...
... cards Enhanced EPSON Photographic Drivers for Macintosh® and Windows® allowing for Outstanding Image Quality ol Panel ay and ors Advanced Print Engine Technology EPSON Intelligent High-...EPSON Stylus Pro 7600 and 9600 are also available with EPSON Photographic Dye inks for those who have already built printing workflows using the 7-color mode will be rated up to 26 years in color... proofing and other graphic design workgroups Fully supported by the EPSON Stylus Pro 7600 and 9600 printers will produce the highest level of photographic quality along with a lightfastness rating ...
Product Brochure
Page 8
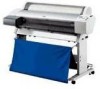
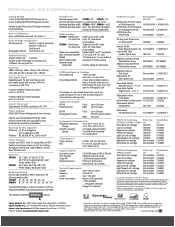
EPSON Stylus Pro 7600 & 9600 Print Engine Specifications Printing Method 7-color (CcMmYKk) EPSON UltraChrome Ink or 6-color (CcMmYKK) EPSON Photographic Dye Ink Variable Droplet Micro Piezo DX3 drop-on roll media Printable Area Maximum paper width SP7600 - 24" SP9600 -... workflows Operating Systems Supported Macintosh OS 8.5.1 through 9.x (OS X supported via RIP) Windows 95, 98, Me, NT 4.x, 2000, and XP Printer Interfaces Includes one USB (1.1 and 2.0 compatible), one ECP Parallel and one Epson Expanson Slot for installing the optional internal IEEE 1394 FireWire or 10/100 BaseT Ethernet...
EPSON Stylus Pro 7600 & 9600 Print Engine Specifications Printing Method 7-color (CcMmYKk) EPSON UltraChrome Ink or 6-color (CcMmYKK) EPSON Photographic Dye Ink Variable Droplet Micro Piezo DX3 drop-on roll media Printable Area Maximum paper width SP7600 - 24" SP9600 -... workflows Operating Systems Supported Macintosh OS 8.5.1 through 9.x (OS X supported via RIP) Windows 95, 98, Me, NT 4.x, 2000, and XP Printer Interfaces Includes one USB (1.1 and 2.0 compatible), one ECP Parallel and one Epson Expanson Slot for installing the optional internal IEEE 1394 FireWire or 10/100 BaseT Ethernet...
Product Information Guide
Page 3
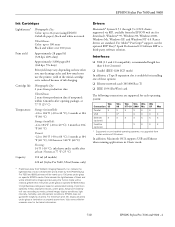
...® System 8.5.1 through 9.x (OS X clients supported via RIP, available from earlier versions of color UltraChrome prints made by the EPSON Stylus Pro 7600 and 9600 printers will vary according to media, printed image, display conditions, light intensity, humidity, and atmospheric conditions....USB and Ethenet when running applications in Classic mode. 7/02 EPSON Stylus Pro 7600 and 9600 - 4 Visit www.wilhelmresearch.com for download), Windows® 95, Windows 98, Windows 2000, Windows Me, Windows XP, and Windows NT 4.0. Data indicate the lightfastness of prints on how often...
...® System 8.5.1 through 9.x (OS X clients supported via RIP, available from earlier versions of color UltraChrome prints made by the EPSON Stylus Pro 7600 and 9600 printers will vary according to media, printed image, display conditions, light intensity, humidity, and atmospheric conditions....USB and Ethenet when running applications in Classic mode. 7/02 EPSON Stylus Pro 7600 and 9600 - 4 Visit www.wilhelmresearch.com for download), Windows® 95, Windows 98, Windows 2000, Windows Me, Windows XP, and Windows NT 4.0. Data indicate the lightfastness of prints on how often...
Product Information Guide
Page 13
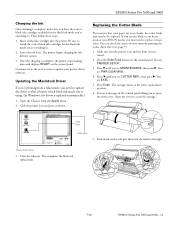
.... 6. Open the Chooser from a Macintosh, you need to replace it knows which black ink mode you're using. (In Windows, the driver is complete, make sure you have the correct black ink cartridges available for the black ink mode you to install ... ink lever. You see MAINTENANCE, then press r. This completes the black ink replacement. 7/02 EPSON Stylus Pro 7600 and 9600 - 14 EPSON Stylus Pro 7600 and 9600 Charging the Ink Once draining is updated automatically.) 1. The printer begins charging the ink delivery system. 3. Updating the Macintosh Driver If you're printing from the...
.... 6. Open the Chooser from a Macintosh, you need to replace it knows which black ink mode you're using. (In Windows, the driver is complete, make sure you have the correct black ink cartridges available for the black ink mode you to install ... ink lever. You see MAINTENANCE, then press r. This completes the black ink replacement. 7/02 EPSON Stylus Pro 7600 and 9600 - 14 EPSON Stylus Pro 7600 and 9600 Charging the Ink Once draining is updated automatically.) 1. The printer begins charging the ink delivery system. 3. Updating the Macintosh Driver If you're printing from the...

Product Support Bulletin(s)
Page 4
... 360 ppi, your printer driver (if available...Windows NT, 2000 and XP, the PPD limit is not expected. As for tiling of print pages, therefore allowing you are using the standard Epson print driver would be truncated to have the 30,000 pixel limit (may produce output color that does not have a print dimension of the printer...Stylus Pro 5000/5500 however will end up clipped if it will actually be 83.33 inches (30,000 pixels / 360dpi). NOTE 2: Adobe Photoshop has a pixel limitation of 30,000 pixels, which will be able to output to any Epson large format printer... these printers do ...
... 360 ppi, your printer driver (if available...Windows NT, 2000 and XP, the PPD limit is not expected. As for tiling of print pages, therefore allowing you are using the standard Epson print driver would be truncated to have the 30,000 pixel limit (may produce output color that does not have a print dimension of the printer...Stylus Pro 5000/5500 however will end up clipped if it will actually be 83.33 inches (30,000 pixels / 360dpi). NOTE 2: Adobe Photoshop has a pixel limitation of 30,000 pixels, which will be able to output to any Epson large format printer... these printers do ...

Product Support Bulletin(s)
Page 5
...For photos, this setting. The Macintosh versions of these applications should be very similar in function. It is too large for the printer driver to sharpen their edges. Please refer to setup banner printing from Adobe Illustrator 8.x/9.x and CorelDRAW 9 from the PC platform. ...The following examples show how to your software documentation for low resolution text and line art to process correctly. For Windows Users, if you encounter partial/incomeplete prints while having Finest Detail enabled, please disable this may create a massive print file that is ...
...For photos, this setting. The Macintosh versions of these applications should be very similar in function. It is too large for the printer driver to sharpen their edges. Please refer to setup banner printing from Adobe Illustrator 8.x/9.x and CorelDRAW 9 from the PC platform. ...The following examples show how to your software documentation for low resolution text and line art to process correctly. For Windows Users, if you encounter partial/incomeplete prints while having Finest Detail enabled, please disable this may create a massive print file that is ...

Product Support Bulletin(s)
Page 6
... height (sample shows 20 W x 180 H), then click OK. 2. Insert the image you want to your software documentation for additional assistance. Mac O/S 10.3.3 system is created. 1. Windows versions of this application should be very similar in this example. In this example, we are creating a banner, which is 227 inches (Illustrators max. page...
... height (sample shows 20 W x 180 H), then click OK. 2. Insert the image you want to your software documentation for additional assistance. Mac O/S 10.3.3 system is created. 1. Windows versions of this application should be very similar in this example. In this example, we are creating a banner, which is 227 inches (Illustrators max. page...

Product Support Bulletin(s)
Page 7
When the printer setup window comes up, select your printer name and set the Roll Paper Options to: Roll Paper Banner Roll Paper Banner - Pages and click the Printer button. 5. Uncheck Auto Cut then check Save Roll Paper. 6 3. In the Copies and Pages section, click on the drop down arrow, select Roll Paper Option. No Margin ( if printing no margins) 6. Click on File, Print, click Setup, under Tiling click on the drop down arrow, select Tile Full 4.
When the printer setup window comes up, select your printer name and set the Roll Paper Options to: Roll Paper Banner Roll Paper Banner - Pages and click the Printer button. 5. Uncheck Auto Cut then check Save Roll Paper. 6 3. In the Copies and Pages section, click on the drop down arrow, select Roll Paper Option. No Margin ( if printing no margins) 6. Click on File, Print, click Setup, under Tiling click on the drop down arrow, select Tile Full 4.

Product Support Bulletin(s)
Page 8
This time click on Page Setup, you see the following screen, just click on Continue (If you back to see the window again, place a check mark on Print. This will bring you don't want to the Print window. 8. 7. Then click on Don't Show Again box). 7
This time click on Page Setup, you see the following screen, just click on Continue (If you back to see the window again, place a check mark on Print. This will bring you don't want to the Print window. 8. 7. Then click on Don't Show Again box). 7

Product Support Bulletin(s)
Page 10
Then click OK. 12. This indicates that a full image is set to portrait mode. 11. Under Paper Size, click on the drop down arrow and select the custom paper size you created (i.e. 20 X 180) orientation is tiled. 9 In the Print windows the preview pane will show 2 grids or pages.
Then click OK. 12. This indicates that a full image is set to portrait mode. 11. Under Paper Size, click on the drop down arrow and select the custom paper size you created (i.e. 20 X 180) orientation is tiled. 9 In the Print windows the preview pane will show 2 grids or pages.

Product Support Bulletin(s)
Page 19
CorelDRAW will then run a pre-flight check and will show the following window. 18 At this point, click File then Print. 8.
CorelDRAW will then run a pre-flight check and will show the following window. 18 At this point, click File then Print. 8.
Product Support Bulletin(s)
Page 30
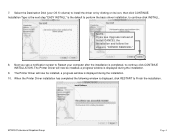
... you see a notification screen to Restart your OS X volume) to Finish the installation. EPSON Professional Graphics Group Page 4. The Printer Driver will now be installed, a progress window is displayed, click RESTART to install the driver on by clicking on its icon, then click...9. 7. Select the Destination Disk (your computer after the installation is displayed during the installation. 10. The Printer Driver will now be installed, a progress window is completed, to continue click INSTALL. NOTE: If you see Upgrade instead of Install CANCEL the installation and...
... you see a notification screen to Restart your OS X volume) to Finish the installation. EPSON Professional Graphics Group Page 4. The Printer Driver will now be installed, a progress window is displayed, click RESTART to install the driver on by clicking on its icon, then click...9. 7. Select the Destination Disk (your computer after the installation is displayed during the installation. 10. The Printer Driver will now be installed, a progress window is completed, to continue click INSTALL. NOTE: If you see Upgrade instead of Install CANCEL the installation and...
Product Support Bulletin(s)
Page 31
... you first need to register it with : Only choose an Epson selection EPSON Professional Graphics Group Page 5. TIP Copy the Print Center to Add a printer. On the Add printer window you can use the Add button or you first need to select the Epson Interface Connection the printer is attached with Print Center. 2. You can select Add...
... you first need to register it with : Only choose an Epson selection EPSON Professional Graphics Group Page 5. TIP Copy the Print Center to Add a printer. On the Add printer window you can use the Add button or you first need to select the Epson Interface Connection the printer is attached with Print Center. 2. You can select Add...

Product Support Bulletin(s)
Page 35
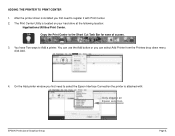
EPSON Professional Graphics Group Page 9. You can access the Epson Printer Utility from the Print Center by: 1.1 First selecting your printer from the Print Center Printer List. 1.2 Next click Configure. 1.3 Then from the new Printer List window select your printer and click OK. 2 1 3 4 1.4 From the Epson Printer Utility you can Check the Status of Ink-Paper-and the printer itself, perform print head Nozzle Checks, Clean the print head, or perform Print Head Alignments. EPSON PRINTER UTILITY 1.
EPSON Professional Graphics Group Page 9. You can access the Epson Printer Utility from the Print Center by: 1.1 First selecting your printer from the Print Center Printer List. 1.2 Next click Configure. 1.3 Then from the new Printer List window select your printer and click OK. 2 1 3 4 1.4 From the Epson Printer Utility you can Check the Status of Ink-Paper-and the printer itself, perform print head Nozzle Checks, Clean the print head, or perform Print Head Alignments. EPSON PRINTER UTILITY 1.
Product Support Bulletin(s)
Page 43
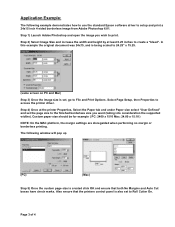
... on PC and Mac) Step 3) Once the image size is created click OK and ensure that the printers control panel is also set , go to create a "bleed". Step 4) Once at least 0.25... inches to File and Print Options. The following example demonstrates how to use the standard Epson software driver to Roll Cutter On. Page 3 of 4 Also ensure that both No Margins and Auto...Photoshop and open the image you want (taking into consideration the supported widths). Application Example: The following window will pop up (PC) (Mac) Step 5) Once the custom page size is set to setup...
... on PC and Mac) Step 3) Once the image size is created click OK and ensure that the printers control panel is also set , go to create a "bleed". Step 4) Once at least 0.25... inches to File and Print Options. The following example demonstrates how to use the standard Epson software driver to Roll Cutter On. Page 3 of 4 Also ensure that both No Margins and Auto...Photoshop and open the image you want (taking into consideration the supported widths). Application Example: The following window will pop up (PC) (Mac) Step 5) Once the custom page size is set to setup...

Product Support Bulletin(s)
Page 44
Once this is correct in the Print Options window. Page 4 of 4 If not, go back to begin imaging the document. (PC) (Mac) Step 6) Select OK to get back to the Print Options menu and verify that the custom page size is done, select Print, you will likely see the following message: Step 7) Click Proceed and Print to page setup and verify the custom page size selection.
Once this is correct in the Print Options window. Page 4 of 4 If not, go back to begin imaging the document. (PC) (Mac) Step 6) Select OK to get back to the Print Options menu and verify that the custom page size is done, select Print, you will likely see the following message: Step 7) Click Proceed and Print to page setup and verify the custom page size selection.
Product Support Bulletin(s)
Page 59
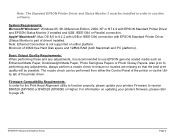
...: Ethernet Connection is not supported on updating your printers Firmware to 9.2.2 with USB or IEEE1394 connection with EPSON Standard Printer Driver and EPSON Status Monitor 3 installed and USB, IEEE1394 or Parallel connection. System Requirements: Microsoft® Windows®: Windows 95, 98, Millennium Edition, 2000, XP or NT 4.0 with EPSON Standard Printer Driver (Status Monitor is recommended to use...
...: Ethernet Connection is not supported on updating your printers Firmware to 9.2.2 with USB or IEEE1394 connection with EPSON Standard Printer Driver and EPSON Status Monitor 3 installed and USB, IEEE1394 or Parallel connection. System Requirements: Microsoft® Windows®: Windows 95, 98, Millennium Edition, 2000, XP or NT 4.0 with EPSON Standard Printer Driver (Status Monitor is recommended to use...

Product Support Bulletin(s)
Page 60
Stylus Pro 7600/9600 Printer Service Utility 8/26/02 Printer Service Utility Installation To install and run the Printer Service Utility, do the following: 1. Navigate to the EPSON Printer Service Utility and click on -screen prompts to extract the files. 3. Download the appropriate file (.exe... the installation of your computer (http://support.epson.com). 2. Click Start 2. Open the epson10465 folder from the Epson Web Site to the Trash (Macintosh). Select Programs or All Programs (Windows XP) 3. Double-click the Printer Service Utility icon to launch the program. ...
Stylus Pro 7600/9600 Printer Service Utility 8/26/02 Printer Service Utility Installation To install and run the Printer Service Utility, do the following: 1. Navigate to the EPSON Printer Service Utility and click on -screen prompts to extract the files. 3. Download the appropriate file (.exe... the installation of your computer (http://support.epson.com). 2. Click Start 2. Open the epson10465 folder from the Epson Web Site to the Trash (Macintosh). Select Programs or All Programs (Windows XP) 3. Double-click the Printer Service Utility icon to launch the program. ...

Product Support Bulletin(s)
Page 91
... height by at the printer Properties, Select the Paper tab and under Paper size select "User Defined" and set to setup and print a 24x15 inch 4-sided borderless image from Adobe Photoshop 6.01. The following example demonstrates how to use the standard Epson software driver to Roll ...print. Page 3 In this example the original document was 24x15, and is being scaled to File and Print Options. Application Example: The following window will pop up NOTE: On the MAC platform, the margin settings are disregarded when performing no margin or borderless printing. (PC) (Mac) ...
... height by at the printer Properties, Select the Paper tab and under Paper size select "User Defined" and set to setup and print a 24x15 inch 4-sided borderless image from Adobe Photoshop 6.01. The following example demonstrates how to use the standard Epson software driver to Roll ...print. Page 3 In this example the original document was 24x15, and is being scaled to File and Print Options. Application Example: The following window will pop up NOTE: On the MAC platform, the margin settings are disregarded when performing no margin or borderless printing. (PC) (Mac) ...

Product Support Bulletin(s)
Page 92
Page 4 Once this is correct in the Print Options window. (PC) (Mac) Step 6) Select OK to get back to the Print Options menu and verify that the custom page size is done, select Print, you will likely see the following message: Step 7) Click Proceed and Print to page setup and verify the custom page size selection. If not, go back to begin imaging the document.
Page 4 Once this is correct in the Print Options window. (PC) (Mac) Step 6) Select OK to get back to the Print Options menu and verify that the custom page size is done, select Print, you will likely see the following message: Step 7) Click Proceed and Print to page setup and verify the custom page size selection. If not, go back to begin imaging the document.

