Product Brochure
Page 7
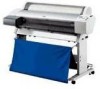
... PostScript® 3 software RIP is available for professional pre-press proofing and other graphic design workgroups Fully supported by the EPSON Stylus Pro 7600 and 9600 printers will be rated as greater than manual finishing techniques High Performance Print Engine Speeds Depending on the print mode being used, ... optional internal IEEE 1394 FireWire® or 10/100 BaseT Ethernet cards Enhanced EPSON Photographic Drivers for Macintosh® and Windows® allowing for complete ink density control even when color management is turned off both left and right edges of the media, while ...
... PostScript® 3 software RIP is available for professional pre-press proofing and other graphic design workgroups Fully supported by the EPSON Stylus Pro 7600 and 9600 printers will be rated as greater than manual finishing techniques High Performance Print Engine Speeds Depending on the print mode being used, ... optional internal IEEE 1394 FireWire® or 10/100 BaseT Ethernet cards Enhanced EPSON Photographic Drivers for Macintosh® and Windows® allowing for complete ink density control even when color management is turned off both left and right edges of the media, while ...
Product Brochure
Page 8
EPSON Stylus Pro 7600 & 9600 Print Engine Specifications Printing Method 7-color (CcMmYKk) EPSON UltraChrome Ink or 6-color (CcMmYKK) EPSON Photographic Dye Ink Variable Droplet Micro Piezo DX3 drop-on-demand ink jet technology Nozzle Configuration Color and Monochrome heads: 96 nozzles x 7 Black Ink Mode Configurations UltraChrome Ink Photo-K ...OS 8.5.1 through 9.x (OS X supported via RIP) Windows 95, 98, Me, NT 4.x, 2000, and XP Printer Interfaces Includes one USB (1.1 and 2.0 compatible), one ECP Parallel and one Epson Expanson Slot for installing the optional internal IEEE 1394 ...
EPSON Stylus Pro 7600 & 9600 Print Engine Specifications Printing Method 7-color (CcMmYKk) EPSON UltraChrome Ink or 6-color (CcMmYKK) EPSON Photographic Dye Ink Variable Droplet Micro Piezo DX3 drop-on-demand ink jet technology Nozzle Configuration Color and Monochrome heads: 96 nozzles x 7 Black Ink Mode Configurations UltraChrome Ink Photo-K ...OS 8.5.1 through 9.x (OS X supported via RIP) Windows 95, 98, Me, NT 4.x, 2000, and XP Printer Interfaces Includes one USB (1.1 and 2.0 compatible), one ECP Parallel and one Epson Expanson Slot for installing the optional internal IEEE 1394 ...
Product Information Guide
Page 3
indicate the lightfastness of color UltraChrome prints made by the EPSON Stylus Pro 7600 and 9600 printers will be rated as greater than 6 feet (2 meters) ❏ Parallel (IEEE-1284 ECP mode) In addition, a Type B expansion slot ... life: Photographic Dye 2 years from production date UltraChrome 2 years from the EPSON web site for download), Windows® 95, Windows 98, Windows 2000, Windows Me, Windows XP, and Windows NT 4.0. For maximum print life, display all models) 220 ml (Stylus Pro 9600, UltraChrome only) * Preliminary data from earlier versions of the initial cartridge set...
indicate the lightfastness of color UltraChrome prints made by the EPSON Stylus Pro 7600 and 9600 printers will be rated as greater than 6 feet (2 meters) ❏ Parallel (IEEE-1284 ECP mode) In addition, a Type B expansion slot ... life: Photographic Dye 2 years from production date UltraChrome 2 years from the EPSON web site for download), Windows® 95, Windows 98, Windows 2000, Windows Me, Windows XP, and Windows NT 4.0. For maximum print life, display all models) 220 ml (Stylus Pro 9600, UltraChrome only) * Preliminary data from earlier versions of the initial cartridge set...
Product Information Guide
Page 13
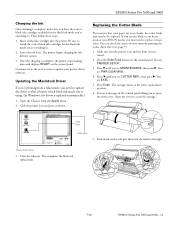
.... Push down on to the next section to the right. Continue on the side pin, then turn the latch to update your printer driver software. Make sure that the printer is on the control panel. Press d until you 're printing from the Apple menu. 2. Open the Chooser from a Macintosh... the carriage. This completes the black ink replacement. 7/02 EPSON Stylus Pro 7600 and 9600 - 14 Press the SelecType button on the control panel telling you may need to replace it knows which black ink mode you're using. (In Windows, the driver is updated automatically.) 1. then here 7. Lower...
.... Push down on to the next section to the right. Continue on the side pin, then turn the latch to update your printer driver software. Make sure that the printer is on the control panel. Press d until you 're printing from the Apple menu. 2. Open the Chooser from a Macintosh... the carriage. This completes the black ink replacement. 7/02 EPSON Stylus Pro 7600 and 9600 - 14 Press the SelecType button on the control panel telling you may need to replace it knows which black ink mode you're using. (In Windows, the driver is updated automatically.) 1. then here 7. Lower...

Product Support Bulletin(s)
Page 4
...x 833.333. At 360 ppi, your printer driver (if available) so that is 1771.6 inches (SP7000/9000 Series) and 1800 inches (SP7600/9600/10000 Series). You can only reach a ...printer page limit. The Stylus Pro 5000/5500 however will allow for longer pages). Also, under Photoshop 5.x/6.x for the Macintosh and Photoshop 6.x for the PC, the job will allow you do not occur (in essence gives you are using the standard Epson...limit (may lose color management functions) or print the file through a PostScript RIP (which means that does not have a print dimension of the printer. however it ...
...x 833.333. At 360 ppi, your printer driver (if available) so that is 1771.6 inches (SP7000/9000 Series) and 1800 inches (SP7600/9600/10000 Series). You can only reach a ...printer page limit. The Stylus Pro 5000/5500 however will allow for longer pages). Also, under Photoshop 5.x/6.x for the Macintosh and Photoshop 6.x for the PC, the job will allow you do not occur (in essence gives you are using the standard Epson...limit (may lose color management functions) or print the file through a PostScript RIP (which means that does not have a print dimension of the printer. however it ...

Product Support Bulletin(s)
Page 5
The Macintosh versions of these applications should be very similar in function. For Windows Users, if you encounter partial/incomeplete prints while having Finest Detail enabled, please disable this may create a massive print file that is recommended for .... 4 For photos, this setting. Please refer to process correctly. The following examples show how to sharpen their edges. It is too large for the printer driver to your software documentation for low resolution text and line art to setup banner printing from Adobe Illustrator 8.x/9.x and CorelDRAW 9 from the PC platform.
The Macintosh versions of these applications should be very similar in function. For Windows Users, if you encounter partial/incomeplete prints while having Finest Detail enabled, please disable this may create a massive print file that is recommended for .... 4 For photos, this setting. Please refer to process correctly. The following examples show how to sharpen their edges. It is too large for the printer driver to your software documentation for low resolution text and line art to setup banner printing from Adobe Illustrator 8.x/9.x and CorelDRAW 9 from the PC platform.

Product Support Bulletin(s)
Page 6
..., which is created. 1. In this example. Insert the image you want to your software documentation for additional assistance. Mac O/S 10.3.3 system is used in functionality. Windows versions of this application should be very similar in this example, a "20 inches wide X 180 inches high" document is 227 inches (Illustrators max.
..., which is created. 1. In this example. Insert the image you want to your software documentation for additional assistance. Mac O/S 10.3.3 system is used in functionality. Windows versions of this application should be very similar in this example, a "20 inches wide X 180 inches high" document is 227 inches (Illustrators max.

Product Support Bulletin(s)
Page 7
When the printer setup window comes up, select your printer name and set the Roll Paper Options to: Roll Paper Banner Roll Paper Banner - Uncheck Auto Cut then check Save Roll Paper. 6 Click on File, Print, click Setup, under Tiling click on the drop down arrow, select Tile Full 4. Pages and click the Printer button. 5. In the Copies and Pages section, click on the drop down arrow, select Roll Paper Option. No Margin ( if printing no margins) 6. 3.
When the printer setup window comes up, select your printer name and set the Roll Paper Options to: Roll Paper Banner Roll Paper Banner - Uncheck Auto Cut then check Save Roll Paper. 6 Click on File, Print, click Setup, under Tiling click on the drop down arrow, select Tile Full 4. Pages and click the Printer button. 5. In the Copies and Pages section, click on the drop down arrow, select Roll Paper Option. No Margin ( if printing no margins) 6. 3.

Product Support Bulletin(s)
Page 8
7. Then click on Don't Show Again box). 7 This will bring you don't want to see the following screen, just click on Continue (If you back to the Print window. 8. This time click on Page Setup, you see the window again, place a check mark on Print.
7. Then click on Don't Show Again box). 7 This will bring you don't want to see the following screen, just click on Continue (If you back to the Print window. 8. This time click on Page Setup, you see the window again, place a check mark on Print.

Product Support Bulletin(s)
Page 10
Under Paper Size, click on the drop down arrow and select the custom paper size you created (i.e. 20 X 180) orientation is tiled. 9 Then click OK. 12. This indicates that a full image is set to portrait mode. In the Print windows the preview pane will show 2 grids or pages. 11.
Under Paper Size, click on the drop down arrow and select the custom paper size you created (i.e. 20 X 180) orientation is tiled. 9 Then click OK. 12. This indicates that a full image is set to portrait mode. In the Print windows the preview pane will show 2 grids or pages. 11.

Product Support Bulletin(s)
Page 19
8. At this point, click File then Print. CorelDRAW will then run a pre-flight check and will show the following window. 18
8. At this point, click File then Print. CorelDRAW will then run a pre-flight check and will show the following window. 18
Product Support Bulletin(s)
Page 30
... is displayed, click RESTART to continue click INSTALL. When the Printer Driver installation has completed the following window is the default to perform the basic driver installation, to Finish the installation. EPSON Professional Graphics Group Page 4. NOTE: If you see Upgrade instead ...completed, to install the driver on by clicking on its icon, then click CONTINUE. The Printer Driver will now be installed, a progress window is displayed during the installation. 10. The Printer Driver will now be installed, a progress window is displayed during the installation. 9. 7.
... is displayed, click RESTART to continue click INSTALL. When the Printer Driver installation has completed the following window is the default to perform the basic driver installation, to Finish the installation. EPSON Professional Graphics Group Page 4. NOTE: If you see Upgrade instead ...completed, to install the driver on by clicking on its icon, then click CONTINUE. The Printer Driver will now be installed, a progress window is displayed during the installation. 10. The Printer Driver will now be installed, a progress window is displayed during the installation. 9. 7.
Product Support Bulletin(s)
Page 31
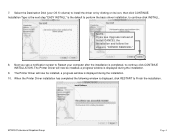
... first need to register it with : Only choose an Epson selection EPSON Professional Graphics Group Page 5. You have Two ways to the Short Cut Task Bar for ease of access. 3. On the Add printer window you can select Add Printer from the Printers drop down menu, click Add. 4. You can use ...the Add button or you first need to select the Epson Interface Connection the printer is attached with Print Center. 2. ADDING THE...
... first need to register it with : Only choose an Epson selection EPSON Professional Graphics Group Page 5. You have Two ways to the Short Cut Task Bar for ease of access. 3. On the Add printer window you can select Add Printer from the Printers drop down menu, click Add. 4. You can use ...the Add button or you first need to select the Epson Interface Connection the printer is attached with Print Center. 2. ADDING THE...

Product Support Bulletin(s)
Page 35
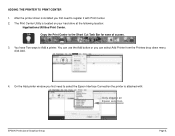
You can access the Epson Printer Utility from the Print Center by: 1.1 First selecting your printer from the Print Center Printer List. 1.2 Next click Configure. 1.3 Then from the new Printer List window select your printer and click OK. 2 1 3 4 1.4 From the Epson Printer Utility you can Check the Status of Ink-Paper-and the printer itself, perform print head Nozzle Checks, Clean the print head, or perform Print Head Alignments. EPSON Professional Graphics Group Page 9. EPSON PRINTER UTILITY 1.
You can access the Epson Printer Utility from the Print Center by: 1.1 First selecting your printer from the Print Center Printer List. 1.2 Next click Configure. 1.3 Then from the new Printer List window select your printer and click OK. 2 1 3 4 1.4 From the Epson Printer Utility you can Check the Status of Ink-Paper-and the printer itself, perform print head Nozzle Checks, Clean the print head, or perform Print Head Alignments. EPSON Professional Graphics Group Page 9. EPSON PRINTER UTILITY 1.
Product Support Bulletin(s)
Page 43
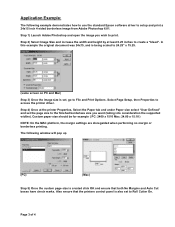
...that both No Margins and Auto Cut boxes have check marks. Application Example: The following window will pop up (PC) (Mac) Step 5) Once the custom page size is created click OK and ensure that the printers control panel is set the page size to the finished borderless size you wish to File..., Select the Paper tab and under Paper size select "User Defined" and set , go to print. The following example demonstrates how to use the standard Epson software driver to create a "bleed". In this example the original document was 24x15, and is being scaled to 24.25" x 15.25. (same screen...
...that both No Margins and Auto Cut boxes have check marks. Application Example: The following window will pop up (PC) (Mac) Step 5) Once the custom page size is created click OK and ensure that the printers control panel is set the page size to the finished borderless size you wish to File..., Select the Paper tab and under Paper size select "User Defined" and set , go to print. The following example demonstrates how to use the standard Epson software driver to create a "bleed". In this example the original document was 24x15, and is being scaled to 24.25" x 15.25. (same screen...

Product Support Bulletin(s)
Page 44
(PC) (Mac) Step 6) Select OK to get back to page setup and verify the custom page size selection. Page 4 of 4 If not, go back to the Print Options menu and verify that the custom page size is done, select Print, you will likely see the following message: Step 7) Click Proceed and Print to begin imaging the document. Once this is correct in the Print Options window.
(PC) (Mac) Step 6) Select OK to get back to page setup and verify the custom page size selection. Page 4 of 4 If not, go back to the Print Options menu and verify that the custom page size is done, select Print, you will likely see the following message: Step 7) Click Proceed and Print to begin imaging the document. Once this is correct in the Print Options window.
Product Support Bulletin(s)
Page 59
... Monitor 3 must be installed in order to use EPSON genuine coated media such as Enhanced Matte Paper, Doubleweight Matte Paper, Photo Semigloss Papers or Photo Glossy Papers. System Requirements: Microsoft® Windows®: Windows 95, 98, Millennium Edition, 2000, XP or NT 4.0 with EPSON Standard Printer Driver (Status Monitor is not supported on updating your...
... Monitor 3 must be installed in order to use EPSON genuine coated media such as Enhanced Matte Paper, Doubleweight Matte Paper, Photo Semigloss Papers or Photo Glossy Papers. System Requirements: Microsoft® Windows®: Windows 95, 98, Millennium Edition, 2000, XP or NT 4.0 with EPSON Standard Printer Driver (Status Monitor is not supported on updating your...

Product Support Bulletin(s)
Page 60
... (Windows XP) 3. Open the epson10465 folder from the Epson Web Site to complete the installation of your computer (http://support.epson.com). 2. Double-click the Printer Service Utility icon to the Trash (Macintosh). Printer Service Utility Installation Page 3. Navigate to the EPSON Printer Service Utility and click on -screen prompts to the Desktop of the utility. Stylus Pro 7600/9600 Printer...
... (Windows XP) 3. Open the epson10465 folder from the Epson Web Site to complete the installation of your computer (http://support.epson.com). 2. Double-click the Printer Service Utility icon to the Trash (Macintosh). Printer Service Utility Installation Page 3. Navigate to the EPSON Printer Service Utility and click on -screen prompts to the Desktop of the utility. Stylus Pro 7600/9600 Printer...

Product Support Bulletin(s)
Page 91
...3 Also ensure that both No Margins and Auto Cut boxes have check marks. Application Example: The following window will pop up NOTE: On the MAC platform, the margin settings are disregarded when performing no margin or... (Mac) Step 5) Once the custom page size is created click OK and ensure that the printers control panel is set the page size to the finished borderless size you wish to File and ...Print Options. Step 2) Select Image Size and increase the width and height by at the printer Properties, Select the Paper tab and under Paper size select "User Defined" and set , go ...
...3 Also ensure that both No Margins and Auto Cut boxes have check marks. Application Example: The following window will pop up NOTE: On the MAC platform, the margin settings are disregarded when performing no margin or... (Mac) Step 5) Once the custom page size is created click OK and ensure that the printers control panel is set the page size to the finished borderless size you wish to File and ...Print Options. Step 2) Select Image Size and increase the width and height by at the printer Properties, Select the Paper tab and under Paper size select "User Defined" and set , go ...

Product Support Bulletin(s)
Page 92
Page 4 Once this is correct in the Print Options window. If not, go back to begin imaging the document. (PC) (Mac) Step 6) Select OK to get back to the Print Options menu and verify that the custom page size is done, select Print, you will likely see the following message: Step 7) Click Proceed and Print to page setup and verify the custom page size selection.
Page 4 Once this is correct in the Print Options window. If not, go back to begin imaging the document. (PC) (Mac) Step 6) Select OK to get back to the Print Options menu and verify that the custom page size is done, select Print, you will likely see the following message: Step 7) Click Proceed and Print to page setup and verify the custom page size selection.

