
User Manual - Lens Options
Page 1
... performance. • Note that this product is designed for use only with EPSON multimedia projectors. • It makes it possible to increase the distance between the projector and the screen. • Please read this warning, or implementing the content incorrectly, could result in the manual. Warning Ignoring this manual thoroughly before use to avoid doing. 9
... performance. • Note that this product is designed for use only with EPSON multimedia projectors. • It makes it possible to increase the distance between the projector and the screen. • Please read this warning, or implementing the content incorrectly, could result in the manual. Warning Ignoring this manual thoroughly before use to avoid doing. 9

User Manual - Lens Options
Page 2
... Be sure to use a Phillips screwdriver that you will also need a Phillips screwdriver, and various other common tools. Before mounting the zoom lens 1-1 Safety precautions Warning Be sure to the included screwdriver, you have all the parts, as shown below, before starting. 1. Unless they are securely screwed on, they could fall...
... Be sure to use a Phillips screwdriver that you will also need a Phillips screwdriver, and various other common tools. Before mounting the zoom lens 1-1 Safety precautions Warning Be sure to the included screwdriver, you have all the parts, as shown below, before starting. 1. Unless they are securely screwed on, they could fall...
User Manual - Lens Options
Page 3
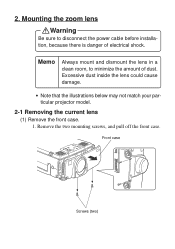
Memo Always mount and dismount the lens in a clean room, to disconnect the power cable before installation, because there is danger of dust. Front case Screws (two) 11 Excessive dust inside the lens could cause damage. • Note that the illustrations below may not match your particular projector model. 2-1 Removing the current lens (1) Remove the front case. 1. Mounting the zoom lens Warning Be sure to minimize the amount of electrical shock. Remove the two mounting screws, and pull off the front case. 2.
Memo Always mount and dismount the lens in a clean room, to disconnect the power cable before installation, because there is danger of dust. Front case Screws (two) 11 Excessive dust inside the lens could cause damage. • Note that the illustrations below may not match your particular projector model. 2-1 Removing the current lens (1) Remove the front case. 1. Mounting the zoom lens Warning Be sure to minimize the amount of electrical shock. Remove the two mounting screws, and pull off the front case. 2.

User Manual - Lens Options
Page 7
... this manual thoroughly before use to increase the distance between the projector and the screen. • Please read this warning, or implementing the content incorrectly, could result in the manual. User's Manual for use only with EPSON multimedia projectors. • It makes it possible to ensure safety and optimum performance. Safety Precautions To assure...
... this manual thoroughly before use to increase the distance between the projector and the screen. • Please read this warning, or implementing the content incorrectly, could result in the manual. User's Manual for use only with EPSON multimedia projectors. • It makes it possible to ensure safety and optimum performance. Safety Precautions To assure...
User Manual - Lens Options
Page 8
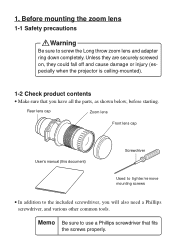
Unless they are securely screwed on, they could fall off and cause damage or injury (especially when the projector is ceiling-mounted). 1-2 Check product contents • Make sure that fits the screws properly. 10 1. Memo Be sure to use a Phillips screwdriver that you will .../remove mounting screws • In addition to screw the Long throw zoom lens and adapter ring down completely. Before mounting the zoom lens 1-1 Safety precautions Warning Be sure to the included screwdriver, you have all the parts, as shown below, before starting.
Unless they are securely screwed on, they could fall off and cause damage or injury (especially when the projector is ceiling-mounted). 1-2 Check product contents • Make sure that fits the screws properly. 10 1. Memo Be sure to use a Phillips screwdriver that you will .../remove mounting screws • In addition to screw the Long throw zoom lens and adapter ring down completely. Before mounting the zoom lens 1-1 Safety precautions Warning Be sure to the included screwdriver, you have all the parts, as shown below, before starting.

User Manual - Lens Options
Page 9
Remove the two mounting screws, and pull off the front case. Mounting the zoom lens Warning Be sure to minimize the amount of electrical shock. Excessive dust inside the lens could cause damage. • Note that the illustrations below may not match your particular projector model. 2-1 Remove the current lens (1) Remove the front case. 1. Front case Screws (two) 11 Memo Always mount and dismount the lens in a clean room, to disconnect the power cable before installation, because there is danger of dust. 2.
Remove the two mounting screws, and pull off the front case. Mounting the zoom lens Warning Be sure to minimize the amount of electrical shock. Excessive dust inside the lens could cause damage. • Note that the illustrations below may not match your particular projector model. 2-1 Remove the current lens (1) Remove the front case. 1. Front case Screws (two) 11 Memo Always mount and dismount the lens in a clean room, to disconnect the power cable before installation, because there is danger of dust. 2.
User Manual - Lens Options
Page 13
... are used safely, and to help prevent damage or injury, the following symbols are subject to ensure safety and optimum performance. Warning Ignoring this manual completely before use to change without notice. Memo Important information, such as additional explanations, key points to remember,... box systems. • Please read this warning, or implementing the content incorrectly, could result in the manual. User's Manual for ELPLR01 Rear Projector wide Lens • This wide-angle lens is designed for use only on EPSON multimedia projectors. • This lens is used in...
... are used safely, and to help prevent damage or injury, the following symbols are subject to ensure safety and optimum performance. Warning Ignoring this manual completely before use to change without notice. Memo Important information, such as additional explanations, key points to remember,... box systems. • Please read this warning, or implementing the content incorrectly, could result in the manual. User's Manual for ELPLR01 Rear Projector wide Lens • This wide-angle lens is designed for use only on EPSON multimedia projectors. • This lens is used in...
User Manual - Lens Options
Page 14
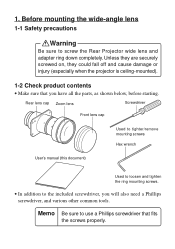
... screwed on, they could fall off and cause damage or injury (especially when the projector is ceiling-mounted). 1-2 Check product contents • Make sure that fits the screws properly. 12 Before mounting the wide-angle lens 1-1 Safety precautions Warning Be sure to the included screwdriver, you have all the parts, as shown.../remove mounting screws Hex wrench User's manual (this document) Used to loosen and tighten the ring mounting screws. • In addition to screw the Rear Projector wide lens and adapter ring down completely. 1.
... screwed on, they could fall off and cause damage or injury (especially when the projector is ceiling-mounted). 1-2 Check product contents • Make sure that fits the screws properly. 12 Before mounting the wide-angle lens 1-1 Safety precautions Warning Be sure to the included screwdriver, you have all the parts, as shown.../remove mounting screws Hex wrench User's manual (this document) Used to loosen and tighten the ring mounting screws. • In addition to screw the Rear Projector wide lens and adapter ring down completely. 1.

User Manual - Lens Options
Page 15
Remove the two mounting screws, and pull off the front case. Memo Always mount and dismount the lens in a clean room, to disconnect the power cable before installation, because there is danger of dust. Mounting the rear-projection wide-angle lens Warning Be sure to minimize the amount of electrical shock. Excessive dust inside the lens could cause damage. • Note that the illustrations below may not match your particular projector model. 2-1 Removing the current lens (1) Remove the front case. 1. Front case Screws (two) 13 2.
Remove the two mounting screws, and pull off the front case. Memo Always mount and dismount the lens in a clean room, to disconnect the power cable before installation, because there is danger of dust. Mounting the rear-projection wide-angle lens Warning Be sure to minimize the amount of electrical shock. Excessive dust inside the lens could cause damage. • Note that the illustrations below may not match your particular projector model. 2-1 Removing the current lens (1) Remove the front case. 1. Front case Screws (two) 13 2.

User Manual - Lens Options
Page 17
...Focus ring mounting screws Resolving plane correction ring mounting screws Warning Turn the power only when adjusting the lens. Adjust the lens as there is a danger of the projector or lens, as follows, before turning on the projector power. 5. The resolving plane correction ring should provide a... sharp image across the entire screen area. 6. (2) Adjusting the wide lens for a rear projector • This lens must be adjusted to...
...Focus ring mounting screws Resolving plane correction ring mounting screws Warning Turn the power only when adjusting the lens. Adjust the lens as there is a danger of the projector or lens, as follows, before turning on the projector power. 5. The resolving plane correction ring should provide a... sharp image across the entire screen area. 6. (2) Adjusting the wide lens for a rear projector • This lens must be adjusted to...

User Manual - Lens Options
Page 20
...information, such as additional explanations, key points to remember, and things to change without notice. Warning Ignoring this product is designed for use only with EPSON multimedia projectors. • Please read this manual completely before use to assure maximum performance. • Note... that this warning, or implementing the content incorrectly, could result in the manual. Safety Precautions To assure...
...information, such as additional explanations, key points to remember, and things to change without notice. Warning Ignoring this product is designed for use only with EPSON multimedia projectors. • Please read this manual completely before use to assure maximum performance. • Note... that this warning, or implementing the content incorrectly, could result in the manual. Safety Precautions To assure...
User Manual - Lens Options
Page 21
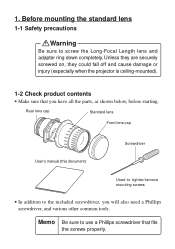
... tools. 1. Memo Be sure to the included screwdriver, you have all the parts, as shown below, before starting. Before mounting the standard lens 1-1 Safety precautions Warning Be sure to screw the Long-Focal Length lens and adapter ring down completely. Unless they are securely screwed on, they could fall off and...
... tools. 1. Memo Be sure to the included screwdriver, you have all the parts, as shown below, before starting. Before mounting the standard lens 1-1 Safety precautions Warning Be sure to screw the Long-Focal Length lens and adapter ring down completely. Unless they are securely screwed on, they could fall off and...

User Manual - Lens Options
Page 22
Memo Always mount and dismount the lens in a clean room, to disconnect the power cable before installation, because there is danger of dust. Remove the two mounting screws, and pull off the front case. Excessive dust inside the lens could cause damage. • Note that the illustrations below may not match your particular projector model. 2-1 Removing the current lens (1) Remove the front case. 1. Front case Screws (two) 11 Mounting the standard lens Warning Be sure to minimize the amount of electrical shock. 2.
Memo Always mount and dismount the lens in a clean room, to disconnect the power cable before installation, because there is danger of dust. Remove the two mounting screws, and pull off the front case. Excessive dust inside the lens could cause damage. • Note that the illustrations below may not match your particular projector model. 2-1 Removing the current lens (1) Remove the front case. 1. Front case Screws (two) 11 Mounting the standard lens Warning Be sure to minimize the amount of electrical shock. 2.

User Manual - Lens Options
Page 26
...to remember, and things to avoid doing. 9 Warning Ignoring this product is designed for the ELPLW01 Wide Zoom Lens • This wide zoom lens is used in injury or even death. User's Manual for use only with EPSON multimedia projectors. • It makes it possible to decrease... the distance between the projector and the screen. • Please read this manual completely before use to assure maximum performance. •...
...to remember, and things to avoid doing. 9 Warning Ignoring this product is designed for the ELPLW01 Wide Zoom Lens • This wide zoom lens is used in injury or even death. User's Manual for use only with EPSON multimedia projectors. • It makes it possible to decrease... the distance between the projector and the screen. • Please read this manual completely before use to assure maximum performance. •...
User Manual - Lens Options
Page 27
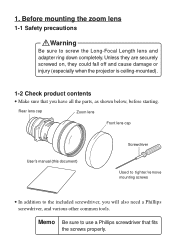
Before mounting the zoom lens 1-1 Safety precautions Warning Be sure to use a Phillips screwdriver that you will also need a Phillips screwdriver, and various other common tools. Unless they are securely screwed on, they could fall off and cause damage or injury (especially when the projector is ceiling-mounted). 1-2 Check product contents • Make...
Before mounting the zoom lens 1-1 Safety precautions Warning Be sure to use a Phillips screwdriver that you will also need a Phillips screwdriver, and various other common tools. Unless they are securely screwed on, they could fall off and cause damage or injury (especially when the projector is ceiling-mounted). 1-2 Check product contents • Make...

User Manual - Lens Options
Page 28
Remove the three mounting screws, and pull off the front case. Front case Screws (three) 11 2. Memo Always mount and dismount the lens in a clean room, to disconnect the power cable before installation, because there is danger of dust. Mounting the zoom lens Warning Be sure to minimize the amount of electrical shock. The two components will separate from each other. Excessive dust inside the lens could cause damage. • Note that the illustrations below may not match your particular projector model. 2-1 Removing the current lens (1) Remove the front case. 1.
Remove the three mounting screws, and pull off the front case. Front case Screws (three) 11 2. Memo Always mount and dismount the lens in a clean room, to disconnect the power cable before installation, because there is danger of dust. Mounting the zoom lens Warning Be sure to minimize the amount of electrical shock. The two components will separate from each other. Excessive dust inside the lens could cause damage. • Note that the illustrations below may not match your particular projector model. 2-1 Removing the current lens (1) Remove the front case. 1.
Product Information Guide
Page 4
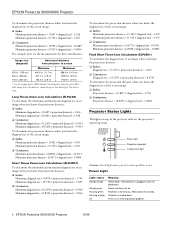
... an image size of 320 inches, the projector may be up . EPSON PowerLite 8000i/9000i Projector 10/99 EPSON PowerLite 8000i/9000i Projector To determine the projection distance when you if a serious problem occurs. Power light Projection lamp light Temperature light Caution: A red light warns you know the diagonal size of the projector indicate the projector's operating status. Long Throw Zoom Lens...
... an image size of 320 inches, the projector may be up . EPSON PowerLite 8000i/9000i Projector 10/99 EPSON PowerLite 8000i/9000i Projector To determine the projection distance when you if a serious problem occurs. Power light Projection lamp light Temperature light Caution: A red light warns you know the diagonal size of the projector indicate the projector's operating status. Long Throw Zoom Lens...
Product Information Guide
Page 7
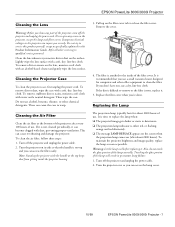
...or starts to qualified service personnel. t The projection lamp indicator is attached to warp. Turn the projector over so you 're done. EPSON PowerLite 8000i/9000i Projector Cleaning the Lens Warning: Before you clean any cover on (after every 100 hours of the lamp assembly. Dangerous electrical ...is on top and you can access the lamp cover. 10/99 EPSON PowerLite 8000i/9000i Projector - 7 Replace the filter cover when you can access the filter easily. Turn off the projector and unplug the power cord. Turn the projector on the lens, moisten a soft cloth with a soft, dry...
...or starts to qualified service personnel. t The projection lamp indicator is attached to warp. Turn the projector over so you 're done. EPSON PowerLite 8000i/9000i Projector Cleaning the Lens Warning: Before you clean any cover on (after every 100 hours of the lamp assembly. Dangerous electrical ...is on top and you can access the lamp cover. 10/99 EPSON PowerLite 8000i/9000i Projector - 7 Replace the filter cover when you can access the filter easily. Turn off the projector and unplug the power cord. Turn the projector on the lens, moisten a soft cloth with a soft, dry...
Quick Start
Page 2
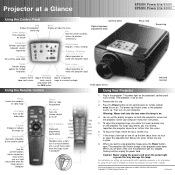
...all buttons on setting up and down . Copyright © 1999 by Epson America, Inc. Press the Power button on using the ELP Link IV software to raise or lower the adjustable feet. Warning: Never look into the lens when the lamp is not on your ...lock the feet in conjunction with the Shift button Sync +, Sync (up your User's Guide. Projector at a Glance EPSON PowerLite 8000i EPSON PowerLite 9000i Using the Control Panel Help Displays the projector's Power button online help Turns projector on . 4. To adjust the projected image size, rotate the zoom (outside) ring Video on...
...all buttons on setting up and down . Copyright © 1999 by Epson America, Inc. Press the Power button on using the ELP Link IV software to raise or lower the adjustable feet. Warning: Never look into the lens when the lamp is not on your ...lock the feet in conjunction with the Shift button Sync +, Sync (up your User's Guide. Projector at a Glance EPSON PowerLite 8000i EPSON PowerLite 9000i Using the Control Panel Help Displays the projector's Power button online help Turns projector on . 4. To adjust the projected image size, rotate the zoom (outside) ring Video on...

User Manual
Page 3
...specifically explained in the room. These conditions commonly cause problems for most infrared-controlled equipment. WARNING: The projector and its accessories come packaged in an environment containing one of the projector. Caution: When you replace the lamp, never touch the new lamp with your computer...even in plastic bags. If the remote control still does not work properly, remember you . Important Information About Your Projector Important Safety Information WARNING: Never look into the lens when it is on. the bright light can always control your bare hands; Never let...
...specifically explained in the room. These conditions commonly cause problems for most infrared-controlled equipment. WARNING: The projector and its accessories come packaged in an environment containing one of the projector. Caution: When you replace the lamp, never touch the new lamp with your computer...even in plastic bags. If the remote control still does not work properly, remember you . Important Information About Your Projector Important Safety Information WARNING: Never look into the lens when it is on. the bright light can always control your bare hands; Never let...
