
Warranty Statement - International
Page 2
... Dusseldorf Tech. INFOCOM 6a. Help Desk: 01805235470 Web Address: http://www.epson.de Greece: Pouliadis Ass. When the product was repaired or modified by optional equipment or consumables, other than original EPSON product or product of the same quality Notice: The power supply cable packed with instructions in consumables such as lamps or optional equipment b. Help Desk: 0800.523010 (note: some...
... Dusseldorf Tech. INFOCOM 6a. Help Desk: 01805235470 Web Address: http://www.epson.de Greece: Pouliadis Ass. When the product was repaired or modified by optional equipment or consumables, other than original EPSON product or product of the same quality Notice: The power supply cable packed with instructions in consumables such as lamps or optional equipment b. Help Desk: 0800.523010 (note: some...

Product Brochure
Page 1
.... PST Monday to 6 p.m. The PowerLite 9000i also comes with outstanding image quality and color saturation. Calls are usually answered within a room, corrects the angle, aspect ratio and shape of your images while retaining perfect projection from Epson, the world leader in -picture display, improved remote control, electronic zoom, five presets, discrete computer and video source selection • EPSON PrivateLineSM toll-free technical support Riveting presentations are easier...
.... PST Monday to 6 p.m. The PowerLite 9000i also comes with outstanding image quality and color saturation. Calls are usually answered within a room, corrects the angle, aspect ratio and shape of your images while retaining perfect projection from Epson, the world leader in -picture display, improved remote control, electronic zoom, five presets, discrete computer and video source selection • EPSON PrivateLineSM toll-free technical support Riveting presentations are easier...

Product Brochure
Page 2
... Video Signal RGB (PC) Video signal level Analog RGB 0.71Vp-p 75 Ω TTL RGB* Sync. EP SON POWER LITE 9000i SP ECI F IC ATION S Projection System EPSON Original Prism technology LCD Panel EPSON 1.32" Poly-Silicon TFT; Active-matrix Number of Pixels 3,932,160 pixels (1280 x 1024) x 3 panels Pixel Arrangement Stripe Lens Manual zoom /manual focus 1.4:1 zoom, F = 1.8 - 2.3, f= 49 - 69mm Keystone Correction Manual lens shift: 0 - 10 degrees Electronic +/- 20 degrees Lamp Ultra High Efficiency (UHE) 220W (user replaceable...
... Video Signal RGB (PC) Video signal level Analog RGB 0.71Vp-p 75 Ω TTL RGB* Sync. EP SON POWER LITE 9000i SP ECI F IC ATION S Projection System EPSON Original Prism technology LCD Panel EPSON 1.32" Poly-Silicon TFT; Active-matrix Number of Pixels 3,932,160 pixels (1280 x 1024) x 3 panels Pixel Arrangement Stripe Lens Manual zoom /manual focus 1.4:1 zoom, F = 1.8 - 2.3, f= 49 - 69mm Keystone Correction Manual lens shift: 0 - 10 degrees Electronic +/- 20 degrees Lamp Ultra High Efficiency (UHE) 220W (user replaceable...
Product Information Guide
Page 3
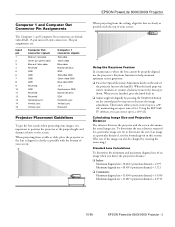
... Optical Keystone Adjustment knob on the control panel to help maintain optimum screen geometry. EPSON PowerLite 8000i/9000i Projector Computer 1 and Computer Out Connector Pin Assignments The Computer 1 and Computer Out connectors are : Input pin 1 2 3 4 5 6 7 8 9 10 11 12 13 14 15 Computer Out connector signals Red out / red video Green out / green video Blue out / blue video Reserved GND GND GND GND Reserved GND Reserved Reserved Horizontal sync Vertical sync Vertical sync Computer 1 connector signals Red video Green video Blue video...
... Optical Keystone Adjustment knob on the control panel to help maintain optimum screen geometry. EPSON PowerLite 8000i/9000i Projector Computer 1 and Computer Out Connector Pin Assignments The Computer 1 and Computer Out connectors are : Input pin 1 2 3 4 5 6 7 8 9 10 11 12 13 14 15 Computer Out connector signals Red out / red video Green out / green video Blue out / blue video Reserved GND GND GND GND Reserved GND Reserved Reserved Horizontal sync Vertical sync Vertical sync Computer 1 connector signals Red video Green video Blue video...
Product Information Guide
Page 4
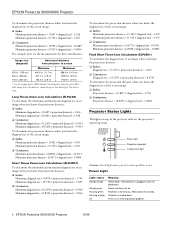
... Lens Calculations (ELPLR01) To determine the diagonal size of an image when you know the projection distance: t Inches: Diagonal size = (1.239 × projection distance) + 3.415 t Centimeters: Diagonal size = (3.1470 × projection distance) + 8.6741 To determine the projection distance when you if a serious problem occurs. Power Light Light status Steady orange Steady green Flashing green Flashing orange Off Meaning Sleep mode. (The projector is cooling down. Power light Projection lamp light Temperature light Caution: A red light warns you know the diagonal size of the screen...
... Lens Calculations (ELPLR01) To determine the diagonal size of an image when you know the projection distance: t Inches: Diagonal size = (1.239 × projection distance) + 3.415 t Centimeters: Diagonal size = (3.1470 × projection distance) + 8.6741 To determine the projection distance when you if a serious problem occurs. Power Light Light status Steady orange Steady green Flashing green Flashing orange Off Meaning Sleep mode. (The projector is cooling down. Power light Projection lamp light Temperature light Caution: A red light warns you know the diagonal size of the screen...
Product Information Guide
Page 5
... freehand line 5. Front Back Open the cover just below the Esc button to a stamp 2. Volume + Help BNC Video Resize Preset Volume 10/99 EPSON PowerLite 8000i/9000i Projector - 5 Flashing red Problem with the cooling fan or temperature sensor. The remote control buttons and commands are low.) You must also be able to use the remote control, point it to the right. EPSON PowerLite 8000i/9000i Projector 1 1 Projection Lamp Light Light status Meaning Orange and red Projection lamp needs replacing. flashing alternately Steady red Projection lamp has burned out. Freeze...
... freehand line 5. Front Back Open the cover just below the Esc button to a stamp 2. Volume + Help BNC Video Resize Preset Volume 10/99 EPSON PowerLite 8000i/9000i Projector - 5 Flashing red Problem with the cooling fan or temperature sensor. The remote control buttons and commands are low.) You must also be able to use the remote control, point it to the right. EPSON PowerLite 8000i/9000i Projector 1 1 Projection Lamp Light Light status Meaning Orange and red Projection lamp needs replacing. flashing alternately Steady red Projection lamp has burned out. Freeze...
Product Information Guide
Page 6
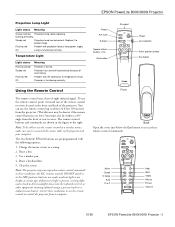
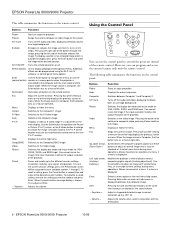
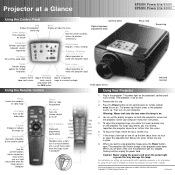
... it twice switches to the Video image. To overwrite a saved setting, move to change numeric settings during menu operations. Using the Control Panel Power Help Computer Video Menu Esc Sync. Resize Switches the display dot mode and resize mode for VGA, UXGA, SVGA, and SXGA input. Pressing the button once switches to composite video, pressing it will be programmed using the ELP Link IV software, or control panel menu options. Menu Displays or hides the menu. Esc Stops the current function. When the image source is Computer...
... it twice switches to the Video image. To overwrite a saved setting, move to change numeric settings during menu operations. Using the Control Panel Power Help Computer Video Menu Esc Sync. Resize Switches the display dot mode and resize mode for VGA, UXGA, SVGA, and SXGA input. Pressing the button once switches to composite video, pressing it will be programmed using the ELP Link IV software, or control panel menu options. Menu Displays or hides the menu. Esc Stops the current function. When the image source is Computer...
Product Information Guide
Page 7
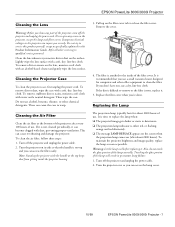
... proper ventilation. Remove the cover. 4. It is recommended that the handle is either red, or flashing orange and red alternately. To maintain the projector brightness and image quality, replace the lamp as soon as specifically explained in this Product Information Guide. Warning: Let the lamp cool before replacing it . 5. EPSON PowerLite 8000i/9000i Projector Cleaning the Lens Warning: Before you clean any cover on the surface. This can access the lamp cover. 10/99 EPSON PowerLite 8000i/9000i Projector - 7 Then...
... proper ventilation. Remove the cover. 4. It is recommended that the handle is either red, or flashing orange and red alternately. To maintain the projector brightness and image quality, replace the lamp as soon as specifically explained in this Product Information Guide. Warning: Let the lamp cool before replacing it . 5. EPSON PowerLite 8000i/9000i Projector Cleaning the Lens Warning: Before you clean any cover on the surface. This can access the lamp cover. 10/99 EPSON PowerLite 8000i/9000i Projector - 7 Then...
Product Information Guide
Page 8
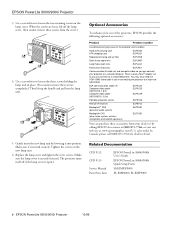
..., lift off if the lamp cover is open.) Related Documentation CPD 9112 CPD 9113 Service Manual Parts Price Lists EPSON PowerLite 8000i/9000i User's Guide EPSON PowerLite 8000i/9000i Quick Setup Poster SM-EMP8/9000 PL-EMP8000, PL-EMP9000 8 - Use a screwdriver to a high-end workstation. There is securely fastened. ELP communication cable set and computer cable so you 're connecting the projector to loosen the two retaining screws on the new lamp unit. 6. In Canada...
..., lift off if the lamp cover is open.) Related Documentation CPD 9112 CPD 9113 Service Manual Parts Price Lists EPSON PowerLite 8000i/9000i User's Guide EPSON PowerLite 8000i/9000i Quick Setup Poster SM-EMP8/9000 PL-EMP8000, PL-EMP9000 8 - Use a screwdriver to a high-end workstation. There is securely fastened. ELP communication cable set and computer cable so you 're connecting the projector to loosen the two retaining screws on the new lamp unit. 6. In Canada...
Quick Start
Page 1
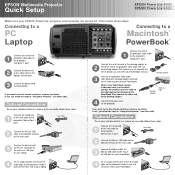
... EPSON® PowerLite® projector and computer are set correctly for the resolution you want . Connect one end of the projector video cable. (Be sure the desktop adapter DIP switches are turned off. desktop adapter vidveido-eoou-tout cacblaeble 4 Connect the power cord to use audio, connect one end of the 1 projector video cable to the projector's Computer 1 port. 2 Connect the other end to the mouse or USB port on the main cable. Note: If your laptop. 4 To use the remote control...
... EPSON® PowerLite® projector and computer are set correctly for the resolution you want . Connect one end of the projector video cable. (Be sure the desktop adapter DIP switches are turned off. desktop adapter vidveido-eoou-tout cacblaeble 4 Connect the power cord to use audio, connect one end of the 1 projector video cable to the projector's Computer 1 port. 2 Connect the other end to the mouse or USB port on the main cable. Note: If your laptop. 4 To use the remote control...
Quick Start
Page 2
... the lens when the lamp is Computer Power Starts or stops the projector RC on/off the audio-video Control panel Menu Displays or hides the menu Esc Ends the current function; BNC 5. For instructions on setting up your projector with the Shift button Sync +, Sync (up and down . Projector at a Glance EPSON PowerLite 8000i EPSON PowerLite 9000i Using the Control Panel Help Displays the projector's Power button online help Turns projector on . 4. Keystone + Adjusts a trapezoid image to turn on the projector. acts as a right mouse-click when the image source is...
... the lens when the lamp is Computer Power Starts or stops the projector RC on/off the audio-video Control panel Menu Displays or hides the menu Esc Ends the current function; BNC 5. For instructions on setting up your projector with the Shift button Sync +, Sync (up and down . Projector at a Glance EPSON PowerLite 8000i EPSON PowerLite 9000i Using the Control Panel Help Displays the projector's Power button online help Turns projector on . 4. Keystone + Adjusts a trapezoid image to turn on the projector. acts as a right mouse-click when the image source is...
User Manual
Page 3
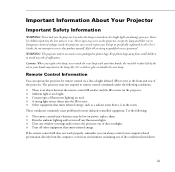
... avoid any window coverings and/or move the projector out of direct sunlight. Ë Turn off any fluorescent lights. Ë Close any risk of fluorescent lighting are used. Ë A strong light source shines into the lens when it is on the projector, except the lamp and filter covers. Caution: When you replace the lamp, never touch the new lamp with your eyes. If the remote control still does not work properly...
... avoid any window coverings and/or move the projector out of direct sunlight. Ë Turn off any fluorescent lights. Ë Close any risk of fluorescent lighting are used. Ë A strong light source shines into the lens when it is on the projector, except the lamp and filter covers. Caution: When you replace the lamp, never touch the new lamp with your eyes. If the remote control still does not work properly...
User Manual
Page 8
... the Equipment On and Off 57 Turning the Projector On and Off 58 2 Using the Projector 61 Positioning the Projector 62 Calculating Image Size and Projection Distance 65 Focusing and Positioning the Screen Image 69 Resizing the Projected Image 71 Sleep Mode 72 Controlling the Projector 72 Using the Remote Control 73 Using the Control Panel 78 Projector Status Lights 80 Power Light 81 Projection Lamp Light 81 Temperature Light 82 3 Using the Projector Menus 83 Accessing the Main Menu 85 Changing a Menu Setting 86 Video Menu (Image Source = Computer 88 viii
... the Equipment On and Off 57 Turning the Projector On and Off 58 2 Using the Projector 61 Positioning the Projector 62 Calculating Image Size and Projection Distance 65 Focusing and Positioning the Screen Image 69 Resizing the Projected Image 71 Sleep Mode 72 Controlling the Projector 72 Using the Remote Control 73 Using the Control Panel 78 Projector Status Lights 80 Power Light 81 Projection Lamp Light 81 Temperature Light 82 3 Using the Projector Menus 83 Accessing the Main Menu 85 Changing a Menu Setting 86 Video Menu (Image Source = Computer 88 viii
User Manual
Page 10
... Changing Projector Settings 118 Changing the Test Pattern 125 Specifying an Image Gamma 126 Saving Projector Setting Files 127 Opening a Projector Setting File 128 Creating a User Logo 129 Creating Cursors/Stamps 131 Exiting the Software 133 5 Maintenance 135 Cleaning the Lens 136 Cleaning the Projector Case 136 Cleaning the Air Filter 137 Replacing the Lamp 138 Transporting the Projector 141 6 Troubleshooting 143 Problems with the Projector 144 Problems with the Remote Control 147 Problems with the Image or Sound 148 7 Technical Specifications...
... Changing Projector Settings 118 Changing the Test Pattern 125 Specifying an Image Gamma 126 Saving Projector Setting Files 127 Opening a Projector Setting File 128 Creating a User Logo 129 Creating Cursors/Stamps 131 Exiting the Software 133 5 Maintenance 135 Cleaning the Lens 136 Cleaning the Projector Case 136 Cleaning the Air Filter 137 Replacing the Lamp 138 Transporting the Projector 141 6 Troubleshooting 143 Problems with the Projector 144 Problems with the Remote Control 147 Problems with the Image or Sound 148 7 Technical Specifications...
User Manual
Page 16
... the screen image, control the projector using the remote control and the control panel, and monitor the projector's operating status. and turn it . Chapter 2, "Using the Projector," explains how to position the projector relative to interpret your computer, video source, or other optional equipment; connect it to control the projector settings from the computer and use the ELP Link IV software to your projector's warning lights and gives helpful information for transporting it on how to both the PowerLite...
... the screen image, control the projector using the remote control and the control panel, and monitor the projector's operating status. and turn it . Chapter 2, "Using the Projector," explains how to position the projector relative to interpret your computer, video source, or other optional equipment; connect it to control the projector settings from the computer and use the ELP Link IV software to your projector's warning lights and gives helpful information for transporting it on how to both the PowerLite...
User Manual
Page 68
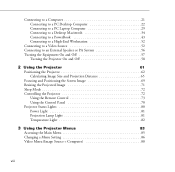
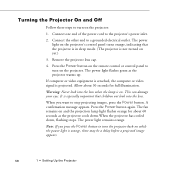
... before a projected image appears. 58 1 • Setting Up the Projector Press the Power button on the remote control or control panel to turn on the projector: 1. Connect one end of the power cord to a grounded electrical outlet. Press the Power button again. The power light on the projector's control panel turns orange, indicating that children not look into the lens. The power light flashes green as the projector cools down.When the projector has cooled down, flashing stops. A confirmation message appears. Turning the Projector On and...
... before a projected image appears. 58 1 • Setting Up the Projector Press the Power button on the remote control or control panel to turn on the projector: 1. Connect one end of the power cord to a grounded electrical outlet. Press the Power button again. The power light on the projector's control panel turns orange, indicating that children not look into the lens. The power light flashes green as the projector cools down.When the projector has cooled down, flashing stops. A confirmation message appears. Turning the Projector On and...
User Manual
Page 94
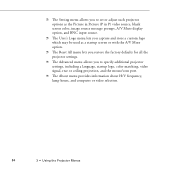
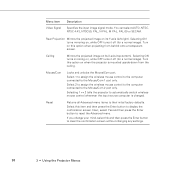
... screen color, image source message prompt, A/V Mute display option, and BNC input source. Ë The User's Logo menu lets you capture and store a custom logo which may be used as a startup screen or with the A/V Mute option. Ë The Reset All menu lets you restore the factory defaults for all the projector settings. Ë The Advanced menu allows you to specify additional projector settings, including a language, startup logo, color matching, video signal, rear or ceiling projection...
... screen color, image source message prompt, A/V Mute display option, and BNC input source. Ë The User's Logo menu lets you capture and store a custom logo which may be used as a startup screen or with the A/V Mute option. Ë The Reset All menu lets you restore the factory defaults for all the projector settings. Ë The Advanced menu allows you to specify additional projector settings, including a language, startup logo, color matching, video signal, rear or ceiling projection...
User Manual
Page 108
... switch wireless mouse control whenever the input source computer is mounted upside-down from behind onto a transparent screen. Select this option on this option when projecting from the ceiling. Select 1 to assign the wireless mouse control to the computer connected to the Mouse/Com 2 port only. Menu item Video Signal Description Specifies the input image signal mode. Turn on when the projector is changed. Mouse/Com Locks and unlocks the Mouse/Com port. Rear Projection Mirrors the projected image...
... switch wireless mouse control whenever the input source computer is mounted upside-down from behind onto a transparent screen. Select this option on this option when projecting from the ceiling. Select 1 to assign the wireless mouse control to the computer connected to the Mouse/Com 2 port only. Menu item Video Signal Description Specifies the input image signal mode. Turn on when the projector is changed. Mouse/Com Locks and unlocks the Mouse/Com port. Rear Projection Mirrors the projected image...

User Manual
Page 148
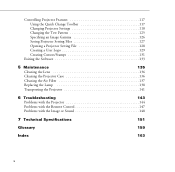
... , use ). Touching the glass portion of the filter cover. Contact your dealer or call EPSON Accessories at (800) 873-7766 in the United States and Canada to the inside of the lamp will result in premature lamp failure. 138 5 • Maintenance Warning: Let the lamp cool before replacing it . The filter is either red, or flashing orange and red alternately. Ë The message LAMP REPLACE appears on the screen...
... , use ). Touching the glass portion of the filter cover. Contact your dealer or call EPSON Accessories at (800) 873-7766 in the United States and Canada to the inside of the lamp will result in premature lamp failure. 138 5 • Maintenance Warning: Let the lamp cool before replacing it . The filter is either red, or flashing orange and red alternately. Ë The message LAMP REPLACE appears on the screen...
User Manual
Page 159
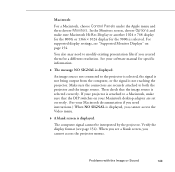
... supported display settings, see "Supported Monitor Displays" on your Macintosh desktop adapter are securely attached to the projector is selected, the signal is not being output from the computer, or the signal is selected correctly. An image source not connected to both the projector and the image source. Then check that the DIP switches on page 154. Problems with the Image or Sound 149 If your software manual for specific information. The message...
... supported display settings, see "Supported Monitor Displays" on your Macintosh desktop adapter are securely attached to the projector is selected, the signal is not being output from the computer, or the signal is selected correctly. An image source not connected to both the projector and the image source. Then check that the DIP switches on page 154. Problems with the Image or Sound 149 If your software manual for specific information. The message...

