
Technical Brief (Multimedia Projectors)
Page 5
... Change the test pattern Specify an image gamma Create a user logo Versatility-Flexible installation EPSON PowerLite projectors can be installed in a variety of ways: Front projection Rear projection Ceiling mount Ceiling mount LL L L LLL Many EPSON projectors can be installed outside of their respective owners. Customize remote control buttons to the remote control, and can also be...
... Change the test pattern Specify an image gamma Create a user logo Versatility-Flexible installation EPSON PowerLite projectors can be installed in a variety of ways: Front projection Rear projection Ceiling mount Ceiling mount LL L L LLL Many EPSON projectors can be installed outside of their respective owners. Customize remote control buttons to the remote control, and can also be...

Product Brochure
Page 2
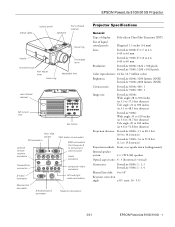
... respective companies. EPSON PowerLite 8100i Specifications Projection System EPSON original LCD prism technology Projection Method Front/rear/ceiling mount/stack LCD Size Driving method Pixel number Native resolution Aspect ratio Pixel arrangement 1.3 inches EPSON Poly-silicon TFT Active Matrix 786432 dots (1024 x 768) x 3 XGA 4:3 (supports..., PC serial cable, Mac serial cable, USB mouse cable, ELP Link, Start Here kit. Product/Acessory Part Numbers Epson PowerLite 8100i Projector Long throw zoom lens 2.4:1 wide to 4.3:1 tele Extra long throw zoom lens 4.9:1 wide to 6.6:1 tele Fixed short...
... respective companies. EPSON PowerLite 8100i Specifications Projection System EPSON original LCD prism technology Projection Method Front/rear/ceiling mount/stack LCD Size Driving method Pixel number Native resolution Aspect ratio Pixel arrangement 1.3 inches EPSON Poly-silicon TFT Active Matrix 786432 dots (1024 x 768) x 3 XGA 4:3 (supports..., PC serial cable, Mac serial cable, USB mouse cable, ELP Link, Start Here kit. Product/Acessory Part Numbers Epson PowerLite 8100i Projector Long throw zoom lens 2.4:1 wide to 4.3:1 tele Extra long throw zoom lens 4.9:1 wide to 6.6:1 tele Fixed short...
Product Information Guide
Page 1
...: PowerLite 8100i: 3.1 to 48.1 feet (0.9 to 14.6 meters) PowerLite 9100i: 3.6 to 51.8 feet (1.1 to 15.8 meters) Projection methods: Front, rear, upside-down (ceiling mount) Internal speaker system: 2 × 3 W 8 (Ω) speakers Optical aspect ratio: 4 : 3 (horizontal : vertical) Zoom ratio: PowerLite 8100i: 1 : 1.3 PowerLite 9100i: 1 : 1.4 Manual lens shift: 0 to 10° Keystone correction angle: ±30°; ratio: 10 : 5.5) 3/01 EPSON PowerLite 8100i/9100i...
...: PowerLite 8100i: 3.1 to 48.1 feet (0.9 to 14.6 meters) PowerLite 9100i: 3.6 to 51.8 feet (1.1 to 15.8 meters) Projection methods: Front, rear, upside-down (ceiling mount) Internal speaker system: 2 × 3 W 8 (Ω) speakers Optical aspect ratio: 4 : 3 (horizontal : vertical) Zoom ratio: PowerLite 8100i: 1 : 1.3 PowerLite 9100i: 1 : 1.4 Manual lens shift: 0 to 10° Keystone correction angle: ±30°; ratio: 10 : 5.5) 3/01 EPSON PowerLite 8100i/9100i...

Product Information Guide
Page 5
...215; diagonal size) - 12.9 Minimum projection distance = (2.053 × diagonal size) - 12.2 3/01 EPSON PowerLite 8100i/9100i - 5 See "Adjusting the Image Shape" on page 7. You'll also need to position the projector when the screen is within 6 feet of a grounded electrical outlet or extension cord and within 5 feet of... the image can use electronic keystone correction, your image will be changed by mounting the projector parallel to the ceiling, with its lens is placed flat, without tilting it up at least as high as shown: no...
...215; diagonal size) - 12.9 Minimum projection distance = (2.053 × diagonal size) - 12.2 3/01 EPSON PowerLite 8100i/9100i - 5 See "Adjusting the Image Shape" on page 7. You'll also need to position the projector when the screen is within 6 feet of a grounded electrical outlet or extension cord and within 5 feet of... the image can use electronic keystone correction, your image will be changed by mounting the projector parallel to the ceiling, with its lens is placed flat, without tilting it up at least as high as shown: no...

Product Information Guide
Page 12
... lens ELPLL03 Fixed short throw lens ELPLR01 Ceiling mount ELPMB31 Suspension adapter for at www.epsonstore.com (U.S. PL-EMP9100 12 - Tighten the screws on the Enter button (remote control) to reset the timer. Press Enter to select Yes. 3. sales only). EPSON PowerLite 8100i/9100i 3/01 EPSON PowerLite 8100i/9100i Projector 4. Reset the lamp timer as shown below . Press...
... lens ELPLL03 Fixed short throw lens ELPLR01 Ceiling mount ELPMB31 Suspension adapter for at www.epsonstore.com (U.S. PL-EMP9100 12 - Tighten the screws on the Enter button (remote control) to reset the timer. Press Enter to select Yes. 3. sales only). EPSON PowerLite 8100i/9100i 3/01 EPSON PowerLite 8100i/9100i Projector 4. Reset the lamp timer as shown below . Press...
Product Support Bulletin(s)
Page 1
... is applied to have a projector needing the firmware update, please contact Epson Support for some early production PowerLite 8100i and PowerLite 9100i projectors. Page 1 of a firmware update for assistance. Symptoms of the PowerLite 8100i and PowerLite 9100i projectors may experience difficulty retaining ceiling mount and rear projection menu settings. Epson Resellers should use the Epson Reseller Support Line and Epson Customers should use the...
... is applied to have a projector needing the firmware update, please contact Epson Support for some early production PowerLite 8100i and PowerLite 9100i projectors. Page 1 of a firmware update for assistance. Symptoms of the PowerLite 8100i and PowerLite 9100i projectors may experience difficulty retaining ceiling mount and rear projection menu settings. Epson Resellers should use the Epson Reseller Support Line and Epson Customers should use the...

User Manual
Page 10
... V folder for ceiling mount ELPMBAST Kensington security lock ELPSL01 4 Welcome The installation program also installs the EMP Link V User's Guide on using the program. note The EMP Link V program is optional; you want to use of the projector, EPSON provides the following optional ...accessories: Product Product number Customized carrying cases for the projector and its cables: Hard shell carrying case ATA shipping case ELPKS22 ELPKS21 Replacement lamp and...
... V folder for ceiling mount ELPMBAST Kensington security lock ELPSL01 4 Welcome The installation program also installs the EMP Link V User's Guide on using the program. note The EMP Link V program is optional; you want to use of the projector, EPSON provides the following optional ...accessories: Product Product number Customized carrying cases for the projector and its cables: Hard shell carrying case ATA shipping case ELPKS22 ELPKS21 Replacement lamp and...

User Manual
Page 20
...it so that its lens is to set the projector flat on its surface. When projecting from EPSON. (See page 4.) (If you have to raise the front of the projector, you can use the projector's keystone correction to eliminate distortion caused by mounting the projector parallel to the ceiling, with its lens at... as shown: no higher than middle of screen no higher than bottom of raising the projector's feet) to select ceiling projection in the projector's Advanced menu (see page 71). 14 Setting Up the Projector But you'll still get the best-looking picture. You won't need to position the...
...it so that its lens is to set the projector flat on its surface. When projecting from EPSON. (See page 4.) (If you have to raise the front of the projector, you can use the projector's keystone correction to eliminate distortion caused by mounting the projector parallel to the ceiling, with its lens at... as shown: no higher than middle of screen no higher than bottom of raising the projector's feet) to select ceiling projection in the projector's Advanced menu (see page 71). 14 Setting Up the Projector But you'll still get the best-looking picture. You won't need to position the...
User Manual
Page 78
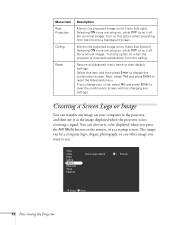
... Yes and press Enter to display the confirmation screen. Selecting ON turns mirroring on the remote, or as the image displayed when the projector is mounted upside-down from behind onto a transparent screen. Select this item and then press Enter to reset the Advanced menu. You can also ...image on , while OFF turns it off (for a normal image). The image can transfer any settings. Mirrors the projected image on when the projector is not receiving a signal. Turn this option on its Y-axis (left-right). Video Audio Effect Setting Capture Advanced About Reset All User's ...
... Yes and press Enter to display the confirmation screen. Selecting ON turns mirroring on the remote, or as the image displayed when the projector is mounted upside-down from behind onto a transparent screen. Select this item and then press Enter to reset the Advanced menu. You can also ...image on , while OFF turns it off (for a normal image). The image can transfer any settings. Mirrors the projected image on when the projector is not receiving a signal. Turn this option on its Y-axis (left-right). Video Audio Effect Setting Capture Advanced About Reset All User's ...

User Manual
Page 99
...) PowerLite 8100i: F=1.7-2.3, f=49-63 mm PowerLite 9100i: F=1.8-2.4, f=49-69 mm PowerLite 8100i: 1024 × 768 pixels PowerLite 9100i: 1280 × 1024 pixels 24 bit, 16.7 million colors PowerLite 8100i: 3200 lumens (ANSI) PowerLite 9100i: 2400 lumens (ANSI) PowerLite 8100i: 400 : 1 PowerLite 9100i: 300 : 1 PowerLite 8100i: Wide... angle: 28 to 300 inches (at 3.3 to 37.3 feet distance) Tele angle: 21 to 300 inches (at 3.1 to 48.1 feet distance) PowerLite...
...) PowerLite 8100i: F=1.7-2.3, f=49-63 mm PowerLite 9100i: F=1.8-2.4, f=49-69 mm PowerLite 8100i: 1024 × 768 pixels PowerLite 9100i: 1280 × 1024 pixels 24 bit, 16.7 million colors PowerLite 8100i: 3200 lumens (ANSI) PowerLite 9100i: 2400 lumens (ANSI) PowerLite 8100i: 400 : 1 PowerLite 9100i: 300 : 1 PowerLite 8100i: Wide... angle: 28 to 300 inches (at 3.3 to 37.3 feet distance) Tele angle: 21 to 300 inches (at 3.1 to 48.1 feet distance) PowerLite...

User Manual
Page 115
... BNC cable, 10, 11, 33, 37 format, 70 option, 70, 87 signal, 11 Box tool changing, 68 using, 54 to 55 Brightness option, 64 Brightness, projector, 93 C Cables, 5, 9 to 11 Camcorder, 1, 15 Capture menu, 60, 72 to 73 Capturing image, 72 to 74 Carrying case, 4, 9, 82 Case, cleaning, 78 ...CE Marking, 95 Ceiling mount, 4 Ceiling, hanging the projector from, 72 Cleaning air filter, 78 to 79 lens, 77 projector case, 78 Color menu option, 64 Color noise, 1 Color Setting option, 71 Comp2 Sync Termination, 71 Comp2/YCbCr button...
... BNC cable, 10, 11, 33, 37 format, 70 option, 70, 87 signal, 11 Box tool changing, 68 using, 54 to 55 Brightness option, 64 Brightness, projector, 93 C Cables, 5, 9 to 11 Camcorder, 1, 15 Capture menu, 60, 72 to 73 Capturing image, 72 to 74 Carrying case, 4, 9, 82 Case, cleaning, 78 ...CE Marking, 95 Ceiling mount, 4 Ceiling, hanging the projector from, 72 Cleaning air filter, 78 to 79 lens, 77 projector case, 78 Color menu option, 64 Color noise, 1 Color Setting option, 71 Comp2 Sync Termination, 71 Comp2/YCbCr button...

User Manual - Lens Options
Page 2
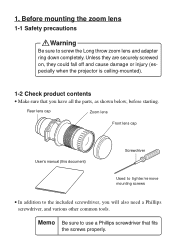
Rear lens cap Zoom lens Front lens cap User's manual (this document) Screwdriver Used to tighter/remove mounting screws • In addition to screw the Long-Focal Length lens and adapter ring down completely. Memo Be sure to use a Phillips screwdriver... they are securely screwed on, they could fall off and cause damage or injury (especially when the projector is ceiling-mounted). 1-2 Check product contents • Make sure that fits the screws properly. 10 Before mounting the zoom lens 1-1 Safety precautions Warning Be sure to the included screwdriver, you have all the parts...
Rear lens cap Zoom lens Front lens cap User's manual (this document) Screwdriver Used to tighter/remove mounting screws • In addition to screw the Long-Focal Length lens and adapter ring down completely. Memo Be sure to use a Phillips screwdriver... they are securely screwed on, they could fall off and cause damage or injury (especially when the projector is ceiling-mounted). 1-2 Check product contents • Make sure that fits the screws properly. 10 Before mounting the zoom lens 1-1 Safety precautions Warning Be sure to the included screwdriver, you have all the parts...
User Manual - Lens Options
Page 3
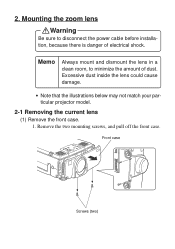
Memo Always mount and dismount the lens in a clean room, to disconnect the power cable before installation, because there is danger of dust. Remove the two mounting screws, and pull off the front case. Front case Screws (two) 11 Mounting the zoom lens Warning Be sure to minimize the amount of electrical shock. Excessive dust inside the lens could cause damage. • Note that the illustrations below may not match your particular projector model. 2-1 Removing the current lens (1) Remove the front case. 1. 2.
Memo Always mount and dismount the lens in a clean room, to disconnect the power cable before installation, because there is danger of dust. Remove the two mounting screws, and pull off the front case. Front case Screws (two) 11 Mounting the zoom lens Warning Be sure to minimize the amount of electrical shock. Excessive dust inside the lens could cause damage. • Note that the illustrations below may not match your particular projector model. 2-1 Removing the current lens (1) Remove the front case. 1. 2.

User Manual - Lens Options
Page 4
Be sure that the seal reading "UPPER" is on top. Use the enclosed screwdriver to mount the zoom lens with the four mounting screws. Remove the rear lens cap. 2. Use the enclosed screwdriver to remove the four mounting screws, and dismount the current lens. Current lens 2-2 Mounting the zoom lens (1) Mounting the zoom lens 1. Seal Rear lens cap 12 (2) Remove the current lens. 1.
Be sure that the seal reading "UPPER" is on top. Use the enclosed screwdriver to mount the zoom lens with the four mounting screws. Remove the rear lens cap. 2. Use the enclosed screwdriver to remove the four mounting screws, and dismount the current lens. Current lens 2-2 Mounting the zoom lens (1) Mounting the zoom lens 1. Seal Rear lens cap 12 (2) Remove the current lens. 1.
User Manual - Lens Options
Page 5
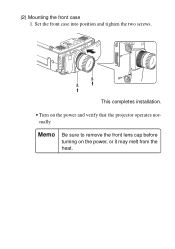
(2) Mounting the front case 1. Set the front case into position and tighten the two screws. Memo Be sure to remove the front lens cap before turning on the power and verify that the projector operates normally. This completes installation. • Turn on the power, or it may melt from the heat. 13
(2) Mounting the front case 1. Set the front case into position and tighten the two screws. Memo Be sure to remove the front lens cap before turning on the power and verify that the projector operates normally. This completes installation. • Turn on the power, or it may melt from the heat. 13

User Manual - Lens Options
Page 6
f number 4. Zoom lens specifications 4-1 Lens specifications 1. Zoom ratio 3. Mass 68.3 to 116.2 mm 1.7 x 2.14 to 2.98 60 to 300 inches 2100 g 4-2 Appearance with zoom lens mounted About 505mm 15 4. Focal length 2. Projection size 5.
f number 4. Zoom lens specifications 4-1 Lens specifications 1. Zoom ratio 3. Mass 68.3 to 116.2 mm 1.7 x 2.14 to 2.98 60 to 300 inches 2100 g 4-2 Appearance with zoom lens mounted About 505mm 15 4. Focal length 2. Projection size 5.
User Manual - Lens Options
Page 8
1. Rear lens cap Zoom lens Front lens cap User's manual (this document) Screwdriver Used to tighter/remove mounting screws • In addition to screw the Long throw zoom lens and adapter ring down completely. Memo Be sure to use a Phillips screwdriver ... they are securely screwed on, they could fall off and cause damage or injury (especially when the projector is ceiling-mounted). 1-2 Check product contents • Make sure that fits the screws properly. 10 Before mounting the zoom lens 1-1 Safety precautions Warning Be sure to the included screwdriver, you have all the parts...
1. Rear lens cap Zoom lens Front lens cap User's manual (this document) Screwdriver Used to tighter/remove mounting screws • In addition to screw the Long throw zoom lens and adapter ring down completely. Memo Be sure to use a Phillips screwdriver ... they are securely screwed on, they could fall off and cause damage or injury (especially when the projector is ceiling-mounted). 1-2 Check product contents • Make sure that fits the screws properly. 10 Before mounting the zoom lens 1-1 Safety precautions Warning Be sure to the included screwdriver, you have all the parts...

User Manual - Lens Options
Page 9
Remove the two mounting screws, and pull off the front case. Excessive dust inside the lens could cause damage. • Note that the illustrations below may not match your particular projector model. 2-1 Remove the current lens (1) Remove the front case. 1. Mounting the zoom lens Warning Be sure to minimize the amount of electrical shock. Front case Screws (two) 11 Memo Always mount and dismount the lens in a clean room, to disconnect the power cable before installation, because there is danger of dust. 2.
Remove the two mounting screws, and pull off the front case. Excessive dust inside the lens could cause damage. • Note that the illustrations below may not match your particular projector model. 2-1 Remove the current lens (1) Remove the front case. 1. Mounting the zoom lens Warning Be sure to minimize the amount of electrical shock. Front case Screws (two) 11 Memo Always mount and dismount the lens in a clean room, to disconnect the power cable before installation, because there is danger of dust. 2.

User Manual - Lens Options
Page 10
Remove the rear lens cap. 2. Use the enclosed screwdriver to remove the four mounting screws, and dismount the current lens. Use the enclosed screwdriver to mount the zoom lens with the four mounting screws. Current lens 2-2 Mounting the zoom lens (1) Mounting the zoom lens 1. Be sure that the seal reading "UPPER" is on top. Seal Rear lens cap 12 (2) Remove the current lens. 1.
Remove the rear lens cap. 2. Use the enclosed screwdriver to remove the four mounting screws, and dismount the current lens. Use the enclosed screwdriver to mount the zoom lens with the four mounting screws. Current lens 2-2 Mounting the zoom lens (1) Mounting the zoom lens 1. Be sure that the seal reading "UPPER" is on top. Seal Rear lens cap 12 (2) Remove the current lens. 1.

User Manual - Lens Options
Page 11
Set the front case into position and tighten the two screws. This completes installation. • Turn on the power, or it may melt from the heat. 13 Memo Be sure to remove the front lens cap before turning on the power and verify that the projector operates normally. (2) Mounting the front case 1.
Set the front case into position and tighten the two screws. This completes installation. • Turn on the power, or it may melt from the heat. 13 Memo Be sure to remove the front lens cap before turning on the power and verify that the projector operates normally. (2) Mounting the front case 1.

