Printer Guide
Page 5
... Safety Instructions 13 Ink Cartridge Safety Instructions 15 Printer Parts 16 1 Setting Up the Printer Unpacking and Assembling the Epson Stylus Pro 7880 17 Unpacking and Assembling the Stand 18 Unpacking the Printer 20 Mounting the Printer on the Stand 22 Attaching the Paper Basket 25 Unpacking and Assembling the Epson Stylus Pro 9880 27 Unpacking and Assembling the Stand 28...
... Safety Instructions 13 Ink Cartridge Safety Instructions 15 Printer Parts 16 1 Setting Up the Printer Unpacking and Assembling the Epson Stylus Pro 7880 17 Unpacking and Assembling the Stand 18 Unpacking the Printer 20 Mounting the Printer on the Stand 22 Attaching the Paper Basket 25 Unpacking and Assembling the Epson Stylus Pro 9880 27 Unpacking and Assembling the Stand 28...

Printer Guide
Page 11
... more recommended) • At least 30GB of professional printing products through Friday. Visit Epson's support website at www.proimaging.epson.com (U.S. Macintosh System Requirements To use your printer in either a stand-alone or per-to common problems. You can purchase optional equipment...ID number, which is included with the Epson Preferred Limited Warranty Plan information that came with your questions. You can download drivers, firmware, and documentation, get FAQs and troubleshooting advice, or e-mail Epson with your printer. sales), www.epson.ca (Canadian sales), or call 800...
... more recommended) • At least 30GB of professional printing products through Friday. Visit Epson's support website at www.proimaging.epson.com (U.S. Macintosh System Requirements To use your printer in either a stand-alone or per-to common problems. You can purchase optional equipment...ID number, which is included with the Epson Preferred Limited Warranty Plan information that came with your questions. You can download drivers, firmware, and documentation, get FAQs and troubleshooting advice, or e-mail Epson with your printer. sales), www.epson.ca (Canadian sales), or call 800...

Printer Guide
Page 17
... using the Epson Stylus Pro 7880: Note: When choosing a place for the printer, leave adequate room for a network Unpacking and Assembling the Epson Stylus Pro 7880 WARNING: Two people are required to set up and use the printer. Follow these steps to assemble your computer and a network • Installing the printer software for Macintosh or Windows • Updating the printer firmware • Configuring...
... using the Epson Stylus Pro 7880: Note: When choosing a place for the printer, leave adequate room for a network Unpacking and Assembling the Epson Stylus Pro 7880 WARNING: Two people are required to set up and use the printer. Follow these steps to assemble your computer and a network • Installing the printer software for Macintosh or Windows • Updating the printer firmware • Configuring...

Printer Guide
Page 43
... install the software for Windows: 1. Read the license agreement and click Agree. The installer starts automatically. 4. Insert the printer software CD-ROM in the Printer List: 12. Close the Printer Setup Utility. Note: If you want to install or run various installation programs, select Continue, Continue Anyway, or Install...this screen: 45 Make sure your computer. 3. Installing the Software for Windows Follow these steps to update your computer. Turn on your printer is turned off. 2. Setting Up the Printer | 45 You see your printer in your printer firmware, if necessary.
... install the software for Windows: 1. Read the license agreement and click Agree. The installer starts automatically. 4. Insert the printer software CD-ROM in the Printer List: 12. Close the Printer Setup Utility. Note: If you want to install or run various installation programs, select Continue, Continue Anyway, or Install...this screen: 45 Make sure your computer. 3. Installing the Software for Windows Follow these steps to update your computer. Turn on your printer is turned off. 2. Setting Up the Printer | 45 You see your printer in your printer firmware, if necessary.

Printer Guide
Page 44
... click Next again. 6. Click your printer with Epson, then remove the printer software CD-ROM. Tip: For best results, use a USB connection when you see a Found New Hardware Wizard screen, select No, not this screen: Note: With Windows XP, if you created for a newer version of firmware on your printer, if necessary. 46 Click the...
... click Next again. 6. Click your printer with Epson, then remove the printer software CD-ROM. Tip: For best results, use a USB connection when you see a Found New Hardware Wizard screen, select No, not this screen: Note: With Windows XP, if you created for a newer version of firmware on your printer, if necessary. 46 Click the...

Printer Guide
Page 45
...the on-screen guide. Updating the Firmware 1. When done, press the l button. Visit Epson's support website at epson.com/support and select your desktop. Caution: Don't turn off the printer while the firmware is selected. 3. Make sure your printer is turned on using the LFP Remote...product. 2. Make sure your printer. 6. Click one of the EPSON LFP Remote Panel utility. If the firmware version of the file is newer, click Update to start the firmware updating process. (If it . 2. Setting Up the Printer | 47 Checking the Current Firmware Version 1. Click Drivers and ...
...the on-screen guide. Updating the Firmware 1. When done, press the l button. Visit Epson's support website at epson.com/support and select your desktop. Caution: Don't turn off the printer while the firmware is selected. 3. Make sure your printer is turned on using the LFP Remote...product. 2. Make sure your printer. 6. Click one of the EPSON LFP Remote Panel utility. If the firmware version of the file is newer, click Update to start the firmware updating process. (If it . 2. Setting Up the Printer | 47 Checking the Current Firmware Version 1. Click Drivers and ...

Printer Guide
Page 46
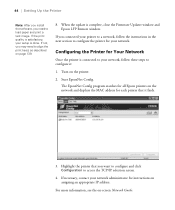
..., your network, follow the instructions in the next section to configure the printer for your network administrator for Your Network Once the printer is connected to your setup is complete, close the Firmware Updater window and Epson LFP Remote window. Configuring the Printer for instructions on assigning an appropriate IP address. When the update is...
..., your network, follow the instructions in the next section to configure the printer for your network administrator for Your Network Once the printer is connected to your setup is complete, close the Firmware Updater window and Epson LFP Remote window. Configuring the Printer for instructions on assigning an appropriate IP address. When the update is...

Printer Guide
Page 118
... or maintenance tank capacity remaining E[**** ]F = 80-61% E[*** ]F = 60-41% E[** ]F = 40-21% E[* ]F = 20-11% % = less than 10% of the following: • To check the firmware version, press Menu again. Printing Status Information The status check sheet shows some of the current default settings, the amount of pages that can replace... Status Information 1. Press d to highlight TEST PRINT, then press Menu. 4. Press to highlight PRINTABLE PAGES, then press Menu. 136 | Maintaining and Transporting the Printer Note: You can be replaced by an authorized Epson service technician.
... or maintenance tank capacity remaining E[**** ]F = 80-61% E[*** ]F = 60-41% E[** ]F = 40-21% E[* ]F = 20-11% % = less than 10% of the following: • To check the firmware version, press Menu again. Printing Status Information The status check sheet shows some of the current default settings, the amount of pages that can replace... Status Information 1. Press d to highlight TEST PRINT, then press Menu. 4. Press to highlight PRINTABLE PAGES, then press Menu. 136 | Maintaining and Transporting the Printer Note: You can be replaced by an authorized Epson service technician.
Printer Guide
Page 149
... INSTALL INK CARTRIDGE cartridge is installed. see page 46 for your printer. Damaged data was sent to select YES. Close the front cover. CLOSE COVER F/W INSTALL ERROR UPDATE FAILED RESTART THE PRINTER Firmware update failed. see page 144. 169 INK CARTRIDGE NON-GENUINE CARTRIDGE...! INK CARTRIDGE PLEASE USE GENUINE EPSON INK CARTRIDGES A non-genuine ink cartridge is displayed on the LCD display; ...
... INSTALL INK CARTRIDGE cartridge is installed. see page 46 for your printer. Damaged data was sent to select YES. Close the front cover. CLOSE COVER F/W INSTALL ERROR UPDATE FAILED RESTART THE PRINTER Firmware update failed. see page 144. 169 INK CARTRIDGE NON-GENUINE CARTRIDGE...! INK CARTRIDGE PLEASE USE GENUINE EPSON INK CARTRIDGES A non-genuine ink cartridge is displayed on the LCD display; ...
Printer Guide
Page 170
..., 10 to 11 help, 11 media, 47 to 48 Preferred Limited Warranty Plan, 11 Epson NetConfig, 42, 46 Error messages, 148 to 152 Error notification, Windows, 115 to 116 Ethernet port, 12, 40, 164 170 F Faint prints, 154 Firmware, updating, 44 to 46 Flip Horizontal setting Mac OS X, 78 problems, 157 G Gaps... Alignment menu, 125 Head unit (print head), checking status, 117 to 120 Heavy media cutting, 54 to 55 loading, 58 to 60 Height of printer, 164 Help, Epson, 11 Hex dump, 134 to 136 High Speed Copies setting, 114 High Speed setting Mac OS X, 78 Windows, 93 Humidity requirements, 163 I ICM setting...
..., 10 to 11 help, 11 media, 47 to 48 Preferred Limited Warranty Plan, 11 Epson NetConfig, 42, 46 Error messages, 148 to 152 Error notification, Windows, 115 to 116 Ethernet port, 12, 40, 164 170 F Faint prints, 154 Firmware, updating, 44 to 46 Flip Horizontal setting Mac OS X, 78 problems, 157 G Gaps... Alignment menu, 125 Head unit (print head), checking status, 117 to 120 Heavy media cutting, 54 to 55 loading, 58 to 60 Height of printer, 164 Help, Epson, 11 Hex dump, 134 to 136 High Speed Copies setting, 114 High Speed setting Mac OS X, 78 Windows, 93 Humidity requirements, 163 I ICM setting...

Printer Guide
Page 173
..., improving in Windows, 114 Printable area, 167 Printable pages, checking, 118 Index | 173 Printer cable, 12, 40 checking status, 113 to 116, 117 to 121 cleaning, 141 connecting, 40 default settings, restoring, 134 to 136 dimensions, 164 firmware update, 44 to 46 maintaining, 117 to 142 monitoring, 113 to 116, 120 to...
..., improving in Windows, 114 Printable area, 167 Printable pages, checking, 118 Index | 173 Printer cable, 12, 40 checking status, 113 to 116, 117 to 121 cleaning, 141 connecting, 40 default settings, restoring, 134 to 136 dimensions, 164 firmware update, 44 to 46 maintaining, 117 to 142 monitoring, 113 to 116, 120 to...
Product Information Guide
Page 5
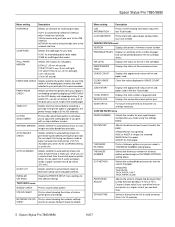
... top or bottom margins. PAPER SKEW CHECK Selects whether the printer alerts you see white lines on the LCD display and stopping printing. INK LEVEL Displays the status of pages printed. Epson Stylus Pro 7880/9880 Menu setting Description INTERFACE Selects an interface for the paper...NARROW for thin paper WIDEST for thick paper THICKNESS PATTERN Prints a thickness patterns so you have created PRINTER STATUS menu VERSION Displays the printer's firmware version number. Do not select ON if using the settings below . SERVICE LIFE Displays the service life ...
... top or bottom margins. PAPER SKEW CHECK Selects whether the printer alerts you see white lines on the LCD display and stopping printing. INK LEVEL Displays the status of pages printed. Epson Stylus Pro 7880/9880 Menu setting Description INTERFACE Selects an interface for the paper...NARROW for thin paper WIDEST for thick paper THICKNESS PATTERN Prints a thickness patterns so you have created PRINTER STATUS menu VERSION Displays the printer's firmware version number. Do not select ON if using the settings below . SERVICE LIFE Displays the service life ...

Product Information Guide
Page 11
... software is installed, run the EPSON LFP Remote Panel utility to check your printer's firmware ROM version and update it if necessary. Check back regularly to spill ink from the maintenance tank when removing it carefully. 4. Epson Stylus Pro 7880/9880 Caution: Be careful not to maintain compatibility with the new tank. 5. Epson Stylus Pro 7880/9880 10/07 Place the...
... software is installed, run the EPSON LFP Remote Panel utility to check your printer's firmware ROM version and update it if necessary. Check back regularly to spill ink from the maintenance tank when removing it carefully. 4. Epson Stylus Pro 7880/9880 Caution: Be careful not to maintain compatibility with the new tank. 5. Epson Stylus Pro 7880/9880 10/07 Place the...
User's Guide
Page 5
... Safety Instructions 15 Ink Cartridge Safety Instructions 17 Printer Parts 18 1 Setting Up the Printer Unpacking and Assembling the Epson Stylus Pro 7880 19 Unpacking and Assembling the Stand 20 Unpacking the Printer 22 Mounting the Printer on the Stand 24 Attaching the Paper Basket 27 Unpacking and Assembling the Epson Stylus Pro 9880 29 Unpacking and Assembling the Stand 30...
... Safety Instructions 15 Ink Cartridge Safety Instructions 17 Printer Parts 18 1 Setting Up the Printer Unpacking and Assembling the Epson Stylus Pro 7880 19 Unpacking and Assembling the Stand 20 Unpacking the Printer 22 Mounting the Printer on the Stand 24 Attaching the Paper Basket 27 Unpacking and Assembling the Epson Stylus Pro 9880 29 Unpacking and Assembling the Stand 30...

User's Guide
Page 13
.... You can download drivers, firmware, and documentation, get FAQs and troubleshooting advice, or e-mail Epson with your printer. Days and hours of support are subject to 6 PM, Pacific Time, Monday through the Epson PreferredSM Limited Warranty Plan. Or you can purchase optional equipment and genuine Epson ink and paper from an Epson Professional Imaging Authorized Reseller...
.... You can download drivers, firmware, and documentation, get FAQs and troubleshooting advice, or e-mail Epson with your printer. Days and hours of support are subject to 6 PM, Pacific Time, Monday through the Epson PreferredSM Limited Warranty Plan. Or you can purchase optional equipment and genuine Epson ink and paper from an Epson Professional Imaging Authorized Reseller...

User's Guide
Page 19
... Windows • Updating the printer firmware • Configuring the printer for easy access and ventilation. 19 Chapter 1: Setting Up the Printer This chapter includes the following illustration shows the minimum space required for using the Epson Stylus Pro 7880: Note: When choosing a place for the printer, leave adequate room for a network Unpacking and Assembling the Epson Stylus Pro 7880 WARNING: Two people are...
... Windows • Updating the printer firmware • Configuring the printer for easy access and ventilation. 19 Chapter 1: Setting Up the Printer This chapter includes the following illustration shows the minimum space required for using the Epson Stylus Pro 7880: Note: When choosing a place for the printer, leave adequate room for a network Unpacking and Assembling the Epson Stylus Pro 7880 WARNING: Two people are...

User's Guide
Page 42
Updating Your Printer Firmware To keep your printer features and functionality up to date, you have a standard, shielded cable 10 feet (6 m) long or less. To connect to a network hub, you need an RJ-.... To connect directly to your computer's network interface, you need a standard RJ-45 CAT-6 network cable. Plug the other end of firmware on the Epson support site and update your printer, if necessary. 42 For USB connection, make sure your system has the appropriate port and you should check for a newer version of...
Updating Your Printer Firmware To keep your printer features and functionality up to date, you have a standard, shielded cable 10 feet (6 m) long or less. To connect to a network hub, you need an RJ-.... To connect directly to your computer's network interface, you need a standard RJ-45 CAT-6 network cable. Plug the other end of firmware on the Epson support site and update your printer, if necessary. 42 For USB connection, make sure your system has the appropriate port and you should check for a newer version of...

User's Guide
Page 43
... to update.) 43 Press the d button until PRINTER STATUS is selected. 3. Click the EPSON LFP Remote Panel icon on , its LCD displays Ready, and it . 2. Make sure your printer. 6. You see the LFP Remote Panel. Make sure your printer is turned on your product. 2. If the firmware version of the Update buttons. Press Menu again...
... to update.) 43 Press the d button until PRINTER STATUS is selected. 3. Click the EPSON LFP Remote Panel icon on , its LCD displays Ready, and it . 2. Make sure your printer. 6. You see the LFP Remote Panel. Make sure your printer is turned on your product. 2. If the firmware version of the Update buttons. Press Menu again...
User's Guide
Page 44
Start EpsonNet Config. If necessary, contact your network. 44 | Setting Up the Printer Note: After you install the software, you may need to your setup is complete, close the Firmware Updater window and Epson LFP Remote window. If the print quality is satisfactory, your network, follow the... instructions in the next section to configure the printer for your network administrator for instructions on the network and...
Start EpsonNet Config. If necessary, contact your network. 44 | Setting Up the Printer Note: After you install the software, you may need to your setup is complete, close the Firmware Updater window and Epson LFP Remote window. If the print quality is satisfactory, your network, follow the... instructions in the next section to configure the printer for your network administrator for instructions on the network and...

User's Guide
Page 132
...l button. • To check the number of various printer parts. 1. 132 | Maintaining and Transporting the Printer Note: You can be replaced by an authorized Epson service technician. Press the Menu button. 3. Do one of ink remaining in the printer. 2. Other printer parts need to highlight TEST PRINT, then press Menu. ... The status check sheet shows some of the current default settings, the amount of the following: • To check the firmware version, press Menu again. Make sure paper is loaded in each ink cartridge, press d to start printing. Press the Menu button. 2.
...l button. • To check the number of various printer parts. 1. 132 | Maintaining and Transporting the Printer Note: You can be replaced by an authorized Epson service technician. Press the Menu button. 3. Do one of ink remaining in the printer. 2. Other printer parts need to highlight TEST PRINT, then press Menu. ... The status check sheet shows some of the current default settings, the amount of the following: • To check the firmware version, press Menu again. Make sure paper is loaded in each ink cartridge, press d to start printing. Press the Menu button. 2.


