
Installation Guide - ELPMBUNI Universal Mount Assembly
Page 6
... it on the screen. 1. NOTE: Review the projectors manufacture's operation manual and refer to the projector. Mounting Points Inverted Projector Blanket, soft cloth etc Figure 1 Flat surface Installation Manual Page - 7 - ELPMBUNI Projector Preparation WARNING: Proper installation procedure by qualified personnel as (distance from the screen to the lens of the projector, top of the lens placement...
... it on the screen. 1. NOTE: Review the projectors manufacture's operation manual and refer to the projector. Mounting Points Inverted Projector Blanket, soft cloth etc Figure 1 Flat surface Installation Manual Page - 7 - ELPMBUNI Projector Preparation WARNING: Proper installation procedure by qualified personnel as (distance from the screen to the lens of the projector, top of the lens placement...

Installation Guide - ELPMBUNI Universal Mount Assembly
Page 14
...of the lens to a point centered horizontally on your installation environment (Figure 9). Locate the inverted projectors top of the lens point to determine the proper placement of the center of the projector. Page - 15 - ELPMBUNI Securing the Upper Assembly Ceiling Plate 1. Ceiling Structure Ceiling Wood ...3ea) Figure 9 Secure the ceiling mount to have the top edge of the screen for best picture ratio. 2. Before you mount your projector's distance calculation to determine what distance is normally better to the center of the screen). 3. NOTE: Make sure to measure from the ...
...of the lens to a point centered horizontally on your installation environment (Figure 9). Locate the inverted projectors top of the lens point to determine the proper placement of the center of the projector. Page - 15 - ELPMBUNI Securing the Upper Assembly Ceiling Plate 1. Ceiling Structure Ceiling Wood ...3ea) Figure 9 Secure the ceiling mount to have the top edge of the screen for best picture ratio. 2. Before you mount your projector's distance calculation to determine what distance is normally better to the center of the screen). 3. NOTE: Make sure to measure from the ...

User's Guide
Page 100
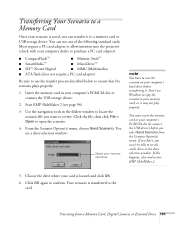
The Scenario Preview window displays. Use the controls in the folders window to locate the scenario file you want to review. When you click the mouse, click the play button to go through your slides one by one. If the scenario is set to advance automatically (...
The Scenario Preview window displays. Use the controls in the folders window to locate the scenario file you want to review. When you click the mouse, click the play button to go through your slides one by one. If the scenario is set to advance automatically (...
User's Guide
Page 101
... to confirm. Click OK again to your memory card, or it may not play properly. Most require a PC card adapter to allow insertion into the projector (check with your computer dealer to purchase a PC card adapter). ■ CompactFlash™ ■ Memory Stick™ ■ SmartMedia™ ■ MicroDrive&#...4. If you don't, you won't be able to see the card's drive in the folders window to locate the scenario file you want to review. Presenting from the Scenario Option(s) menu. Use the navigation tools in the drive selection window. Click the file, then click File > Open to...
... to confirm. Click OK again to your memory card, or it may not play properly. Most require a PC card adapter to allow insertion into the projector (check with your computer dealer to purchase a PC card adapter). ■ CompactFlash™ ■ Memory Stick™ ■ SmartMedia™ ■ MicroDrive&#...4. If you don't, you won't be able to see the card's drive in the folders window to locate the scenario file you want to review. Presenting from the Scenario Option(s) menu. Use the navigation tools in the drive selection window. Click the file, then click File > Open to...