Operation Guide - EMP Monitor v4.30
Page 2
s [ (name) ] "(name)" Timer Indicates a page where a related topic or a more detailed explanation is provided. Indicates the name of the buttons or items on the remote control or the control panel. Timer Settings. Example: Select "Timer" - Example: Esc button Indicates the name of the buttons on EMP Monitor. 2 Meanings of symbols used The following table shows the symbols used in this manual, along with descriptions of what they mean. "Timer Settings". Select Timer -
s [ (name) ] "(name)" Timer Indicates a page where a related topic or a more detailed explanation is provided. Indicates the name of the buttons or items on the remote control or the control panel. Timer Settings. Example: Select "Timer" - Example: Esc button Indicates the name of the buttons on EMP Monitor. 2 Meanings of symbols used The following table shows the symbols used in this manual, along with descriptions of what they mean. "Timer Settings". Select Timer -
Operation Guide - EMP Monitor v4.30
Page 3
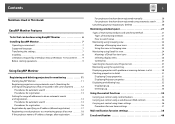
... search 13 Procedures for registration 15 Registration by specifying an IP address (Manual registration 17 Registering several projectors to a monitoring group all at once 18 If the projector name or IP address changes after registration 20 For projectors that have been registered manually 20 For projectors that have been registered using automatic search 20 Cancelling (deleting...
... search 13 Procedures for registration 15 Registration by specifying an IP address (Manual registration 17 Registering several projectors to a monitoring group all at once 18 If the projector name or IP address changes after registration 20 For projectors that have been registered manually 20 For projectors that have been registered using automatic search 20 Cancelling (deleting...
Operation Guide - EMP Monitor v4.30
Page 11
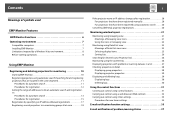
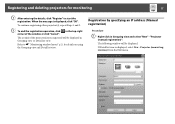
... New - If Detail list view is displayed, select "New" - Registering and deleting projectors for monitoring 11 Registering projectors using automatic search (Searching for and registering projectors that are using a serial TCP/IP conversion adapter cannot be detected. B Click "Search...". "Projector (automatic search)" from the Edit menu. • Projectors that have been detected will be displayed. If a projector does not appear in Grouping view and select "New" - The Create new projector (automatic registration) window will be displayed. ...
... New - If Detail list view is displayed, select "New" - Registering and deleting projectors for monitoring 11 Registering projectors using automatic search (Searching for and registering projectors that are using a serial TCP/IP conversion adapter cannot be detected. B Click "Search...". "Projector (automatic search)" from the Edit menu. • Projectors that have been detected will be displayed. If a projector does not appear in Grouping view and select "New" - The Create new projector (automatic registration) window will be displayed. ...
Operation Guide - EMP Monitor v4.30
Page 17
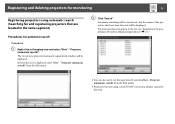
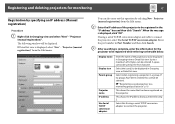
...a serial TCP/IP conversion adapter to be used as the first character. Select when registering a projector in Port Number and then click Search. "Projector (manual registration)" from the Edit menu. This shows the IP address that has been registered on the... projector. Display name Display icon Parent group Projector name IP address Use Serial TCP/IP conversion adaptor. Select the icon(s) to connect the projector. A space cannot be displayed in step 2. "Projector (manual registration)". C After searching is complete, ...
...a serial TCP/IP conversion adapter to be used as the first character. Select when registering a projector in Port Number and then click Search. "Projector (manual registration)" from the Edit menu. This shows the IP address that has been registered on the... projector. Display name Display icon Parent group Projector name IP address Use Serial TCP/IP conversion adaptor. Select the icon(s) to connect the projector. A space cannot be displayed in step 2. "Projector (manual registration)". C After searching is complete, ...
Operation Guide - EMP Monitor v4.30
Page 20
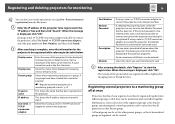
... When the display returns to re-register the projector(s). Procedure Right-click the icon for deleting by using automatic search Procedure A Delete the projector(s) whose name or IP address has been changed in Grouping view, all projectors that have been registered manually Procedure A Right-click on the desired icons.... • Use drag and drop to select a range of selecting more than one projector at the same time. • Hold down the ...
... When the display returns to re-register the projector(s). Procedure Right-click the icon for deleting by using automatic search Procedure A Delete the projector(s) whose name or IP address has been changed in Grouping view, all projectors that have been registered manually Procedure A Right-click on the desired icons.... • Use drag and drop to select a range of selecting more than one projector at the same time. • Hold down the ...
Operation Guide - EasyMP Monitor v4.40
Page 2
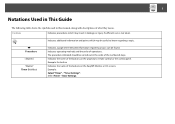
Example: Esc button Indicates the name of the buttons on the projector's remote control or the control panel. Indicates the name of the numbered steps. Select Timer - Indicates operating methods and the order of what they ...screens. Indicates a page where detailed information regarding a topic. Timer Settings. 2 Notations Used in This Guide The following table shows the symbols used in this manual, along with descriptions of operations. Caution Indicates procedures which may result in damage or injury if sufficient care is not taken. The procedure indicated should...
Example: Esc button Indicates the name of the buttons on the projector's remote control or the control panel. Indicates the name of the numbered steps. Select Timer - Indicates operating methods and the order of what they ...screens. Indicates a page where detailed information regarding a topic. Timer Settings. 2 Notations Used in This Guide The following table shows the symbols used in this manual, along with descriptions of operations. Caution Indicates procedures which may result in damage or injury if sufficient care is not taken. The procedure indicated should...
Operation Guide - EasyMP Monitor v4.40
Page 3
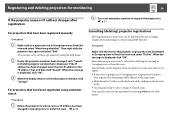
...by specifying an IP address (Manual registration 17 Registering several projectors to a monitoring group all at once 18 If the projector name or IP address changes after registration 20 For projectors that have been registered manually 20 For projectors that have been registered using automatic... search 20 Cancelling projector registrations (Delete 20 Monitoring window layout 21 ...
...by specifying an IP address (Manual registration 17 Registering several projectors to a monitoring group all at once 18 If the projector name or IP address changes after registration 20 For projectors that have been registered manually 20 For projectors that have been registered using automatic... search 20 Cancelling projector registrations (Delete 20 Monitoring window layout 21 ...

Operation Guide - EasyMP Monitor v4.40
Page 12
... a serial W TCP/IP conversion adapter cannot be detected. s p.17 q • You can also carry out this operation by specifying an IP address (Manual registration)". If a projector does not appear in Grouping view and select "New" - Registering and deleting projectors for automatic search Procedure A Right-click in the list, use "Registration by selecting New -
... a serial W TCP/IP conversion adapter cannot be detected. s p.17 q • You can also carry out this operation by specifying an IP address (Manual registration)". If a projector does not appear in Grouping view and select "New" - Registering and deleting projectors for automatic search Procedure A Right-click in the list, use "Registration by selecting New -
Operation Guide - EasyMP Monitor v4.40
Page 17
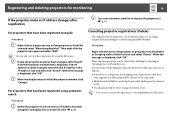
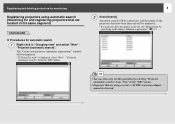
... to start the registration. Registration by specifying an IP address (Manual registration) Procedure A Right-click in Grouping view or Detail list view. Projector (manual registration) from the Edit menu. To continue registering other projector(s), repeat Steps 1 and 2. When the message is displayed, ... following window will be displayed. Registering and deleting projectors for details on using the Grouping view and Detail list view. in the top-right The icon(s) of the window or click "Cancel". "Projector (manual registration)". If Detail list view is displayed, click...
... to start the registration. Registration by specifying an IP address (Manual registration) Procedure A Right-click in Grouping view or Detail list view. Projector (manual registration) from the Edit menu. To continue registering other projector(s), repeat Steps 1 and 2. When the message is displayed, ... following window will be displayed. Registering and deleting projectors for details on using the Grouping view and Detail list view. in the top-right The icon(s) of the window or click "Cancel". "Projector (manual registration)". If Detail list view is displayed, click...
Operation Guide - EasyMP Monitor v4.40
Page 18
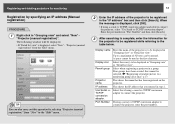
...be entered. Up to a maximum of the projector to be selected. A Parent group can be registered in the "IP address" box and then click "Search". Registering and deleting projectors for all projectors in that Parent group. Projector (manual registration) from the Edit menu. B Enter... the IP address of 60 bytes can be used . A space cannot be set . s "Registering several projectors to be displayed in Grouping view ...
...be entered. Up to a maximum of the projector to be selected. A Parent group can be registered in the "IP address" box and then click "Search". Registering and deleting projectors for all projectors in that Parent group. Projector (manual registration) from the Edit menu. B Enter... the IP address of 60 bytes can be used . A space cannot be set . s "Registering several projectors to be displayed in Grouping view ...
Operation Guide - EasyMP Monitor v4.40
Page 20
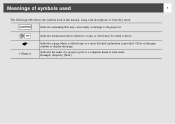
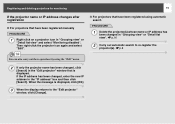
... manually Procedure A Right-click on the desired icons. • Use drag and drop to the Edit projector window, click "Change". q You can also carry out these operations by selecting in the Edit projector window that group will be deleted at the same time are no longer required for projectors... after registration B Carry out automatic search to be deleted in Grouping view or Detail list view and select "Delete". More than one projector can also carry out this operation by selecting Delete in Grouping view or Detail list view and select "Monitoring disabled". Procedure Right-click...
... manually Procedure A Right-click on the desired icons. • Use drag and drop to the Edit projector window, click "Change". q You can also carry out these operations by selecting in the Edit projector window that group will be deleted at the same time are no longer required for projectors... after registration B Carry out automatic search to be deleted in Grouping view or Detail list view and select "Delete". More than one projector can also carry out this operation by selecting Delete in Grouping view or Detail list view and select "Monitoring disabled". Procedure Right-click...
Operation Guide - EMP Monitor v4.22
Page 2
Indicates a page where a related topic or a more detailed explanation is related to a topic or which may cause injury or damage to the projector. Click on the page number to know. Example: [InputA] [Start] TIP [ (Name) ] Indicates information that page. Indicates the name of what they mean. CAUTION Indicates something that may be useful to display that is provided. Meanings of symbols used 1 The following table shows the symbols used in this manual, along with descriptions of a projector port or a computer menu or item name.
Indicates a page where a related topic or a more detailed explanation is related to a topic or which may cause injury or damage to the projector. Click on the page number to know. Example: [InputA] [Start] TIP [ (Name) ] Indicates information that page. Indicates the name of what they mean. CAUTION Indicates something that may be useful to display that is provided. Meanings of symbols used 1 The following table shows the symbols used in this manual, along with descriptions of a projector port or a computer menu or item name.
Operation Guide - EMP Monitor v4.22
Page 3
... search 10 Procedures for registration 11 Registration by specifying an IP address (Manual registration 12 Registering several projectors to a monitoring group all at once 13 If the projector name or IP address changes after registration 15 For projectors that have been registered manually 15 For projectors that have been registered using automatic search 15 Cancelling (deleting...
... search 10 Procedures for registration 11 Registration by specifying an IP address (Manual registration 12 Registering several projectors to a monitoring group all at once 13 If the projector name or IP address changes after registration 15 For projectors that have been registered manually 15 For projectors that have been registered using automatic search 15 Cancelling (deleting...
Operation Guide - EMP Monitor v4.22
Page 9
... can also carry out this operation by specifying an IP address (Manual registration)". Registering and deleting projectors for monitoring Registering projectors using a serial ⇔ TCP/IP conversion adapter cannot be displayed. • If a projector does not appear in "Grouping view" and select "New" - "Projector (automatic search)". "Projector (automatic search)" from "New" in the "Edit" menu. •...
... can also carry out this operation by specifying an IP address (Manual registration)". Registering and deleting projectors for monitoring Registering projectors using a serial ⇔ TCP/IP conversion adapter cannot be displayed. • If a projector does not appear in "Grouping view" and select "New" - "Projector (automatic search)". "Projector (automatic search)" from "New" in the "Edit" menu. •...
Operation Guide - EMP Monitor v4.22
Page 13
...• If "Detail list view" is complete, enter the information for monitoring Registration by selecting "Projector (manual registration)" from the "Edit" menu. Registering and deleting projectors for the projector to be registered while referring to the table below. TIP You can be selected. A space cannot...(s) to be used as the first character. This shows the IP address that has been registered on the projector. Select this operation by specifying an IP address (Manual registration) PROCEDURE 1 Right-click in "Grouping view" or "Detail list view". If using a serial &#...
...• If "Detail list view" is complete, enter the information for monitoring Registration by selecting "Projector (manual registration)" from the "Edit" menu. Registering and deleting projectors for the projector to be registered while referring to the table below. TIP You can be selected. A space cannot...(s) to be used as the first character. This shows the IP address that has been registered on the projector. Select this operation by specifying an IP address (Manual registration) PROCEDURE 1 Right-click in "Grouping view" or "Detail list view". If using a serial &#...
Operation Guide - EMP Monitor v4.22
Page 16
... been changed in "Grouping view" or "Detail list view". Then right-click the projector icon again and select "Edit". f For projectors that have been registered manually PROCEDURE 1 Right-click on a projector icon in the "IP address" box and then click [Search]. sp.8 2 If only the projector name has been changed, click [Search] in the "Edit...
... been changed in "Grouping view" or "Detail list view". Then right-click the projector icon again and select "Edit". f For projectors that have been registered manually PROCEDURE 1 Right-click on a projector icon in the "IP address" box and then click [Search]. sp.8 2 If only the projector name has been changed, click [Search] in the "Edit...

Installation Guide - ELPMBUNI Universal Mount Assembly
Page 3
...THIS PRODUCT. Contact Premier Mounts with any surface other source of the wooden stud must be disconnected from dropping or mishandling the projector. When mounting to installation. Do not install near heater, fireplace, direct sunlight, air conditioning or any other than wooden ...studs, use suitable hardware (which is commercially available). Installation Manual PROPER INSTALLATION PROCEDURE BY QUALIFIED PERSONNEL AS OUTLINED IN THE INSTALLATIONS INSTRUCTIONS MUST BE ADHERED TO. USE PROPER SAFETY GEAR AND TOOLS...
...THIS PRODUCT. Contact Premier Mounts with any surface other source of the wooden stud must be disconnected from dropping or mishandling the projector. When mounting to installation. Do not install near heater, fireplace, direct sunlight, air conditioning or any other than wooden ...studs, use suitable hardware (which is commercially available). Installation Manual PROPER INSTALLATION PROCEDURE BY QUALIFIED PERSONNEL AS OUTLINED IN THE INSTALLATIONS INSTRUCTIONS MUST BE ADHERED TO. USE PROPER SAFETY GEAR AND TOOLS...

Installation Guide - ELPMBUNI Universal Mount Assembly
Page 4
... (Qty 4) M6 x 12mm Security Head Screws (Qty 4) Portable Drill Pencil Level (Supplied) Stud Finder (Commercially Available) M5 Allen Wrench NOTE: Mounting screws will vary by projector. Lag Screws (#14 x 2") (Qty 3) M4 x 12 Security Head Screws (Qty 4) M3 x 16mm Phillips Head Screws (Qty 4) Installation Tools Phillips Head Screw Driver Soft Material/ Blanket... installation hardware and components. Please see the following hardware is included in the hardware pack but is shipped with the M3 x 16 Phillips screws. Installation Manual Page - 5 -
... (Qty 4) M6 x 12mm Security Head Screws (Qty 4) Portable Drill Pencil Level (Supplied) Stud Finder (Commercially Available) M5 Allen Wrench NOTE: Mounting screws will vary by projector. Lag Screws (#14 x 2") (Qty 3) M4 x 12 Security Head Screws (Qty 4) M3 x 16mm Phillips Head Screws (Qty 4) Installation Tools Phillips Head Screw Driver Soft Material/ Blanket... installation hardware and components. Please see the following hardware is included in the hardware pack but is shipped with the M3 x 16 Phillips screws. Installation Manual Page - 5 -

Installation Guide - ELPMBUNI Universal Mount Assembly
Page 5
ELPMBUNI A NOTE: The four (2-piece) leg assemblies can be used as single leg or any combination C of your projector for filter and lamp access. The number of legs E may vary depending on the number of mounting points found on the ...Structure Mounting Points C Ceiling Plate D Allen Wrench E Height Adjustment Screws F Tension Knobs G Safety Knob H Security Screws I Leveling Barrels J Universal Mounting Bracket K Leg Assembly L Projector (Not Supplied) M Tri-Lock Opening Option 1 H B D F Combination I Leg Single Leg D Option 2 M NOTE: See the best configuration for your...
ELPMBUNI A NOTE: The four (2-piece) leg assemblies can be used as single leg or any combination C of your projector for filter and lamp access. The number of legs E may vary depending on the number of mounting points found on the ...Structure Mounting Points C Ceiling Plate D Allen Wrench E Height Adjustment Screws F Tension Knobs G Safety Knob H Security Screws I Leveling Barrels J Universal Mounting Bracket K Leg Assembly L Projector (Not Supplied) M Tri-Lock Opening Option 1 H B D F Combination I Leg Single Leg D Option 2 M NOTE: See the best configuration for your...

Installation Guide - ELPMBUNI Universal Mount Assembly
Page 6
... installation procedure by qualified personnel as (distance from the screen to the lens of the projector, top of the lens placement to the top screen etc. HANDLE WITH CARE AT ALL TIMES. NOTE: Review the projectors manufacture's operation manual and refer to the ceiling installation instruction. Identify the number of mounting points and...
... installation procedure by qualified personnel as (distance from the screen to the lens of the projector, top of the lens placement to the top screen etc. HANDLE WITH CARE AT ALL TIMES. NOTE: Review the projectors manufacture's operation manual and refer to the ceiling installation instruction. Identify the number of mounting points and...

