Installation Guide - Control Pad and Touch Unit
Page 3
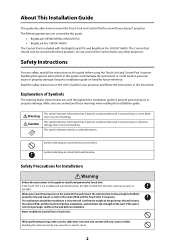
... Touch Unit. Make sure you mount the projector on the wall with your Epson® projector. Confirm the weight of the projector, the wall mount, the Control Pad, and the Touch Unit before installation, and maintain the strength of Symbols The warning marks shown below are covered... using the Touch Unit and Control Pad. If the wall is not installed and operated properly, the light emitted from the laser could possibly result in this guide: • BrightLink® 695Wi/695Wi+/696Ui/697Ui • BrightLink Pro 1450Ui/1460Ui The Control Pad is included with any other projectors. ...
... Touch Unit. Make sure you mount the projector on the wall with your Epson® projector. Confirm the weight of the projector, the wall mount, the Control Pad, and the Touch Unit before installation, and maintain the strength of Symbols The warning marks shown below are covered... using the Touch Unit and Control Pad. If the wall is not installed and operated properly, the light emitted from the laser could possibly result in this guide: • BrightLink® 695Wi/695Wi+/696Ui/697Ui • BrightLink Pro 1450Ui/1460Ui The Control Pad is included with any other projectors. ...
Installation Guide - Control Pad and Touch Unit
Page 4
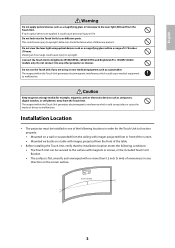
... within a range of the screen. • Mounted vertically on a wall or suspended from the ceiling with images projected from the Touch Unit. Installation Location • The projector must be installed in one of the following conditions: • The Touch Unit can be taken when children are using optical devices such as a magnifying... could corrupt data or cause the media or device to malfunction. English Warning Do not apply optical devices such as a magnifying glass or telescope to BrightLink 695Wi/695Wi+/696Ui/697Ui and BrightLink Pro 1450Wi/1460Ui models only.
... within a range of the screen. • Mounted vertically on a wall or suspended from the ceiling with images projected from the Touch Unit. Installation Location • The projector must be installed in one of the following conditions: • The Touch Unit can be taken when children are using optical devices such as a magnifying... could corrupt data or cause the media or device to malfunction. English Warning Do not apply optical devices such as a magnifying glass or telescope to BrightLink 695Wi/695Wi+/696Ui/697Ui and BrightLink Pro 1450Wi/1460Ui models only.

Installation Guide - Control Pad and Touch Unit
Page 6
... Touch Unit 30 Connect the cable 31 Adjust the angle 31 Attach labels 39 Attach cover 39 4 Installing the Control Pad (BrightLink 697Ui and 40 BrightLink Pro 1450Ui/1460Ui) Remove the front cover 41 Attach the Control Pad 41 Connect the projector cables to the Control Pad 42 Attach the port ...
... Touch Unit 30 Connect the cable 31 Adjust the angle 31 Attach labels 39 Attach cover 39 4 Installing the Control Pad (BrightLink 697Ui and 40 BrightLink Pro 1450Ui/1460Ui) Remove the front cover 41 Attach the Control Pad 41 Connect the projector cables to the Control Pad 42 Attach the port ...

Installation Guide - Control Pad and Touch Unit
Page 8
...installing the Control Pad on a wall, you will also need four M4 × 20 mm screws. The labels contain the following parts are packaged with optical instruments • Class 1 laser product 7 There are necessary when attaching the Control Pad. Port protection stickers 8.3 in. (210 mm) 2.0 in . (95 mm) English Control Pad (BrightLink 697Ui... and BrightLink Pro 1450Ui/1460Ui) The following information: • Invisible laser radiation • Do not view the beam ...
...installing the Control Pad on a wall, you will also need four M4 × 20 mm screws. The labels contain the following parts are packaged with optical instruments • Class 1 laser product 7 There are necessary when attaching the Control Pad. Port protection stickers 8.3 in. (210 mm) 2.0 in . (95 mm) English Control Pad (BrightLink 697Ui... and BrightLink Pro 1450Ui/1460Ui) The following information: • Invisible laser radiation • Do not view the beam ...
Installation Guide - Control Pad and Touch Unit
Page 11
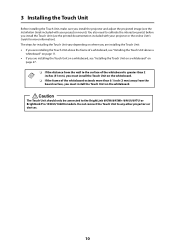
...other projectors or devices. 10 Do not connect the Touch Unit to the BrightLink 695Wi/695Wi+/696Ui/697Ui or BrightLink Pro 1450Ui/1460Ui models. The steps for more than 0.1 inch (3 mm) away from the board surface, you must install the Touch Unit on the whiteboard. ❏ If the frame of ...a whiteboard, see "Installing the Touch Unit above the frame of the whiteboard extends ...
...other projectors or devices. 10 Do not connect the Touch Unit to the BrightLink 695Wi/695Wi+/696Ui/697Ui or BrightLink Pro 1450Ui/1460Ui models. The steps for more than 0.1 inch (3 mm) away from the board surface, you must install the Touch Unit on the whiteboard. ❏ If the frame of ...a whiteboard, see "Installing the Touch Unit above the frame of the whiteboard extends ...

Installation Guide - Control Pad and Touch Unit
Page 41
... surrounding the Control Pad to any other projectors. Follow the steps below to install the Control Pad and connect to the BrightLink 697Ui and BrightLink Pro 1450Ui/ 1460Ui. Caution The Control Pad should only be connected to the projector. 4 Installing the Control Pad (BrightLink 697Ui and BrightLink Pro 1450Ui/1460Ui) You must install the projector before installing the Control Pad.
... surrounding the Control Pad to any other projectors. Follow the steps below to install the Control Pad and connect to the BrightLink 697Ui and BrightLink Pro 1450Ui/ 1460Ui. Caution The Control Pad should only be connected to the projector. 4 Installing the Control Pad (BrightLink 697Ui and BrightLink Pro 1450Ui/1460Ui) You must install the projector before installing the Control Pad.
Installation Guide - Control Pad and Touch Unit
Page 45
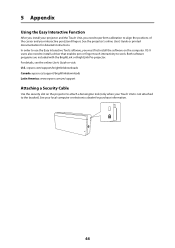
.... See your local computer or electronics dealer for detailed instructions. Both software programs are included with the BrightLink or BrightLink Pro projector. In order to the bracket). See the projector's online User's Guide or printed documentation for...epson.com/support/brightlinkdownloads Canada: epson.ca/support/brightlinkdownloads Latin America: www.epson.com.jm/support Attaching a Security Cable Use the security slot on the projector to attach a Kensington lock (only when your Touch Unit is not attached to use the Easy Interactive Tools software, you need to install...
.... See your local computer or electronics dealer for detailed instructions. Both software programs are included with the BrightLink or BrightLink Pro projector. In order to the bracket). See the projector's online User's Guide or printed documentation for...epson.com/support/brightlinkdownloads Canada: epson.ca/support/brightlinkdownloads Latin America: www.epson.com.jm/support Attaching a Security Cable Use the security slot on the projector to attach a Kensington lock (only when your Touch Unit is not attached to use the Easy Interactive Tools software, you need to install...
Installation Guide - Ultra-Short Throw Wall Mount ELPMB46
Page 2
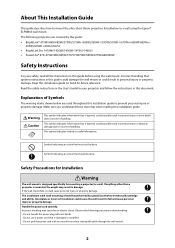
... symbol indicates related or useful information. The installation work (wall mounting) should be performed by this guide: • BrightLink® 475Wi/480i/485Wi/575Wi/575Wi+/585Wi/585Wi+/595Wi/595Wi+/675Wi+/685Wi/685Wi+/ 695Wi/695Wi+/696Ui/697Ui • BrightLink Pro 1410Wi/1420Wi/1430Wi/1450Ui/1460Ui •... mount to incorrect handling. Keep this installation guide on hand for your safety, read all the instructions in this installation guide to a wall. Observe the following projectors are used throughout this guide before using the Epson® ELPMB46 wall mount. Make sure...
... symbol indicates related or useful information. The installation work (wall mounting) should be performed by this guide: • BrightLink® 475Wi/480i/485Wi/575Wi/575Wi+/585Wi/585Wi+/595Wi/595Wi+/675Wi+/685Wi/685Wi+/ 695Wi/695Wi+/696Ui/697Ui • BrightLink Pro 1410Wi/1420Wi/1430Wi/1450Ui/1460Ui •... mount to incorrect handling. Keep this installation guide on hand for your safety, read all the instructions in this installation guide to a wall. Observe the following projectors are used throughout this guide before using the Epson® ELPMB46 wall mount. Make sure...
Installation Guide - Ultra-Short Throw Wall Mount ELPMB46
Page 12
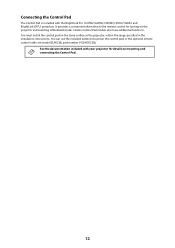
... the Control Pad. 12 Certain Control Pad models also have additional functions. You must install the control pad on the projector and selecting whiteboard mode. See the documentation included with the BrightLink Pro 1410Wi/1420Wi/1430Wi/1450Ui/1460Ui and BrightLink 697Ui projectors. It provides a convenient alternative to power the control pad, or the optional...
... the Control Pad. 12 Certain Control Pad models also have additional functions. You must install the control pad on the projector and selecting whiteboard mode. See the documentation included with the BrightLink Pro 1410Wi/1420Wi/1430Wi/1450Ui/1460Ui and BrightLink 697Ui projectors. It provides a convenient alternative to power the control pad, or the optional...

Installation Guide - Ultra-Short Throw Wall Mount ELPMB46
Page 13
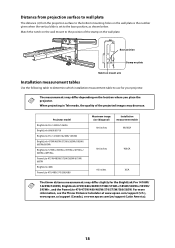
... inches (120 mm) between the top edge of the projected image and the top edge of the board: at www.epson.com/support (U.S.), www.epson.ca/support (Canada), or www.epson.com/jm/support (Latin America). Use the following gaps around the edge of the board: ❏ From the top of...Unit outside of the frame of the board. WXGA/WUXGA XGA When installing the Touch Unit on a whiteboard (if applicable), make sure to leave the following worksheets to 93 inches diagonally. The BrightLink Pro 1450Ui/1460Ui and BrightLink 696Ui/ 697Ui can project an XGA image up to determine the proper location of...
... inches (120 mm) between the top edge of the projected image and the top edge of the board: at www.epson.com/support (U.S.), www.epson.ca/support (Canada), or www.epson.com/jm/support (Latin America). Use the following gaps around the edge of the board: ❏ From the top of...Unit outside of the frame of the board. WXGA/WUXGA XGA When installing the Touch Unit on a whiteboard (if applicable), make sure to leave the following worksheets to 93 inches diagonally. The BrightLink Pro 1450Ui/1460Ui and BrightLink 696Ui/ 697Ui can project an XGA image up to determine the proper location of...
Installation Guide - Ultra-Short Throw Wall Mount ELPMB46
Page 18
... for your projector. Projector model BrightLink Pro 1450Ui/1460Ui BrightLink 696Ui/697Ui BrightLink Pro 1410Wi/1420Wi/1430Wi BrightLink 475W/485W/575Wi/585Wi/595Wi/ 685Wi/695Wi BrightLink 575Wi+/585Wi+/595Wi+/675Wi+/ 685Wi+/695Wi+ PowerLite 475W/485W/575W/585W/675W/ 685W BrightLink 480i PowerLite 470/480/570/580/680 Maximum image size (diagonal) Installation measurement table 100 inches WUXGA 100...
... for your projector. Projector model BrightLink Pro 1450Ui/1460Ui BrightLink 696Ui/697Ui BrightLink Pro 1410Wi/1420Wi/1430Wi BrightLink 475W/485W/575Wi/585Wi/595Wi/ 685Wi/695Wi BrightLink 575Wi+/585Wi+/595Wi+/675Wi+/ 685Wi+/695Wi+ PowerLite 475W/485W/575W/585W/675W/ 685W BrightLink 480i PowerLite 470/480/570/580/680 Maximum image size (diagonal) Installation measurement table 100 inches WUXGA 100...
Installation Guide - Ultra-Short Throw Wall Mount ELPMB46
Page 27
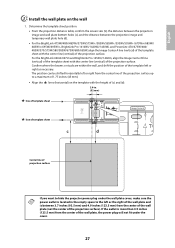
...of the projection surface up to a maximum of 1.77 inches (45 mm.) • Align the lines (horizontal) on the wall 1. For the BrightLink 696Ui/697Ui and BrightLink Pro 1450Ui/1460Ui, align the Image Center B line (vertical) of the template sheet with the center line (vertical) of the wall plate, the power...template sheet line of template sheet Center line of projection surface If you want to hide the projector power plug under the cover. 27 English B Install the wall plate on the template with the height of (c) and (d). 2.0 in the empty space to the left or right as necessary. ...
...of the projection surface up to a maximum of 1.77 inches (45 mm.) • Align the lines (horizontal) on the wall 1. For the BrightLink 696Ui/697Ui and BrightLink Pro 1450Ui/1460Ui, align the Image Center B line (vertical) of the template sheet with the center line (vertical) of the wall plate, the power...template sheet line of template sheet Center line of projection surface If you want to hide the projector power plug under the cover. 27 English B Install the wall plate on the template with the height of (c) and (d). 2.0 in the empty space to the left or right as necessary. ...

Installation Guide - Ultra-Short Throw Wall Mount ELPMB46
Page 36
.../1420Wi/1430Wi/1450Ui/1460Ui, BrightLink 475Wi/485Wi/575Wi/ 575Wi+/585Wi/585Wi+/595Wi/595Wi+/675Wi+/685Wi/685Wi+/695Wi/695Wi+/696Ui/697Ui, and PowerLite 475W/485W/575W/585W/675W/685W • Auto: Automatically sets the aspect ratio according to fit. Remote Control Control Panel 2. Choose ... aspect ratio of the image. The image may be cut off on the top and bottom depending on the remote control or control panel. Select Installation Guide. 4. C Display the test pattern 1. Select the current aspect ratio. Black bands may appear or images may be cut off , depending on the ...
.../1420Wi/1430Wi/1450Ui/1460Ui, BrightLink 475Wi/485Wi/575Wi/ 575Wi+/585Wi/585Wi+/595Wi/595Wi+/675Wi+/685Wi/685Wi+/695Wi/695Wi+/696Ui/697Ui, and PowerLite 475W/485W/575W/585W/675W/685W • Auto: Automatically sets the aspect ratio according to fit. Remote Control Control Panel 2. Choose ... aspect ratio of the image. The image may be cut off on the top and bottom depending on the remote control or control panel. Select Installation Guide. 4. C Display the test pattern 1. Select the current aspect ratio. Black bands may appear or images may be cut off , depending on the ...
Installation Guide - Ultra-Short Throw Wall Mount ELPMB46
Page 44
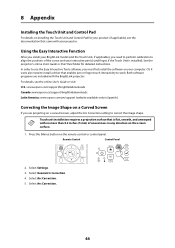
... unwarped with no more than 0.2 inches (5 mm) of the cursor and your BrightLink model (and the Touch Unit, if applicable), you need to install a driver that came with the BrightLink projector. Select Geometric Correction. 4. See the projector's online User's Guide or Start... Here folder for your product (if applicable), see the online User's Guide or visit: U.S.: www.epson.com/support/brightlinkdownloads Canada: www.epson.ca/...
... unwarped with no more than 0.2 inches (5 mm) of the cursor and your BrightLink model (and the Touch Unit, if applicable), you need to install a driver that came with the BrightLink projector. Select Geometric Correction. 4. See the projector's online User's Guide or Start... Here folder for your product (if applicable), see the online User's Guide or visit: U.S.: www.epson.com/support/brightlinkdownloads Canada: www.epson.ca/...

Warranty Statement
Page 1
...and, if required, date of Product: Model: Marketing Name: Epson® Projector H728A/H823A BrightLink 696Ui/697Ui Wireless LAN Safety and Specifications Contains wireless LAN module model: WN7522BEP, WLU5000-D101(RoHS) (BrightLink 697Ui) This document provides safety instructions and describes the specifications. Limited Warranty... will be within five working days of receipt of exchange, Epson will direct you use ■ Consumables such as you to you, freight prepaid, so long as filters ■ Installation or removal This equipment is then passed down through the MAC...
...and, if required, date of Product: Model: Marketing Name: Epson® Projector H728A/H823A BrightLink 696Ui/697Ui Wireless LAN Safety and Specifications Contains wireless LAN module model: WN7522BEP, WLU5000-D101(RoHS) (BrightLink 697Ui) This document provides safety instructions and describes the specifications. Limited Warranty... will be within five working days of receipt of exchange, Epson will direct you use ■ Consumables such as you to you, freight prepaid, so long as filters ■ Installation or removal This equipment is then passed down through the MAC...

Get Started with BrightLink
Page 1
.... Start writing Project from any time by the installer or network administrator. What would you need it. to quickly access Whiteboard mode, switch the active source, and select other options. Using the Home screen Use the Home screen to your ideas. BrightLink® 697Ui Get Started with your computer View your notes and...
.... Start writing Project from any time by the installer or network administrator. What would you need it. to quickly access Whiteboard mode, switch the active source, and select other options. Using the Home screen Use the Home screen to your ideas. BrightLink® 697Ui Get Started with your computer View your notes and...

Get Started with BrightLink
Page 6
...change without notice. Days and hours of Apple Inc., registered in XXXXXX CPD-52891 BrightLink and PrivateLine are 6 AM to 8 PM, Pacific Time, Monday through Friday and 7 AM to change without notice. © 2016 Epson America, Inc., 11/16 Printed in the U.S. Android and Google Play are subject...programs You can use the interactive pen or your file system, right on the screen. Mac is available for 3 seconds Need help? To install the software, use the pen or finger as a mouse Mouse command Click Double-click Click and drag Move cursor Right-click Pen/finger ...
...change without notice. Days and hours of Apple Inc., registered in XXXXXX CPD-52891 BrightLink and PrivateLine are 6 AM to 8 PM, Pacific Time, Monday through Friday and 7 AM to change without notice. © 2016 Epson America, Inc., 11/16 Printed in the U.S. Android and Google Play are subject...programs You can use the interactive pen or your file system, right on the screen. Mac is available for 3 seconds Need help? To install the software, use the pen or finger as a mouse Mouse command Click Double-click Click and drag Move cursor Right-click Pen/finger ...

Users Guide
Page 3
Back Panel...26 Projector Parts - Control Panel ...29 Projector Parts - Contents BrightLink 697Ui User's Guide ...13 Introduction to Your Projector ...14 Projector Features...14 Product Box Contents...16 Additional Components ...18 Optional Equipment ...24 Projector Parts - Remote Control 31 Projector Parts - Touch Unit ...34 Setting Up the Projector ...36 Projector Placement...36 Projector Setup and Installation Options 37 Projection Distance...39 Removing and Attaching the Cable Cover 39 Projector Connections...40 Connecting to Computer Sources 41 Connecting to a Computer for ...
Back Panel...26 Projector Parts - Control Panel ...29 Projector Parts - Contents BrightLink 697Ui User's Guide ...13 Introduction to Your Projector ...14 Projector Features...14 Product Box Contents...16 Additional Components ...18 Optional Equipment ...24 Projector Parts - Remote Control 31 Projector Parts - Touch Unit ...34 Setting Up the Projector ...36 Projector Placement...36 Projector Setup and Installation Options 37 Projection Distance...39 Removing and Attaching the Cable Cover 39 Projector Connections...40 Connecting to Computer Sources 41 Connecting to a Computer for ...
Users Guide
Page 14
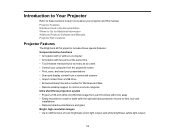
... in the Documentation Where to Go for Additional Information Additional Projector Software and Manuals Projector Part Locations Projector Features The BrightLink 697Ui projector includes these sections to learn more about your presentations • Scan and display content from a connected scanner ... functions • Annotation with or without a computer • Annotation with the optional table projection mount) for fast, low-cost installations • Reduced shadow interference and glare Bright, high-resolution images • Up to control a remote computer Ultra short throw projection...
... in the Documentation Where to Go for Additional Information Additional Projector Software and Manuals Projector Part Locations Projector Features The BrightLink 697Ui projector includes these sections to learn more about your presentations • Scan and display content from a connected scanner ... functions • Annotation with or without a computer • Annotation with the optional table projection mount) for fast, low-cost installations • Reduced shadow interference and glare Bright, high-resolution images • Up to control a remote computer Ultra short throw projection...
Users Guide
Page 202
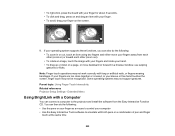
... time 202 If your fingers are too close together or crossed, or your computer • Use the Easy Interactive Tools software to the projector and install the software from each other (zoom in) or toward each other (zoom out). • To rotate an image, touch the image with your fingers and... rotate your finger on a page, or move your fingers away from the Easy Interactive Function CD. Extended Menu Using BrightLink with a Computer You can then do the following : • Use the pens or your finger as a mouse to control your sleeve or free hand ...
... time 202 If your fingers are too close together or crossed, or your computer • Use the Easy Interactive Tools software to the projector and install the software from each other (zoom in) or toward each other (zoom out). • To rotate an image, touch the image with your fingers and... rotate your finger on a page, or move your fingers away from the Easy Interactive Function CD. Extended Menu Using BrightLink with a Computer You can then do the following : • Use the pens or your finger as a mouse to control your sleeve or free hand ...


