Installation Guide - Control Pad and Touch Unit
Page 3
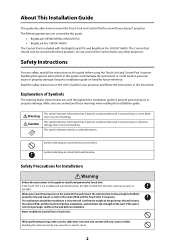
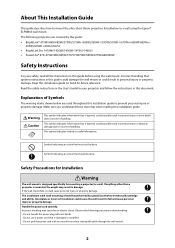
...handling. Safety Instructions For your Epson® projector. Read the safety instructions in the User's Guide for Installation Warning Follow the instructions in this installation guide on hand for use with...BrightLink 697Ui and BrightLink Pro 1450Ui/1460Ui. Keep this document. Warning Caution This symbol indicates information that should be strong enough to incorrect handling. The following projectors are used throughout this installation guide. When you understand these warnings when reading this installation guide to these products. About This Installation Guide This guide...
...handling. Safety Instructions For your Epson® projector. Read the safety instructions in the User's Guide for Installation Warning Follow the instructions in this installation guide on hand for use with...BrightLink 697Ui and BrightLink Pro 1450Ui/1460Ui. Keep this document. Warning Caution This symbol indicates information that should be strong enough to incorrect handling. The following projectors are used throughout this installation guide. When you understand these warnings when reading this installation guide to these products. About This Installation Guide This guide...
Installation Guide - Control Pad and Touch Unit
Page 11
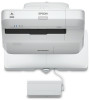
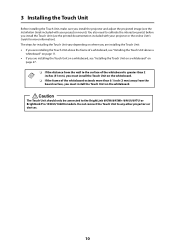
Do not connect the Touch Unit to the BrightLink 695Wi/695Wi+/696Ui/697Ui or BrightLink Pro 1450Ui/1460Ui models. 3 Installing the Touch Unit Before installing the Touch Unit, make sure you install the projector and adjust the projected image (see the Installation Guide included with your projector mount). Caution The Touch Unit should only be connected to any other...
Do not connect the Touch Unit to the BrightLink 695Wi/695Wi+/696Ui/697Ui or BrightLink Pro 1450Ui/1460Ui models. 3 Installing the Touch Unit Before installing the Touch Unit, make sure you install the projector and adjust the projected image (see the Installation Guide included with your projector mount). Caution The Touch Unit should only be connected to any other...
Installation Guide - Control Pad and Touch Unit
Page 45
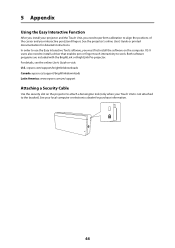
.... See your interactive pen(s) and fingers. 5 Appendix Using the Easy Interactive Function After you install your projector and the Touch Unit, you must first install the software on the projector to attach a Kensington lock (only when your Touch Unit is ... detailed instructions. Both software programs are included with the BrightLink or BrightLink Pro projector. For details, see the online User's Guide or visit: U.S.: epson.com/support/brightlinkdownloads Canada: epson.ca/support/brightlinkdownloads Latin America: www.epson.com.jm/support Attaching a Security Cable Use the security...
.... See your interactive pen(s) and fingers. 5 Appendix Using the Easy Interactive Function After you install your projector and the Touch Unit, you must first install the software on the projector to attach a Kensington lock (only when your Touch Unit is ... detailed instructions. Both software programs are included with the BrightLink or BrightLink Pro projector. For details, see the online User's Guide or visit: U.S.: epson.com/support/brightlinkdownloads Canada: epson.ca/support/brightlinkdownloads Latin America: www.epson.com.jm/support Attaching a Security Cable Use the security...
Installation Guide - Ultra-Short Throw Wall Mount ELPMB46
Page 2
... this guide before using the Epson® ELPMB46 wall mount. Explanation of Symbols The warning marks shown below to a wall using the wall mount. The installation work (wall mounting) should be performed by this guide: • BrightLink® 475Wi/480i/485Wi/575Wi/575Wi+/585Wi/585Wi+/595Wi/595Wi+/675Wi+/685Wi/685Wi+/ 695Wi/695Wi+/696Ui/697Ui • BrightLink Pro...
... this guide before using the Epson® ELPMB46 wall mount. Explanation of Symbols The warning marks shown below to a wall using the wall mount. The installation work (wall mounting) should be performed by this guide: • BrightLink® 475Wi/480i/485Wi/575Wi/575Wi+/585Wi/585Wi+/595Wi/595Wi+/675Wi+/685Wi/685Wi+/ 695Wi/695Wi+/696Ui/697Ui • BrightLink Pro...

Installation Guide - Ultra-Short Throw Wall Mount ELPMB46
Page 13
... www.epson.com/support (U.S.), www.epson.ca/support (Canada), or www.epson.com/jm/support (Latin America). The distance of the projector from the board surface, you are planning to determine the proper location of the wall plate on the aspect ratio. The BrightLink Pro 1450Ui/1460Ui and BrightLink 696Ui/ 697Ui can project onto a pre-installed whiteboard...
... www.epson.com/support (U.S.), www.epson.ca/support (Canada), or www.epson.com/jm/support (Latin America). The distance of the projector from the board surface, you are planning to determine the proper location of the wall plate on the aspect ratio. The BrightLink Pro 1450Ui/1460Ui and BrightLink 696Ui/ 697Ui can project onto a pre-installed whiteboard...

Installation Guide - Ultra-Short Throw Wall Mount ELPMB46
Page 36
... Displays images as you make the E J adjustments in steps to . Press the [Menu] button on the control panel. 36 Select Installation Guide. 4. Black bands may appear or images may be cut off , depending on the remote control or control panel. C Display the test pattern 1. ...ratio of the image. Select the current aspect ratio. Select Settings. 3. BrightLink Pro 1410Wi/1420Wi/1430Wi/1450Ui/1460Ui, BrightLink 475Wi/485Wi/575Wi/ 575Wi+/585Wi/585Wi+/595Wi/595Wi+/675Wi+/685Wi/685Wi+/695Wi/695Wi+/696Ui/697Ui, and PowerLite 475W/485W/575W/585W/675W/685W • Auto: Automatically ...
... Displays images as you make the E J adjustments in steps to . Press the [Menu] button on the control panel. 36 Select Installation Guide. 4. Black bands may appear or images may be cut off , depending on the remote control or control panel. C Display the test pattern 1. ...ratio of the image. Select the current aspect ratio. Select Settings. 3. BrightLink Pro 1410Wi/1420Wi/1430Wi/1450Ui/1460Ui, BrightLink 475Wi/485Wi/575Wi/ 575Wi+/585Wi/585Wi+/595Wi/595Wi+/675Wi+/685Wi/685Wi+/695Wi/695Wi+/696Ui/697Ui, and PowerLite 475W/485W/575W/585W/675W/685W • Auto: Automatically ...
Installation Guide - Ultra-Short Throw Wall Mount ELPMB46
Page 44
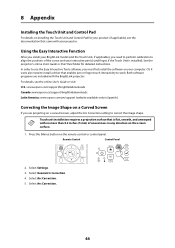
... unit installation requires a projection surface that is installed). Select Settings. 3. Select Arc Correction. 44 Using the Easy Interactive Function After you install your BrightLink model (and the Touch Unit, if applicable), you must first install the software...installing the Touch Unit and Control Pad for detailed instructions. See the projector's online User's Guide or Start Here folder for your product (if applicable), see the online User's Guide or visit: U.S.: www.epson.com/support/brightlinkdownloads Canada: www.epson.ca/support/brightlinkdownloads Latin America: www.epson...
... unit installation requires a projection surface that is installed). Select Settings. 3. Select Arc Correction. 44 Using the Easy Interactive Function After you install your BrightLink model (and the Touch Unit, if applicable), you must first install the software...installing the Touch Unit and Control Pad for detailed instructions. See the projector's online User's Guide or Start Here folder for your product (if applicable), see the online User's Guide or visit: U.S.: www.epson.com/support/brightlinkdownloads Canada: www.epson.ca/support/brightlinkdownloads Latin America: www.epson...

Get Started with BrightLink
Page 1
... it. For more information. Save your content on the screen. Start writing Project from any time by the installer or network administrator. BrightLink® 697Ui Get Started with the interactive Import content from a connected storage device directly pen or your finger. Use your ...like to quickly access Whiteboard mode, switch the active source, and select other options. See the online BrightLink User's Guide for more information, see the online BrightLink User's Guide. Interact with your computer View your ideas. Using the Home screen Use the Home screen to do...
... it. For more information. Save your content on the screen. Start writing Project from any time by the installer or network administrator. BrightLink® 697Ui Get Started with the interactive Import content from a connected storage device directly pen or your finger. Use your ...like to quickly access Whiteboard mode, switch the active source, and select other options. See the online BrightLink User's Guide for more information, see the online BrightLink User's Guide. Interact with your computer View your ideas. Using the Home screen Use the Home screen to do...

Users Guide
Page 3
... Control Panel ...29 Projector Parts - Pen Stand ...30 Projector Parts - Remote Control 31 Projector Parts - Contents BrightLink 697Ui User's Guide ...13 Introduction to Your Projector ...14 Projector Features...14 Product Box Contents...16 Additional Components ...18 Optional Equipment and... - Base...28 Projector Parts - Touch Unit ...34 Setting Up the Projector ...36 Projector Placement...36 Projector Setup and Installation Options 37 Projection Distance...39 Removing and Attaching the Cable Cover 39 Projector Connections...40 Connecting to Computer Sources 41 Connecting to...
... Control Panel ...29 Projector Parts - Pen Stand ...30 Projector Parts - Remote Control 31 Projector Parts - Contents BrightLink 697Ui User's Guide ...13 Introduction to Your Projector ...14 Projector Features...14 Product Box Contents...16 Additional Components ...18 Optional Equipment and... - Base...28 Projector Parts - Touch Unit ...34 Setting Up the Projector ...36 Projector Placement...36 Projector Setup and Installation Options 37 Projection Distance...39 Removing and Attaching the Cable Cover 39 Projector Connections...40 Connecting to Computer Sources 41 Connecting to...


