
User Manual (P.I.M Plug-in)
Page 5
If you overwrite your file in one of the sections below, depending on the program and operating system you are converted into the EPSON RGB 2001 color space. Printing in other P.I .M. header information but will still retain P.I .M. quality and enhancements, make sure you will not contain P.I .M.... Then click Show More Options and select Color Management. Image PRINT Image Matching images are using . You see a screen like this: Make sure this source is selected Select the profile for use the Save command to save your printer and paper 5 The new file will lose all...
If you overwrite your file in one of the sections below, depending on the program and operating system you are converted into the EPSON RGB 2001 color space. Printing in other P.I .M. header information but will still retain P.I .M. quality and enhancements, make sure you will not contain P.I .M.... Then click Show More Options and select Color Management. Image PRINT Image Matching images are using . You see a screen like this: Make sure this source is selected Select the profile for use the Save command to save your printer and paper 5 The new file will lose all...

User Manual (P.I.M Plug-in)
Page 6
... box, make sure EPSON RGB 2001 is selected. 3. Select Perceptual for your printer Properties or Preferences window: . Under Media Type (or Type), select the paper you don't see your printer and the paper you're using. Click Setup, then select your paper Click Advanced Click Custom, then Advanced 6. Select your paper Select your printer and click the Properties...
... box, make sure EPSON RGB 2001 is selected. 3. Select Perceptual for your printer Properties or Preferences window: . Under Media Type (or Type), select the paper you don't see your printer and the paper you're using. Click Setup, then select your paper Click Advanced Click Custom, then Advanced 6. Select your paper Select your printer and click the Properties...
User Manual (P.I.M Plug-in)
Page 8
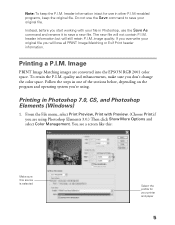
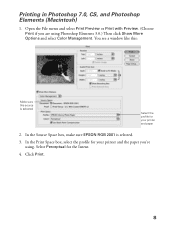
You see a window like this: Make sure this source is selected. 3. Select Perceptual for your printer and paper 2. In the Source Space box, make sure EPSON RGB 2001 is selected Select the profile for your printer and the paper you are using . In the Print Space box, select the profile for the Intent. 4. Click Print. 8 Open the File menu and select Print Preview or Print with Preview. (Choose Print if you 're using Photoshop Elements 3.0.) Then click Show More Options and select Color Management. Printing in Photoshop 7.0, CS, and Photoshop Elements (Macintosh) 1.
You see a window like this: Make sure this source is selected. 3. Select Perceptual for your printer and paper 2. In the Source Space box, make sure EPSON RGB 2001 is selected Select the profile for your printer and the paper you are using . In the Print Space box, select the profile for the Intent. 4. Click Print. 8 Open the File menu and select Print Preview or Print with Preview. (Choose Print if you 're using Photoshop Elements 3.0.) Then click Show More Options and select Color Management. Printing in Photoshop 7.0, CS, and Photoshop Elements (Macintosh) 1.
User Manual (P.I.M Plug-in)
Page 11
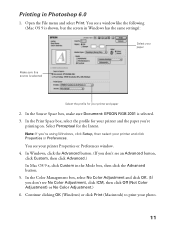
...select the profile for the Intent. Select Perceptual for your printer and the paper you 're using Windows, click Setup, then select your printer Properties or Preferences window. 4. In the Source Space box, make sure Document: EPSON RGB 2001 is selected Select the profile for your photo. 11... 1. In the Color Management box, select No Color Adjustment and click OK. (If you don't see No Color Adjustment, click ICM, then click Off (Not Color Adjustment) or No Color Adjustment.) 6. Continue clicking OK (Windows) or click Print (Macintosh) to print your printer and paper 2. Open the File...
...select the profile for the Intent. Select Perceptual for your printer and the paper you 're using Windows, click Setup, then select your printer Properties or Preferences window. 4. In the Source Space box, make sure Document: EPSON RGB 2001 is selected Select the profile for your photo. 11... 1. In the Color Management box, select No Color Adjustment and click OK. (If you don't see No Color Adjustment, click ICM, then click Off (Not Color Adjustment) or No Color Adjustment.) 6. Continue clicking OK (Windows) or click Print (Macintosh) to print your printer and paper 2. Open the File...

Color Management Workbook
Page 5
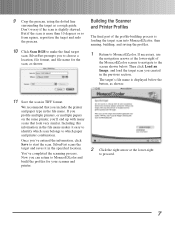
... to Adobe Photoshop Elements, and applying the profiles to your EPSON® photo printer form an ideal system for your EPSON system. It gives you all the tips and techniques you need to optimize color on the same paper, with the step-by step instructions you build a scanner and printer profile in the EPSON Perfection 3200 Pro software bundle: MonacoEZcolor...
... to Adobe Photoshop Elements, and applying the profiles to your EPSON® photo printer form an ideal system for your EPSON system. It gives you all the tips and techniques you need to optimize color on the same paper, with the step-by step instructions you build a scanner and printer profile in the EPSON Perfection 3200 Pro software bundle: MonacoEZcolor...
Color Management Workbook
Page 6
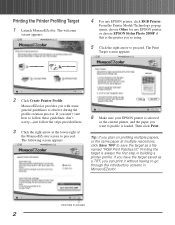
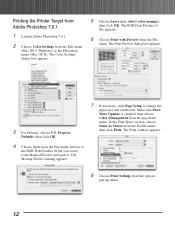
... screen appears: 4 For any EPSON printer, or choose EPSON Stylus Photo 2000P if this is loaded. The Print Target screen appears: 2 Click Create Printer Profile. The following screen appears: 6 Make sure your EPSON printer is always the first step in MonacoEZcolor. Printing the target is selected as a TIFF, you plan on profiling multiple papers, or the same paper at the lower-right...
... screen appears: 4 For any EPSON printer, or choose EPSON Stylus Photo 2000P if this is loaded. The Print Target screen appears: 2 Click Create Printer Profile. The following screen appears: 6 Make sure your EPSON printer is always the first step in MonacoEZcolor. Printing the target is selected as a TIFF, you plan on profiling multiple papers, or the same paper at the lower-right...

Color Management Workbook
Page 7
...Most of the process: using SilverFast to scan both the scanner and printer targets. 8 Choose the paper type you can apply them when you use the profile. The color management settings appear: 7 Choose Print Settings from the Options menu. Some paper-and-ink combinations take longer to the next part of the time... the next day, you want to profile from the Media Type list-for at least an hour to reach its final color. 3 MonacoEZcolor advises you to record the settings you'll make sure you let the printer target dry for example, Enhanced Matte Paper. Once you've printed the target,...
...Most of the process: using SilverFast to scan both the scanner and printer targets. 8 Choose the paper type you can apply them when you use the profile. The color management settings appear: 7 Choose Print Settings from the Options menu. Some paper-and-ink combinations take longer to the next part of the time... the next day, you want to profile from the Media Type list-for at least an hour to reach its final color. 3 MonacoEZcolor advises you to record the settings you'll make sure you let the printer target dry for example, Enhanced Matte Paper. Once you've printed the target,...
Color Management Workbook
Page 11
... shown below the button, as a rough guide. You've completed the scanning process. The target's file name is slightly skewed. If you profile multiple printers, or multiple papers on the same printer, you'll end up with many scans that you created in the previous section. Don't worry if the scan is displayed below .
... shown below the button, as a rough guide. You've completed the scanning process. The target's file name is slightly skewed. If you profile multiple printers, or multiple papers on the same printer, you'll end up with many scans that you created in the previous section. Don't worry if the scan is displayed below .
Color Management Workbook
Page 12
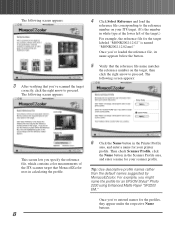
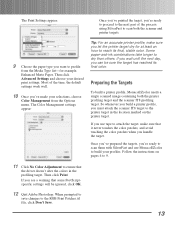
...the reference file name matches the reference number on your IT8 target. (It's the number in the Scanner Profile area, and enter a name for your printer profile. The following screen appears: 4 Click Select Reference and load the reference file corresponding to the reference number ... its name appears below the button. 3 After verifying that you might name the profile for an EPSON Stylus® Photo 2200 using Enhanced Matte Paper "SP2200 EM." Once you specify the reference file, which contains color measurements of the target.) For example, the reference file for the target labeled ...
...the reference file name matches the reference number on your IT8 target. (It's the number in the Scanner Profile area, and enter a name for your printer profile. The following screen appears: 4 Click Select Reference and load the reference file corresponding to the reference number ... its name appears below the button. 3 After verifying that you might name the profile for an EPSON Stylus® Photo 2200 using Enhanced Matte Paper "SP2200 EM." Once you specify the reference file, which contains color measurements of the target.) For example, the reference file for the target labeled ...
Color Management Workbook
Page 13
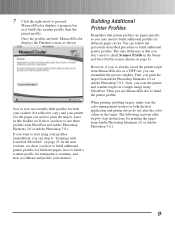
... targets in both your scanner (for reflective copy) and your printer (for the paper you how to build additional printer profiles for different papers, how to build a scanner profile for printing the target from Adobe Photoshop Elements 2.0 or Adobe Photoshop 7.0.1. 9 When printing profiling targets, make sure the color management features in a single image using your monitor. The only...
... targets in both your scanner (for reflective copy) and your printer (for the paper you how to build additional printer profiles for different papers, how to build a scanner profile for printing the target from Adobe Photoshop Elements 2.0 or Adobe Photoshop 7.0.1. 9 When printing profiling targets, make sure the color management features in a single image using your monitor. The only...
Color Management Workbook
Page 14
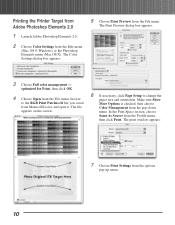
The Color Settings dialog box appears: 5 Choose Print Preview from the Profile menu, then click Print. The file appears on the screen: 6 If ...from the File menu. The Print Preview dialog box appears: 3 Choose Full color management - Printing the Printer Target from Adobe Photoshop Elements 2.0 1 Launch Adobe Photoshop Elements 2.0. 2 Choose Color Settings from the options pop-up menu. 10 optimized for Print, then click...Elements menu (Mac OS X). Make sure Show More Options is checked, then choose Color Management from the File menu, browse to change the paper size and orientation.
The Color Settings dialog box appears: 5 Choose Print Preview from the Profile menu, then click Print. The file appears on the screen: 6 If ...from the File menu. The Print Preview dialog box appears: 3 Choose Full color management - Printing the Printer Target from Adobe Photoshop Elements 2.0 1 Launch Adobe Photoshop Elements 2.0. 2 Choose Color Settings from the options pop-up menu. 10 optimized for Print, then click...Elements menu (Mac OS X). Make sure Show More Options is checked, then choose Color Management from the File menu, browse to change the paper size and orientation.

Color Management Workbook
Page 15
... the target has reached its final, stable color. The Color Management settings appear: Tip: For an accurate printer profile, make sure you want to reach its final color. 11 See pages 4 to 9 for step-bystep instructions. 8 Choose the paper type you let the printer target dry for example, Enhanced Matte Paper. If you see a warning that the driver...
... the target has reached its final, stable color. The Color Management settings appear: Tip: For an accurate printer profile, make sure you want to reach its final color. 11 See pages 4 to 9 for step-bystep instructions. 8 Choose the paper type you let the printer target dry for example, Enhanced Matte Paper. If you see a warning that the driver...
Color Management Workbook
Page 16
...appears: 3 For Settings, choose U.S. The Missing Profile warning appears: 8 Choose Print Settings from the Edit menu (Mac OS 9, Windows) or the Photoshop menu (Mac OS X). Printing the Printer Target from Adobe Photoshop 7.0.1 1 Launch Adobe Photoshop 7.0.1. 2 Choose Color Settings from the options pop-up menu. 12 ...Print window appears: 4 Choose Open from the File menu, browse to change the paper size and orientation. In the Print Space section, choose Same As Source from MonacoEZcolor, and open it. The Color Settings dialog box appears: 5 Choose Leave as is checked, then choose...
...appears: 3 For Settings, choose U.S. The Missing Profile warning appears: 8 Choose Print Settings from the Edit menu (Mac OS 9, Windows) or the Photoshop menu (Mac OS X). Printing the Printer Target from Adobe Photoshop 7.0.1 1 Launch Adobe Photoshop 7.0.1. 2 Choose Color Settings from the options pop-up menu. 12 ...Print window appears: 4 Choose Open from the File menu, browse to change the paper size and orientation. In the Print Space section, choose Same As Source from MonacoEZcolor, and open it. The Color Settings dialog box appears: 5 Choose Leave as is checked, then choose...
Color Management Workbook
Page 17
...attach the target, make sure you let the printer target dry for example, Enhanced Matte Paper. Most of the process: using SilverFast to scan both the printer profiling target and the scanner IT8 profiling target. Follow the instructions on the printer target. If you see a warning that ...some PostScriptspecific settings will be sure the target has reached its final, stable color. If...
...attach the target, make sure you let the printer target dry for example, Enhanced Matte Paper. Most of the process: using SilverFast to scan both the printer profiling target and the scanner IT8 profiling target. Follow the instructions on the printer target. If you see a warning that ...some PostScriptspecific settings will be sure the target has reached its final, stable color. If...
Color Management Workbook
Page 31
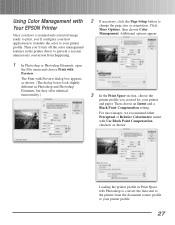
... printer profile. 27 Click More Options, then choose Color Management. Additional options appear: 1 In Photoshop or Photoshop Elements, open the File menu and choose Print with Preview. Using Color Management with Your EPSON Printer Once you have a scanned and corrected image ready to print, you'll configure your host application to translate the color to your printer and paper...
... printer profile. 27 Click More Options, then choose Color Management. Additional options appear: 1 In Photoshop or Photoshop Elements, open the File menu and choose Print with Preview. Using Color Management with Your EPSON Printer Once you have a scanned and corrected image ready to print, you'll configure your host application to translate the color to your printer and paper...

Color Management Workbook
Page 32
... settings for the target when you built your printer profile. One advantage of this , the printer driver will perform an additional correction to a paper type and resolution. 7 When you've made your settings, click the Print button. Your EPSON printer produces a colormanaged print that you can easily ... the image data, usually with disappointing results.) Then click Print. The Color Management settings appear: 5 Choose Print Settings from the Options pop-up menu. The Print settings appear: 8 Click No Color Adjustment. (If you don't do this approach is physically possible. 28...
... settings for the target when you built your printer profile. One advantage of this , the printer driver will perform an additional correction to a paper type and resolution. 7 When you've made your settings, click the Print button. Your EPSON printer produces a colormanaged print that you can easily ... the image data, usually with disappointing results.) Then click Print. The Color Management settings appear: 5 Choose Print Settings from the Options pop-up menu. The Print settings appear: 8 Click No Color Adjustment. (If you don't do this approach is physically possible. 28...
Color Management Workbook
Page 33
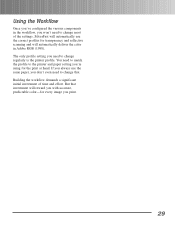
... and will reward you with accurate, predictable color-for every image you need to change most of time and effort. But that . Using the Workflow Once you've configured the various components in Adobe RGB (1998). You need to match the profile to the printer and paper setting you won't need to change regularly...
... and will reward you with accurate, predictable color-for every image you need to change most of time and effort. But that . Using the Workflow Once you've configured the various components in Adobe RGB (1998). You need to match the profile to the printer and paper setting you won't need to change regularly...

Printer Basics
Page 4
... OS X 45 Macintosh 8.6 to 9.x 47 Managing Color with Custom Profiles 48 Printing a Custom Profile Test Target 48 Creating Your Custom Profile 50 Printing With Your Custom Profile 50 Solving Color Management Problems 56 Maintaining Your Printer 57 Cleaning the Print Head 57 Running the Head ... Aligning the Print Head 65 Cleaning the Automatic Roll Paper Cutter 68 iv Contents Printing on Roll Paper 32 Selecting Roll Paper Print Settings 33 Removing Your Printed Photos 39 Removing and Storing Roll Paper 40 Using PRINT Image Matching 41 Using Film Factory 42...
... OS X 45 Macintosh 8.6 to 9.x 47 Managing Color with Custom Profiles 48 Printing a Custom Profile Test Target 48 Creating Your Custom Profile 50 Printing With Your Custom Profile 50 Solving Color Management Problems 56 Maintaining Your Printer 57 Cleaning the Print Head 57 Running the Head ... Aligning the Print Head 65 Cleaning the Automatic Roll Paper Cutter 68 iv Contents Printing on Roll Paper 32 Selecting Roll Paper Print Settings 33 Removing Your Printed Photos 39 Removing and Storing Roll Paper 40 Using PRINT Image Matching 41 Using Film Factory 42...
Printer Basics
Page 10
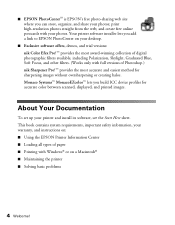
...color between scanned, displayed, and printed images. Your printer software installer lets you add a link to EPSON PhotoCenter on a Macintosh® ■ Maintaining the printer...and instructions on: ■ Using the EPSON Printer Information Center ■ Loading all types of paper ■ Printing with full versions of ...photos; and create free online postcards with your printer and install its software, see the Start Here sheet. print high-resolution photos straight from the web; ■ EPSON PhotoCenterSM is EPSON's free photo-sharing web site where you build ICC device profiles...
...color between scanned, displayed, and printed images. Your printer software installer lets you add a link to EPSON PhotoCenter on a Macintosh® ■ Maintaining the printer...and instructions on: ■ Using the EPSON Printer Information Center ■ Loading all types of paper ■ Printing with full versions of ...photos; and create free online postcards with your printer and install its software, see the Start Here sheet. print high-resolution photos straight from the web; ■ EPSON PhotoCenterSM is EPSON's free photo-sharing web site where you build ICC device profiles...

Printer Basics
Page 25
..." on page 43 ■ "Managing Color with Custom Profiles" on page 22 ■ "Basic Printing With Macintosh OS 8.6 to print using all your printer settings are correct for the paper you : ■ Use the right paper. For the best-looking photos, most vivid colors, and greatest detail, always use genuine EPSON papers and EPSON UltraChrome inks. ■ Choose the right...
..." on page 43 ■ "Managing Color with Custom Profiles" on page 22 ■ "Basic Printing With Macintosh OS 8.6 to print using all your printer settings are correct for the paper you : ■ Use the right paper. For the best-looking photos, most vivid colors, and greatest detail, always use genuine EPSON papers and EPSON UltraChrome inks. ■ Choose the right...


