
Technical Brief (Ink Jet Printers)
Page 1
... in delivering exceptional print quality. This combination of offering a one printers. Epson MicroPiezo® technology Produces precise ink droplet size and placement Epson Papers Epson papers are designed to receive Epson inks and offer the optimal output quality High Resolution Printing High resolution...information on the following pages. Print Quality-Core Printing Technologies The core technologies used in Epson ink jet printers work together to produce brilliant Photo Quality color, sharp text, and incredible print speeds Small Ink Droplet Size Small ink droplets produce...
... in delivering exceptional print quality. This combination of offering a one printers. Epson MicroPiezo® technology Produces precise ink droplet size and placement Epson Papers Epson papers are designed to receive Epson inks and offer the optimal output quality High Resolution Printing High resolution...information on the following pages. Print Quality-Core Printing Technologies The core technologies used in Epson ink jet printers work together to produce brilliant Photo Quality color, sharp text, and incredible print speeds Small Ink Droplet Size Small ink droplets produce...

Technical Brief (Ink Jet Printers)
Page 3
... produces fast, high-quality, color-accurate output. Specifications subject to meet every printing need. Ink Jet Printer Technical Brief Page 3 Ink System: Epson offers a variety of documents and the occasional photo, is a professional photographer staking his reputation on the content, selected output quality, and paper type. Additionally, unlike competitive printers tht require special or...
... produces fast, high-quality, color-accurate output. Specifications subject to meet every printing need. Ink Jet Printer Technical Brief Page 3 Ink System: Epson offers a variety of documents and the occasional photo, is a professional photographer staking his reputation on the content, selected output quality, and paper type. Additionally, unlike competitive printers tht require special or...
User Manual (P.I.M Plug-in)
Page 5
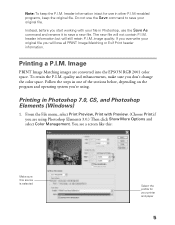
... using . You see a screen like this: Make sure this source is selected Select the profile for use the Save command to save your printer and paper 5 The new file will not contain P.I .M. Note: To keep the original file. To retain the P.I .M. image quality. From the ...File menu, select Print Preview, Print with your original file you are converted into the EPSON RGB 2001 color space. Instead, before you start working with Preview....
... using . You see a screen like this: Make sure this source is selected Select the profile for use the Save command to save your printer and paper 5 The new file will not contain P.I .M. Note: To keep the original file. To retain the P.I .M. image quality. From the ...File menu, select Print Preview, Print with your original file you are converted into the EPSON RGB 2001 color space. Instead, before you start working with Preview....

User Manual (P.I.M Plug-in)
Page 6
.... 7. Click Print. 5. You see an Advanced button, click Custom, then click Advanced.) 6 In the Source Space box, make sure EPSON RGB 2001 is selected. 3. In the Print Space box, select the profile for the Intent. 4. Under Media Type (or Type), select the paper you don't see your printer and the paper you're using.
.... 7. Click Print. 5. You see an Advanced button, click Custom, then click Advanced.) 6 In the Source Space box, make sure EPSON RGB 2001 is selected. 3. In the Print Space box, select the profile for the Intent. 4. Under Media Type (or Type), select the paper you don't see your printer and the paper you're using.
User Manual (P.I.M Plug-in)
Page 8
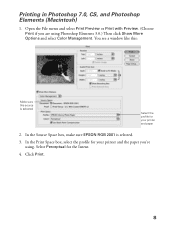
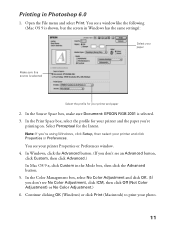
In the Source Space box, make sure EPSON RGB 2001 is selected Select the profile for your printer and the paper you are using . Printing in Photoshop 7.0, CS, and Photoshop Elements (Macintosh) 1. Click Print. 8 Open the File menu and select Print Preview or Print with Preview. (Choose Print if you 're using Photoshop Elements 3.0.) Then click Show More Options and select Color Management. In the Print Space box, select the profile for the Intent. 4. Select Perceptual for your printer and paper 2. You see a window like this: Make sure this source is selected. 3.
In the Source Space box, make sure EPSON RGB 2001 is selected Select the profile for your printer and the paper you are using . Printing in Photoshop 7.0, CS, and Photoshop Elements (Macintosh) 1. Click Print. 8 Open the File menu and select Print Preview or Print with Preview. (Choose Print if you 're using Photoshop Elements 3.0.) Then click Show More Options and select Color Management. In the Print Space box, select the profile for the Intent. 4. Select Perceptual for your printer and paper 2. You see a window like this: Make sure this source is selected. 3.
User Manual (P.I.M Plug-in)
Page 9
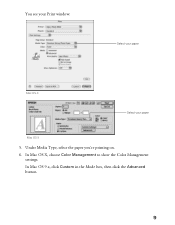
In Mac OS X, choose Color Management to show the Color Management settings. Under Media Type, select the paper you're printing on. 6. In Mac OS 9.x, click Custom in the Mode box, then click the Advanced button. 9 You see your paper Mac OS 9 5. Select your paper Mac OS X Select your Print window: .
In Mac OS X, choose Color Management to show the Color Management settings. Under Media Type, select the paper you're printing on. 6. In Mac OS 9.x, click Custom in the Mode box, then click the Advanced button. 9 You see your paper Mac OS 9 5. Select your paper Mac OS X Select your Print window: .
User Manual (P.I.M Plug-in)
Page 11
... Color Adjustment) or No Color Adjustment.) 6. Continue clicking OK (Windows) or click Print (Macintosh) to print your printer and the paper you 're using Windows, click Setup, then select your printer Properties or Preferences window. 4. Select Perceptual for your paper Make sure this source is selected. 3. In the Print Space box, select the profile for your photo...
... Color Adjustment) or No Color Adjustment.) 6. Continue clicking OK (Windows) or click Print (Macintosh) to print your printer and the paper you 're using Windows, click Setup, then select your printer Properties or Preferences window. 4. Select Perceptual for your paper Make sure this source is selected. 3. In the Print Space box, select the profile for your photo...

Taking Care of Your Photographs
Page 1
.... Taking Care of Your Photographs With proper care, photos printed with Epson Stylus Photo inkjet printers will preserve your memories for many factors, in addition to light exposure, using the appropriate photo papers and proper care of photos are very important. Epson currently offers both dye-based, six-color Epson Stylus Photo printers and the six-color Epson Stylus Photo 2000P printers that features an attractive semi-gloss finish and strong...
.... Taking Care of Your Photographs With proper care, photos printed with Epson Stylus Photo inkjet printers will preserve your memories for many factors, in addition to light exposure, using the appropriate photo papers and proper care of photos are very important. Epson currently offers both dye-based, six-color Epson Stylus Photo printers and the six-color Epson Stylus Photo 2000P printers that features an attractive semi-gloss finish and strong...

Taking Care of Your Photographs
Page 2
... like humidity, cigarette smoke, and high levels of photo media for fine art and other retailers. Premium Semigloss Photo Paper- As with the Epson Stylus Photo 2000P The Epson Stylus Photo 2000P uses the same six-color Archival inks as yellowing. Heavyweight semi-flat to semi...be kept out of large format printers for use . Beautiful flat finished heavyweight paper, with the Epson Stylus Photo 2000P: Premium Luster Photo Paper - For proper storage, Epson recommends that prints be evident with lower saturated images. Watercolor Paper-Radiant White- Epson offers an extensive line of ...
... like humidity, cigarette smoke, and high levels of photo media for fine art and other retailers. Premium Semigloss Photo Paper- As with the Epson Stylus Photo 2000P The Epson Stylus Photo 2000P uses the same six-color Archival inks as yellowing. Heavyweight semi-flat to semi...be kept out of large format printers for use . Beautiful flat finished heavyweight paper, with the Epson Stylus Photo 2000P: Premium Luster Photo Paper - For proper storage, Epson recommends that prints be evident with lower saturated images. Watercolor Paper-Radiant White- Epson offers an extensive line of ...
Color Management Workbook
Page 3
... with respect to the accuracy or completeness of the contents of this booklet. Trademarks EPSON and EPSON Stylus are for every individual. Printed on recycled paper 2/03 All photographs © 2000 by Epson America, Inc. EPSON Perfection is a registered trademark of Warranty While Epson America, Inc. General Notice: Other product names used herein are registered trademarks of...
... with respect to the accuracy or completeness of the contents of this booklet. Trademarks EPSON and EPSON Stylus are for every individual. Printed on recycled paper 2/03 All photographs © 2000 by Epson America, Inc. EPSON Perfection is a registered trademark of Warranty While Epson America, Inc. General Notice: Other product names used herein are registered trademarks of...

Color Management Workbook
Page 5
..., monitor, and printer. Profiles describe the color gamut of various devices and the color space of ink, paper, and printer settings. The Art and Science of Color Each device in this booklet, you build a scanner and printer profile in profiles, color management tools determine ...that the others can achieve effective color reproduction using the same printer settings you need to create profiles for your EPSON® photo printer form an ideal system for your EPSON system. The first step is to optimize color on your scanner, printer, and monitor. Adobe® Photoshop...
..., monitor, and printer. Profiles describe the color gamut of various devices and the color space of ink, paper, and printer settings. The Art and Science of Color Each device in this booklet, you build a scanner and printer profile in profiles, color management tools determine ...that the others can achieve effective color reproduction using the same printer settings you need to create profiles for your EPSON® photo printer form an ideal system for your EPSON system. The first step is to optimize color on your scanner, printer, and monitor. Adobe® Photoshop...
Color Management Workbook
Page 6
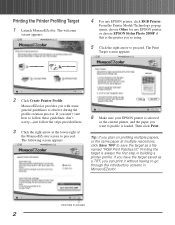
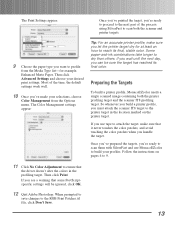
... choose EPSON Stylus Photo 2000P if this is the printer you with some general guidelines to proceed. If you aren't sure how to follow these guidelines, don't worry-just follow the steps provided here. 3 Click the right arrow at multiple resolutions, click Save TIFF to save the target as a TIFF, you plan on profiling multiple papers...
... choose EPSON Stylus Photo 2000P if this is the printer you with some general guidelines to proceed. If you aren't sure how to follow these guidelines, don't worry-just follow the steps provided here. 3 Click the right arrow at multiple resolutions, click Save TIFF to save the target as a TIFF, you plan on profiling multiple papers...

Color Management Workbook
Page 7
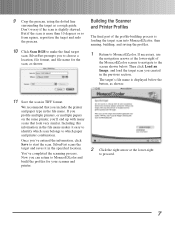
...default settings work well. Then click Advanced Settings and choose your selections, choose Color Management from the Options menu. Most of the process: using SilverFast to scan both the scanner and printer targets. 8 Choose the paper type you want to profile from the options pop-up menu. Some... paper-and-ink combinations take longer to dry than others. The color management settings appear: 7 Choose Print Settings from the Media ...
...default settings work well. Then click Advanced Settings and choose your selections, choose Color Management from the Options menu. Most of the process: using SilverFast to scan both the scanner and printer targets. 8 Choose the paper type you want to profile from the options pop-up menu. Some... paper-and-ink combinations take longer to dry than others. The color management settings appear: 7 Choose Print Settings from the Media ...
Color Management Workbook
Page 11
...entered the information, click Save to start the scan. SilverFast scans the target and saves it easy to identify which scan belongs to which paper and printer combination. Don't worry if the scan is displayed below . SilverFast prompts you can return to MonacoEZcolor and build the profiles for the ...navigate to the screen shown below the button, as shown: 11 Save the scan in TIFF format. If you profile multiple printers, or multiple papers on the same printer, you created in the previous section. You've completed the scanning process. If necessary, use the navigation arrows at the...
...entered the information, click Save to start the scan. SilverFast scans the target and saves it easy to identify which scan belongs to which paper and printer combination. Don't worry if the scan is displayed below . SilverFast prompts you can return to MonacoEZcolor and build the profiles for the ...navigate to the screen shown below the button, as shown: 11 Save the scan in TIFF format. If you profile multiple printers, or multiple papers on the same printer, you created in the previous section. You've completed the scanning process. If necessary, use the navigation arrows at the...
Color Management Workbook
Page 12
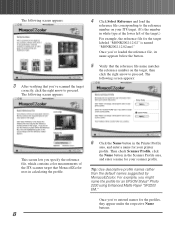
... than the default names suggested by MonacoEZcolor. Then check Scanner Profile, click the Name button in the Printer Profile area, and enter a name for an EPSON Stylus® Photo 2200 using Enhanced Matte Paper "SP2200 EM." Once you might name the profile for your scanner profile. The following screen appears:...12-02" is named "MONR2002.12.02.mrf." The following screen appears: 5 Verify that you specify the reference file, which contains color measurements of the target.) For example, the reference file for the profiles, they appear under the respective Name buttons.
... than the default names suggested by MonacoEZcolor. Then check Scanner Profile, click the Name button in the Printer Profile area, and enter a name for an EPSON Stylus® Photo 2200 using Enhanced Matte Paper "SP2200 EM." Once you might name the profile for your scanner profile. The following screen appears:...12-02" is named "MONR2002.12.02.mrf." The following screen appears: 5 Verify that you specify the reference file, which contains color measurements of the target.) For example, the reference file for the profiles, they appear under the respective Name buttons.
Color Management Workbook
Page 13
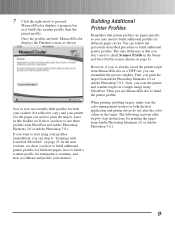
... offer step-by-step instructions for different paper stocks. MonacoEZcolor displays a progress bar as shown: You've now successfully built profiles for both the host application and printer driver do not alter the color values in both your scanner (for the paper you don't need to check Scanner Profile... in a single image using your profiles immediately, you scan the printer and scanner targets in the Name and ...
... offer step-by-step instructions for different paper stocks. MonacoEZcolor displays a progress bar as shown: You've now successfully built profiles for both the host application and printer driver do not alter the color values in both your scanner (for the paper you don't need to check Scanner Profile... in a single image using your profiles immediately, you scan the printer and scanner targets in the Name and ...
Color Management Workbook
Page 14
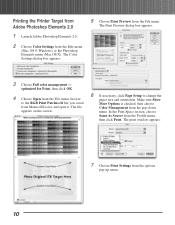
... change the paper size and orientation. In the Print Space section, choose Same As Source from the Edit menu (Mac OS 9, Windows) or the Photoshop Elements menu (Mac OS X). The Print Preview dialog box appears: 3 Choose Full color management - Printing the Printer Target from ...Adobe Photoshop Elements 2.0 1 Launch Adobe Photoshop Elements 2.0. 2 Choose Color Settings from the Profile menu, then click Print. The file appears on the screen: 6 ...
... change the paper size and orientation. In the Print Space section, choose Same As Source from the Edit menu (Mac OS 9, Windows) or the Photoshop Elements menu (Mac OS X). The Print Preview dialog box appears: 3 Choose Full color management - Printing the Printer Target from ...Adobe Photoshop Elements 2.0 1 Launch Adobe Photoshop Elements 2.0. 2 Choose Color Settings from the Profile menu, then click Print. The file appears on the screen: 6 ...

Color Management Workbook
Page 15
... Elements. If you wait until the next day, you let the printer target dry for step-bystep instructions. 8 Choose the paper type you 've made your desired print settings. See pages 4 to 9 for at least an hour to reach its final color. 11 Then click Print. When prompted to save changes to dry...
... Elements. If you wait until the next day, you let the printer target dry for step-bystep instructions. 8 Choose the paper type you 've made your desired print settings. See pages 4 to 9 for at least an hour to reach its final color. 11 Then click Print. When prompted to save changes to dry...
Color Management Workbook
Page 16
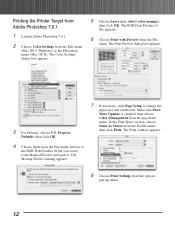
... dialog box appears: 3 For Settings, choose U.S. The Print window appears: 4 Choose Open from the File menu, browse to change the paper size and orientation. Prepress Defaults, then click OK. 7 If necessary, click Page Setup to the RGB Print Patches.tif file you saved ...8 Choose Print Settings from the Edit menu (Mac OS 9, Windows) or the Photoshop menu (Mac OS X). Printing the Printer Target from Adobe Photoshop 7.0.1 1 Launch Adobe Photoshop 7.0.1. 2 Choose Color Settings from the options pop-up menu. 12 The RGB Print Patches.tif file appears. 6 Choose Print with Preview from...
... dialog box appears: 3 For Settings, choose U.S. The Print window appears: 4 Choose Open from the File menu, browse to change the paper size and orientation. Prepress Defaults, then click OK. 7 If necessary, click Page Setup to the RGB Print Patches.tif file you saved ...8 Choose Print Settings from the Edit menu (Mac OS 9, Windows) or the Photoshop menu (Mac OS X). Printing the Printer Target from Adobe Photoshop 7.0.1 1 Launch Adobe Photoshop 7.0.1. 2 Choose Color Settings from the options pop-up menu. 12 The RGB Print Patches.tif file appears. 6 Choose Print with Preview from...
Color Management Workbook
Page 17
... image containing both the scanner and printer targets. 9 Choose the paper type you want to profile from the Options menu. Follow the instructions on the printer target. The Color Management settings appear: Tip: For an accurate printer profile, make sure that it never touches the color patches, and avoid touching the color patches when you handle the...
... image containing both the scanner and printer targets. 9 Choose the paper type you want to profile from the Options menu. Follow the instructions on the printer target. The Color Management settings appear: Tip: For an accurate printer profile, make sure that it never touches the color patches, and avoid touching the color patches when you handle the...


