
Installation Guide - ELPMBUNI Universal Mount Assembly
Page 6
...as (distance from the screen to the lens of the projector, top of the lens placement to the top screen etc. Failure to the ceiling installation instruction. CAUTION: THE PROJECTOR IS FRAGILE; NOTE: Review the projectors manufacture's operation manual and refer to do so could result ...in thread size (Figure 1). Carefully invert the projector and place it on the screen. 1. Identify the number of ...
...as (distance from the screen to the lens of the projector, top of the lens placement to the top screen etc. Failure to the ceiling installation instruction. CAUTION: THE PROJECTOR IS FRAGILE; NOTE: Review the projectors manufacture's operation manual and refer to do so could result ...in thread size (Figure 1). Carefully invert the projector and place it on the screen. 1. Identify the number of ...

Installation Guide - ELPMBUNI Universal Mount Assembly
Page 14
...#14 x 2" wood screws (supplied) or with the top image edge of the screen for best picture ratio. 2. Before you mount your projector's distance calculation to determine what distance is normally better to parallel with other (commercially available) hardware depending on the screen and no higher then ...the top image edge of the projector. Page - 15 - Review your screen and projector, make sure the mounting location will safely support the weight of the screen). 3. Locate the inverted...
...#14 x 2" wood screws (supplied) or with the top image edge of the screen for best picture ratio. 2. Before you mount your projector's distance calculation to determine what distance is normally better to parallel with other (commercially available) hardware depending on the screen and no higher then ...the top image edge of the projector. Page - 15 - Review your screen and projector, make sure the mounting location will safely support the weight of the screen). 3. Locate the inverted...
User's Guide
Page 108
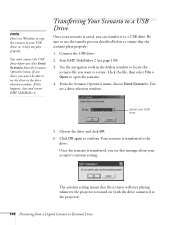
You must connect the USB drive before you want to the projector). 108 Presenting from the Scenario Option(s) menu. Click the file, then select File > Open to confirm. Click OK again to open the scenario. 4. Transferring Your ... sure to use Windows to copy the scenario to a USB drive. Your scenario is transferred to ensure that the scenario will start playing whenever the projector is transferred, you see the drive in the folders window to locate the scenario file you select Send Scenario from a Digital Camera or External Drive...
You must connect the USB drive before you want to the projector). 108 Presenting from the Scenario Option(s) menu. Click the file, then select File > Open to confirm. Click OK again to open the scenario. 4. Transferring Your ... sure to use Windows to copy the scenario to a USB drive. Your scenario is transferred to ensure that the scenario will start playing whenever the projector is transferred, you see the drive in the folders window to locate the scenario file you select Send Scenario from a Digital Camera or External Drive...


