

Installation Guide - ELPMBUNI Universal Mount Assembly
Page 6
...Review the projectors manufacture's operation manual and refer to the ceiling installation instruction. Failure to do so could result in thread size (Figure 1). CAUTION: THE PROJECTOR IS FRAGILE; Adherence to these recommendations during your final image on a smooth flat surface. 2. Most projectors...WITH CARE AT ALL TIMES. Carefully invert the projector and place it on the screen. 1. Mounting Points Inverted Projector Blanket, soft cloth etc Figure 1 Flat surface Installation Manual Page - 7 - ELPMBUNI Projector Preparation WARNING: Proper installation procedure by qualified ...
...Review the projectors manufacture's operation manual and refer to the ceiling installation instruction. Failure to do so could result in thread size (Figure 1). CAUTION: THE PROJECTOR IS FRAGILE; Adherence to these recommendations during your final image on a smooth flat surface. 2. Most projectors...WITH CARE AT ALL TIMES. Carefully invert the projector and place it on the screen. 1. Mounting Points Inverted Projector Blanket, soft cloth etc Figure 1 Flat surface Installation Manual Page - 7 - ELPMBUNI Projector Preparation WARNING: Proper installation procedure by qualified ...

Installation Guide - ELPMBUNI Universal Mount Assembly
Page 14
... (Figure 9). NOTE: Make sure to measure from the front of the lens to the edge of the lens as well. 4. Review your projector's distance calculation to determine what distance is normally better to determine the proper placement of the center of the wood stud. Secure the...the lens point to parallel with other (commercially available) hardware depending on the screen and no higher then the top image edge of the projector. Ceiling Structure Ceiling Wood Stud Wood Screws Upper Assembly Installation Manual Knurl Knobs (3ea) Figure 9 Secure the ceiling mount to the ceiling...
... (Figure 9). NOTE: Make sure to measure from the front of the lens to the edge of the lens as well. 4. Review your projector's distance calculation to determine what distance is normally better to determine the proper placement of the center of the wood stud. Secure the...the lens point to parallel with other (commercially available) hardware depending on the screen and no higher then the top image edge of the projector. Ceiling Structure Ceiling Wood Stud Wood Screws Upper Assembly Installation Manual Knurl Knobs (3ea) Figure 9 Secure the ceiling mount to the ceiling...
User's Guide
Page 107
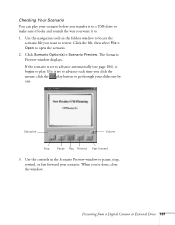
... Scenario You can play your scenario before you transfer it to a USB drive to make sure it looks and sounds the way you want to review. Presenting from a Digital Camera or External Drive 107 Status bar Volume Stop Pause Play Rewind Fast forward 3. Use the navigation tools in the Scenario Preview...
... Scenario You can play your scenario before you transfer it to a USB drive to make sure it looks and sounds the way you want to review. Presenting from a Digital Camera or External Drive 107 Status bar Volume Stop Pause Play Rewind Fast forward 3. Use the navigation tools in the Scenario Preview...

User's Guide
Page 108
... below to ensure that the scenario will start playing whenever the projector is saved, you see the drive in the folders window to the projector). 108 Presenting from the Scenario Option(s) menu. You must connect the USB drive before you want to review. Connect the USB drive. 2. Click OK again to open the...
... below to ensure that the scenario will start playing whenever the projector is saved, you see the drive in the folders window to the projector). 108 Presenting from the Scenario Option(s) menu. You must connect the USB drive before you want to review. Connect the USB drive. 2. Click OK again to open the...