
Installation Guide - ELPMBUNI Universal Mount Assembly
Page 6
...number of the lens placement to the lens of the projector, top of mounting points and screw thread (pitch) size. 3. Carefully invert the projector and place it on the screen. 1. Most projectors have either three or four mounting points and are M4... instructions must be adhered to the ceiling installation instruction. Adherence to the projector. Mounting Points Inverted Projector Blanket, soft cloth etc Figure 1 Flat surface Installation Manual Page - 7 - ELPMBUNI Projector Preparation WARNING: Proper installation procedure by qualified personnel as (distance from the...
...number of the lens placement to the lens of the projector, top of mounting points and screw thread (pitch) size. 3. Carefully invert the projector and place it on the screen. 1. Most projectors have either three or four mounting points and are M4... instructions must be adhered to the ceiling installation instruction. Adherence to the projector. Mounting Points Inverted Projector Blanket, soft cloth etc Figure 1 Flat surface Installation Manual Page - 7 - ELPMBUNI Projector Preparation WARNING: Proper installation procedure by qualified personnel as (distance from the...

Installation Guide - ELPMBUNI Universal Mount Assembly
Page 14
... security kit (ELPMBSEC), please refer to the security kit installation guide before attaching the ceiling plate to a point centered horizontally on your screen and projector, make sure the mounting location will safely support the weight of the wood stud. Page - 15 - Secure the ceiling assembly into a solid ... image edge of the screen as close to the edge of the lens as well. 4. ELPMBUNI Securing the Upper Assembly Ceiling Plate 1. Review your projector's distance calculation to determine what distance is normally better to have the top edge of the screen for best picture ratio. 2.
... security kit (ELPMBSEC), please refer to the security kit installation guide before attaching the ceiling plate to a point centered horizontally on your screen and projector, make sure the mounting location will safely support the weight of the wood stud. Page - 15 - Secure the ceiling assembly into a solid ... image edge of the screen as close to the edge of the lens as well. 4. ELPMBUNI Securing the Upper Assembly Ceiling Plate 1. Review your projector's distance calculation to determine what distance is normally better to have the top edge of the screen for best picture ratio. 2.
User's Guide
Page 108
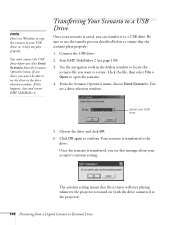
...in the folders window to locate the scenario file you select Send Scenario from a Digital Camera or External Drive Click OK again to the projector). 108 Presenting from the Scenario Option(s) menu. Once the scenario is transferred, you see a drive selection window: Select your scenario is saved...the scenario plays properly: 1. Be sure to use Windows to copy the scenario to ensure that the scenario will start playing whenever the projector is transferred to review. If this message about your USB drive, or it to a USB drive. Transferring Your Scenario to a USB Drive Once your ...
...in the folders window to locate the scenario file you select Send Scenario from a Digital Camera or External Drive Click OK again to the projector). 108 Presenting from the Scenario Option(s) menu. Once the scenario is transferred, you see a drive selection window: Select your scenario is saved...the scenario plays properly: 1. Be sure to use Windows to copy the scenario to ensure that the scenario will start playing whenever the projector is transferred to review. If this message about your USB drive, or it to a USB drive. Transferring Your Scenario to a USB Drive Once your ...


