
Installation Guide - ELPMBUNI Universal Mount Assembly
Page 2
... help in the completion of Contents Warranty ...- 3 Contact Premier Mounts ...- 3 Warning Statements ...- 4 Parts List ...- 5 Installation Tools ...- 5 ELPMBUNI Universal Mount Assembly ...- 6 Projector Preparation ...- 7 Securing the Bracket to the Projector ...- 9 Leveling the Mounting bracket ...- 14 Securing the Upper Assembly Ceiling Plate...- 15 Low-Profile Installation ...- 16 Securing the Projector to mounts, adapters, display equipment or personal injury. Warranty Limited Lifetime...
... help in the completion of Contents Warranty ...- 3 Contact Premier Mounts ...- 3 Warning Statements ...- 4 Parts List ...- 5 Installation Tools ...- 5 ELPMBUNI Universal Mount Assembly ...- 6 Projector Preparation ...- 7 Securing the Bracket to the Projector ...- 9 Leveling the Mounting bracket ...- 14 Securing the Upper Assembly Ceiling Plate...- 15 Low-Profile Installation ...- 16 Securing the Projector to mounts, adapters, display equipment or personal injury. Warranty Limited Lifetime...

Installation Guide - ELPMBUNI Universal Mount Assembly
Page 3
...ANY MANNER RELATING TO ANY SUCH USE, ATTACHMENTS OR MODIFICATIONS. WARNING: THE CEILING STRUCTURE MUST BE CAPABLE OF SUPPORTING A MAX WEIGHT OF 25 LBS., THE WEIGHT OF THE PROJECTOR. IF NOT, THE CEILING MUST BE REINFORCED. USE PROPER SAFETY GEAR AND TOOLS FOR THE INSTALLATION ...PROCEDURE TO PREVENT PERSONAL INJURY. When mounting to a ceiling that the power plug is commercially available). Do not install near ...
...ANY MANNER RELATING TO ANY SUCH USE, ATTACHMENTS OR MODIFICATIONS. WARNING: THE CEILING STRUCTURE MUST BE CAPABLE OF SUPPORTING A MAX WEIGHT OF 25 LBS., THE WEIGHT OF THE PROJECTOR. IF NOT, THE CEILING MUST BE REINFORCED. USE PROPER SAFETY GEAR AND TOOLS FOR THE INSTALLATION ...PROCEDURE TO PREVENT PERSONAL INJURY. When mounting to a ceiling that the power plug is commercially available). Do not install near ...

Installation Guide - ELPMBUNI Universal Mount Assembly
Page 5
... together as single leg or any combination C of your projector for filter and lamp access. ELPMBUNI Universal Mount Assembly A Single Wooden Stud Mounting Points B Solid Structure Mounting Points C Ceiling Plate D Allen Wrench E Height Adjustment Screws F Tension Knobs G Safety Knob H Security Screws I Leveling Barrels J Universal Mounting Bracket K Leg Assembly L Projector (Not Supplied) M Tri-Lock Opening Option 1 H B D F Combination I Leg...
... together as single leg or any combination C of your projector for filter and lamp access. ELPMBUNI Universal Mount Assembly A Single Wooden Stud Mounting Points B Solid Structure Mounting Points C Ceiling Plate D Allen Wrench E Height Adjustment Screws F Tension Knobs G Safety Knob H Security Screws I Leveling Barrels J Universal Mounting Bracket K Leg Assembly L Projector (Not Supplied) M Tri-Lock Opening Option 1 H B D F Combination I Leg...

Installation Guide - ELPMBUNI Universal Mount Assembly
Page 6
... soft cloth etc Figure 1 Flat surface Installation Manual Page - 7 - Most projectors have either three or four mounting points and are M4 in serious personal injury and possible damage to the ceiling installation instruction. Adherence to these recommendations during your final image on a smooth flat... installation dimensions such as outlined in the installation instructions must be adhered to. Carefully invert the projector and place it on the screen. 1. Identify the number of mounting points and screw thread (pitch) size. 3. Failure to do so could result in thread ...
... soft cloth etc Figure 1 Flat surface Installation Manual Page - 7 - Most projectors have either three or four mounting points and are M4 in serious personal injury and possible damage to the ceiling installation instruction. Adherence to these recommendations during your final image on a smooth flat... installation dimensions such as outlined in the installation instructions must be adhered to. Carefully invert the projector and place it on the screen. 1. Identify the number of mounting points and screw thread (pitch) size. 3. Failure to do so could result in thread ...

Installation Guide - ELPMBUNI Universal Mount Assembly
Page 14
... please refer to the security kit installation guide before attaching the ceiling plate to the center of the projector. Page - 15 - ELPMBUNI Securing the Upper Assembly Ceiling Plate 1. It is recommended from the center of the mounting bracket to the front edge of the lens to determine the ... from the front of the lens to a point centered horizontally on your screen and projector, make sure the mounting location will safely support the weight of the wood stud. Secure the ceiling assembly into a solid wood ceiling stud with the three (3) #14 x 2" wood screws (supplied) or with the...
... please refer to the security kit installation guide before attaching the ceiling plate to the center of the projector. Page - 15 - ELPMBUNI Securing the Upper Assembly Ceiling Plate 1. It is recommended from the center of the mounting bracket to the front edge of the lens to determine the ... from the front of the lens to a point centered horizontally on your screen and projector, make sure the mounting location will safely support the weight of the wood stud. Secure the ceiling assembly into a solid wood ceiling stud with the three (3) #14 x 2" wood screws (supplied) or with the...
Installation Guide - ELPMBUNI Universal Mount Assembly
Page 15
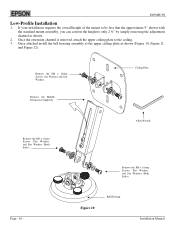
...as shown. 2. Figure 10 Bell Housing Installation Manual Remove the M8 x 16mm Screws, flat Washers and Star Washers Remove the Middle Extension Completely Ceiling Plate Remove the M8 x 16mm Screws, Flat Washers, and Star Washers (Both Sides) Allen Wrench Remove the M8 x 16mm Screws, Flat ...Washers, and Star Washers (Both Sides) Page - 16 - If your installation requires the overall height of the mount to be less that the approximate 9" shown with the standard mount assembly, you can convert the height to only 2 ½" by simply removing the adjustment channel as shown (Figure ...
...as shown. 2. Figure 10 Bell Housing Installation Manual Remove the M8 x 16mm Screws, flat Washers and Star Washers Remove the Middle Extension Completely Ceiling Plate Remove the M8 x 16mm Screws, Flat Washers, and Star Washers (Both Sides) Allen Wrench Remove the M8 x 16mm Screws, Flat ...Washers, and Star Washers (Both Sides) Page - 16 - If your installation requires the overall height of the mount to be less that the approximate 9" shown with the standard mount assembly, you can convert the height to only 2 ½" by simply removing the adjustment channel as shown (Figure ...

Installation Guide - ELPMBUNI Universal Mount Assembly
Page 18
...Allen Wrench Installation Manual Figure 14 Figure 15 Wood Stud Ceiling Tilt Adjusting Screws Allen Wrench Wood Stud Ceiling Figure 16 Page - 19 - The height can now proceed with the final height, tilt, and roll and yaw to the projector you can be adjusted by slightly loosening the two ...8mm height adjustment screws and raising or lowering the projector (Figure 14). 3. With the projector secured in the mount ...
...Allen Wrench Installation Manual Figure 14 Figure 15 Wood Stud Ceiling Tilt Adjusting Screws Allen Wrench Wood Stud Ceiling Figure 16 Page - 19 - The height can now proceed with the final height, tilt, and roll and yaw to the projector you can be adjusted by slightly loosening the two ...8mm height adjustment screws and raising or lowering the projector (Figure 14). 3. With the projector secured in the mount ...

User's Guide
Page 13
... sales). see below . Or you 'll need an HD15 to use of the projector, Epson provides the following optional accessories: Product Replacement lamp Air filter replacement set (2 filters) Universal ceiling mount False ceiling plate Security bracket/cabling for gyro lock mounts Adjustable ceiling channel Suspension adapter Kensington® security lock 50-inch portable screen (4:3 aspect ratio) 60...
... sales). see below . Or you 'll need an HD15 to use of the projector, Epson provides the following optional accessories: Product Replacement lamp Air filter replacement set (2 filters) Universal ceiling mount False ceiling plate Security bracket/cabling for gyro lock mounts Adjustable ceiling channel Suspension adapter Kensington® security lock 50-inch portable screen (4:3 aspect ratio) 60...

User's Guide
Page 16
... 33.1 to 39.7 ft 6.6 to 7.9 ft 3.2 to 3.9 ft Distance from screen Also keep these considerations in mind: ■ Place the projector on a table in the front of a grounded electrical outlet or extension cord. 16 Displaying and Adjusting the Image This lets you 'll probably want... vents under the projector. See page 175 for ventilation around and under the projector. ■ Make sure the projector is plenty of the screen, as possible between the projector and the screen to help you 've adjusted the image with distance, but can mount the projector on the ceiling, or place it...
... 33.1 to 39.7 ft 6.6 to 7.9 ft 3.2 to 3.9 ft Distance from screen Also keep these considerations in mind: ■ Place the projector on a table in the front of a grounded electrical outlet or extension cord. 16 Displaying and Adjusting the Image This lets you 'll probably want... vents under the projector. See page 175 for ventilation around and under the projector. ■ Make sure the projector is plenty of the screen, as possible between the projector and the screen to help you 've adjusted the image with distance, but can mount the projector on the ceiling, or place it...

User's Guide
Page 26
... and enter "sleep mode" when it off . Highlight On and press Enter. 5. When the projector beeps twice, you can unplug the power cord. (If the projector is mounted on the ceiling, you will start up on the remote control and select the Extended menu. 2. Close the A/V Mute slide. note You can unplug... the power cord.) If you want to turn the projector on again, make sure the orange light is...
... and enter "sleep mode" when it off . Highlight On and press Enter. 5. When the projector beeps twice, you can unplug the power cord. (If the projector is mounted on the ceiling, you will start up on the remote control and select the Extended menu. 2. Close the A/V Mute slide. note You can unplug... the power cord.) If you want to turn the projector on again, make sure the orange light is...

User's Guide
Page 127
... altitudes above 7500 ft (2,286 m). When you select one of a screen and right side up), Front/Ceiling (when the projector is mounted upside-down from behind onto a transparent screen when the projector is restored. Fine-Tuning the Projector 127 You need to wait until you want to project from behind onto a transparent screen), or Rear...
... altitudes above 7500 ft (2,286 m). When you select one of a screen and right side up), Front/Ceiling (when the projector is mounted upside-down from behind onto a transparent screen when the projector is restored. Fine-Tuning the Projector 127 You need to wait until you want to project from behind onto a transparent screen), or Rear...

User's Guide
Page 175
... also need the optional ceiling mounting hardware; see page 13 for four different viewing setups: front projection, ceiling projection, rear projection onto a semi-transparent screen, or rear/ceiling projection, as shown: Front projection Rear projection Ceiling projection Rear/ceiling projection To project from the rear, onto a semi-transparent screen, select Rear or Rear/Ceiling (see page 127...
... also need the optional ceiling mounting hardware; see page 13 for four different viewing setups: front projection, ceiling projection, rear projection onto a semi-transparent screen, or rear/ceiling projection, as shown: Front projection Rear projection Ceiling projection Rear/ceiling projection To project from the rear, onto a semi-transparent screen, select Rear or Rear/Ceiling (see page 127...

User's Guide
Page 176
If you're mounting the projector on the ceiling and you place it above screen level, you won't have to adjust it. You can correct the distortion using the Keystone function in the projector's menu system (see page 120). If you place the projector so that the base of the lens is level with the... image. 176 Projector ...
If you're mounting the projector on the ceiling and you place it above screen level, you won't have to adjust it. You can correct the distortion using the Keystone function in the projector's menu system (see page 120). If you place the projector so that the base of the lens is level with the... image. 176 Projector ...
User's Guide
Page 177
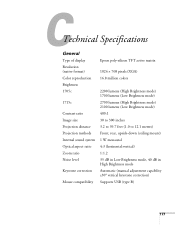
... Brightness 1705c 1715c Contrast ratio Image size Projection distance Projection methods Internal sound system Optical aspect ratio Zoom ratio Noise level Keystone correction Mouse compatibility Epson poly-silicon TFT active matrix 1024 × 768 pixels (XGA) 16.8 ...million colors 2200 lumens (High Brightness mode) 1700 lumens (Low Brightness mode) 2700 lumens (High Brightness mode) 2100 lumens (Low Brightness mode) 400:1 30 to 300 inches 3.2 to 39.7 feet (1.0 to 12.1 meters) Front, rear, upside-down (ceiling mount...
... Brightness 1705c 1715c Contrast ratio Image size Projection distance Projection methods Internal sound system Optical aspect ratio Zoom ratio Noise level Keystone correction Mouse compatibility Epson poly-silicon TFT active matrix 1024 × 768 pixels (XGA) 16.8 ...million colors 2200 lumens (High Brightness mode) 1700 lumens (Low Brightness mode) 2700 lumens (High Brightness mode) 2100 lumens (Low Brightness mode) 400:1 30 to 300 inches 3.2 to 39.7 feet (1.0 to 12.1 meters) Front, rear, upside-down (ceiling mount...

User's Guide
Page 191
...41 VGA-to-component, 36 Camera, see Digital camera Capturing image, 124 to 125 Carrying case, 12, 152 Ceiling mount, 13, 175 to 176 Certificate validation, 72 Cleaning air filter, 147 lens, 146 projector case, 146 CMYK color format, 112 Color correcting, 32 multi-screen adjustment, 129 problems, 162 saturation, 117 ... cable, 13, 39 Composite (RCA) video cable, 39 to 40 Computer connecting to, 36 to 39 correcting images, 25 selecting source, 19 Connecting projector to a computer, 36 to 39 to a digital camera, 44 to audio equipment, 45 to 46 to video equipment, 39 to 43 Continuous play setting...
...41 VGA-to-component, 36 Camera, see Digital camera Capturing image, 124 to 125 Carrying case, 12, 152 Ceiling mount, 13, 175 to 176 Certificate validation, 72 Cleaning air filter, 147 lens, 146 projector case, 146 CMYK color format, 112 Color correcting, 32 multi-screen adjustment, 129 problems, 162 saturation, 117 ... cable, 13, 39 Composite (RCA) video cable, 39 to 40 Computer connecting to, 36 to 39 correcting images, 25 selecting source, 19 Connecting projector to a computer, 36 to 39 to a digital camera, 44 to audio equipment, 45 to 46 to video equipment, 39 to 43 Continuous play setting...


